
- 1辅警考试怎么搜题答案?八个受欢迎的搜题分享了 #学习方法#学习方法#媒体
- 2iperf3 网络带宽性能测试工具
- 3Mac上的PD虚拟机安装parallels tools问题
- 4部队营区能耗管理系统软件解决方案
- 5vivado FFT IP核使用
- 6【GitHub项目推荐--开源PDF 工具】【转载】_github pdf
- 7每日一题:Java实现单向链表的反转_java单链表反转
- 8Python提取斗鱼美女图片--selenium requests两种方式_selenium 最新爬取斗鱼
- 9json数据转化为二维数组_jsp 把json转成二位数组
- 10缓存同步之 RabbitMQ 和 Canal_canal通知
1+X云计算平台运维与开发认证(中级)样卷B-实操过程_下面关于软件项目开发过程,叙述错误的是
赞
踩
相关内容:
- 1+X云计算平台运维与开发认证(中级)样卷A-过程与答案
- 1+X云计算平台运维与开发认证(中级)样卷B-过程与答案
- 1+X云计算平台运维与开发认证(中级)样卷C-过程与答案
- 1+X云计算平台运维与开发认证(中级)样卷D-过程与答案
- 1+X云计算平台运维与开发认证(中级)样卷E-过程与答案
- 1+X中级商城集群搭建(三台主机)
选择题可能有些题目有点小问题,请酌情参考,主要还是以实操为主
单选题(200分):
1.下面关于软件项目开发过程,叙述错误的是?(10分)
A、敏捷开发从需求、计划、开发、测试,直到项目结束,整个周期一直在迭代中
B、敏捷开发中开发、测试、发布又可以单独迭代多次
C、瀑布式模型分为计划、分析、设计、程序开发、测试、修改和整合,一个阶段结束,另一个阶段接着开始
D、瀑布式模型着重迭代式开发,分析、设计、开发、测试和发布(正确答案)
2.敏捷开发从需求、计划、开发、测试,直到项目结束,整个周期一直在迭代中,而其中可以单独迭代多次的不包括哪个过程?(10分)
A、开发
B、测试
C、计划(正确答案)
D、发布
3.以下关于STP协议的描述中,哪项是正确的? (10分)
A、STP运行在交换机和网桥设备上
B、STP协议是一个二层链路管理协议
C、STP在选定根网桥,让一些端口进入阻塞工作模式,这些被阻塞端口没有被激活(正确答案)
D、STP的主要功能是在保证网络中没有回路的基础上,允许在第二层链路中提供冗余路径
4.以下哪个状态不是RSTP的工作状态? (10分)
A、监听状态(正确答案)
B、丢弃状态
C、转发状态
D、学习状态
5.在常用的数据库表单管理命令当中,“use 数据库;”名称的作用是?(10分)
A、描述表单
B、指定使用的数据库(正确答案)
C、显示当前已有的数据库
D、更新表单中的数据
6.在mysqldump备份命令当中,参数-u的作用是?(10分)
A、数据库的用户名称(正确答案)
B、密码提示符
C、只导出表结构
D、备份完成后将不再允许修改数据
7.basic paxos流程中server的主要功能是什么?(10分)
A、对投票结果进行统计(正确答案)
B、进行投票
C、筛选无用的投票
D、无任何功能
8.选完Leader以后,ZooKeeper就进入状态同步过程,具体方式如下:① Leader等待Server连接;② Follower连接Leader,将最大的zxid发送给Leader;③ Leader根据Follower的zxid确定同步点;④ 完成同步后通知Follower已经成为uptodate状态;⑤ Follower收到uptodate消息后,又可以重新接受client的请求进行服务了。请问正确的顺序是什么?(10分)
A、12345(正确答案)
B、13245
C、12435
D、21345
9.Keystone为OpenStack平台提供了什么服务?(10分)
A、认证服务(正确答案)
B、存储服务
C、镜像服务
D、计算服务
10.什么是私有云计算基础架构的基石?(10分)
A、虚拟化(正确答案)
B、分布式
C、并行
D、集中式
11.Swift将Object存储在节点(Node)上,每个节点都是由多个硬盘组成的,并保证对象在多个节点上有备份,默认情况下,Swift会给所有数据保存多少个副本?(10分)
A、1
B、2
C、3(正确答案)
D、4
12.以下关于行业云的描述中,错误的是哪项?(10分)
A、能为行业的业务作专门的优化
B、能进一步方便用户
C、能进一步降低成本
D、可同时支持的范围较大,如金融云、政务云、医疗云、卫生云等(正确答案)
13.以下哪个不是小微企业使用云计算可以带来的好处?(10分)
A、省下基础设施投资
B、省去底层人才投资
C、随时可用最新的资源
D、获得大量的机房管理经验(正确答案)
14.下列关于弹性伸缩服务中,描述正确的是?(10分)
A、弹性伸缩服务中的服务器采用特殊软性材质生产
B、弹性伸缩的收费形式包括按需付费和包年包月两种
C、弹性伸缩是一种可以根据服务器压力的不同自动增加或减少实例的服务(正确答案)
D、以上皆为错误
15.以下关于不同租户间网络描述正确的是?(10分)
A、在腾讯云中,不同租户之间可以设置冲突的IP地址(正确答案)
B、在腾讯云中,不同租户之间不可以设置冲突的IP地址
C、不同租户间网络默认可以互相通信
D、不同租户间无法通信
16.下面哪个是Docker用到的命名空间?(10分)
A、 PID命名空间
B、 NET命名空间
C、 IPC命名空间
D、以上都是(正确答案)
17.在Docker的描述文件Dockerfile中,RUN的含义是?(10分)
A、 定义基础镜像
B、 作者或者维护者
C、 运行的Linux命令(正确答案)
D、 增加文件或目录
18.用户按照Shell语言规范编写程序并将其保存为?(10分)
A、文件(正确答案)
B、目录
C、压缩包
D、图片
19.Ansible的参数中inventory文件的位置在哪个目录下_。(10分)
A、/etc/ansible.cfg
B、/etc/ansible
C、/etc/ansible/hosts(正确答案)
D、 /var/log/ansible
20.Python模块,是一个Python文件,它的后缀是以_结尾。(10分)
A、.yml
B、.py(正确答案)
C、.cpp
D、.dll
多选题(200分):
1.下面对项目需求阶段表述正确的是?(10分)
A、在软件需求阶段,要分析客户的业务活动,确定系统的目的、范围、定义和功能(正确答案)
B、求的调研、挖掘和整理必须由项目经理牵头,由产品经理负责收集客户需求(正确答案)
C、测试人员也需要参与需求分析、评审和总结(正确答案)
D、需求也是项目的灵魂,有了需求才有项目开展的可能(正确答案)
2.关于变更阶段下面叙述错误的是?(10分)
A、在整个软件开发过程中,需求变更会带来不确定性,但是是可以避免的(正确答案)
B、按照变更的影响程度和客户投入,可以分为关键性需求、后续关键性需求、后续重要需求、改良型需求和可选性需求等。在时间优先级上进行管理和控制。
C、对一个需求分析做得很好的项目来说,需求规格说明书定义的范围越详细越清晰,用户跟项目经理提出需求变更的几率就越小。
D、合作双方在签订协议之初,书面约定不需要编写修改要求和执行过程。(正确答案)
3.WLAN中常用的加密方式有? (10分)
A、wap(正确答案)
B、wep(正确答案)
C、wep2(正确答案)
D、tkip
4.交换网络中的冗余链路会产生? (10分)
A、广播风暴(正确答案)
B、MAC地址表不稳定(正确答案)
C、多帧复制(正确答案)
D、交换机无法工作
5.下列有关Nginx配置文件nginx.conf的叙述正确的是?(10分)
A、nginx进程数设置为CPU总核心数最佳(正确答案)
B、虚拟主机配置多个域名时,各域名间应用逗号隔开
C、sendfile on;表示为开启高效文件传输模式,对于执行下载操作等相关应用时,应设置为on
D、设置工作模式与连接数上限时,应考虑单个进程最大连接数(最大连接数=连接数*进程数)(正确答案)
6.Linux系统上,下面哪些文件是与用户管理相关的配置文件?(10分)
A、/etc/passwd(正确答案)
B、/etc/shadow(正确答案)
C、/etc/group(正确答案)
D、/etc/password
7.下面哪些是Swift对象存储的特点?(10分)
A、弹性可伸缩(正确答案)
B、高可用(正确答案)
C、分布式(正确答案)
D、集群式
8.下列选项当中,哪些不是Glance查看镜像列表的命令?(10分)
A、glance iamges-show(正确答案)
B、glance image-list
C、glance images-list(正确答案)
D、glance image-show(正确答案)
9.下列选项当中,哪些说法是正确的?(10分)
A、nova start是创建云主机
B、nova restart是重启云主机(正确答案)
C、nova boot是启动云主机
D、nova reset是重建云主机(正确答案)
10.AP注册失败的原因? (10分)
A、AP没有上电(正确答案)
B、AP连接的网线存在问题(正确答案)
C、AP设备提供的信息不匹配(正确答案)
D、交换机设备不通(正确答案)
11.块存储服务(cinder)为实例提供块存储。存储的分配和消耗是由块存储驱动器,或者多后端配置的驱动器决定的。下面那些是可用的驱动程序。(10分)
A、NAS/SAN(正确答案)
B、NFS(正确答案)
C、NTFS
D、Ceph(正确答案)
12.下列选项当中,哪些不是Glance查看镜像列表的命令(10分)
A、glance iamges-show(正确答案)
B、glance image-list
C、glance images-list(正确答案)
D、glance image-show(正确答案)
13.关于openstack组件的描述以下正确的是?(10分)
A、Heat是一个基于模板来编排复合云应用的服务。(正确答案)
B、Cinder的核心功能是对卷的管理,允许对卷、卷的类型、快照进行处理。(正确答案)
C、Neutron网络服务是OpenStack管理所有的网络方面的物理网络基础设施和访问层方面的虚拟网络基础设施
D、网络也支持安全组。安全组允许管理员在组内定义防火墙规则。(正确答案)
14.腾讯云服务器分为上一代实例、当前一代实例、最新一代实例,若无特殊需求,一般建议新建实例时使用当前一代实例类型,下列哪些属于当前一代实例?(10分)
A、高IO型I2(正确答案)
B、计算型C2(正确答案)
C、标准型 S1
D、内存型 M3
15.下列关于专用宿主机与黑石物理服务器的描述正确的是?(10分)
A、专用宿主机是基于虚拟化技术的云服务器。黑石物理服务器属于裸金属架构(正确答案)
B、黑石物理服务器提供的是可以按需购买、按量付费的物理服务器租赁服务(正确答案)
C、专用宿主机是提供以独享宿主机资源的方式购买、创建云主机的服务(正确答案)
D、专用宿主机无法和云服务器互相通信
16.相较于传统IDC,云计算具有哪些优势?(10分)
A、没有硬件购买和运维成本(正确答案)
B、无需部署和配置实体硬件,资源交付时效性高(正确答案)
C、资源可在短时间内按需弹性分配,减少资源闲置和浪费(正确答案)
D、无需部署和维护用户自己开发的软件
17.以下哪些场景适合选择预付费(包年包月)的计费方式?(10分)
A、具有较稳定的业务场景(正确答案)
B、业务发展有较大波动性,且无法进行准确预测
C、需要长期使用云资源,追求低成本(正确答案)
D、资源使用有临时性和突发性
18.下面关于Docker容器的说法,正确的是?(10分)
A、 容器是一个镜像的运行实例(正确答案)
B、 可以通过运行用户指定的指令进行启动、停止、删除(正确答案)
C、 通过命令分配一个伪终端可以进入容器操作(正确答案)
D、 容器都是相互可见的
19.常见的Python网页解析技术有_。(10分)
A、正则表达式(正确答案)
B、html.parser(正确答案)
C、lxml(正确答案)
D、Beautiful Soup(正确答案)
20.以下哪些是常见的Shell的种类_。(10分)
A、Bourne Shell(正确答案)
B、Bourne-Again Shell(正确答案)
C、Korn Shell(正确答案)
D、Z Shell(正确答案)
实操题(600分):
1.交换机管理(40分)
在eNSP中使用S5700交换机进行配置,通过一条命令划分vlan 2、vlan 3、vlan 1004,通过端口组的方式配置端口1-5为access模式,并添加至vlan2中。配置端口10为trunk模式,并放行vlan3。创建三层vlan 2,配置IP地址为:172.16.2.1/24,创建三层vlan1004,配置IP地址为:192.168.4.2/30。通过命令添加默认路由,下一跳为192.168.4.1。(使用完整命令)将上述操作命令及返回结果以文本形式提交到答题框。
SW1配置:
- <Huawei>system-view
- [Huawei]sysname SW1
- [SW1]vlan batch 2 3 1004
- [SW1]port-group 1
- [SW1-port-group-1]group-member GigabitEthernet 0/0/1 to GigabitEthernet 0/0/5
- [SW1-port-group-1]port link-type access
- [SW1-port-group-1]port default vlan 2
- [SW1]interface GigabitEthernet 0/0/10
- [SW1-GigabitEthernet0/0/10]port link-type trunk
- [SW1-GigabitEthernet0/0/10]port trunk allow-pass vlan 3
- [SW1-GigabitEthernet0/0/10]quit
- [SW1]interface Vlanif 2
- [SW1-Vlanif2]ip address 172.16.2.1 24
- [SW1-Vlanif2]quit
- [SW1]interface Vlanif 1004
- [SW1-Vlanif1004]ip address 192.168.4.2 30
- [SW1-Vlanif1004]quit
- [SW1]ip route-static 0.0.0.0 0 192.168.4.1

2.交换机管理(40分)
交换机配置:交换机g0/0/1端口连接R1路由器,所属vlan1001,配置地址192.168.1.2/30,与路由器通信。配置g0/0/2连接PC1机,所属vlan101,配置PC1机网关地址为172.16.101.254/24。配置默认路由下一跳为路由器地址。路由器配置:R1路由器g0/0/1端口配置地址12.12.12.1/30,配置端口多路复用PAT配置。R1路由器g0/0/2端口配置地址192.168.1.1/30,连接交换机。路由器配置默认路由访问外部网络,配置静态路由访问PC机网络。(所有配置命令使用完整命令)将上述操作命令及返回结果以文本形式提交到答题框。
架构图(考试时命令对就行了,只用 一台SW1和R1就够了,但为了学到东西所以练习时采用完整的部署方案)
SW1配置:
- system-view
- [Huawei]sysname SW1
- [SW1]vlan batch 101 1001
- [SW1]interface GigabitEthernet 0/0/1
- [SW1-GigabitEthernet0/0/1]port link-type access
- [SW1-GigabitEthernet0/0/1]port default vlan 1001
- [SW1-GigabitEthernet0/0/1]quit
- [SW1]interface vlan 1001
- [SW1-Vlanif1001]ip address 192.168.1.2 30
- [SW1-Vlanif1001]quit
- [SW1]interface GigabitEthernet 0/0/2
- [SW1-GigabitEthernet0/0/2]port link-type access
- [SW1-GigabitEthernet0/0/2]port default vlan 101
- [SW1-GigabitEthernet0/0/2]quit
- [SW1]interface vlan 101
- [SW1-Vlanif101]ip address 172.16.101.254 24
- [SW1-Vlanif101]quit
- [SW1]ip route-static 0.0.0.0 0 192.168.1.1
R1配置:
- system-view
- [Huawei]sysname R1
- [R1]acl number 2000
- [R1-acl-basic-2000]rule 1 permit
- [R1-acl-basic-2000]quit
- [R1]interface GigabitEthernet 0/0/1
- [R1-GigabitEthernet0/0/1]ip address 12.12.12.1 30
- [R1-GigabitEthernet0/0/1]nat outbound 2000
- [R1-GigabitEthernet0/0/1]quit
- [R1]interface GigabitEthernet 0/0/2
- [R1-GigabitEthernet0/0/2]ip address 192.168.1.1 30
- [R1-GigabitEthernet0/0/2]quit
- [R1]ip route-static 0.0.0.0 0 GigabitEthernet 0/0/1
- [R1]ip route-static 172.16.101.0 255.255.255.0 192.168.1.2
结果(看一下连通性):
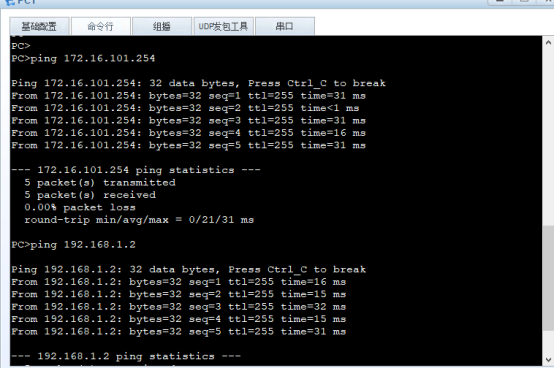
先查看PC1能不能ping通交换机和路由
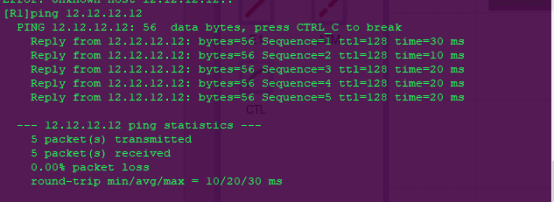
在使用R1路由看看能不能ping通外网
3.YUM源管理(40分)
假设当前有一个centos7.2-1511.iso的镜像文件,使用这个文件配置yum源,要求将这个镜像文件挂载在/opt/centos目录。还存在一个ftp源,IP地址为192.168.100.200,ftp配置文件中配置为anon_root=/opt,/opt目录中存在一个iaas目录(该目录下存在一个repodata目录)请问如何配置自己的local.repo文件,使得可以使用这两个地方的软件包,安装软件。请将local.repo文件的内容以文本形式提交到答题框。
Xserver1:
- [root@xserver1 ~]# yum install -y vsftpd
- [root@xserver1 ~]# vim /etc/vsftpd/vsftpd.conf
- anon_root=/opt
- [root@xserver1 ~]# systemctl restart vsftpd
- [root@xserver1 ~]# systemctl enable vsftpd
- Created symlink from /etc/systemd/system/multi-user.target.wants/vsftpd.service to /usr/lib/systemd/system/vsftpd.service.
- [root@xserver1 ~]# systemctl stop firewalld
- [root@xserver1 ~]# systemctl disable firewalld
- # 注释:selinux防火墙,设置访问模式(得重启才生效):
- [root@xserver1 ~]# vim /etc/selinux/config
- SELINUX=Permissive
- # 注释:配置临时访问模式(无需重启):
- [root@xserver1 ~]# setenforce 0
- [root@xserver1 ~]# getenforce
- Permissive
Xserver2:
- [root@xserver2 ~]# systemctl stop firewalld
- [root@xserver2 ~]# systemctl disable firewalld
- # 注释:selinux防火墙,设置访问模式(得重启才生效):
- [root@xserver2 ~]# vim /etc/selinux/config
- SELINUX=Permissive
- # 注释:配置临时访问模式(无需重启):
- [root@xserver2 ~]# setenforce 0
- [root@xserver2 ~]# getenforce
- Permissive
- [root@xserver2 ~]# mount -o loop CentOS-7-x86_64-DVD-1511.iso /opt/centos/
- mount: /dev/loop0 is write-protected, mounting read-only
- [root@xserver2 ~]# cat /etc/yum.repos.d/local.repo
- [centos]
- name=centos
- baseurl=file:///opt/centos
- enabled=1
- gpgcheck=0
- [iaas]
- name=iaas
- baseurl=ftp://192.168.100.200/iaas
- enabled=1
- gpgcheck=0
4.Raid存储管理(40分)
登录云主机,在云主机中,存在一个大小为20G的硬盘为/dev/vdb,使用fdisk命令对该硬盘进形分区,要求分出两个大小为5G的分区。使用这两个分区,创建名为/dev/md0、raid级别为1的磁盘阵列。创建完成后使用xfs文件系统进形格式化,并挂载到/mnt目录下。将mdadm -D /dev/md0命令和df -h命令返回得结果以文本形式提交到答题框。
- 因为我用的是CentOS7系统做的实验所以磁盘是sdb,CentOS6磁盘是vdb:
- [root@xiandian ~]# fdisk /dev/sdb
- Welcome to fdisk (util-linux 2.23.2).
-
- Changes will remain in memory only, until you decide to write them.
- Be careful before using the write command.
-
- Device does not contain a recognized partition table
- Building a new DOS disklabel with disk identifier 0xb7634785.
-
- Command (m for help): n
- Partition type:
- p primary (0 primary, 0 extended, 4 free)
- e extended
- Select (default p): p
- Partition number (1-4, default 1): 1
- First sector (2048-41943039, default 2048):
- Using default value 2048
- Last sector, +sectors or +size{K,M,G} (2048-41943039, default 41943039): +5G
- Partition 1 of type Linux and of size 5 GiB is set
-
- Command (m for help): n
- Partition type:
- p primary (1 primary, 0 extended, 3 free)
- e extended
- Select (default p): p
- Partition number (2-4, default 2): 2
- First sector (10487808-41943039, default 10487808):
- Using default value 10487808
- Last sector, +sectors or +size{K,M,G} (10487808-41943039, default 41943039): +5G
- Partition 2 of type Linux and of size 5 GiB is set
-
- Command (m for help): n
- Partition type:
- p primary (2 primary, 0 extended, 2 free)
- e extended
- Select (default p): p
- Partition number (3,4, default 3): 3
- First sector (20973568-41943039, default 20973568):
- Using default value 20973568
- Last sector, +sectors or +size{K,M,G} (20973568-41943039, default 41943039): +5G
- Partition 3 of type Linux and of size 5 GiB is set
-
- Command (m for help): w
- The partition table has been altered!
- Calling ioctl() to re-read partition table.
- Syncing disks.
- [root@xiandian ~]# yum install -y mdadm
- [root@xserver1 ~]# mdadm -Cv /dev/md0 -l1 -n2 /dev/sdb[1-2]
- mdadm: Note: this array has metadata at the start and
- may not be suitable as a boot device. If you plan to
- store '/boot' on this device please ensure that
- your boot-loader understands md/v1.x metadata, or use
- --metadata=0.90
- mdadm: size set to 5237760K
- Continue creating array? y
- mdadm: Fail create md0 when using /sys/module/md_mod/parameters/new_array
- mdadm: Defaulting to version 1.2 metadata
- mdadm: array /dev/md0 started.
- # 注释:可以查看一下进度:
- [root@xserver1 ~]# cat /proc/mdstat
- Personalities : [raid1]
- md0 : active raid1 sdb2[1] sdb1[0]
- 5237760 blocks super 1.2 [2/2] [UU]
- [======>..............] resync = 30.5% (1601792/5237760) finish=0.3min speed=200224K/sec
- unused devices: <none>
- [root@xserver1 ~]# mkfs.xfs /dev/md0
- meta-data=/dev/md0 isize=256 agcount=4, agsize=327360 blks
- = sectsz=512 attr=2, projid32bit=1
- = crc=0 finobt=0
- data = bsize=4096 blocks=1309440, imaxpct=25
- = sunit=0 swidth=0 blks
- naming =version 2 bsize=4096 ascii-ci=0 ftype=0
- log =internal log bsize=4096 blocks=2560, version=2
- = sectsz=512 sunit=0 blks, lazy-count=1
- realtime =none extsz=4096 blocks=0, rtextents=0
- [root@xserver1 ~]# mount /dev/md0 /mnt/
- [root@xserver1 ~]# mdadm -D /dev/md0
- /dev/md0:
- Version : 1.2
- Creation Time : Thu May 14 09:15:04 2020
- Raid Level : raid1
- Array Size : 5237760 (5.00 GiB 5.36 GB)
- Used Dev Size : 5237760 (5.00 GiB 5.36 GB)
- Raid Devices : 2
- Total Devices : 2
- Persistence : Superblock is persistent
- Update Time : Thu May 14 09:20:57 2020
- State : clean
- Active Devices : 2
- Working Devices : 2
- Failed Devices : 0
- Spare Devices : 0
- Consistency Policy : unknown
- Name : xserver1:0 (local to host xserver1)
- UUID : 8440d04c:3cf2e84a:4d524020:1072f7b4
- Events : 17
- Number Major Minor RaidDevice State
- 0 8 17 0 active sync /dev/sdb1
- 1 8 18 1 active sync /dev/sdb2
- [root@xserver1 ~]# df -h
- Filesystem Size Used Avail Use% Mounted on
- /dev/mapper/centos-root 32G 5.2G 27G 17% /
- devtmpfs 903M 0 903M 0% /dev
- tmpfs 913M 0 913M 0% /dev/shm
- tmpfs 913M 8.6M 904M 1% /run
- tmpfs 913M 0 913M 0% /sys/fs/cgroup
- /dev/sda1 509M 125M 384M 25% /boot
- /dev/mapper/centos-home 4.0G 33M 4.0G 1% /home
- tmpfs 183M 0 183M 0% /run/user/0
- /dev/md0 5.0G 33M 5.0G 1% /mnt
5.主从数据库管理(40分)
使用提供的两台虚拟机,在虚拟机上安装mariadb数据库,并配置为主从数据库,实现两个数据库的主从同步。配置完毕后,请在从节点上的数据库中执行“show slave status \G”命令查询从节点复制状态,将查询到的结果以文本形式提交到答题框。
- 上传gpmall-repo中有mariadb子文件的文件到/root目录下:
Mysql1:
- [root@xiandian ~]# hostnamectl set-hostname mysql1
- [root@mysql1 ~]# login
- [root@mysql1 ~]# vim /etc/hosts
- 127.0.0.1 localhost localhost.localdomain localhost4 localhost4.localdomain4
- ::1 localhost localhost.localdomain localhost6 localhost6.localdomain6
- 192.168.1.111 mysql1
- 192.168.1.112 mysql2
- [root@mysql1 ~]# systemctl stop firewalld
- [root@mysql1 ~]# systemctl disable firewalld
- [root@mysql1 ~]# setenforce 0
- [root@mysql1 ~]# vim /etc/selinux/config
- SELINUX=Permissive
- [root@mysql1~]# vim /etc/yum.repos.d/local.repo
- [centos]
- name=centos
- baseurl=file:///opt/centos
- enabled=1
- gpgcheck=0
- [mariadb]
- name=mariadb
- baseurl=file:///root/gpmall-repo
- enabled=1
- gpgcheck=0
- [root@mysql1 ~]# yum install -y mariadb mariadb-server
- [root@mysql1 ~]# systemctl restart mariadb
- [root@mysql1 ~]# mysql_secure_installation
- [root@mysql1 ~]# vim /etc/my.cnf
- # 注释:在[mysqld]下添加:
- log_bin = mysql-bin
- binlog_ignore_db = mysql
- server_id = 10
- [root@mysql1 ~]# mysql -uroot -p000000
- Welcome to the MariaDB monitor. Commands end with ; or \g.
- Your MariaDB connection id is 3
- Server version: 5.5.65-MariaDB MariaDB Server
-
- Copyright (c) 2000, 2018, Oracle, MariaDB Corporation Ab and others.
-
- Type 'help;' or '\h' for help. Type '\c' to clear the current input statement.
-
- MariaDB [(none)]> grant all privileges on *.* to 'root'@'%' identified by '000000';
- Query OK, 0 rows affected (0.00 sec)
-
- # 注释:如果你不想配置上面的host文件可以不使用主机名mysql2的形式,可以直接打IP地址,用户可以随意指定,只是一个用于连接的而已
- MariaDB [(none)]> grant replication slave on *.* to 'user'@'mysql2' identified by '000000';
- Query OK, 0 rows affected (0.00 sec)
Mysql2:
- [root@xiandian ~]# hostnamectl set-hostname mysql2
- [root@mysql2 ~]# login
- [root@mysql2 ~]# vim /etc/hosts
- 127.0.0.1 localhost localhost.localdomain localhost4 localhost4.localdomain4
- ::1 localhost localhost.localdomain localhost6 localhost6.localdomain6
- 192.168.1.111 mysql1
- 192.168.1.112 mysql2
- [root@mysql2 ~]# systemctl stop firewalld
- [root@mysql2 ~]# systemctl disable firewalld
- [root@mysql2 ~]# setenforce 0
- [root@mysql2 ~]# vim /etc/selinux/config
- SELINUX=Permissive
- [root@mysql2~]# vim /etc/yum.repos.d/local.repo
- [centos]
- name=centos
- baseurl=file:///opt/centos
- enabled=1
- gpgcheck=0
- [mariadb]
- name=mariadb
- baseurl=file:///root/gpmall-repo
- enabled=1
- gpgcheck=0
- [root@mysql2 ~]# yum install -y mariadb mariadb-server
- [root@mysql2 ~]# systemctl restart mariadb
- [root@mysql2 ~]# mysql_secure_installation
- [root@mysql2 ~]# vim /etc/my.cnf
- # 注释:在[mysqld]下添加:
- log_bin = mysql-bin
- binlog_ignore_db = mysql
- server_id = 20
- [root@mysql2 ~]# mysql -uroot -p000000
- Welcome to the MariaDB monitor. Commands end with ; or \g.
- Your MariaDB connection id is 3
- Server version: 5.5.65-MariaDB MariaDB Server
-
- Copyright (c) 2000, 2018, Oracle, MariaDB Corporation Ab and others.
-
- Type 'help;' or '\h' for help. Type '\c' to clear the current input statement.
-
- # 注释:如果你不想配置上面的host文件可以不使用主机名mysql1的形式,可以直接打IP地址,这里的用户,密码必须和上面mysql1配置的user一致
- MariaDB [(none)]> change master to master_host='mysql1',master_user='user',master_password='000000';
- Query OK, 0 rows affected (0.02 sec)
- MariaDB [(none)]> start slave;
- MariaDB [(none)]> show slave status\G
- *************************** 1. row ***************************
- Slave_IO_State: Waiting for master to send event
- Master_Host: mysql1
- Master_User: user
- Master_Port: 3306
- Connect_Retry: 60
- Master_Log_File: mysql-bin.000003
- Read_Master_Log_Pos: 245
- Relay_Log_File: mariadb-relay-bin.000005
- Relay_Log_Pos: 529
- Relay_Master_Log_File: mysql-bin.000003
- Slave_IO_Running: Yes
- Slave_SQL_Running: Yes
- Replicate_Do_DB:
- Replicate_Ignore_DB:
- Replicate_Do_Table:
- Replicate_Ignore_Table:
- Replicate_Wild_Do_Table:
- Replicate_Wild_Ignore_Table:
- Last_Errno: 0
- Last_Error:
- Skip_Counter: 0
- Exec_Master_Log_Pos: 245
- Relay_Log_Space: 1256
- Until_Condition: None
- Until_Log_File:
- Until_Log_Pos: 0
- Master_SSL_Allowed: No
- Master_SSL_CA_File:
- Master_SSL_CA_Path:
- Master_SSL_Cert:
- Master_SSL_Cipher:
- Master_SSL_Key:
- Seconds_Behind_Master: 0
- Master_SSL_Verify_Server_Cert: No
- Last_IO_Errno: 0
- Last_IO_Error:
- Last_SQL_Errno: 0
- Last_SQL_Error:
- Replicate_Ignore_Server_Ids:
- Master_Server_Id: 30
- 1 row in set (0.00 sec)
验证结果(主从是否同步):
Mysql1:
- [root@mysql1 ~]# mysql -uroot -p000000
- Welcome to the MariaDB monitor. Commands end with ; or \g.
- Your MariaDB connection id is 26
- Server version: 5.5.65-MariaDB MariaDB Server
-
- Copyright (c) 2000, 2018, Oracle, MariaDB Corporation Ab and others.
-
- Type 'help;' or '\h' for help. Type '\c' to clear the current input statement.
-
- MariaDB [(none)]> create database test;
- Query OK, 0 rows affected (0.00 sec)
- MariaDB [(none)]> use test;
- Database changed
- MariaDB [test]> create table demotables(id int not null primary key,name varchar(10),addr varchar(20));
- Query OK, 0 rows affected (0.01 sec)
- MariaDB [test]> insert into demotables values(1,'zhangsan','lztd');
- Query OK, 0 rows affected (0.00 sec)
- MariaDB [test]> select * from demotables;
- +----+----------+------+
- | id | name | addr |
- +----+----------+------+
- | 1 | zhangsan | lztd |
- +----+----------+------+
- 1 rows in set (0.00 sec)
Mysql2:
- [root@mysql2 ~]# mysql -uroot -p000000
- Welcome to the MariaDB monitor. Commands end with ; or \g.
- Your MariaDB connection id is 24
- Server version: 5.5.65-MariaDB MariaDB Server
-
- Copyright (c) 2000, 2018, Oracle, MariaDB Corporation Ab and others.
-
- Type 'help;' or '\h' for help. Type '\c' to clear the current input statement.
-
- MariaDB [(none)]> show databases;
- +--------------------+
- | Database |
- +--------------------+
- | information_schema |
- | mysql |
- | performance_schema |
- | test |
- +--------------------+
- 4 rows in set (0.00 sec)
- MariaDB [(none)]> use test;
- Reading table information for completion of table and column names
- You can turn off this feature to get a quicker startup with -A
- Database changed
- MariaDB [test]> show tables;
- +----------------+
- | Tables_in_test |
- +----------------+
- | demotables |
- +----------------+
- 1 row in set (0.00 sec)
- MariaDB [test]> select * from demotables;
- +----+----------+------+
- | id | name | addr |
- +----+----------+------+
- | 1 | zhangsan | lztd |
- +----+----------+------+
- 1 rows in set (0.00 sec)
6.读写分离数据库管理(40分)
使用提供的虚拟机与软件包,基于上一题构建的主从数据库,进一步完成Mycat读写分离数据库的配置安装。需要用的配置文件schema.xml文件如下所示(server.xml文件不再给出): select user() 配置读写分离数据库完毕后,使用netstat -ntpl命令查询端口启动情况。最后将netstat -ntpl命令的返回结果以文本形式提交到答题框。
Mycat & Mysql1 & Mysql2都执行以下操作:
- # 注释:这个其实配不配都可以,看个人喜欢用主机名还是IP地址咯
- [root@mycat ~]# vim /etc/hosts
- 127.0.0.1 localhost localhost.localdomain localhost4 localhost4.localdomain4
- ::1 localhost localhost.localdomain localhost6 localhost6.localdomain6
- 192.168.1.111 mysql1
- 192.168.1.112 mysql2
- 192.168.1.113 mycat
Mycat:
- 上传gpmall-repo中有mariadb子文件的文件和Mycat-server-1.6-RELEASE-20161028204710-linux.gz到/root目录下,并配置yum源:
- [root@mycat ~]# cat /etc/hosts
- 127.0.0.1 localhost localhost.localdomain localhost4 localhost4.localdomain4
- ::1 localhost localhost.localdomain localhost6 localhost6.localdomain6
- 192.168.1.111 mysql1
- 192.168.1.112 mysql2
- 192.168.1.113 mycat
- [root@mycat~]# vim /etc/yum.repos.d/local.repo
- [centos]
- name=centos
- baseurl=file:///opt/centos
- enabled=1
- gpgcheck=0
- [mariadb]
- name=mariadb
- baseurl=file:///root/gpmall-repo
- enabled=1
- gpgcheck=0
- [root@mycat ~]# yum install -y java-1.8.0-openjdk java-1.8.0-openjdk-devel
- [root@mycat ~]# tar -zvxf Mycat-server-1.6-RELEASE-20161028204710-linux.gz -C /usr/local/
- [root@mycat ~]# chown -R 777 /usr/local/mycat/
- [root@mycat ~]# vim /etc/profile
- export MYCAT_HOME=/usr/local/mycat/
- [root@mycat ~]# source /etc/profile
- [root@mycat ~]# vim /usr/local/mycat/conf/schema.xml
- <?xml version='1.0'?>
- <!DOCTYPE mycat:schema SYSTEM "schema.dtd">
- <mycat:schema xmlns:mycat="http://io.mycat/">
- <!--注释:name=USERDB指的是逻辑数据库,在后面添加一个dataNode="dn1",dn1上绑定的是真是数据库-->
- <schema name="USERDB" checkSQLschema="true" sqlMaxLimit="100"
- dataNode="dn1"></schema>
- <!--注释:name="dn1"上面与逻辑数据库引用的名称,database="test"真实数据库名字-->
- <dataNode name="dn1" dataHost="localhost1" database="test" />
- <dataHost name="localhost1" maxCon="1000" minCon="10" balance="3" dbType="mysql"
- dbDriver="native" writeType="0" switchType="1" slaveThreshold="100">
- <heartbeat>select user()</heartbeat>
- <writeHost host="hostM1" url="192.168.1.111:3306" user="root" password="000000">
- <readHost host="hostS1" url="192.168.1.112:3306" user="root" password="000000" />
- </writeHost>
- </dataHost>
- </mycat:schema>
- [root@mycat ~]# chown root:root /usr/local/mycat/conf/schema.xml
- # 注释:修改root用户的访问密码与数据库
- [root@mycat ~]# vim /usr/local/mycat/conf/server.xml
- <user name="root">
- <property name="password">000000</property>
- <property name="schemas">USERDB</property>
-
- <!-- 表级 DML 权限设置 -->
- <!--
- <privileges check="false">
- <schema name="TESTDB" dml="0110" >
- <table name="tb01" dml="0000"></table>
- <table name="tb02" dml="1111"></table>
- </schema>
- </privileges>
- -->
- </user>
- # 注释:删除之后的<user name="user"></user>的标签与内容
- [root@mycat ~]# /bin/bash /usr/local/mycat/bin/mycat start
- Starting Mycat-server...
- [root@mycat ~]# netstat -ntlp
- Active Internet connections (only servers)
- Proto Recv-Q Send-Q Local Address Foreign Address State PID/Program name
- tcp 0 0 0.0.0.0:22 0.0.0.0:* LISTEN 1114/sshd
- tcp 0 0 127.0.0.1:25 0.0.0.0:* LISTEN 1992/master
- tcp 0 0 127.0.0.1:32000 0.0.0.0:* LISTEN 3988/java
- tcp6 0 0 :::45929 :::* LISTEN 3988/java
- tcp6 0 0 :::9066 :::* LISTEN 3988/java
- tcp6 0 0 :::40619 :::* LISTEN 3988/java
- tcp6 0 0 :::22 :::* LISTEN 1114/sshd
- tcp6 0 0 ::1:25 :::* LISTEN 1992/master
- tcp6 0 0 :::1984 :::* LISTEN 3988/java
- tcp6 0 0 :::8066 :::* LISTEN 3988/java
- # 注释:验证结果(读写分离是否成功):
- [root@mycat ~]# yum install -y MariaDB-client
- # 注释:查看逻辑库
- [root@mycat ~]# mysql -h 127.0.0.1 -P8066 -uroot -p000000
- Welcome to the MariaDB monitor. Commands end with ; or \g.
- Your MySQL connection id is 2
- Server version: 5.6.29-mycat-1.6-RELEASE-20161028204710 MyCat Server (OpenCloundDB)
-
- Copyright (c) 2000, 2018, Oracle, MariaDB Corporation Ab and others.
-
- Type 'help;' or '\h' for help. Type '\c' to clear the current input statement.
-
- MySQL [(none)]> show databases;
- +----------+
- | DATABASE |
- +----------+
- | USERDB |
- +----------+
- 1 row in set (0.003 sec)
-
- MySQL [(none)]> use USERDB
- Reading table information for completion of table and column names
- You can turn off this feature to get a quicker startup with -A
-
- Database changed
- MySQL [USERDB]> show tables;
- +----------------+
- | Tables_in_test |
- +----------------+
- | demotables |
- +----------------+
- 1 row in set (0.007 sec)
-
- MySQL [USERDB]> select * from demotables;
- +----+----------+------+
- | id | name | addr |
- +----+----------+------+
- | 1 | zhangsan | lztd |
- | 2 | xiaohong | lztd |
- | 3 | xiaoli | lztd |
- | 4 | lihua | nnzy |
- +----+----------+------+
- 4 rows in set (0.060 sec)
-
- MySQL [USERDB]> insert into demotables values(5,'tomo','hfdx');
- Query OK, 1 row affected (0.013 sec)
-
- MySQL [USERDB]> select * from demotables;
- +----+----------+------+
- | id | name | addr |
- +----+----------+------+
- | 1 | zhangsan | lztd |
- | 2 | xiaohong | lztd |
- | 3 | xiaoli | lztd |
- | 4 | lihua | nnzy |
- | 5 | tomo | hfdx |
- +----+----------+------+
- 5 rows in set (0.004 sec)
-
- MySQL [USERDB]> exit;
- Bye
- # 注释:查询对数据库读写操作的分离信息
- [root@mycat ~]# mysql -h 127.0.0.1 -P9066 -uroot -p000000 -e 'show @@datasource;'
- +----------+--------+-------+---------------+------+------+--------+------+------+---------+-----------+------------+
- | DATANODE | NAME | TYPE | HOST | PORT | W/R | ACTIVE | IDLE | SIZE | EXECUTE | READ_LOAD | WRITE_LOAD |
- +----------+--------+-------+---------------+------+------+--------+------+------+---------+-----------+------------+
- | dn1 | hostM1 | mysql | 192.168.1.111 | 3306 | W | 0 | 10 | 1000 | 45 | 0 | 1 |
- | dn1 | hostS1 | mysql | 192.168.1.112 | 3306 | R | 0 | 6 | 1000 | 43 | 4 | 0 |
- +----------+--------+-------+---------------+------+------+--------+------+------+---------+-----------+------------+
一些参数注释:
sqlMaxLimit 配置默认查询数量
database 为真实数据库名
balance="0" 不开启读写分离机制,所有读操作都发送到当前可用的writeHost上
balance="1" 全部的readHost与stand by writeHost参与select语句的负载均衡,简单来说,当双主双从模式(M1->S1,M2->S2,并且M1与M2互为主备),正常情况下,M2、S1、S2都参与select语句的负载均衡
balance="2" 所有读操作都随机的在writeHost、readhost上分发
balance="3" 所有读请求随机地分发到wiriterHost对应的readhost执行,writerHost不负担读压力,注意balance=3只在1.4及其以后版本有,1.3版本没有
writeType="0" 所有写操作发送到配置的第一个writeHost,第一个挂了需要切换到还生存的第二个writeHost,重新启动后已切换后的为准,切换记录在配置文件dnindex.properties中
writeType="1" 所有写操作都随机的发送到配置的writeHost
7.Zookeeper集群(40分)
使用提供的三台虚拟机和软件包,完成Zookeeper集群的安装与配置,配置完成后,在相应的目录使用./zkServer.sh status命令查看三个Zookeeper节点的状态,将三个节点的状态以文本形式提交到答题框。
Zookeeper1:
- [root@xiandian ~]# hostnamectl set-hostname zookeeper1
- [root@xiandian ~]# bash
- [root@zookeeper1 ~]# vim /etc/hosts
- 127.0.0.1 localhost localhost.localdomain localhost4 localhost4.localdomain4
- ::1 localhost localhost.localdomain localhost6 localhost6.localdomain6
- 192.168.1.10 zookeeper1
- 192.168.1.20 zookeeper2
- 192.168.1.30 zookeeper3
- # 注释:在zookeeper1节点上传gpmall-repo,然后做vsftp进行共享,我上传到/opt
- [root@zookeeper1 ~]# vim /etc/yum.repos.d/local.repo
- [centos]
- name=centos
- baseurl=file:///opt/centos
- enabled=1
- gpgcheck=0
- [gpmall]
- name=gpmall
- baseurl=file:///opt/gpmall-repo
- enabled=1
- gpgcheck=0
- [root@zookeeper1 ~]# yum repolist
- [root@zookeeper1 ~]# yum install -y vsftpd
- [root@zookeeper1 ~]# vim /etc/vsftpd/vsftpd.conf
- # 注释:添加:
- anon_root=/opt
- [root@zookeeper1 ~]# systemctl restart vsftpd
- [root@zookeeper1 ~]# yum install -y java-1.8.0-openjdk java-1.8.0-openjdk-devel
- [root@zookeeper1 ~]# java -version
- openjdk version "1.8.0_252"
- OpenJDK Runtime Environment (build 1.8.0_252-b09)
- OpenJDK 64-Bit Server VM (build 25.252-b09, mixed mode)
- # 注释:将zookeeper-3.4.14.tar.gz上传至三个节点或者设置nfs进行共享
- [root@zookeeper1 ~]# tar -zvxf zookeeper-3.4.14.tar.gz
- [root@zookeeper1 ~]# cd zookeeper-3.4.14/conf/
- [root@zookeeper1 conf]# mv zoo_sample.cfg zoo.cfg
- [root@zookeeper1 conf]# vim zoo.cfg
- # The number of milliseconds of each tick
- tickTime=2000
- # The number of ticks that the initial
- # synchronization phase can take
- initLimit=10
- # The number of ticks that can pass between
- # sending a request and getting an acknowledgement
- syncLimit=5
- # the directory where the snapshot is stored.
- # do not use /tmp for storage, /tmp here is just
- # example sakes.
- dataDir=/tmp/zookeeper
- # the port at which the clients will connect
- clientPort=2181
- # the maximum number of client connections.
- # increase this if you need to handle more clients
- #maxClientCnxns=60
- #
- # Be sure to read the maintenance section of the
- # administrator guide before turning on autopurge.
- #
- # http://zookeeper.apache.org/doc/current/zookeeperAdmin.html#sc_maintenance
- #
- # The number of snapshots to retain in dataDir
- #autopurge.snapRetainCount=3
- # Purge task interval in hours
- # Set to "0" to disable auto purge feature
- #autopurge.purgeInterval=1
- server.1=192.168.1.10:2888:3888
- server.2=192.168.1.20:2888:3888
- server.3=192.168.1.30:2888:3888
- [root@zookeeper1 conf]# grep -n '^'[a-Z] zoo.cfg
- 2:tickTime=2000
- 5:initLimit=10
- 8:syncLimit=5
- 12:dataDir=/tmp/zookeeper
- 14:clientPort=2181
- 29:server.1=192.168.1.10:2888:3888
- 30:server.2=192.168.1.20:2888:3888
- 31:server.3=192.168.1.30:2888:3888
- [root@zookeeper1 conf]# cd
- [root@zookeeper1 ~]# mkdir /tmp/zookeeper
- [root@zookeeper1 ~]# vim /tmp/zookeeper/myid
- 1
- [root@zookeeper1 ~]# cat /tmp/zookeeper/myid
- 1
- [root@zookeeper1 ~]# cd zookeeper-3.4.14/bin/
- [root@zookeeper1 bin]# ./zkServer.sh start
- zookeeper JMX enabled by default
- Using config: /root/zookeeper-3.4.14/bin/../conf/zoo.cfg
- Starting zookeeper ... STARTED
- [root@zookeeper1 bin]# ./zkServer.sh status
- zookeeper JMX enabled by default
- Using config: /root/zookeeper-3.4.14/bin/../conf/zoo.cfg
- Mode: follower
Zookeeper2:
- [root@xiandian ~]# hostnamectl set-hostname zookeeper2
- [root@xiandian ~]# bash
- [root@zookeeper2 ~]# vim /etc/hosts
- 127.0.0.1 localhost localhost.localdomain localhost4 localhost4.localdomain4
- ::1 localhost localhost.localdomain localhost6 localhost6.localdomain6
- 192.168.1.10 zookeeper1
- 192.168.1.20 zookeeper2
- 192.168.1.30 zookeeper3
- [root@zookeeper2 ~]# vim /etc/yum.repos.d/local.repo
- [centos]
- name=centos
- baseurl=file:///opt/centos
- enabled=1
- gpgcheck=0
- [gpmall]
- name=gpmall
- baseurl=ftp://zookeeper1/gpmall-repo
- enabled=1
- gpgcheck=0
- [root@zookeeper2 ~]# yum install -y java-1.8.0-openjdk java-1.8.0-openjdk-devel
- [root@zookeeper2 ~]# java -version
- openjdk version "1.8.0_252"
- OpenJDK Runtime Environment (build 1.8.0_252-b09)
- OpenJDK 64-Bit Server VM (build 25.252-b09, mixed mode)
- # 注释:将zookeeper-3.4.14.tar.gz上传至三个节点或者设置nfs进行共享
- [root@zookeeper2 ~]# tar -zvxf zookeeper-3.4.14.tar.gz
- [root@zookeeper2 ~]# cd zookeeper-3.4.14/conf/
- [root@zookeeper2 conf]# mv zoo_sample.cfg zoo.cfg
- [root@zookeeper2 conf]# vim zoo.cfg
- # The number of milliseconds of each tick
- tickTime=2000
- # The number of ticks that the initial
- # synchronization phase can take
- initLimit=10
- # The number of ticks that can pass between
- # sending a request and getting an acknowledgement
- syncLimit=5
- # the directory where the snapshot is stored.
- # do not use /tmp for storage, /tmp here is just
- # example sakes.
- dataDir=/tmp/zookeeper
- # the port at which the clients will connect
- clientPort=2181
- # the maximum number of client connections.
- # increase this if you need to handle more clients
- #maxClientCnxns=60
- #
- # Be sure to read the maintenance section of the
- # administrator guide before turning on autopurge.
- #
- # http://zookeeper.apache.org/doc/current/zookeeperAdmin.html#sc_maintenance
- #
- # The number of snapshots to retain in dataDir
- #autopurge.snapRetainCount=3
- # Purge task interval in hours
- # Set to "0" to disable auto purge feature
- #autopurge.purgeInterval=1
- server.1=192.168.1.10:2888:3888
- server.2=192.168.1.20:2888:3888
- server.3=192.168.1.30:2888:3888
- [root@zookeeper2 conf]# grep -n '^'[a-Z] zoo.cfg
- 2:tickTime=2000
- 5:initLimit=10
- 8:syncLimit=5
- 12:dataDir=/tmp/zookeeper
- 14:clientPort=2181
- 29:server.1=192.168.1.10:2888:3888
- 30:server.2=192.168.1.20:2888:3888
- 31:server.3=192.168.1.30:2888:3888
- [root@zookeeper2 conf]# cd
- [root@zookeeper2 ~]# mkdir /tmp/zookeeper
- [root@zookeeper2 ~]# vim /tmp/zookeeper/myid
- 2
- [root@zookeeper1 ~]# cat /tmp/zookeeper/myid
- 2
- [root@zookeeper2 ~]# cd zookeeper-3.4.14/bin/
- [root@zookeeper2 bin]# ./zkServer.sh start
- zookeeper JMX enabled by default
- Using config: /root/zookeeper-3.4.14/bin/../conf/zoo.cfg
- Starting zookeeper ... STARTED
- [root@zookeeper2 bin]# ./zkServer.sh status
- zookeeper JMX enabled by default
- Using config: /root/zookeeper-3.4.14/bin/../conf/zoo.cfg
- Mode: leader
Zookeeper3:
- [root@xiandian ~]# hostnamectl set-hostname zookeeper3
- [root@xiandian ~]# bash
- [root@zookeeper3 ~]# vim /etc/hosts
- 127.0.0.1 localhost localhost.localdomain localhost4 localhost4.localdomain4
- ::1 localhost localhost.localdomain localhost6 localhost6.localdomain6
- 192.168.1.10 zookeeper1
- 192.168.1.20 zookeeper2
- 192.168.1.30 zookeeper3
- [root@zookeeper3 ~]# vim /etc/yum.repos.d/local.repo
- [centos]
- name=centos
- baseurl=file:///opt/centos
- enabled=1
- gpgcheck=0
- [gpmall]
- name=gpmall
- baseurl=ftp://zookeeper1/gpmall-repo
- enabled=1
- gpgcheck=0
- [root@zookeeper3 ~]# yum install -y java-1.8.0-openjdk java-1.8.0-openjdk-devel
- [root@zookeeper3 ~]# java -version
- openjdk version "1.8.0_252"
- OpenJDK Runtime Environment (build 1.8.0_252-b09)
- OpenJDK 64-Bit Server VM (build 25.252-b09, mixed mode)
- # 注释:将zookeeper-3.4.14.tar.gz上传至三个节点或者设置nfs进行共享
- [root@zookeeper3 ~]# tar -zvxf zookeeper-3.4.14.tar.gz
- [root@zookeeper3 ~]# cd zookeeper-3.4.14/conf/
- [root@zookeeper3 conf]# mv zoo_sample.cfg zoo.cfg
- [root@zookeeper3 conf]# vim zoo.cfg
- # The number of milliseconds of each tick
- tickTime=2000
- # The number of ticks that the initial
- # synchronization phase can take
- initLimit=10
- # The number of ticks that can pass between
- # sending a request and getting an acknowledgement
- syncLimit=5
- # the directory where the snapshot is stored.
- # do not use /tmp for storage, /tmp here is just
- # example sakes.
- dataDir=/tmp/zookeeper
- # the port at which the clients will connect
- clientPort=2181
- # the maximum number of client connections.
- # increase this if you need to handle more clients
- #maxClientCnxns=60
- #
- # Be sure to read the maintenance section of the
- # administrator guide before turning on autopurge.
- #
- # http://zookeeper.apache.org/doc/current/zookeeperAdmin.html#sc_maintenance
- #
- # The number of snapshots to retain in dataDir
- #autopurge.snapRetainCount=3
- # Purge task interval in hours
- # Set to "0" to disable auto purge feature
- #autopurge.purgeInterval=1
- server.1=192.168.1.10:2888:3888
- server.2=192.168.1.20:2888:3888
- server.3=192.168.1.30:2888:3888
- [root@zookeeper3 conf]# grep -n '^'[a-Z] zoo.cfg
- 2:tickTime=2000
- 5:initLimit=10
- 8:syncLimit=5
- 12:dataDir=/tmp/zookeeper
- 14:clientPort=2181
- 29:server.1=192.168.1.10:2888:3888
- 30:server.2=192.168.1.20:2888:3888
- 31:server.3=192.168.1.30:2888:3888
- [root@zookeeper3 conf]# cd
- [root@zookeeper3 ~]# mkdir /tmp/zookeeper
- [root@zookeeper3 ~]# vim /tmp/zookeeper/myid
- 3
- [root@zookeeper3 ~]# cat /tmp/zookeeper/myid
- 3
- [root@zookeeper3 ~]# cd zookeeper-3.4.14/bin/
- [root@zookeeper3 bin]# ./zkServer.sh start
- zookeeper JMX enabled by default
- Using config: /root/zookeeper-3.4.14/bin/../conf/zoo.cfg
- Starting zookeeper ... STARTED
- [root@zookeeper3 bin]# ./zkServer.sh status
- zookeeper JMX enabled by default
- Using config: /root/zookeeper-3.4.14/bin/../conf/zoo.cfg
- Mode: follower
8.Kafka集群(40分)
使用提供的三台虚拟机和软件包,完成Kafka集群的安装与配置,配置完成后,在相应的目录使用 ./kafka-topics.sh --create --zookeeper 你的IP:2181 --replication-factor 1 --partitions 1 --topic test创建topic,将输入命令后的返回结果以文本形式提交到答题框。
- 将kafka_2.11-1.1.1.tgz上传至三个节点:(可以在上体的基础上做kafka,因为kafka依赖于zookeeper)
Zookeeper1:
- [root@zookeeper1 ~]# tar -zvxf kafka_2.11-1.1.1.tgz
- [root@zookeeper1 ~]# cd kafka_2.11-1.1.1/config/
- [root@zookeeper1 config]# vim server.properties
- 把broker.id=0和zookeeper.connect=localhost:2181使用#注释掉可以使用在vim中/加要搜索的名字,来查找,并添加三行新的内容:
- #broker.id=0
- #zookeeper.connect=localhost:2181
- broker.id = 1
- zookeeper.connect = 192.168.1.10:2181,192.168.1.20:2181,192.168.1.30:2181
- listeners = PLAINTEXT://192.168.1.10:9092
-
- [root@zookeeper1 config]# cd /root/kafka_2.11-1.1.1/bin/
- [root@zookeeper1 bin]# ./kafka-server-start.sh -daemon ../config/server.properties
- [root@zookeeper1 bin]# jps
- 17645 QuorumPeerMain
- 18029 Kafka
- 18093 Jps
- # 注释:创建topic(下面的IP请设置为自己节点的IP):
- [root@zookeeper1 bin]# ./kafka-topics.sh --create --zookeeper 192.168.1.10:2181 --replication-factor 1 --partitions 1 --topic test
- Created topic "test".
- # 注释:测试结果:
- [root@zookeeper1 bin]# ./kafka-topics.sh --list --zookeeper 192.168.1.10:2181
- test
Zookeeper2:
- [root@zookeeper2 ~]# tar -zvxf kafka_2.11-1.1.1.tgz
- [root@zookeeper2 ~]# cd kafka_2.11-1.1.1/config/
- [root@zookeeper2 config]# vim server.properties
- # 注释:把broker.id=0和zookeeper.connect=localhost:2181使用#注释掉可以使用在vim中/加要搜索的名字,来查找,并添加三行新的内容:
- #broker.id=0
- #zookeeper.connect=localhost:2181
- broker.id = 2
- zookeeper.connect = 192.168.1.10:2181,192.168.1.20:2181,192.168.1.30:2181
- listeners = PLAINTEXT://192.168.1.20:9092
-
- [root@zookeeper2config]# cd /root/kafka_2.11-1.1.1/bin/
- [root@zookeeper2 bin]# ./kafka-server-start.sh -daemon ../config/server.properties
- [root@zookeeper2 bin]# jps
- 3573 Kafka
- 3605 Jps
- 3178 QuorumPeerMain
- # 注释:测试结果:
- [root@zookeeper2 bin]# ./kafka-topics.sh --list --zookeeper 192.168.1.20:2181
- test
Zookeeper3:
- [root@zookeeper3 ~]# tar -zvxf kafka_2.11-1.1.1.tgz
- [root@zookeeper3 ~]# cd kafka_2.11-1.1.1/config/
- [root@zookeeper3 config]# vim server.properties
- # 注释:把broker.id=0和zookeeper.connect=localhost:2181使用#注释掉可以使用在vim中/加要搜索的名字,来查找,并添加三行新的内容:
- #broker.id=0
- #zookeeper.connect=localhost:2181
- broker.id = 3
- zookeeper.connect = 192.168.1.10:2181,192.168.1.20:2181,192.168.1.30:2181
- listeners = PLAINTEXT://192.168.1.30:9092
-
- [root@zookeeper3 config]# cd /root/kafka_2.11-1.1.1/bin/
- [root@zookeeper3 bin]# ./kafka-server-start.sh -daemon ../config/server.properties
- [root@zookeeper3 bin]# jps
- 3904 QuorumPeerMain
- 4257 Kafka
- 4300 Jps
- # 注释:测试结果:
- [root@zookeeper3 bin]# ./kafka-topics.sh --list --zookeeper 192.168.1.30:2181
- test
9.应用商城系统(40分)
继续使用上题的三台虚拟机,使用提供的软件包,基于集群应用系统部署。部署完成后,进行登录,(订单中填写的收货地址填写自己学校的地址,收货人填写自己的实际联系方式)最后使用curl命令去获取商城首页的返回信息,将curl http://你自己的商城IP/#/home获取到的结果以文本形式提交到答题框。
这是gpmall上传的开源项目,如果想了解的更加深入的可以访问这个地址 https://gitee.com/mic112/gpmall
- 将所需的zookeep,kafka和gpmall-repo的包上传到mall虚拟机(按题目要求的答案,其实单节点也一样,推荐单节点部署,集群部署,看大家是否需要,需要的话评论一下,我到时候更新集群部署):
- [root@mall ~]# vim /etc/hosts
- 127.0.0.1 localhost localhost.localdomain localhost4 localhost4.localdomain4
- ::1 localhost localhost.localdomain localhost6 localhost6.localdomain6
- 192.168.1.111 mall
- 192.168.1.111 kafka.mall
- 192.168.1.111 redis.mall
- 192.168.1.111 mysql.mall
- 192.168.1.111 zookeeper.mall
- [root@mall ~]# vim /etc/yum.repos.d/local.repo
- [centos]
- name=centos
- baseurl=file:///opt/centos
- enabled=1
- gpgcheck=0
- [gpmall]
- name=gpmall
- baseurl=file:///root/gpmall-repo
- enabled=1
- gpgcheck=0
- [root@mall ~]# yum install -y java-1.8.0-openjdk java-1.8.0-openjdk-devel
- [root@mall ~]# java -version
- openjdk version "1.8.0_252"
- OpenJDK Runtime Environment (build 1.8.0_252-b09)
- OpenJDK 64-Bit Server VM (build 25.252-b09, mixed mode)
- [root@mall ~]# yum install -y redis
- [root@mall ~]# yum install -y nginx
- [root@mall ~]# yum install -y mariadb mariadb-server
- [root@mall ~]# tar -zvxf zookeeper-3.4.14.tar.gz
- [root@mall ~]# cd zookeeper-3.4.14/conf
- [root@mall conf]# mv zoo_sample.cfg zoo.cfg
- [root@mall conf]# cd /root/zookeeper-3.4.14/bin/
- [root@mall bin]# ./zkServer.sh start
- [root@mall bin]# ./zkServer.sh status
- ZooKeeper JMX enabled by default
- Using config: /root/zookeeper-3.4.14/bin/../conf/zoo.cfg
- Mode: standalone
- [root@mall bin]# cd
- [root@mall ~]# tar -zvxf kafka_2.11-1.1.1.tgz
- [root@mall ~]# cd kafka_2.11-1.1.1/bin/
- [root@mall bin]# ./kafka-server-start.sh -daemon ../config/server.properties
- [root@mall bin]# jps
- 7249 Kafka
- 17347 Jps
- 6927 QuorumPeerMain
- [root@mall bin]# cd
- [root@mall ~]# vim /etc/my.cnf
- # This group is read both both by the client and the server
- # use it for options that affect everything
- #
- [client-server]
- #
- # include all files from the config directory
- #
- !includedir /etc/my.cnf.d
- [mysqld]
- init_connect='SET collation_connection = utf8_unicode_ci'
- init_connect='SET NAMES utf8'
- character-set-server=utf8
- collation-server=utf8_unicode_ci
- skip-character-set-client-handshake
- [root@mall ~]# systemctl restart mariadb
- [root@mall ~]# systemctl enable mariadb
- [root@mall ~]# mysqladmin -uroot password 123456
- [root@mall ~]# mysql -uroot -p123456
- Welcome to the MariaDB monitor. Commands end with ; or \g.
- Your MariaDB connection id is 9
- Server version: 10.3.18-MariaDB MariaDB Server
-
- Copyright (c) 2000, 2018, Oracle, MariaDB Corporation Ab and others.
-
- Type 'help;' or '\h' for help. Type '\c' to clear the current input statement.
- MariaDB [(none)]> create database gpmall;
- Query OK, 1 row affected (0.002 sec)
- MariaDB [(none)]> grant all privileges on *.* to root@localhost identified by '123456' with grant option;
- Query OK, 0 rows affected (0.001 sec)
- MariaDB [(none)]> grant all privileges on *.* to root@'%' identified by '123456' with grant option;
- Query OK, 0 rows affected (0.001 sec)
- MariaDB [(none)]> use gpmall;
- Database changed
- MariaDB [gpmall]> source /root/gpmall-xiangmubao-danji/gpmall.sql
- MariaDB [gpmall]> Ctrl-C -- exit!
- [root@mall ~]# vim /etc/redis.conf
- # 注释:将bind 127.0.0.1这一行注释掉;将protected-mode yes 改为 protected-mode no
- #bind 127.0.0.1
- Protected-mode no
- [root@mall ~]# systemctl restart redis
- [root@mall ~]# systemctl enable redis
- Created symlink from /etc/systemd/system/multi-user.target.wants/redis.service to /usr/lib/systemd/system/redis.service.
- [root@mall ~]# rm -rf /usr/share/nginx/html/*
- [root@mall ~]# cp -rf gpmall-xiangmubao-danji/dist/* /usr/share/nginx/html/
- [root@mall ~]# vim /etc/nginx/conf.d/default.conf
- # 注释:在server块中添加三个location块
- server {
- ...
- location /user {
- proxy_pass http://127.0.0.1:8082;
- }
-
- location /shopping {
- proxy_pass http://127.0.0.1:8081;
- }
-
- location /cashier {
- proxy_pass http://127.0.0.1:8083;
- }
- ...
- }
- [root@mall ~]# systemctl restart nginx
- [root@mall ~]# systemctl enable nginx
- Created symlink from /etc/systemd/system/multi-user.target.wants/nginx.service to /usr/lib/systemd/system/nginx.service.
- [root@mall ~]# cd gpmall-xiangmubao-danji/
- [root@mall gpmall-xiangmubao-danji]# nohup java -jar shopping-provider-0.0.1-SNAPSHOT.jar &
- [1] 3531
- [root@mall gpmall-xiangmubao-danji]# nohup: ignoring input and appending output to ‘nohup.out’
-
- [root@mall gpmall-xiangmubao-danji]# nohup java -jar user-provider-0.0.1-SNAPSHOT.jar &
- [2] 3571
- [root@mall gpmall-xiangmubao-danji]# nohup: ignoring input and appending output to ‘nohup.out’
-
- [root@mall gpmall-xiangmubao-danji]# nohup java -jar gpmall-shopping-0.0.1-SNAPSHOT.jar &
- [3] 3639
- [root@mall gpmall-xiangmubao-danji]# nohup: ignoring input and appending output to ‘nohup.out’
-
- [root@mall gpmall-xiangmubao-danji]# nohup java -jar gpmall-user-0.0.1-SNAPSHOT.jar &
- [4] 3676
- [root@mall gpmall-xiangmubao-danji]# nohup: ignoring input and appending output to ‘nohup.out’
-
- [root@mall gpmall-xiangmubao-danji]# jobs
- [1] Running nohup java -jar shopping-provider-0.0.1-SNAPSHOT.jar &
- [2] Running nohup java -jar user-provider-0.0.1-SNAPSHOT.jar &
- [3]- Running nohup java -jar gpmall-shopping-0.0.1-SNAPSHOT.jar &
- [4]+ Running nohup java -jar gpmall-user-0.0.1-SNAPSHOT.jar &
- [root@mall gpmall-xiangmubao-danji]# curl http://192.168.1.111/#/home
- <!DOCTYPE html><html><head><meta charset=utf-8><title>1+x-示例项目</title><meta name=keywords content=""><meta name=description content=""><meta http-equiv=X-UA-Compatible content="IE=Edge"><meta name=wap-font-scale content=no><link rel="shortcut icon " type=images/x-icon href=/static/images/favicon.ico><link href=/static/css/app.8d4edd335a61c46bf5b6a63444cd855a.css rel=stylesheet></head><body><div id=app></div><script type=text/javascript src=/static/js/manifest.2d17a82764acff8145be.js></script><script type=text/javascript src=/static/js/vendor.4f07d3a235c8a7cd4efe.js></script><script type=text/javascript src=/static/js/app.81180cbb92541cdf912f.js></script></body></html><style>body{
- min-width:1250px;}</style>
10.Keystone管理(40分)
使用提供的“all-in-one”虚拟机,在keystone中创建用户testuser,密码为password,创建好之后,查看testuser的详细信息,以文本形式提交以上操作命令到答题框。
- [root@xiandian~]# source /etc/keystone/admin-openrc.sh
- [root@xiandian~]# openstack user create --domain xiandian --password password testuser
- +-----------+----------------------------------+
- | Field | Value |
- +-----------+----------------------------------+
- | domain_id | 5a486c51bc8e4dffa4a181f6c54e0938 |
- | enabled | True |
- | id | ec6d67cdb3ac4b3ca827587c14be0a3e |
- | name | testuser |
- +-----------+----------------------------------+
- [root@xiandian~]# openstack user show testuser
- +-----------+----------------------------------+
- | Field | Value |
- +-----------+----------------------------------+
- | domain_id | 639e7d52170d4759b5438e3b29bbf339 |
- | enabled | True |
- | id | df8ca15f17a8435d8889987b4b78c7a2 |
- | name | testuser |
- +-----------+----------------------------------+
11.对象存储管理(40分)
使用提供的“all-in-one”虚拟机,使用openstack命令,创建名为examtest的容器并查询,上传一个aaa.txt(可自行创建)文件到这个容器中并查询。依次将操作命令和返回结果以文本形式提交到答题框。
- [root@xiandian ~]# openstack container create examtest
- +---------------------------------------+-----------+------------------------------------+
- | account | container | x-trans-id |
- +---------------------------------------+-----------+------------------------------------+
- | AUTH_0ab2dbde4f754b699e22461426cd0774 | examtest | tx9e7b54f8042d4a6ca5ccf-005a93daf3 |
- +---------------------------------------+-----------+------------------------------------+
- [root@xiandian ~]# openstack container list
- +----------+
- | Name |
- +----------+
- | examtest |
- +----------+
- [root@xiandian ~]# openstack object create examtest aaa.txt
- +---------+-----------+----------------------------------+
- | object | container | etag |
- +---------+-----------+----------------------------------+
- | aaa.txt | examtest | 45226aa24b72ce0ccc4ff73eefe2e26f |
- +---------+-----------+----------------------------------+
- [root@xiandian ~]# openstack object list examtest
- +---------+
- | Name |
- +---------+
- | aaa.txt |
- +---------+
12.Glance管理(40分)
登录“all-in-one”节点,使用crt的传输工具将提供的cirros-0.3.4-x86_64-disk.img镜像上传至“all-in-one”节点的/root目录下;使用glance命令将镜像上传,并命名为mycirros,最后使用glance命令查看该镜像的详细信息。将上述所有操作命令和返回结果以文本形式提交到答题框。
- [root@xiandian ~]# source /etc/keystone/admin-openrc.sh
- [root@xiandian ~]# glance image-create --name mycirros --disk-format qcow2 --container-format bare --progress < cirros-0.3.4-x86_64-disk.img
- [=============================>] 100%
- +------------------+--------------------------------------+
- | Property | Value |
- +------------------+--------------------------------------+
- | checksum | ee1eca47dc88f4879d8a229cc70a07c6 |
- | container_format | bare |
- | created_at | 2019-10-24T10:16:52Z |
- | disk_format | qcow2 |
- | id | d3663be2-3ebf-443a-b3fc-b3e39bda8783 |
- | min_disk | 0 |
- | min_ram | 0 |
- | name | mycirros |
- | owner | 0ab2dbde4f754b699e22461426cd0774 |
- | protected | False |
- | size | 13287936 |
- | status | active |
- | tags | [] |
- | updated_at | 2019-10-24T10:16:52Z |
- | virtual_size | None |
- | visibility | private |
- +------------------+--------------------------------------+
- [root@xiandian ~]# glance image-show d3663be2-3ebf-443a-b3fc-b3e39bda8783
- +------------------+--------------------------------------+
- | Property | Value |
- +------------------+--------------------------------------+
- | checksum | ee1eca47dc88f4879d8a229cc70a07c6 |
- | container_format | bare |
- | created_at | 2019-10-24T10:16:52Z |
- | disk_format | qcow2 |
- | id | d3663be2-3ebf-443a-b3fc-b3e39bda8783 |
- | min_disk | 0 |
- | min_ram | 0 |
- | name | mycirros |
- | owner | 0ab2dbde4f754b699e22461426cd0774 |
- | protected | False |
- | size | 13287936 |
- | status | active |
- | tags | [] |
- | updated_at | 2019-10-24T10:16:52Z |
- | virtual_size | None |
- | visibility | private |
- +------------------+--------------------------------------+
13.Docker安装(40分)
使用提供的虚拟机和软件包,自行配置YUM源,安装docker-ce服务。安装完毕后执行docker info命令的返回结果以文本形式提交到答题框。
- 先上传Docker.tar.gz到/root目录,并解压:
- [root@xiandian ~]# tar -zvxf Docker.tar.gz
- [root@xiandian ~]# vim /etc/yum.repos.d/local.repo
- [centos]
- name=centos
- baseurl=file:///opt/centos
- enabled=1
- gpgcheck=0
- [docker]
- name=docker
- baseurl=file:///root/Docker
- enabled=1
- gpgcheck=0
- [root@xiandian ~]# iptables -F
- [root@xiandian ~]# iptables -X
- [root@xiandian ~]# iptables -Z
- [root@xiandian ~]# iptables-save
- # Generated by iptables-save v1.4.21 on Fri May 15 02:00:29 2020
- *filter
- :INPUT ACCEPT [20:1320]
- :FORWARD ACCEPT [0:0]
- :OUTPUT ACCEPT [11:1092]
- COMMIT
- # Completed on Fri May 15 02:00:29 2020
- [root@xiandian ~]# vim /etc/selinux/config
- SELINUX=disabled
- # 注释:关闭交换分区:
- [root@xiandian ~]# vim /etc/fstab
- #/dev/mapper/centos-swap swap swap defaults 0 0
- [root@xiandian ~]# free -m
- total used free shared buff/cache available
- Mem: 1824 95 1591 8 138 1589
- Swap: 0 0 0
- # 注释:在配置路由转发前,先升级系统并重启,不然会有两条规则可能报错:
- [root@xiandian ~]# yum upgrade -y
- [root@xiandian ~]# reboot
- [root@xiandian ~]# vim /etc/sysctl.conf
- net.ipv4.ip_forward = 1
- net.bridge.bridge-nf-call-ip6tables = 1
- net.bridge.bridge-nf-call-iptables = 1
- [root@xiandian ~]# modprobe br_netfilter
- [root@xiandian ~]# sysctl -p
- net.ipv4.ip_forward = 1
- net.bridge.bridge-nf-call-ip6tables = 1
- net.bridge.bridge-nf-call-iptables = 1
- [root@xiandian ~]# yum install -y yum-utils device-mapper-persistent-data
- [root@xiandian ~]# yum install -y docker-ce-18.09.6 docker-ce-cli-18.09.6 containerd.io
- [root@xiandian ~]# systemctl daemon-reload
- [root@xiandian ~]# systemctl restart docker
- [root@xiandian ~]# systemctl enable docker
- Created symlink from /etc/systemd/system/multi-user.target.wants/docker.service to /usr/lib/systemd/system/docker.service.
- [root@xiandian ~]# docker info
- Containers: 0
- Running: 0
- Paused: 0
- Stopped: 0
- Images: 0
- Server Version: 18.09.6
- Storage Driver: devicemapper
- Pool Name: docker-253:0-100765090-pool
- Pool Blocksize: 65.54kB
- Base Device Size: 10.74GB
- Backing Filesystem: xfs
- Udev Sync Supported: true
- Data file: /dev/loop0
- Metadata file: /dev/loop1
- Data loop file: /var/lib/docker/devicemapper/devicemapper/data
- Metadata loop file: /var/lib/docker/devicemapper/devicemapper/metadata
- Data Space Used: 11.73MB
- Data Space Total: 107.4GB
- Data Space Available: 24.34GB
- Metadata Space Used: 17.36MB
- Metadata Space Total: 2.147GB
- Metadata Space Available: 2.13GB
- Thin Pool Minimum Free Space: 10.74GB
- Deferred Removal Enabled: true
- Deferred Deletion Enabled: true
- Deferred Deleted Device Count: 0
- Library Version: 1.02.164-RHEL7 (2019-08-27)
- Logging Driver: json-file
- Cgroup Driver: cgroupfs
- Plugins:
- Volume: local
- Network: bridge host macvlan null overlay
- Log: awslogs fluentd gcplogs gelf journald json-file local logentries splunk syslog
- Swarm: inactive
- Runtimes: runc
- Default Runtime: runc
- Init Binary: docker-init
- containerd version: b34a5c8af56e510852c35414db4c1f4fa6172339
- runc version: 3e425f80a8c931f88e6d94a8c831b9d5aa481657
- init version: fec3683
- Security Options:
- seccomp
- Profile: default
- Kernel Version: 3.10.0-1127.8.2.el7.x86_64
- Operating System: CentOS Linux 7 (Core)
- OSType: linux
- Architecture: x86_64
- CPUs: 2
- Total Memory: 1.777GiB
- Name: xiandian
- ID: OUR6:6ERV:3UCH:WJCM:TDLL:5ATV:E7IQ:HLAR:JKQB:OBK2:HZ7G:JC3Q
- Docker Root Dir: /var/lib/docker
- Debug Mode (client): false
- Debug Mode (server): false
- Registry: https://index.docker.io/v1/
- Labels:
- Experimental: false
- Insecure Registries:
- 127.0.0.0/8
- Live Restore Enabled: false
- Product License: Community Engine
- WARNING: the devicemapper storage-driver is deprecated, and will be removed in a future release.
- WARNING: devicemapper: usage of loopback devices is strongly discouraged for production use.
- Use `--storage-opt dm.thinpooldev` to specify a custom block storage device.
14.Docker Harbor安装(40分)
使用提供的虚拟机与软件包,部署Docker Harbor镜像仓库服务。安装完毕后,将执行./install.sh --with-notary --with-clair命令返回结果中的[step4]的内容以文本形式提交到答题框。
之前安装docker-cd时解压Docker.tar.gz时会产生有一个image.sh的脚本(是一个自动上传镜像到本地仓库的脚本):
- [root@zookeeper1 ~]# ./image.sh
- [root@zookeeper1 ~]# mkdir -p /data/ssl
- [root@zookeeper1 ~]# cd /data/ssl/
- [root@zookeeper1 ssl]# which openssl
- /usr/bin/openssl
- [root@zookeeper1 ssl]# openssl req -newkey rsa:4096 -nodes -sha256 -keyout ca.key -x509 -days 2.235 -out ca.crt
- Generating a 4096 bit RSA private key
- ...................................................................................................................++
- ............................................................................................................................................++
- writing new private key to 'ca.key'
- -----
- You are about to be asked to enter information that will be incorporated
- into your certificate request.
- What you are about to enter is what is called a Distinguished Name or a DN.
- There are quite a few fields but you can leave some blank
- For some fields there will be a default value,
- If you enter '.', the field will be left blank.
- -----
- Country Name (2 letter code) [XX]:CN # 国家
- State or Province Name (full name) []:Guangxi # 地区(州或省名)
- Locality Name (eg, city) [Default City]:Liuzhou # 城市
- Organization Name (eg, company) [Default Company Ltd]:lztd # 公司名称
- Organizational Unit Name (eg, section) []:xxjsxy # 单位名称
- Common Name (eg, your name or your server's hostname) []: # 服务器主机名,域名
- Email Address []: # 邮箱地址
- [root@zookeeper1 ssl]# openssl req -newkey rsa:4096 -nodes -sha256 -keyout www.yidaoyun.com.key -out www.yidaoyun.com.csr
- Generating a 4096 bit RSA private key
- .........................................................++
- ......++
- writing new private key to 'www.yidaoyun.com.key'
- -----
- You are about to be asked to enter information that will be incorporated
- into your certificate request.
- What you are about to enter is what is called a Distinguished Name or a DN.
- There are quite a few fields but you can leave some blank
- For some fields there will be a default value,
- If you enter '.', the field will be left blank.
- -----
- Country Name (2 letter code) [XX]:CN # 国家
- State or Province Name (full name) []:LGuangxi # 地区(州或省名)
- Locality Name (eg, city) [Default City]:Liuzhou # 城市
- Organization Name (eg, company) [Default Company Ltd]:lztd # 公司名称
- Organizational Unit Name (eg, section) []:xxjsxy # 单位名称
- Common Name (eg, your name or your server's hostname) []:www.yidaoyun.com # 服务器主机名,域名
- Email Address []: # 邮箱地址
-
- Please enter the following 'extra' attributes
- to be sent with your certificate request
- A challenge password []:
- An optional company name []:
- [root@zookeeper1 ssl]# openssl x509 -req -days 2.235 -in www.yidaoyun.com.csr -CA ca.crt -CAkey ca.key -CAcreateserial -out www.yidaoyun.com.crt
- Signature ok
- subject=/C=CN/ST=Guangxi/L=Liuzhou/O=lztd/OU=xxjsxy/CN=www.yidaoyun.com
- Getting CA Private Key
- [root@zookeeper1 ssl]# cp -rvf www.yidaoyun.com.crt /etc/pki/ca-trust/source/anchors/
- ‘www.yidaoyun.com.crt’ -> ‘/etc/pki/ca-trust/source/anchors/www.yidaoyun.com.crt’
- [root@zookeeper1 ssl]# update-ca-trust enable
- [root@zookeeper1 ssl]# update-ca-trust extract
- # 注释:上传docker-compose-Linux-x86_64.64并重命名docker-compose:
- [root@zookeeper1 ~]# mv docker-compose-Linux-x86_64.64 /usr/local/bin/
- [root@zookeeper1 ~]# mv /usr/local/bin/docker-compose-Linux-x86_64.64 /usr/local/bin/docker-compose
- [root@zookeeper1 ~]# chmod +x /usr/local/bin/docker-compose
- [root@zookeeper1 ~]# docker-compose --version
- docker-compose version 1.26.0-rc4, build d279b7a8
- [root@zookeeper1 opt]# tar -zvxf harbor-offline-installer-v1.5.3.tgz -C /opt/
- [root@zookeeper1 opt]# ll
- total 1097260
- drwxr-xr-x. 8 root root 4096 May 14 08:03 centos
- drwx--x--x 4 root root 26 May 19 23:16 containerd
- -rw-r--r--. 1 root root 1123583789 May 15 04:26 Docker.tar.gz
- drwxr-xr-x 4 root root 4096 May 20 03:55 harbor
- [root@zookeeper1 opt]# cd harbor/
- [root@zookeeper1 harbor]# ll
- total 895708
- drwxr-xr-x 3 root root 22 May 20 03:55 common
- -rw-r--r-- 1 root root 1185 Sep 12 2018 docker-compose.clair.yml
- -rw-r--r-- 1 root root 1725 Sep 12 2018 docker-compose.notary.yml
- -rw-r--r-- 1 root root 3596 Sep 12 2018 docker-compose.yml
- drwxr-xr-x 3 root root 150 Sep 12 2018 ha
- -rw-r--r-- 1 root root 6956 Sep 12 2018 harbor.cfg
- -rw-r--r-- 1 root root 915878468 Sep 12 2018 harbor.v1.5.3.tar.gz
- -rwxr-xr-x 1 root root 5773 Sep 12 2018 install.sh
- -rw-r--r-- 1 root root 10764 Sep 12 2018 LICENSE
- -rw-r--r-- 1 root root 482 Sep 12 2018 NOTICE
- -rw-r--r-- 1 root root 1247461 Sep 12 2018 open_source_license
- -rwxr-xr-x 1 root root 27840 Sep 12 2018 prepare
- [root@zookeeper1 harbor]# vim harbor.cfg
- # 注释:修改配置文件内容:
- hostname = 192.168.1.111
- ui_url_protocol = https
- ssl_cert = /data/ssl/www.yidaoyun.com.crt
- ssl_cert_key = /data/ssl/www.yidaoyun.com.key
- harbor_admin_password = 000000
- [root@zookeeper1 harbor]# ./prepare
- Generated and saved secret to file: /data/secretkey
- Generated configuration file: ./common/config/nginx/nginx.conf
- Generated configuration file: ./common/config/adminserver/env
- Generated configuration file: ./common/config/ui/env
- Generated configuration file: ./common/config/registry/config.yml
- Generated configuration file: ./common/config/db/env
- Generated configuration file: ./common/config/jobservice/env
- Generated configuration file: ./common/config/jobservice/config.yml
- Generated configuration file: ./common/config/log/logrotate.conf
- Generated configuration file: ./common/config/jobservice/config.yml
- Generated configuration file: ./common/config/ui/app.conf
- Generated certificate, key file: ./common/config/ui/private_key.pem, cert file: ./common/config/registry/root.crt
- The configuration files are ready, please use docker-compose to start the service.
- [root@zookeeper1 harbor]# ./install.sh --with-notary --with-clair
- [Step 0]: checking installation environment ...
- Note: docker version: 18.09.6
- Note: docker-compose version: 1.26.0
-
- [Step 1]: loading Harbor images ...
- dba693fc2701: Loading layer 133.4MB/133.4MB
- 5773887c4c41: Loading layer 30.09MB/30.09MB
- 6fc2abbcae42: Loading layer 15.37MB/15.37MB
- d85f176a11ec: Loading layer 15.37MB/15.37MB
- Loaded image: vmware/harbor-adminserver:v1.5.3
- 462b14c85230: Loading layer 410.1MB/410.1MB
- c2e0c8cb2903: Loading layer 9.216kB/9.216kB
- 11bdb24cded2: Loading layer 9.216kB/9.216kB
- 5d8f974b49ef: Loading layer 7.68kB/7.68kB
- ee04f13f4147: Loading layer 1.536kB/1.536kB
- 799db4dfe41a: Loading layer 11.78kB/11.78kB
- f7d813585bdd: Loading layer 2.56kB/2.56kB
- 6300bbdbd7ab: Loading layer 3.072kB/3.072kB
- Loaded image: vmware/harbor-db:v1.5.3
- 1d7516778a05: Loading layer 30.09MB/30.09MB
- f7ec8d1b47d0: Loading layer 20.91MB/20.91MB
- 22b0ad749c21: Loading layer 20.91MB/20.91MB
- Loaded image: vmware/harbor-jobservice:v1.5.3
- 2d449d67c05a: Loading layer 89.58MB/89.58MB
- 0bfd4e706575: Loading layer 3.072kB/3.072kB
- 6100e173c230: Loading layer 59.9kB/59.9kB
- 86fe093d1358: Loading layer 61.95kB/61.95kB
- Loaded image: vmware/redis-photon:v1.5.3
- Loaded image: photon:1.0
- 3bf3086a6569: Loading layer 30.09MB/30.09MB
- 641d0f77d675: Loading layer 10.95MB/10.95MB
- 89efbaabea87: Loading layer 17.3MB/17.3MB
- 1276e51f4dc2: Loading layer 15.87kB/15.87kB
- 49e187d04e78: Loading layer 3.072kB/3.072kB
- e62fbfea411d: Loading layer 28.24MB/28.24MB
- Loaded image: vmware/notary-signer-photon:v0.5.1-v1.5.3
- Loaded image: vmware/mariadb-photon:v1.5.3
- 201f6ade61d8: Loading layer 102.5MB/102.5MB
- 81221fbb5879: Loading layer 6.656kB/6.656kB
- 2268e3c9e521: Loading layer 2.048kB/2.048kB
- 9fca06f4b193: Loading layer 7.68kB/7.68kB
- Loaded image: vmware/postgresql-photon:v1.5.3
- 11d6e8a232c9: Loading layer 30.09MB/30.09MB
- 42650b04d53d: Loading layer 24.41MB/24.41MB
- a1cd8af19e29: Loading layer 7.168kB/7.168kB
- 4b1cda90ba19: Loading layer 10.56MB/10.56MB
- 1351f0f3006a: Loading layer 24.4MB/24.4MB
- Loaded image: vmware/harbor-ui:v1.5.3
- e335f4c3af7d: Loading layer 79.93MB/79.93MB
- 2aea487bc2c4: Loading layer 3.584kB/3.584kB
- d2efec3de68b: Loading layer 3.072kB/3.072kB
- d0d71a5ce1dd: Loading layer 4.096kB/4.096kB
- 19930367abf0: Loading layer 3.584kB/3.584kB
- 03e5b7640db5: Loading layer 9.728kB/9.728kB
- Loaded image: vmware/harbor-log:v1.5.3
- 5aebe8cc938c: Loading layer 11.97MB/11.97MB
- Loaded image: vmware/nginx-photon:v1.5.3
- ede6a57cbd7e: Loading layer 30.09MB/30.09MB
- 4d6dd4fc1d87: Loading layer 2.56kB/2.56kB
- c86a69f49f60: Loading layer 2.56kB/2.56kB
- 0cf6e04c5927: Loading layer 2.048kB/2.048kB
- 6fbff4fe9739: Loading layer 22.8MB/22.8MB
- 6f527a618092: Loading layer 22.8MB/22.8MB
- Loaded image: vmware/registry-photon:v2.6.2-v1.5.3
- e29a8834501b: Loading layer 12.16MB/12.16MB
- aaf67f1da2c7: Loading layer 17.3MB/17.3MB
- 8d5718232133: Loading layer 15.87kB/15.87kB
- fc89aca1dd12: Loading layer 3.072kB/3.072kB
- 076eb5a76f6d: Loading layer 29.46MB/29.46MB
- Loaded image: vmware/notary-server-photon:v0.5.1-v1.5.3
- 454c81edbd3b: Loading layer 135.2MB/135.2MB
- e99db1275091: Loading layer 395.4MB/395.4MB
- 051e4ee23882: Loading layer 9.216kB/9.216kB
- 6cca4437b6f6: Loading layer 9.216kB/9.216kB
- 1d48fc08c8bc: Loading layer 7.68kB/7.68kB
- 0419724fd942: Loading layer 1.536kB/1.536kB
- 543c0c1ee18d: Loading layer 655.2MB/655.2MB
- 4190aa7e89b8: Loading layer 103.9kB/103.9kB
- Loaded image: vmware/harbor-migrator:v1.5.0
- 45878c64fc3c: Loading layer 165.3MB/165.3MB
- fc3d407ce98f: Loading layer 10.93MB/10.93MB
- d7a0785bb902: Loading layer 2.048kB/2.048kB
- a17e0f23bc84: Loading layer 48.13kB/48.13kB
- 57c7181f2336: Loading layer 10.97MB/10.97MB
- Loaded image: vmware/clair-photon:v2.0.5-v1.5.3
-
- [Step 2]: preparing environment ...
- Clearing the configuration file: ./common/config/adminserver/env
- Clearing the configuration file: ./common/config/ui/env
- Clearing the configuration file: ./common/config/ui/app.conf
- Clearing the configuration file: ./common/config/ui/private_key.pem
- Clearing the configuration file: ./common/config/db/env
- Clearing the configuration file: ./common/config/jobservice/env
- Clearing the configuration file: ./common/config/jobservice/config.yml
- Clearing the configuration file: ./common/config/registry/config.yml
- Clearing the configuration file: ./common/config/registry/root.crt
- Clearing the configuration file: ./common/config/nginx/cert/www.yidaoyun.com.crt
- Clearing the configuration file: ./common/config/nginx/cert/www.yidaoyun.com.key
- Clearing the configuration file: ./common/config/nginx/nginx.conf
- Clearing the configuration file: ./common/config/log/logrotate.conf
- loaded secret from file: /data/secretkey
- Generated configuration file: ./common/config/nginx/nginx.conf
- Generated configuration file: ./common/config/adminserver/env
- Generated configuration file: ./common/config/ui/env
- Generated configuration file: ./common/config/registry/config.yml
- Generated configuration file: ./common/config/db/env
- Generated configuration file: ./common/config/jobservice/env
- Generated configuration file: ./common/config/jobservice/config.yml
- Generated configuration file: ./common/config/log/logrotate.conf
- Generated configuration file: ./common/config/jobservice/config.yml
- Generated configuration file: ./common/config/ui/app.conf
- Generated certificate, key file: ./common/config/ui/private_key.pem, cert file: ./common/config/registry/root.crt
- Copying sql file for notary DB
- Generated certificate, key file: ./cert_tmp/notary-signer-ca.key, cert file: ./cert_tmp/notary-signer-ca.crt
- Generated certificate, key file: ./cert_tmp/notary-signer.key, cert file: ./cert_tmp/notary-signer.crt
- Copying certs for notary signer
- Copying notary signer configuration file
- Generated configuration file: ./common/config/notary/server-config.json
- Copying nginx configuration file for notary
- Generated configuration file: ./common/config/nginx/conf.d/notary.server.conf
- Generated and saved secret to file: /data/defaultalias
- Generated configuration file: ./common/config/notary/signer_env
- Generated configuration file: ./common/config/clair/postgres_env
- Generated configuration file: ./common/config/clair/config.yaml
- Generated configuration file: ./common/config/clair/clair_env
- The configuration files are ready, please use docker-compose to start the service.
-
- [Step 3]: checking existing instance of Harbor ...
-
- [Step 4]: starting Harbor ...
- Creating network "harbor_harbor" with the default driver
- Creating network "harbor_harbor-clair" with the default driver
- Creating network "harbor_harbor-notary" with the default driver
- Creating network "harbor_notary-mdb" with the default driver
- Creating network "harbor_notary-sig" with the default driver
- Creating harbor-log ... done
- Creating redis ... done
- Creating clair-db ... done
- Creating notary-db ... done
- Creating harbor-db ... done
- Creating registry ... done
- Creating harbor-adminserver ... done
- Creating notary-signer ... done
- Creating clair ... done
- Creating harbor-ui ... done
- Creating notary-server ... done
- Creating nginx ... done
- Creating harbor-jobservice ... done
- ✔ ----Harbor has been installed and started successfully.----
- Now you should be able to visit the admin portal at https://192.168.1.111.
- For more details, please visit https://github.com/vmware/harbor .
15.Shell脚本补全(40分)
下面有一段脚本,作用是自动配置nginx服务,由于工程师的失误,将脚本中的某些代码删除了,但注释还在,请根据注释,填写代码。最后将填写的代码按照顺序以文本形式提交至答题框。 nginx(){ cd #删除默认项目路径下的文件 rm -rf /usr/share/nginx/html/* #将提供的dist静态文件复制到nginx项目目录 cp -rvf /root/dist/* /usr/share/nginx/html #修改nginx配置文件如下 cat > /etc/nginx/conf.d/default.conf << EOF server { listen 80; server_name localhost; #charset koi8-r; #access_log /var/log/nginx/host.access.log main; location / { root /usr/share/nginx/html; index index.html index.htm; } location /user { (此处需要填写) } location /shopping { proxy_pass http://127.0.0.1:8081; } location /cashier { proxy_pass http://127.0.0.1:8083; } error_page 500 502 503 504 /50x.html; location = /50x.html { root /usr/share/nginx/html; } } EOF #启动nginx服务 systemctl start nginx #设置nginx开机自启 (此处需填写) #检查nginx服务是否成功启动 if [ $? -eq 0 ] then sleep 3 echo -e "\033[36m==========nginx启动成功==========\033[0m" else echo -e "\033[31mnginx启动失败,请检查\033[0m" exit 1 fi sleep 2 }
- proxy_pass http://127.0.0.1:8082;
- systemctl enable nginx
©版权声明
著作权归作者所有:如需转载,请注明出处,谢谢。

