- 1用Python实现一个大数据搜索引擎
- 2解决Android Studio中Plugin version和Gradle version不匹配的问题_android studio 无法编辑android gradle plugin version
- 3“从零开始搭建一台ROS开源迷你无人车”第三周学习记录_[fatal] [1715751858.301716956, 202.746000000]: fai
- 4HTTP-内容安全策略(CSP)详细_http csp
- 5ImportError: cannot import name ‘OpenAI‘ from ‘openai‘ (D: \anaconda\lib\site-packages \openail_init_cannot import name 'openai' from 'openai
- 6Oracle ORACLE 快速批量导入文本数据到数据库(sqlldr工具)方法与分析 (Windows CMD 方式)_如何通过cmd将txt文件数据导入到oracle数据库
- 7Qt布局管理详解(5种布局控件)_qt布局详解
- 8【Unity动画】Unity如何导入序列帧动画(GIF)_unity gif
- 9java高分面试指南:java高并发秒杀面试题_java 高并发 面试
- 101.6.2 nuScenes
OpenHarmony实战:瑞芯微RK3566移植案例(下)_openharmony移植路由器
赞
踩
OpenHarmony实战:瑞芯微RK3566移植案例(下)
OpenHarmony实战:瑞芯微RK3566移植案例(中)
WIFI
整改思路及实现流程
整改思路
接下来熟悉HCS文件的格式以及"HDF WIFI”核心驱动框架的代码启动初始化过程,参考hi3881的代码进行改造。
HDF WiFi框架总体框架图
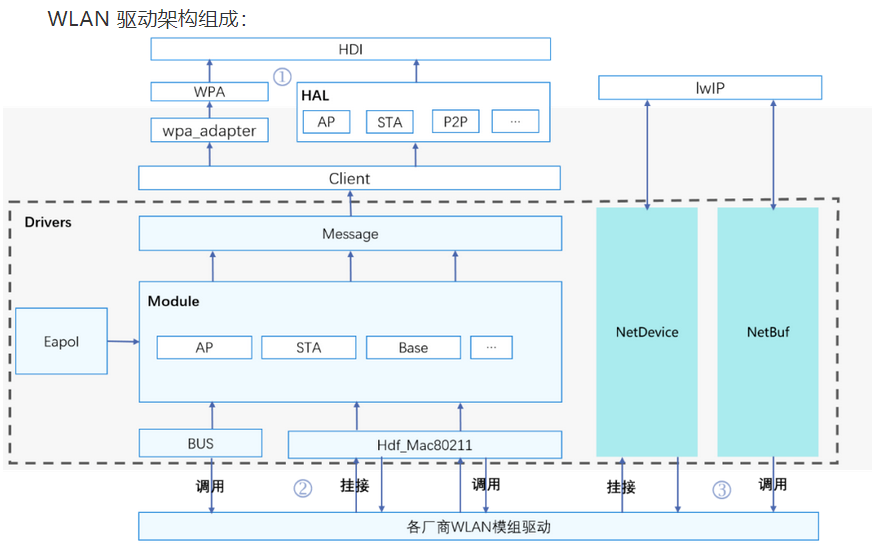
WLAN驱动架构组成:
ap6256驱动代码流程分析
驱动模块初始化流程分析
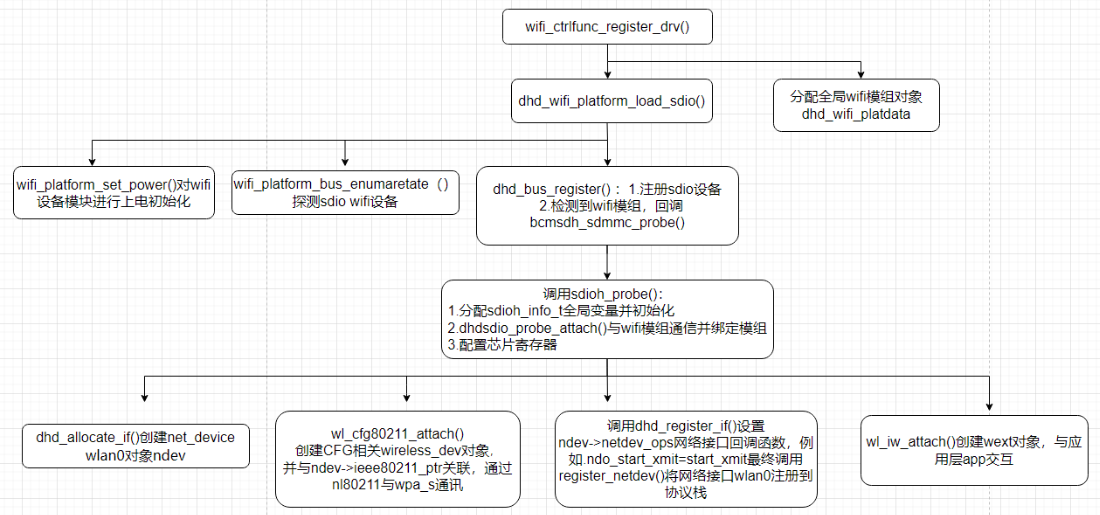
Ap6256 是一款SDIO设备WiFi模组驱动,使用标准Linux的SDIO设备驱动。内核模块初始化入口module_init()调用dhd_wifi_platform_load_sdio()函数进行初始化工作,这里调用wifi_platform_set_power()进行GPIO上电,调用dhd_wlan_set_carddetect()进行探测SDIO设备卡,最后调用sdio_register_driver(&bcmsdh_sdmmc_driver);进行SDIO设备驱动的注册,SDIO总线已经检测到WiFi模块设备,根据设备号和厂商号与该设备驱动匹配, 所以立即回调该驱动的bcmsdh_sdmmc_probe()函数,这里进行WiFi模组芯片的初始化工作,最后创建net_device网络接口wlan0,然后注册到Linux内核协议栈中。
下面对其中比较重要的函数进行举例分析:
(1) dhd_bus_register函数,主要实现sdio设备的注册,通过回调dhd_sdio中的相关函数,对wifi模块进行驱动注册等相关操作。
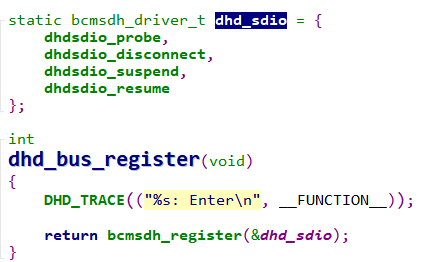
其中函数bcmsdh_register将静态结构体变量dhd_sdio赋值给静态结构体drvinfo,然后通过函数bcmsdh_register_client_driver调用函数sdio_register_driver向系统注册sdio接口驱动。


当sdio设备与sdio总线进行匹配后,会回调函数bcmsdh_sdmmc_probe,函数bcmsdh_sdmmc_probe会进一步回调dhd_sdio结构体中的成员函数dhdsdio_probe。
(2) dhdsdio_probe函数,主要实现net_device对象(wlan0)的创建,以及wireless_dev对象创建,并与net_device对象的成员ieee80211_ptr进行关联,给net_device对象的操作方法成员netdev_ops赋值,最后将net_device对象注册到协议栈中。
- 创建net_device网络接口wlan0对象
dhd_allocate_if()会调用alloc_etherdev()创建net_device对象,即wlan0网络接口。wl_cfg80211_attach()会创建wireless_dev对象,并将wireless_dev对象赋值给net_device对象的成员ieee80211_ptr。
- 将wlan0注册到内核协议栈
调用dhd_register_if()函数,这里将net_device_ops操作方法的实例dhd_ops_pri赋值给net_device对象的成员netdev_ops,然后调用register_netdev(net);将net_device对象wlan0网络接口注册到协议栈。
整改代码适配HDF WiFi框架
对于系统WiFi功能的使用,需要实现AP模式、STA模式、P2P三种主流模式,这里使用wpa_supplicant应用程序通过HDF WiFi框架与WiFi驱动进行交互,实现STA模式和P2P模式的功能,使用hostapd应用程序通过HDF WiFi框架与WiFi驱动进行交互,实现AP模式和P2P模式的功能。
Ap6256 WiFi6内核驱动依赖platform能力,主要包括SDIO总线的通讯能力;与用户态通信依赖HDF WiFi框架的能力,在确保上述能力功能正常后,即可开始本次WiFi驱动的HDF适配移植工作。本文档基于已经开源的rk3568开源版代码为基础版本,来进行此次移植。
适配移植ap6256 WiFi驱动涉及到的文件和目录如下:
3.1 WIFI相关的HDF框架编译控制宏
ap6256采用的是sdio总线,涉及到的通用编译控制宏如下:
CONFIG_DRIVERS_HDF_PLATFORM_SDIO=y
CONFIG_DRIVERS_HDF_PLATFORM_MMC=y
CONFIG_DRIVERS_HDF_WIFI=y
CONFIG_DRIVERS_HDF_STORAGE=y
3.2 具体WiFi设备驱动编译控制宏
涉及到wifi设备驱动的编译控制宏位于drivers/adapter/khdf/linux/model/network/wifi/Kconfig中,其中主要涉及到编译控制宏如下:
CONFIG_DRIVERS_HDF_NETDEV_EXT=y
CONFIG_AP6XXX_WIFI6_HDF=y
编译控制选项CONFIG_AP6XXX_WIFI6_HDF,内容如下:
config AP6XXX_WIFI6_HDF
tristate "support ap6xxx wifi6(80211ax) HDF"
depends on DRIVERS_HDF_WIFI
select CFG80211
select MAC80211
select DRIVERS_HDF_NETDEV_EXT
help
This driver supports wifi6 for ap6xxx HDF chipset.
This driver uses the kernel's wireless extensions subsystem.
If you choose to build a module, it'll be called dhd. Say M if unsure.
NOTE:此处为了保证框架侧与社区代码一致,不建议修改,设置CONFIG_AP6XXX_WIFI6_HDF的配置即可。
3.3 修改编译规则Makefile文件,添加ap6256驱动的源码位置
在drivers/adapter/khdf/linux/model/network/wifi/vendor/Makefile文件,添加如下内容:
ifneq ($(CONFIG_AP6XXX_WIFI6_HDF),)
#RKWIFI_PATH := (HDFVENDORPREFIX)/device/(���������������)/������/(product_company)/$(product_device)/wifi
RKWIFI_PATH := $(HDF_VENDOR_PREFIX)/device/kaihong/rk3568-khdvk/wifi //修改添加部分
obj-(CONFIGAP6XXXWIFI6HDF)+=(��������6�������6���)+=(RKWIFI_PATH)/
endif
ap6256驱动源码就位于源码/device/kaihong/rk3568-khdvk/wifi中,另外再根据ap6256的编译规则,修改wifi中的Makefile。
NOTE:此处也不建议修改,源码就位于device/(productcompany)/(��������������)/(product_device)/wifi中,但此处不能获取(productcompany)与(��������������)与(product_device)的值,还需要社区进行完善
WiFi驱动源码目录
驱动代码编译规则修改
参考device/kaihong/rk3568-khdvk/wifi/Makefile文件,内容如下:
obj-$(CONFIG_AP6XXX_WIFI6_HDF) += bcmdhd_hdf/
NOTE:可以修改目标规则指向不同的wifi驱动代码。
原生驱动代码存放于:
device/kaihong/rk3568-khdvk/patches/kernel/drivers/net/wireless/rockchip_wlan/rkwifi/bcmdhd/
在原生驱动上修改编译规则Makefile文件
由于驱动中添加了HDF框架代码,其中涉及到头文件位于drivers目录中,需要将相关路径加入编译规则中,主要是修改两点:
(1) 引用drivers/hdf/khdf/model/network/wifi/hdfwifi.mk中规则,在Makefile中添加语句如下:
include drivers/hdf/khdf/model/network/wifi/hdfwifi.mk
(2) 将hdfwifi.mk中涉及到的头文件定义添加到编译规则中,方便编译时引用,添加语句如下:
EXTRA_CFLAGS += $(HDF_FRAMEWORKS_INC) \
$(HDF_WIFI_FRAMEWORKS_INC) \
$(HDF_WIFI_ADAPTER_INC) \
$(HDF_WIFI_VENDOR_INC) \
$(SECURE_LIB_INC)
NOTE:如果有其他编译要求,可以修改Makefile中的相关规则
3.4.4 在原生驱动上增加以及修改的HDF驱动代码文件位于:
device/kaihong/rk3568-khdvk/wifi/bcmdhd_hdf/
目录结构:
./device/kaihong/rk3568-khdvk/wifi/bcmdhd_hdf/hdf
├── hdf_bdh_mac80211.c
├── hdf_driver_bdh_register.c
├── hdfinit_bdh.c
├── hdf_mac80211_ap.c
├── hdf_mac80211_sta.c
├── hdf_mac80211_sta.h
├── hdf_mac80211_sta_event.c
├── hdf_mac80211_sta_event.h
├── hdf_mac80211_p2p.c
├── hdf_public_ap6256.h
├── net_bdh_adpater.c
├── net_bdh_adpater.h
其中hdf_bdh_mac80211.c主要对g_bdh6_baseOps所需函数的填充,hdf_mac80211_ap.c主要对g_bdh6_staOps所需函数进行填充,hdf_mac80211_sta.c主要对g_bdh6_staOps所需函数进行填充,hdf_mac80211_p2p.c主要对g_bdh6_p2pOps所需函数进行填充,在drivers/framework/include/wifi/wifi_mac80211_ops.h里有对wifi基本功能所需api的说明。
驱动文件编写
HDF WLAN驱动框架由Module、NetDevice、NetBuf、BUS、HAL、Client 和 Message 这七个部分组成。开发者在WiFi驱动HDF适配过程中主要实现以下几部分功能:
适配HDF WLAN框架的驱动模块初始化
代码流程框图如下:
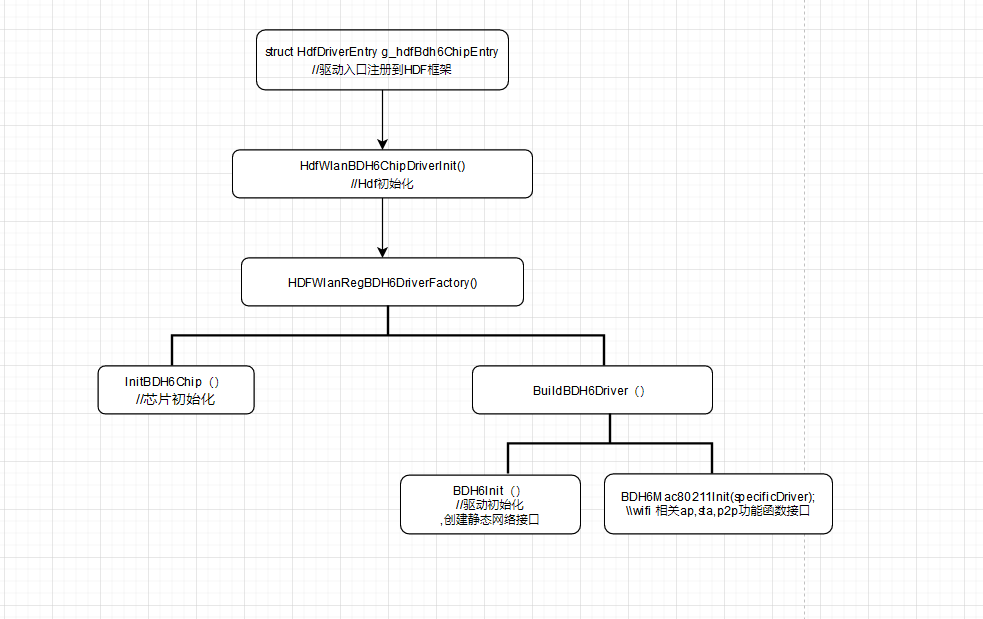
HDF代码入口
HDF代码入口位于device/kaihong/rk3568-khdvk/wifi/bcmdhd_hdf/hdf_driver_bdh_register.c
struct HdfDriverEntry g_hdfBdh6ChipEntry = {
.moduleVersion = 1,
.Bind = HdfWlanBDH6DriverBind,
.Init = HdfWlanBDH6ChipDriverInit,
.Release = HdfWlanBDH6ChipRelease,
.moduleName = "HDF_WLAN_CHIPS"
};
HDF_INIT(g_hdfBdh6ChipEntry);
3.5.2 HDF驱动的注册
在函数HDFWlanRegBDH6DriverFactory中完成HDF驱动的注册,相关代码如下:
static int32_t HDFWlanRegBDH6DriverFactory(void)
{
static struct HdfChipDriverFactory BDH6Factory = { 0 }; // WiFi device chip driver
struct HdfChipDriverManager *driverMgr = NULL;
driverMgr = HdfWlanGetChipDriverMgr();
if (driverMgr == NULL) {
HDF_LOGE("%s fail: driverMgr is NULL!", func);
return HDF_FAILURE;
}
BDH6Factory.driverName = BDH6_DRIVER_NAME;
BDH6Factory.GetMaxIFCount = GetBDH6GetMaxIFCount;
BDH6Factory.InitChip = InitBDH6Chip;
BDH6Factory.DeinitChip = DeinitBDH6Chip;
BDH6Factory.Build = BuildBDH6Driver;
BDH6Factory.Release = ReleaseBDH6Driver;
BDH6Factory.ReleaseFactory = NULL;
if (driverMgr->RegChipDriver(&BDH6Factory) != HDF_SUCCESS) {
HDF_LOGE("%s fail: driverMgr is NULL!", func);
return HDF_FAILURE;
}
return HDF_SUCCESS;
}
在注册HDF驱动时,需要实现HDF的基本操作,对struct HdfChipDriverFactory结构体进行初始化,struct HdfChipDriverFactory结构体的内容如下:
struct HdfChipDriverFactory {
const char *driverName; /**< Driver name */
int32_t (*InitChip)(struct HdfWlanDevice *device);
int32_t (*DeinitChip)(struct HdfWlanDevice *device);
void (*ReleaseFactory)(struct HdfChipDriverFactory *factory);
struct HdfChipDriver *(*Build)(struct HdfWlanDevice *device, uint8_t ifIndex);
void (*Release)(struct HdfChipDriver *chipDriver);
uint8_t (*GetMaxIFCount)(struct HdfChipDriverFactory *factory);
};
相关函数接口说明:
| 函数 | 功能 |
|---|---|
| GetBDH6GetMaxIFCount | 无需实现具体操作 |
| InitBDH6Chip | 芯片初始化 |
| DeinitBDH6Chip | 芯片去初始化 |
| BuildBDH6Driver | 实现芯片驱动侧绑定 |
| ReleaseBDH6Driver | 释放WLAN芯片驱动 |
| ReleaseFactory | 无需实现 |
3.5.3 芯片驱动初始化
芯片驱动初始化函数以及wifi相关的ap、sta、p2p操作函数的注册都在BuildBDH6Driver函数中实现,主要是实现struct HdfChipDriver结构体的初始化,struct HdfChipDriver结构体如下:
struct HdfChipDriver {
uint16_t type; /**< Chip type */
char name[MAX_WIFI_COMPONENT_NAME_LEN]; /**< Chip name */
struct HdfMac80211BaseOps *ops; /**< MAC address for the basic feature */
struct HdfMac80211STAOps *staOps; /**< MAC address for the STA feature */
struct HdfMac80211APOps *apOps; /**< MAC address for the AP feature */
struct HdfMac80211P2POps *p2pOps; /**< MAC address for the P2Pfeature */
void *priv; /**< Private data of the chip driver */
int32_t (*init)(struct HdfChipDriver *chipDriver, NetDevice *netDev);
int32_t (*deinit)(struct HdfChipDriver *chipDriver, NetDevice *netDev);
};
1)函数BuildBDH6Driver具体实现如下:
static struct HdfChipDriver *BuildBDH6Driver(struct HdfWlanDevice *device, uint8_t ifIndex)
{
struct HdfChipDriver *specificDriver = NULL;
if (device == NULL) {
HDF_LOGE("%s fail : channel is NULL", func);
return NULL;
}
(void)device;
(void)ifIndex;
specificDriver = (struct HdfChipDriver *)OsalMemCalloc(sizeof(struct HdfChipDriver)); //分配结构体地址空间
if (specificDriver == NULL) {
HDF_LOGE("%s fail: OsalMemCalloc fail!", func);
return NULL;
}
if (memset_s(specificDriver, sizeof(struct HdfChipDriver), 0, sizeof(struct HdfChipDriver)) != EOK) {
HDF_LOGE("%s fail: memset_s fail!", func);
OsalMemFree(specificDriver);
return NULL;
}
if (strcpy_s(specificDriver->name, MAX_WIFI_COMPONENT_NAME_LEN, BDH6_DRIVER_NAME) != EOK) {
HDF_LOGE("%s fail : strcpy_s fail", func);
OsalMemFree(specificDriver);
return NULL;
}
specificDriver->init = BDH6Init;
specificDriver->deinit = BDH6Deinit;
HDF_LOGW("bdh6: call BuildBDH6Driver %p", specificDriver);
BDH6Mac80211Init(specificDriver); //wifi相关的ap、sta、p2p操作接口初始化赋值
return specificDriver;
}
2)函数BDH6Mac80211Init实现wifi相关的ap、sta、p2p操作接口赋值到struct HdfChipDriver结构体中,具体实现如下
void BDH6Mac80211Init(struct HdfChipDriver *chipDriver)
{
HDF_LOGE("%s: start...", func);
if (chipDriver == NULL) {
HDF_LOGE("%s: input is NULL", func);
return;
}
chipDriver->ops = &g_bdh6_baseOps;
chipDriver->staOps = &g_bdh6_staOps;
chipDriver->apOps = &g_bdh6_apOps;
chipDriver->p2pOps = &g_bdh6_p2pOps;
}
3.5.4 Wifi芯片驱动初始化
Wifi芯片驱动初始化过程,由函数BDH6Init实现,主要涉及到wlan0网络节点的注册与p2p0网络节点的注册,以及芯片驱动的初始化过程。
整体流程如下:

下面对涉及的重要函数代码进行列举:
(1) 设置NetDevice对象的操作接口,函数主要通过全局结构体赋值给NetDevice对象的成员netDeviceIf指针来实现,具体代码如下:

(2) 给NetDevice对象分配私有数据空间,具体实现如下:

(3) 启动芯片初始化流程,请参考原生驱动的初始化流程,其中需要注意的是,需要进行wlan0的节点注册,代码在原生驱动函数dhd_register_if中进行实现,具体代码如下:

(4) 创建p2p0的NetDevice对象,具体代码实现如下:

(5) 重新设置p2p0的操作方法,并进行p2p0节点注册,具体代码实现如下:

3.5.5 HDF WlAN相关的控制接口
HDF WlAN相关的控制接口主要涉及到HdfMac80211BaseOps、HdfMac80211STAOps、HdfMac80211APOps、HdfMac80211P2POps结构体,通过将以上结构体的全局变量赋值给struct HdfChipDriver结构体的ops、staOps、apOps、p2pOps成员来实现。
1)HDF WLAN Base控制侧接口的实现
代码位于hdf_bdh_mac80211.c
static struct HdfMac80211BaseOps g_bdh6_baseOps = {
.SetMode = BDH6WalSetMode,
.AddKey = BDH6WalAddKey,
.DelKey = BDH6WalDelKey,
.SetDefaultKey = BDH6WalSetDefaultKey,
.GetDeviceMacAddr = BDH6WalGetDeviceMacAddr,
.SetMacAddr = BDH6WalSetMacAddr,
.SetTxPower = BDH6WalSetTxPower,
.GetValidFreqsWithBand = BDH6WalGetValidFreqsWithBand,
.GetHwCapability = BDH6WalGetHwCapability,
.SendAction = BDH6WalSendAction,
.GetIftype = BDH6WalGetIftype,
};
上述实现的接口供STA、AP、P2P三种模式中所调用。
2)HDF WLAN STA模式接口的实现
STA模式调用流程图如下:
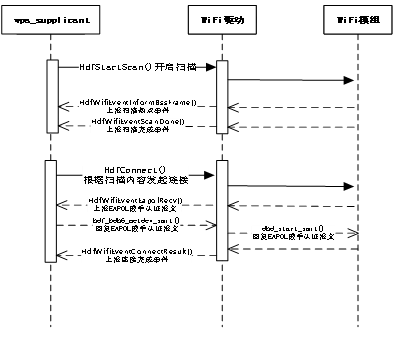
代码位于hdf_mac80211_sta.c
struct HdfMac80211STAOps g_bdh6_staOps = {
.Connect = HdfConnect,
.Disconnect = HdfDisconnect,
.StartScan = HdfStartScan,
.AbortScan = HdfAbortScan,
.SetScanningMacAddress = HdfSetScanningMacAddress,
};
3) HDF WLAN AP模式接口的实现
AP模式调用流程图如下:
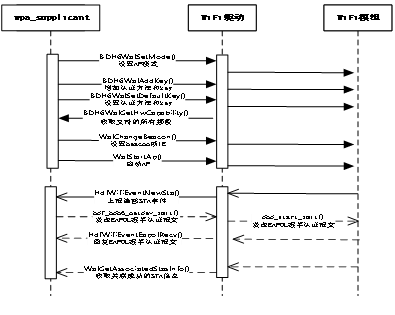
代码位于hdf_mac80211_ap.c
struct HdfMac80211APOps g_bdh6_apOps = {
.ConfigAp = WalConfigAp,
.StartAp = WalStartAp,
.StopAp = WalStopAp,
.ConfigBeacon = WalChangeBeacon,
.DelStation = WalDelStation,
.SetCountryCode = WalSetCountryCode,
.GetAssociatedStasCount = WalGetAssociatedStasCount,
.GetAssociatedStasInfo = WalGetAssociatedStasInfo
};
4)HDF WLAN P2P模式接口的实现
P2P模式调用流程图如下:
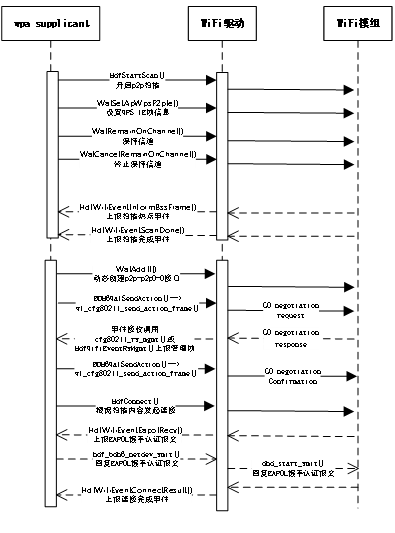
struct HdfMac80211P2POps g_bdh6_p2pOps = {
.RemainOnChannel = WalRemainOnChannel,
.CancelRemainOnChannel = WalCancelRemainOnChannel,
.ProbeReqReport = WalProbeReqReport,
.AddIf = WalAddIf,
.RemoveIf = WalRemoveIf,
.SetApWpsP2pIe = WalSetApWpsP2pIe,
.GetDriverFlag = WalGetDriverFlag,
};
5) HDF WLAN框架事件上报接口的实现
WiFi驱动需要通过上报事件给wpa_supplicant和hostapd应用程序,比如扫描热点结果上报,新STA终端关联完成事件上报等等,HDF WLAN事件上报的所有接口请参考drivers/framework/include/wifi/hdf_wifi_event.h:
事件上报HDF WLAN接口主要有:
| 头文件 | 接口名称 | 功能描述 |
|---|---|---|
| hdf_wifi_event.h | HdfWifiEventNewSta() | 上报一个新的sta事件 |
| HdfWifiEventDelSta() | 上报一个删除sta事件 | |
| HdfWifiEventInformBssFrame() | 上报扫描Bss事件 | |
| HdfWifiEventScanDone() | 上报扫描完成事件 | |
| HdfWifiEventConnectResult() | 上报连接结果事件 | |
| HdfWifiEventDisconnected() | 上报断开连接事件 | |
| HdfWifiEventMgmtTxStatus() | 上报发送状态事件 | |
| HdfWifiEventRxMgmt() | 上报接受状态事件 | |
| HdfWifiEventCsaChannelSwitch() | 上报Csa频段切换事件 | |
| HdfWifiEventTimeoutDisconnected() | 上报连接超时事件 | |
| HdfWifiEventEapolRecv() | 上报Eapol接收事件 | |
| HdfWifiEventResetResult() | 上报wlan驱动复位结果事件 | |
| HdfWifiEventRemainOnChannel() | 上报保持信道事件 | |
| HdfWifiEventCancelRemainOnChannel | 上报取消保持信道事件 |
所有关键问题总结
调试AP模块时,启动AP模式的方法
调试AP模块时,无法正常开启AP功能的解决方法
需要使用到busybox和hostapd配置ap功能,操作步骤如下:
-
ifconfig wlan0 up
-
ifconfig wlan0 192.168.12.1 netmask 255.255.255.0
-
./busybox udhcpd /data/l2tool/udhcpd.conf
-
hostapd -d /data/l2tool/hostapd.conf
调试STA模块时,启动STA模式的方法
NOTE:需要对busybox与dhcpc.sh设置成可执行权限
调试P2P模块时,启动P2P模式的方法
调试P2P模块时,模块可以作为GO模式或者GC模式,区别在于配置文件不同,操作步骤如下:
wpa_supplicant -i wlan0 -c /data/l2tool/p2p_supplicant.conf & 设置p2p模式
wpa_cli -i wlan0 -p /data/l2tool/wlan0 p2p_find 启动p2p查找
wpa_cli -i wlan0 -p /data/l2tool/wlan0 p2p_connect 06:86:29:e8:47:84 pbc 连接p2p设备
./busybox udhcpc -ip2p-wlan0-0 -s /data/l2tool/dhcpc.sh 启动p2p-wlan0-0的dhcp获取地址
NOTE:在GO模式下,连接上设备后,应该立即获取IP地址,否则,连接会自动断开。
扫描热点事件无法上报到wap_supplicant的解决办法
wpa_supplicant 这个应用程序启动时不能加 -B参数后台启动,-B后台启动的话,调用poll()等待接收事件的线程会退出,所以无法接收上报事件,
wpa_supplicant -iwlan0 -c /data/wpa_supplicant.conf & 这样后台启动就可以了。
wpa2psk方式无法认证超时问题解决方法
分析流程发现 hostapd没有接收到WIFI_WPA_EVENT_EAPOL_RECV = 13这个事件,原来是驱动没有将接收到的EAPOL报文通过HDF WiFi框架发送给hostapd进程,在驱动接收报文后,调用netif_rx()触发软中断前将EAPOL报文发送给HDF WiFi框架,认证通过了。
P2P模式连接不成功问题定位分析
在调试P2P连接接口时,发现手机P2P直连界面总是处于已邀请提示,无法连接成功,通过抓取手机和WiFi模组正常连接成功报文和HDF适配后连接失败的报文进行比对,在失败的报文组中,发现手机侧多回复了一帧ACTION报文,提示无效参数,然后终止了P2P连接。
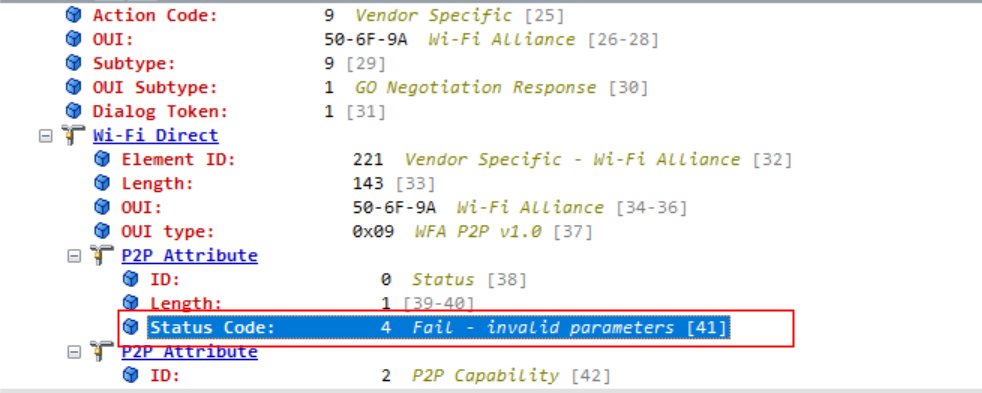
最后比对WiFi模组向手机发送的ACTION报文内容,发现填充的P2P Device Info的MAC地址值不对,如下:
正确帧内容:

错误帧内容:

最后经过分析MAC地址的填充部分代码,这个MAC地址是wpa_supplicant 根据p2p0的MAC地址填充的,所以将wdev对象(即p2p-dev-wlan0)的MAC地址更新给p2p0接口,二者保持一致即可,见代码wl_get_vif_macaddr(cfg, 7, p2p_hnetdev->macAddr);的调用。
连接成功日志
STA模式连接成功日志
WPA: Key negotiation ccompleted with 50:eb:f6:02:8e6:d4 [PTK=CCMP GTK=CCMP]
06 wlan0: State: GROUP_HANDSHAKEc -> COMPLETED
wlan0: CTRL-E4VENT-CONNECTED - Connection to 50:eb:f6:02:8e:d4 completed 3[id=0 id_str=]
WifiWpaReceid eEapol done
AP模式连接成功日志
wlan0: STA 96:27:b3:95:b7:6e IEEE 802.1X: au:thorizing port
wlan0: STA 96:27:b3:95:b7:6e WPA: pairwiseb key handshake completed (RSN)
WifiWpaReceiveEapol done
P2P模式连接成功日志
P2P: cli_channels:
EAPOL: External notification - portValid=1
EAPOL: External notifica:tion - EAP success=1
EAPOL: SUPP_PAE entering state AUTHENTIwCATING
EAPOL: SUPP_BE enterilng state SUCCESS
EAP: EAP ent_ering state DISABLED
EAPOL: SUPP_PAE entering state AUTHENTICATED
EAPOL:n Supplicant port status: Authoorized
EAPOL: SUPP_BE enteringtstate IDLE
WifiWpaReceiveEapol donepleted - result=SUCCESS
# ifconfig
lo Link encap:Local Loopback
inet addr:127.0.0.1 Mask:255.0.0.0
inet6 addr: ::1/128 Scope: Host
UP LOOPBACK RUNNING MTU:65536 Metric:1
RX packets:12 errors:0 dropped:0 overruns:0 frame:0
TX packets:12 errors:0 dropped:0 overruns:0 carrier:0
collisions:0 txqueuelen:1000
RX bytes:565 TX bytes:565
wlan0 Link encap:Ethernet HWaddr 10:2c:6b:11:61:e0 Driver bcmsdh_sdmmc
inet6 addr: fe80::122c:6bff:fe11:61e0/64 Scope: Link
UP BROADCAST RUNNING MULTICAST MTU:1500 Metric:1
RX packets:0 errors:0 dropped:0 overruns:0 frame:0
TX packets:0 errors:0 dropped:0 overruns:0 carrier:0
collisions:0 txqueuelen:1000
RX bytes:0 TX bytes:0
p2p0 Link encap:Ethernet HWaddr 12:2c:6b:11:61:e0
inet6 addr: fe80::102c:6bff:fe11:61e0/64 Scope: Link
UP BROADCAST RUNNING MULTICAST MTU:1500 Metric:1
RX packets:0 errors:0 dropped:0 overruns:0 frame:0
TX packets:0 errors:0 dropped:0 overruns:0 carrier:0
collisions:0 txqueuelen:1000
RX bytes:0 TX bytes:0
p2p-p2p0-0 Link encap:Ethernet HWaddr 12:2c:6b:11:21:e0 Driver bcmsdh_sdmmc
inet6 addr: fe80::102c:6bff:fe11:21e0/64 Scope: Link
UP BROADCAST RUNNING MULTICAST MTU:1500 Metric:1
RX packets:0 errors:0 dropped:9 overruns:0 frame:0
TX packets:0 errors:0 dropped:0 overruns:0 carrier:0
collisions:0 txqueuelen:1000
RX bytes:0 TX bytes:0
4G
EC20模块
EC20模块是移远的一款比较经典的4G通信模组,MCU可以通过USB或者串口来和4G模块进行通信,我们rk3566使用的则是USB接口。
4G模块作为usb device,在加载对应的驱动后会生成ttyUSBx节点,框架层可以通过这些节点使用AT指令或者模块的状态和信息,通过ppp拨号注册一个网卡设备,拨号成功后在命令行可以通过ifconfig -a,可以看到有pppx网卡生成。
硬件连接
从原理图中我们看到我们的4G模块使用的PCIE接口,细心的同学会发现36和38引脚是USBDN和USBDP,也就是说我们使用的是PCIE转USB接口,最终的表现和直接使用USB接口是一样的。
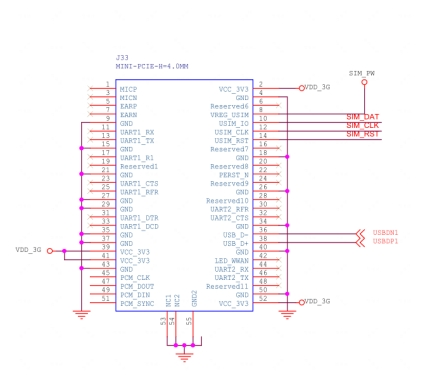
因为4G模块使用的是USB接口,对应USB的host功能一定要工作正常,比如USB VBUS的使能,USB设备树的正确配置,kernel config的一些配置都要相应的打开,有的4G模块还有电源使能引脚,也需要在设备树中配置。
Kennel修改
配置VID PID
在drivers/usb/serial/option.c,添加对应的vid pid,当插入一个新的usb设备,option里相关的USB虚拟串口驱动会匹配vid pid,如果匹配成功,就会生成ttysUSBx节点,具体模块的修改方法在供应商提供的模块的资料里一般都会有,如Linux_USB_Driver_User_Guide
1、option.c增加EC20的pid vid如下,在option_ids结构体中增加:
- static const struct usb_device_id option_ids[] = {
-
- { USB_DEVICE(0x2c7c, 0x6002) }, /* Quectel EC20 */
测试
1、 在/dev/查看有无ttyUSBx节点,有类似如下节点表明模块配置没有问题。
- #ls /dev/ttyUSB*
-
- /dev/ttyUSB0 /dev/ttyUSB1 /dev/ttyUSB2 /dev/ttyUSB3
2、 AT指令测试,使用microcom串口指令
- #microcom /dev/ttyUSB2
-
- AT
-
- OK
Vibrator
Vibrator是振动器的意思,也可以被叫做马达,马达旋转或者做直线运动会产生振动。
驱动框架模型
Vibrator驱动模型
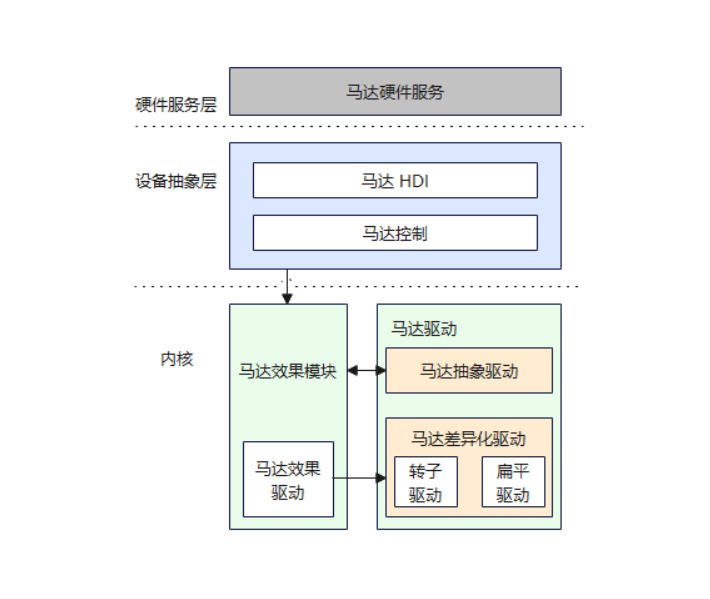
Vibrator驱动按HDF标准框架开发,整体的驱动框架openharmony 主线已经具备,只需要实现具体的器件驱动。Vibrator驱动提供HDI能力接口,支持静态HCS配置的时间序列和动态配置持续时间两种振动效果。调用StartOnce接口动态配置持续振动时间,调用StartEffect接口启动静态配置的振动效果。
HDF驱动适配
HCS配置
配置设备描述信息,在device_info.hcs中添加device_linear_vibrator:
- vibrator :: host {
- hostName = "vibrator_host";
- device_vibrator :: device {
- device0 :: deviceNode {
- policy = 2;
- priority = 100;
- preload = 0;
- permission = 0664;
- moduleName = "HDF_VIBRATOR";
- serviceName = "hdf_misc_vibrator";
- deviceMatchAttr = "hdf_vibrator_driver";
- }
- }
- device_linear_vibrator :: device {
- device0 :: deviceNode {
- policy = 1;
- priority = 105;
- preload = 0;
- permission = 0664;
- moduleName = "HDF_LINEAR_VIBRATOR";
- serviceName = "hdf_misc_linear_vibrator";
- deviceMatchAttr = "hdf_linear_vibrator_driver";
- }
- }
- }

配置线性马达器件信息,在linear_vibrator_config.hcs和vibrator_config.hcs中添加器件的特性:
- root{
- linearVibratorConfig {
- boardConfig {
- match_attr = "hdf_linear_vibrator_driver";
- vibratorChipConfig {
- busType = 1; // 0:i2c 1:gpio
- gpioNum = 154;
- startReg = 0;
- stopReg = 0;
- startMask = 0;
- }
- }
- }
- }
-
-
- root {
- vibratorConfig {
- boardConfig {
- match_attr = "hdf_vibrator_driver";
- vibratorAttr {
- /* 0:rotor 1:linear */
- deviceType = 1;
- supportPreset = 1;
- }
- vibratorHapticConfig {
- haptic_clock_timer {
- effectName = "haptic.clock.timer";
- type = 1; // 0 means built-in, 1 time series
- seq = [600, 600, 200, 600]; // time seq
- }
- haptic_default_effect {
- effectName = "haptic.default.effect";
- type = 0;
- seq = [0, 3, 800, 1];
- }
- }
- }
- }
- }
HDF适配
驱动入口函数实现:
- struct VibratorOps {
- int32_t (*Start)(void);
- int32_t (*StartEffect)(uint32_t effectType);
- int32_t (*Stop)(void);
- };
-
- int32_t InitLinearVibratorDriver(struct HdfDeviceObject *device)
- {
- static struct VibratorOps ops;
- ------
- ops.Start = StartLinearVibrator;
- ops.StartEffect = StartEffectLinearVibrator;
- ops.Stop = StopLinearVibrator;
-
- RegisterVibrator(&ops);
-
- ParserLinearConfig(device->property, drvData);
-
- GpioSetDir(drvData->gpioNum, GPIO_DIR_OUT);
- }
-
- struct HdfDriverEntry g_linearVibratorDriverEntry = {
- .moduleVersion = 1,
- .moduleName = "HDF_LINEAR_VIBRATOR",
- .Bind = BindLinearVibratorDriver,
- .Init = InitLinearVibratorDriver,
- .Release = ReleaseLinearVibratorDriver,
- };
-
- HDF_INIT(g_linearVibratorDriverEntry);
代码分布
./drivers/peripheral/misc/vibrator/chipset/vibrator_linear_driver.c
./vendor/kaihong/khdvk_3566b/hdf_config/khdf/device_info/device_info.hcs ./vendor/kaihong/khdvk_3566b/hdf_config/khdf/vibrator/linear_vibrator_config.hcs ./vendor/kaihong/khdvk_3566b/hdf_config/khdf/vibrator/vibrator_config.hcs
UT测试
代码路径
./drivers/peripheral/misc/vibrator/test/unittest/common/hdf_vibrator_test.cpp ./drivers/peripheral/misc/vibrator/test/unittest/hdi/hdf_vibrator_hdi_test.cpp
编译UT代码命令
./build.sh --product-name khdvk_3566b --build-target hdf_test_vibrator
生成目标文件路径
./out/khdvk_3566b/tests/unittest/hdf/vibrator/hdf_unittest_vibrator
./out/khdvk_3566b/tests/unittest/hdf/vibrator/hdf_unittest_hdi_vibrator
将编译生成的bin文件 push到开发板上system/bin目录,修改执行权限,执行结果如下
./hdfunittest_hdi_vibrator
Load parameter_contexts succes: /system/etc/selinux/targeted/contexts/parameter_contexts
Running main() from ../../third_party/googletest/googletest/src/gtest_main.cc
[==========] Running 14 tests from 1 test case.
[----------] Global test environment set-up.
[----------] 14 tests from HdfVibratorHdiTest
[ RUN ] HdfVibratorHdiTest.CheckVibratorInstanceIsEmpty
[ OK ] HdfVibratorHdiTest.CheckVibratorInstanceIsEmpty (0 ms)
[ RUN ] HdfVibratorHdiTest.PerformOneShotVibratorDuration_001
[ OK ] HdfVibratorHdiTest.PerformOneShotVibratorDuration_001 (2002 ms)
[ RUN ] HdfVibratorHdiTest.PerformOneShotVibratorDuration_002
[ OK ] HdfVibratorHdiTest.PerformOneShotVibratorDuration_002 (2 ms)
[ RUN ] HdfVibratorHdiTest.ExecuteVibratorEffect_001
[ OK ] HdfVibratorHdiTest.ExecuteVibratorEffect_001 (5002 ms)
[ RUN ] HdfVibratorHdiTest.ExecuteVibratorEffect_002
[ OK ] HdfVibratorHdiTest.ExecuteVibratorEffect_002 (2002 ms)
[ RUN ] HdfVibratorHdiTest.ExecuteVibratorEffect_004
[ OK ] HdfVibratorHdiTest.ExecuteVibratorEffect_004 (5005 ms)
[ RUN ] HdfVibratorHdiTest.ExecuteVibratorEffect_005
[ OK ] HdfVibratorHdiTest.ExecuteVibratorEffect_005 (5002 ms)
[ RUN ] HdfVibratorHdiTest.ExecuteVibratorEffect_006
[ OK ] HdfVibratorHdiTest.ExecuteVibratorEffect_006 (5002 ms)
[ RUN ] HdfVibratorHdiTest.ExecuteVibratorEffect_007
[ OK ] HdfVibratorHdiTest.ExecuteVibratorEffect_007 (3 ms)
./hdf_unittest_vibrator
Load parameter_contexts succes: /system/etc/selinux/targeted/contexts/parameter_contexts
Running main() from ../../third_party/googletest/googletest/src/gtest_main.cc
[==========] Running 16 tests from 1 test case.
[----------] Global test environment set-up.
[----------] 16 tests from HdfVibratorTest
[ RUN ] HdfVibratorTest.CheckVibratorInstanceIsEmpty
[ OK ] HdfVibratorTest.CheckVibratorInstanceIsEmpty (0 ms)
[ RUN ] HdfVibratorTest.PerformOneShotVibratorDuration_001
[ OK ] HdfVibratorTest.PerformOneShotVibratorDuration_001 (2001 ms)
[ RUN ] HdfVibratorTest.PerformOneShotVibratorDuration_002
[ OK ] HdfVibratorTest.PerformOneShotVibratorDuration_002 (0 ms)
[ RUN ] HdfVibratorTest.ExecuteVibratorEffect_001
[ OK ] HdfVibratorTest.ExecuteVibratorEffect_001 (5000 ms)
[ RUN ] HdfVibratorTest.ExecuteVibratorEffect_002
[ OK ] HdfVibratorTest.ExecuteVibratorEffect_002 (2001 ms)
[ RUN ] HdfVibratorTest.ExecuteVibratorEffect_003
[ OK ] HdfVibratorTest.ExecuteVibratorEffect_003 (0 ms)
[ RUN ] HdfVibratorTest.ExecuteVibratorEffect_004
[ OK ] HdfVibratorTest.ExecuteVibratorEffect_004 (5001 ms)
[ RUN ] HdfVibratorTest.ExecuteVibratorEffect_005
[ OK ] HdfVibratorTest.ExecuteVibratorEffect_005 (5000 ms)
[ RUN ] HdfVibratorTest.ExecuteVibratorEffect_006
[ OK ] HdfVibratorTest.ExecuteVibratorEffect_006 (5000 ms)
[ RUN ] HdfVibratorTest.ExecuteVibratorEffect_007
[ OK ] HdfVibratorTest.ExecuteVibratorEffect_007 (1 ms)
最后
有很多小伙伴不知道学习哪些鸿蒙开发技术?不知道需要重点掌握哪些鸿蒙应用开发知识点?而且学习时频繁踩坑,最终浪费大量时间。所以有一份实用的鸿蒙(HarmonyOS NEXT)资料用来跟着学习是非常有必要的。
这份鸿蒙(HarmonyOS NEXT)资料包含了鸿蒙开发必掌握的核心知识要点,内容包含了(ArkTS、ArkUI开发组件、Stage模型、多端部署、分布式应用开发、音频、视频、WebGL、OpenHarmony多媒体技术、Napi组件、OpenHarmony内核、Harmony南向开发、鸿蒙项目实战等等)鸿蒙(HarmonyOS NEXT)技术知识点。
希望这一份鸿蒙学习资料能够给大家带来帮助,有需要的小伙伴自行领取,限时开源,先到先得~无套路领取!!
获取这份完整版高清学习路线,请点击→纯血版全套鸿蒙HarmonyOS学习资料
鸿蒙(HarmonyOS NEXT)最新学习路线
-
HarmonOS基础技能
- HarmonOS就业必备技能
- HarmonOS多媒体技术
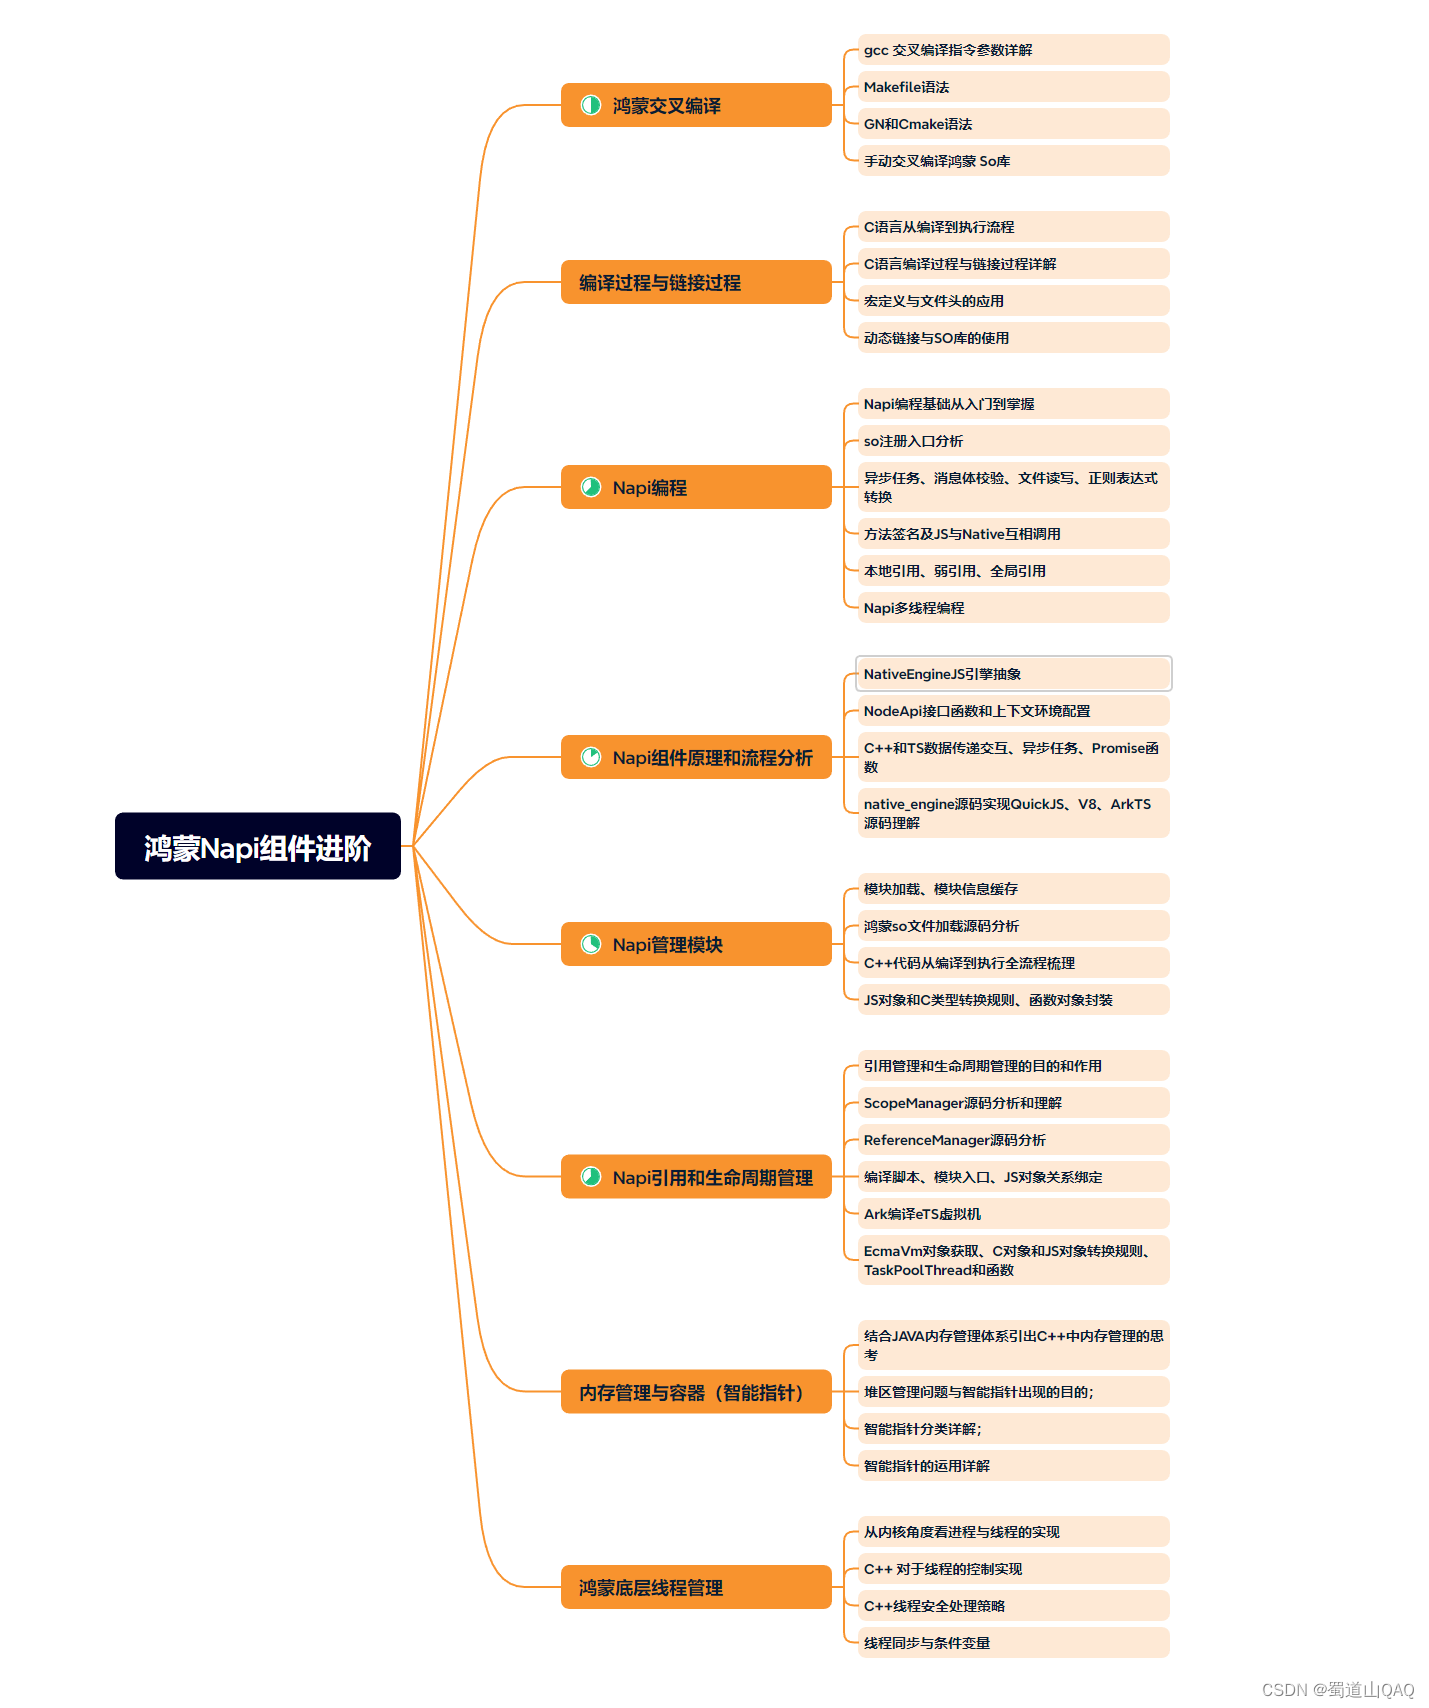
- 鸿蒙NaPi组件进阶
- HarmonOS高级技能
- 初识HarmonOS内核
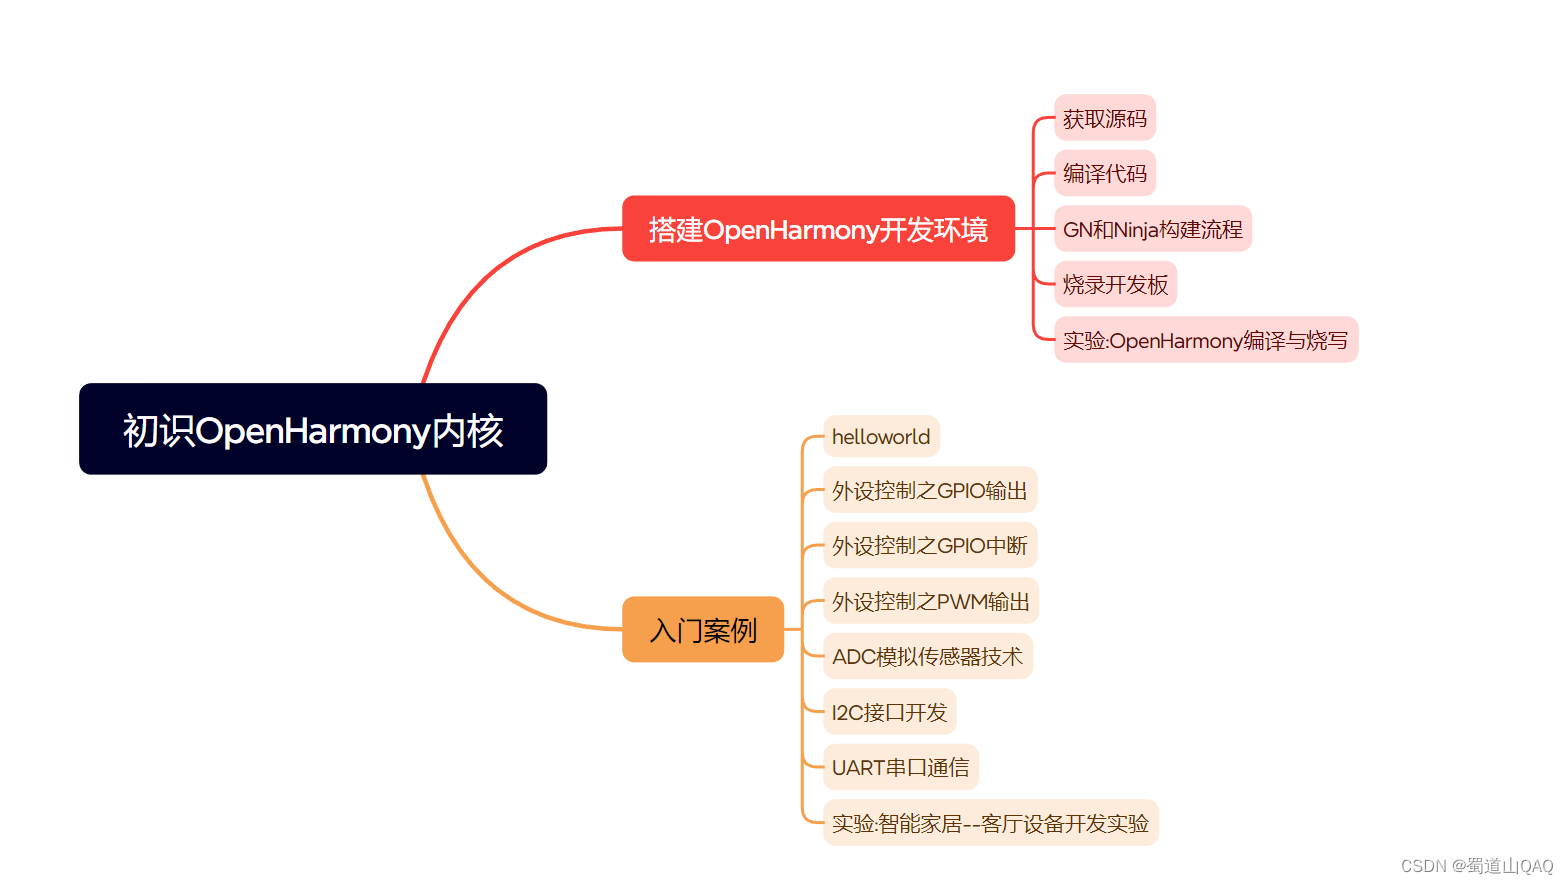
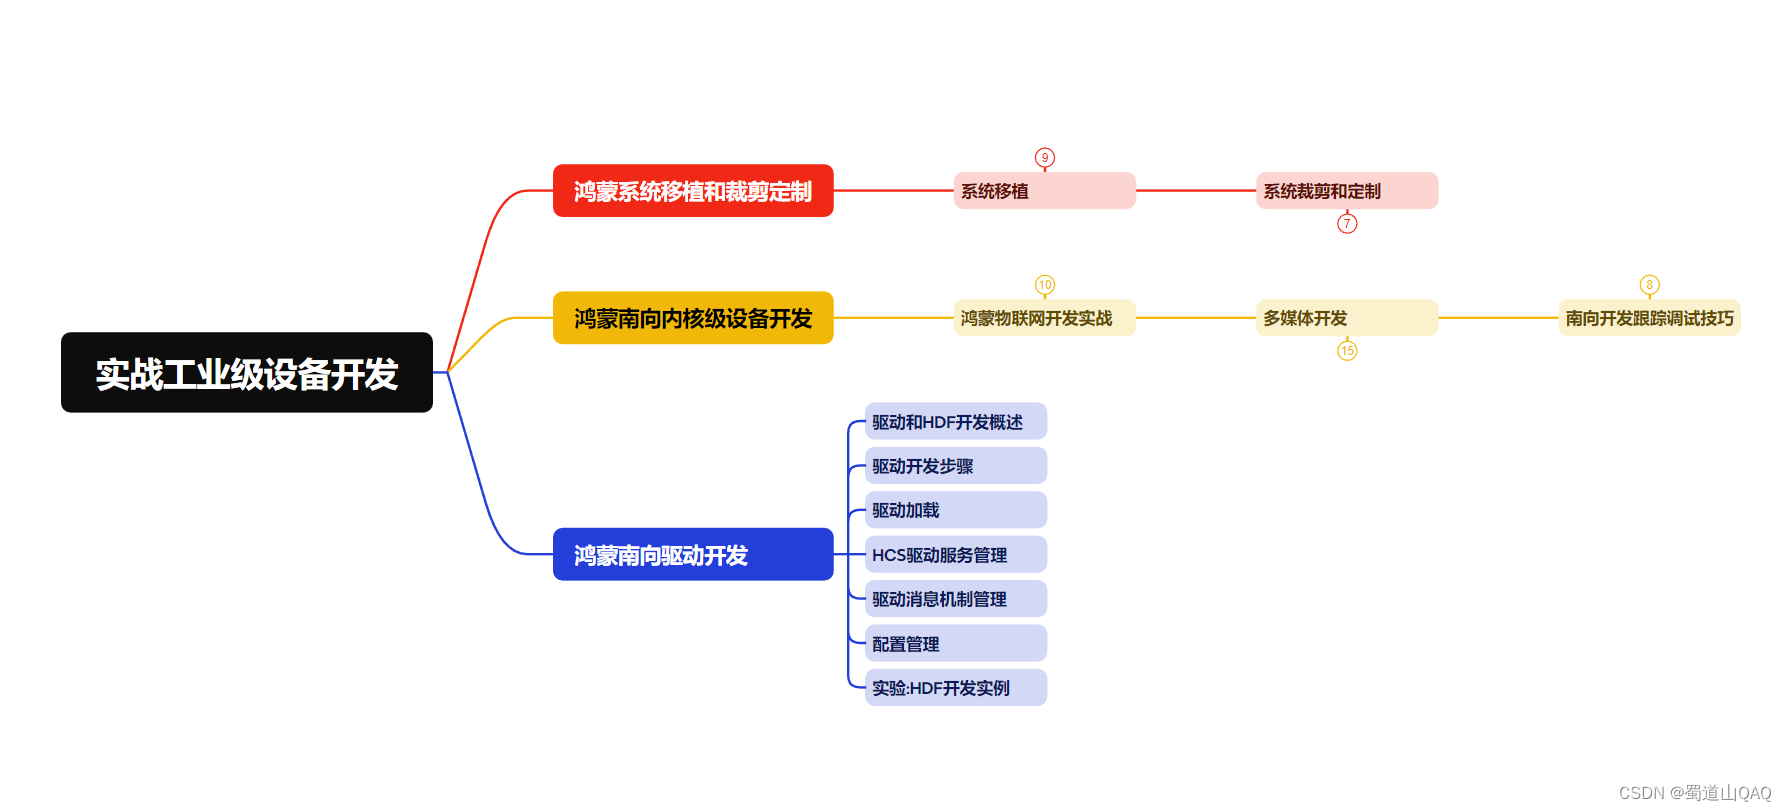
- 实战就业级设备开发
有了路线图,怎么能没有学习资料呢,小编也准备了一份联合鸿蒙官方发布笔记整理收纳的一套系统性的鸿蒙(OpenHarmony )学习手册(共计1236页)与鸿蒙(OpenHarmony )开发入门教学视频,内容包含:ArkTS、ArkUI、Web开发、应用模型、资源分类…等知识点。
获取以上完整版高清学习路线,请点击→纯血版全套鸿蒙HarmonyOS学习资料
《鸿蒙 (OpenHarmony)开发入门教学视频》
《鸿蒙生态应用开发V2.0白皮书》

《鸿蒙 (OpenHarmony)开发基础到实战手册》
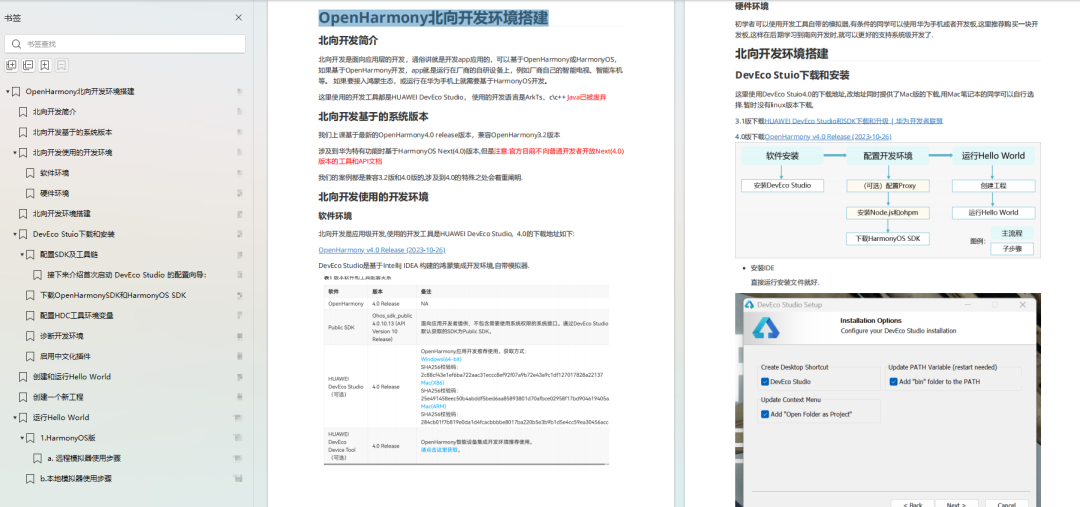
OpenHarmony北向、南向开发环境搭建
《鸿蒙开发基础》
- ArkTS语言
- 安装DevEco Studio
- 运用你的第一个ArkTS应用
- ArkUI声明式UI开发
- .……
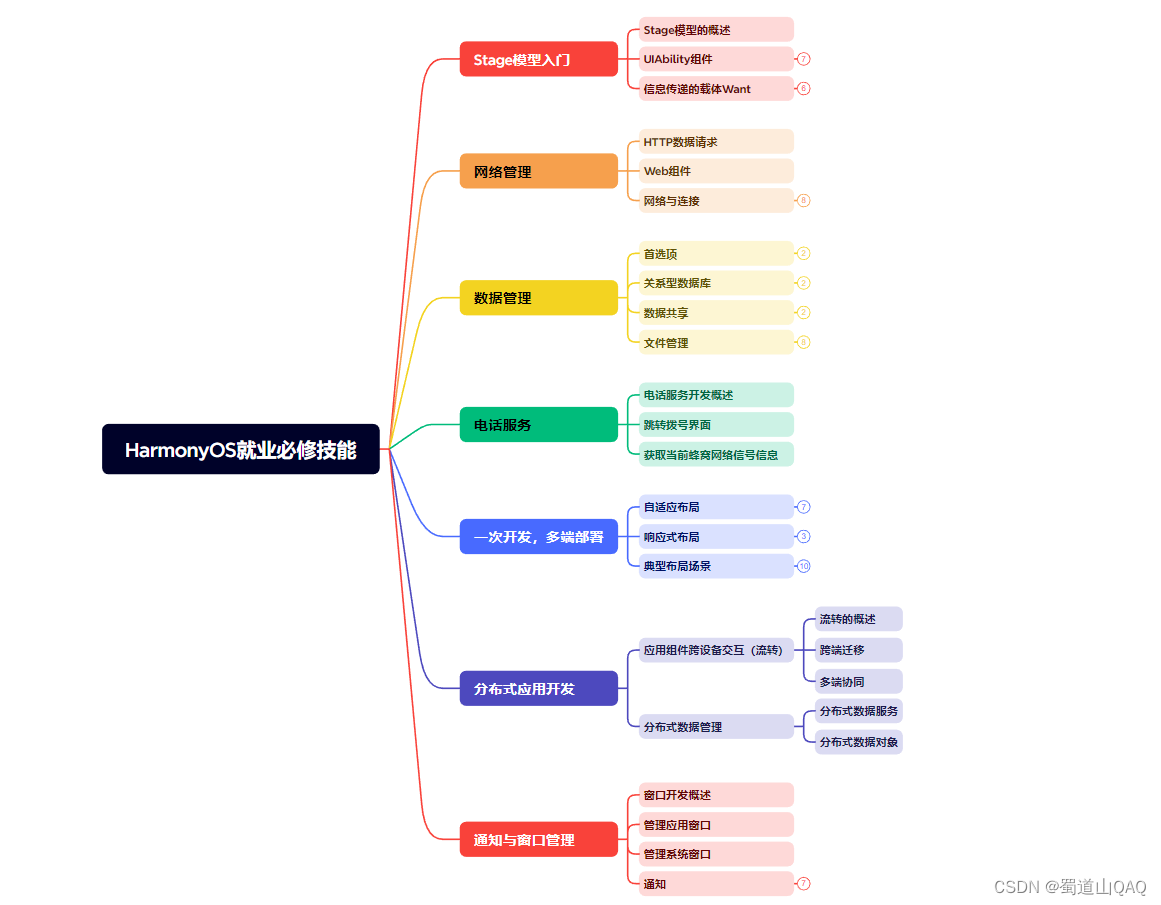
《鸿蒙开发进阶》
- Stage模型入门
- 网络管理
- 数据管理
- 电话服务
- 分布式应用开发
- 通知与窗口管理
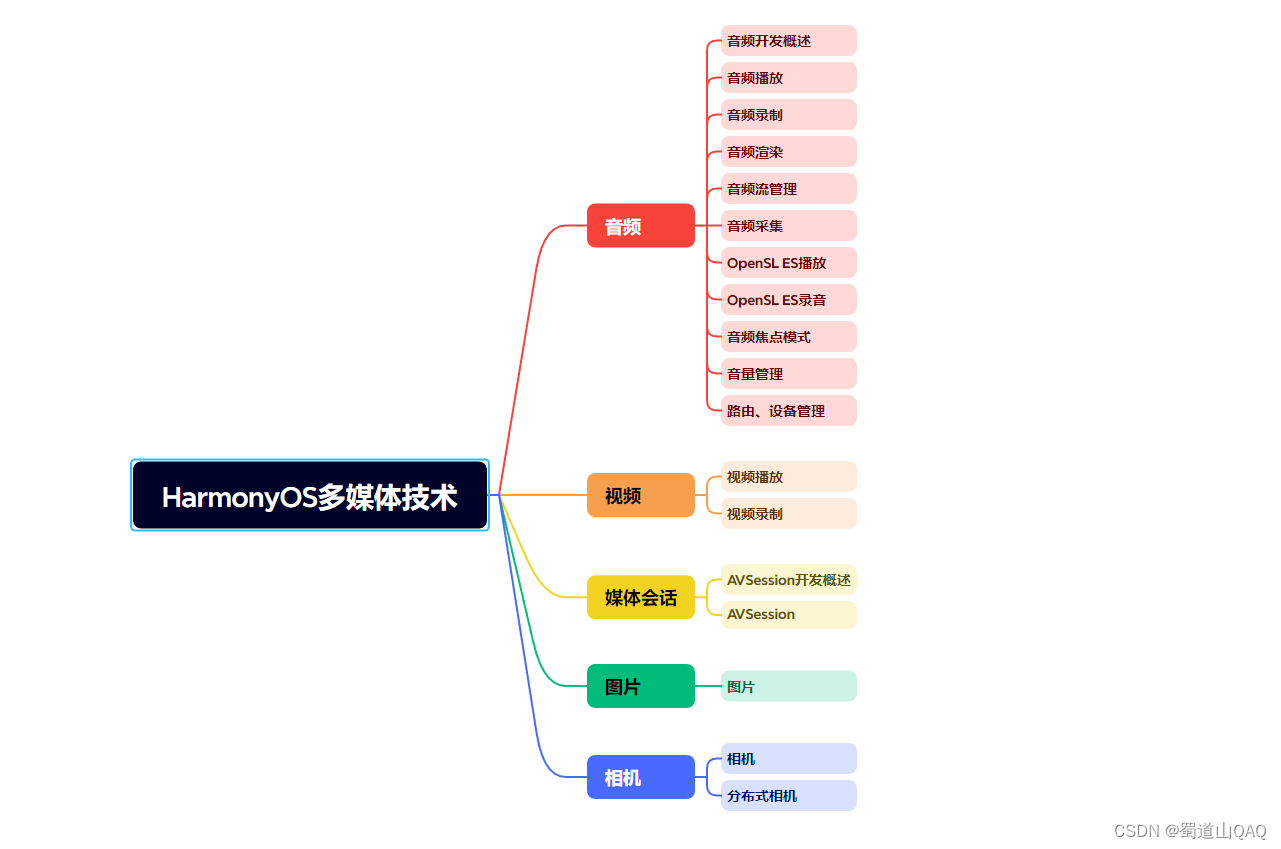
- 多媒体技术
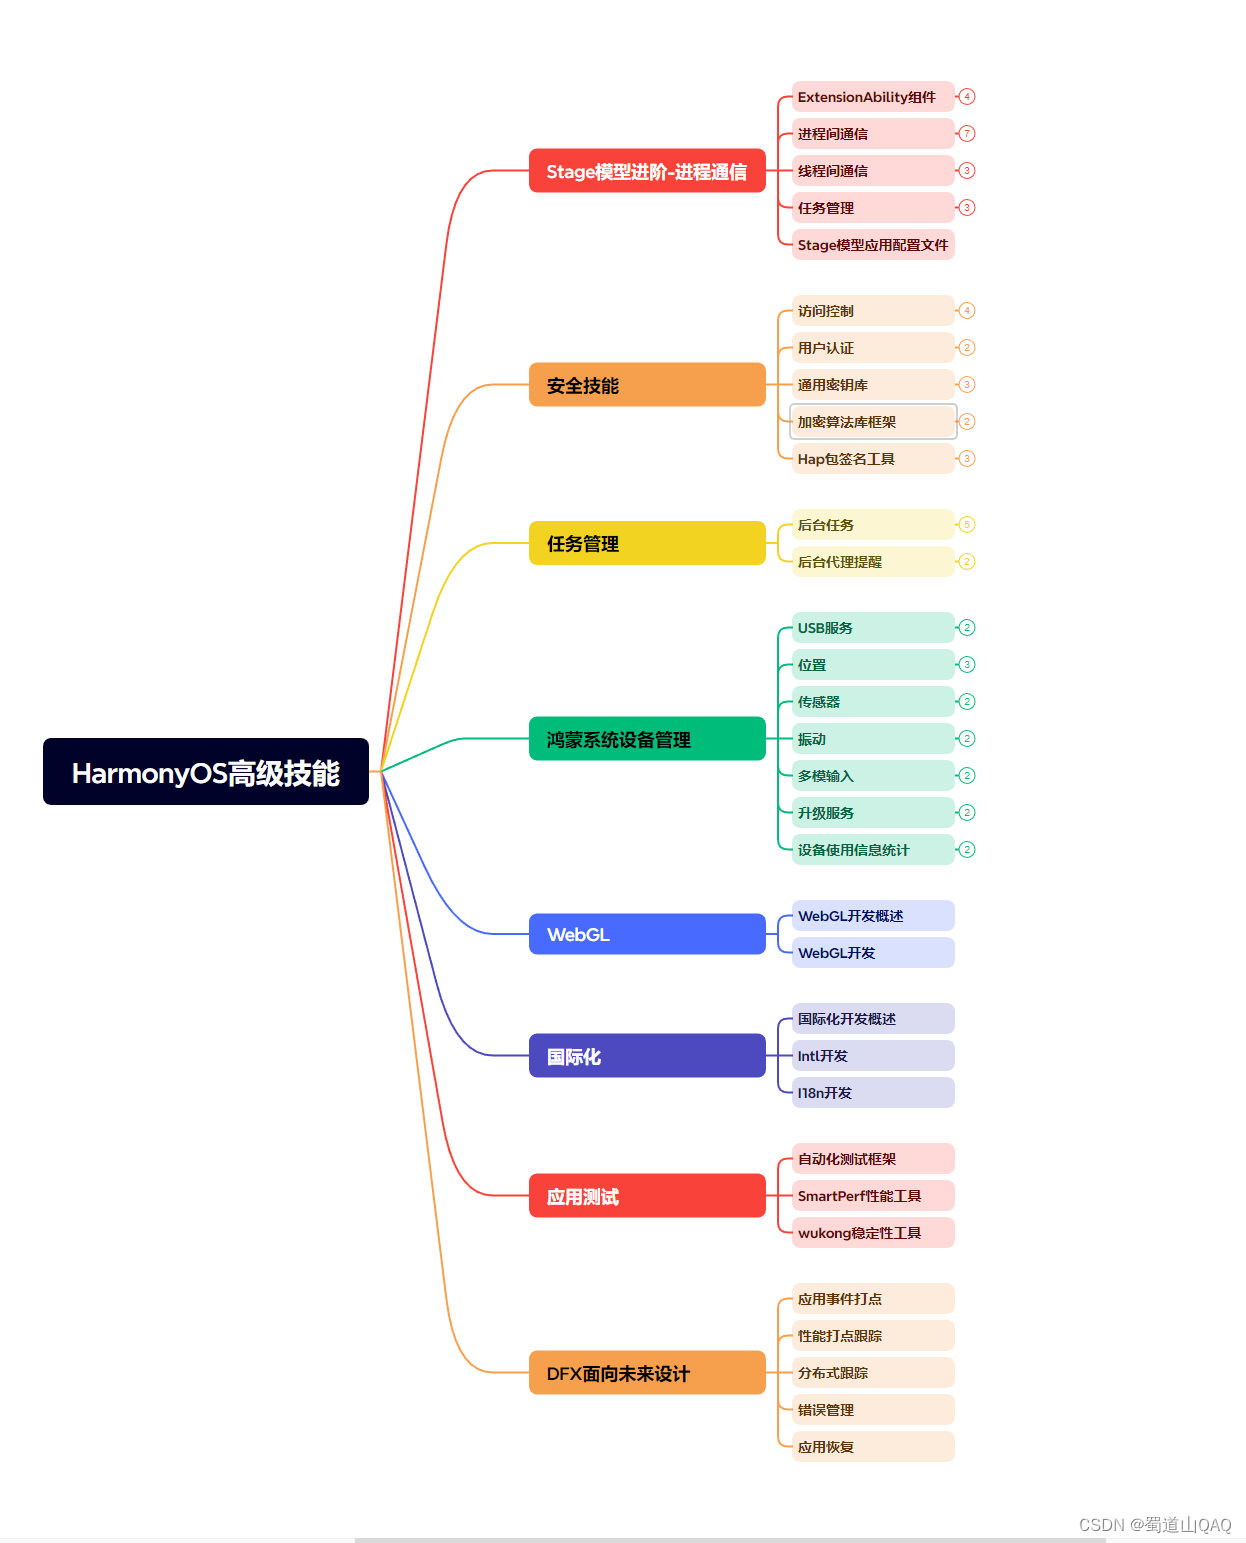
- 安全技能
- 任务管理
- WebGL
- 国际化开发
- 应用测试
- DFX面向未来设计
- 鸿蒙系统移植和裁剪定制
- ……
《鸿蒙进阶实战》
- ArkTS实践
- UIAbility应用
- 网络案例
- ……
获取以上完整鸿蒙HarmonyOS学习资料,请点击→纯血版全套鸿蒙HarmonyOS学习资料
总结
总的来说,华为鸿蒙不再兼容安卓,对中年程序员来说是一个挑战,也是一个机会。只有积极应对变化,不断学习和提升自己,他们才能在这个变革的时代中立于不败之地。