搭建OpenStack云平台_openstack云平台搭建
赞
踩
一、前言
OpenStack云平台搭建需要两个节点,一个是controller(控制节点),另一个是compute(计算节点)。
控制节点(controller)规划如下:
一块200G的硬盘。两块网卡,第一块网卡IP地址使用192.168.100.10,第二块网卡IP地址使用192.168.200.10。
计算节点(compute)规划如下:
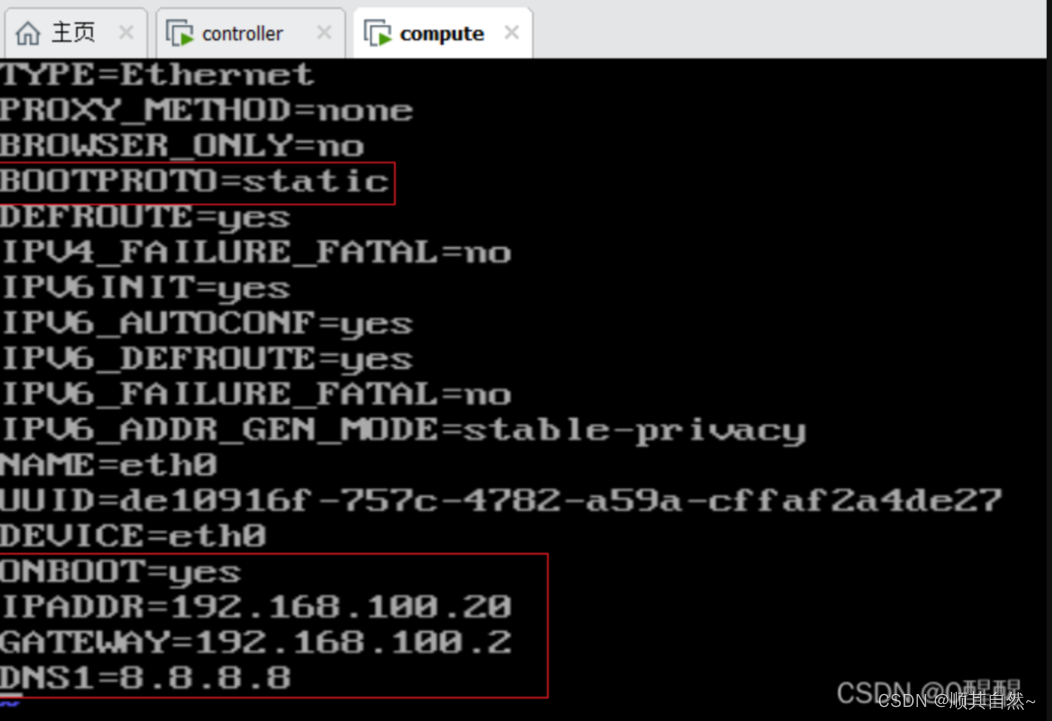
一块200G的硬盘和一块100G的硬盘。两块网卡,第一块网卡IP地址使用192.168.100.20,第二块网卡IP地址使用192.168.200.20。
云平台搭建需要使用centos7.5及7.0版本的镜像和chinaskills_cloud_iaas.iso镜像,镜像提供如下:
centos7.5镜像链接:https://pan.baidu.com/s/1stvdGLKTwVqrAyzTW-WQuA
提取码:yjsq
centos7.0镜像链接:https://pan.baidu.com/s/10zQAxkSqO37_EAX2wVyy9A
提取码:yjsq
iaas镜像链接:https://pan.baidu.com/s/11iAL7pQf31Kyer2UfVe2ZA
提取码:yjsq
二、基础环境准备及安装系统
1、controller控制节点

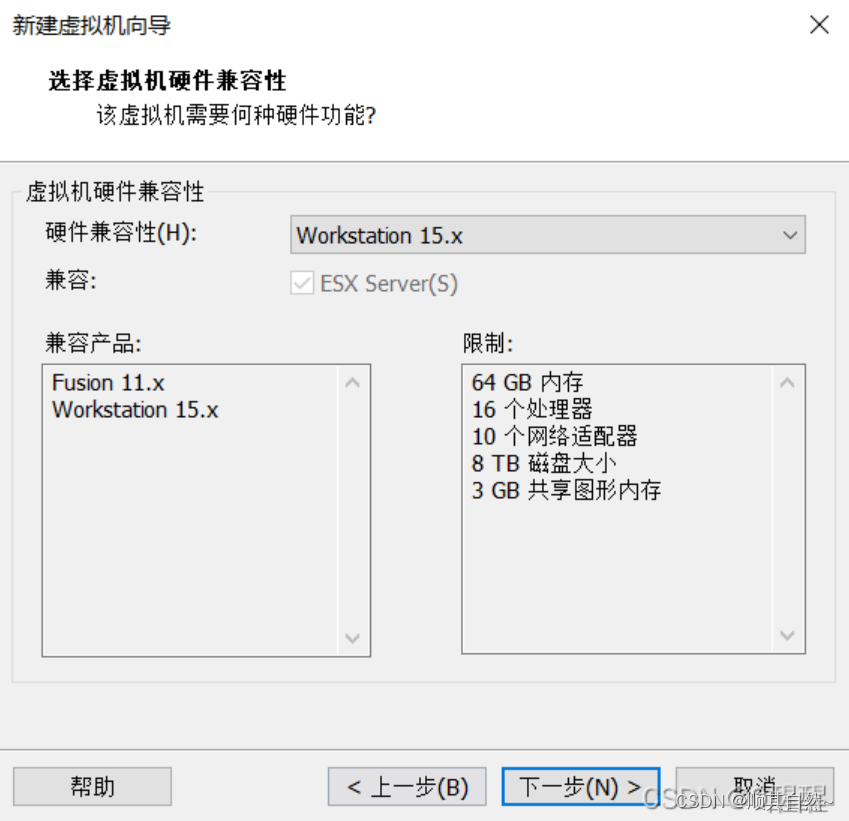
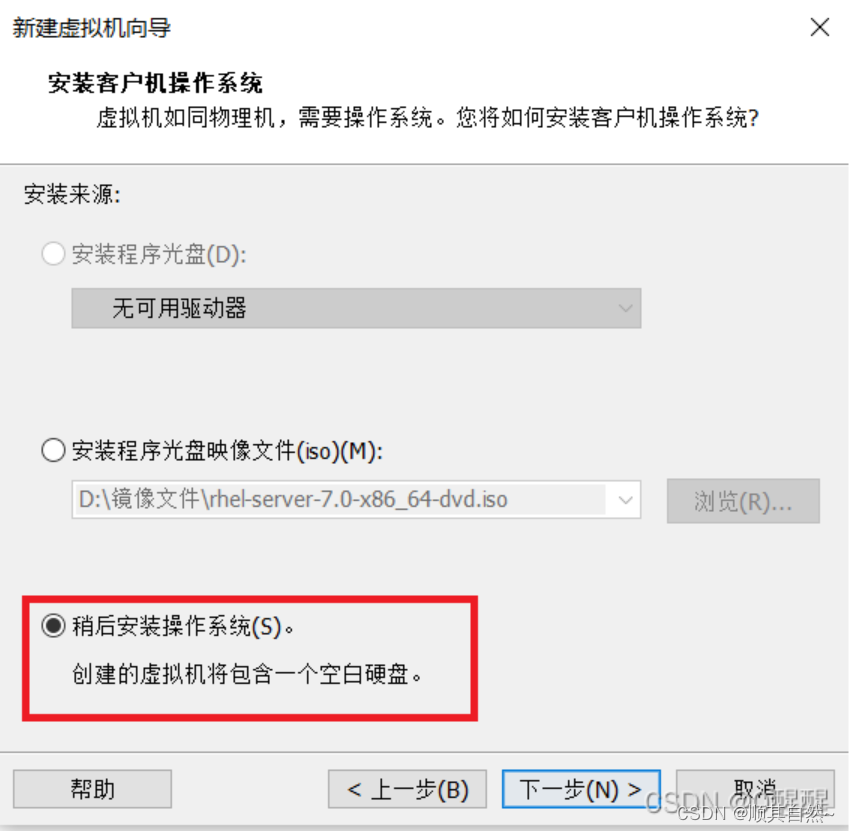
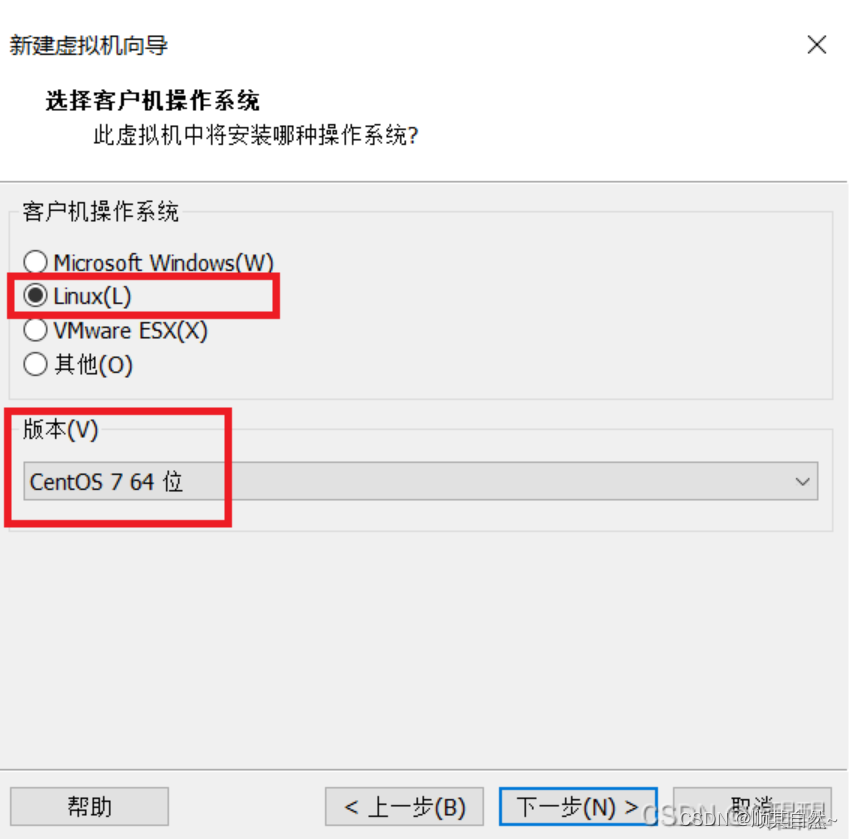
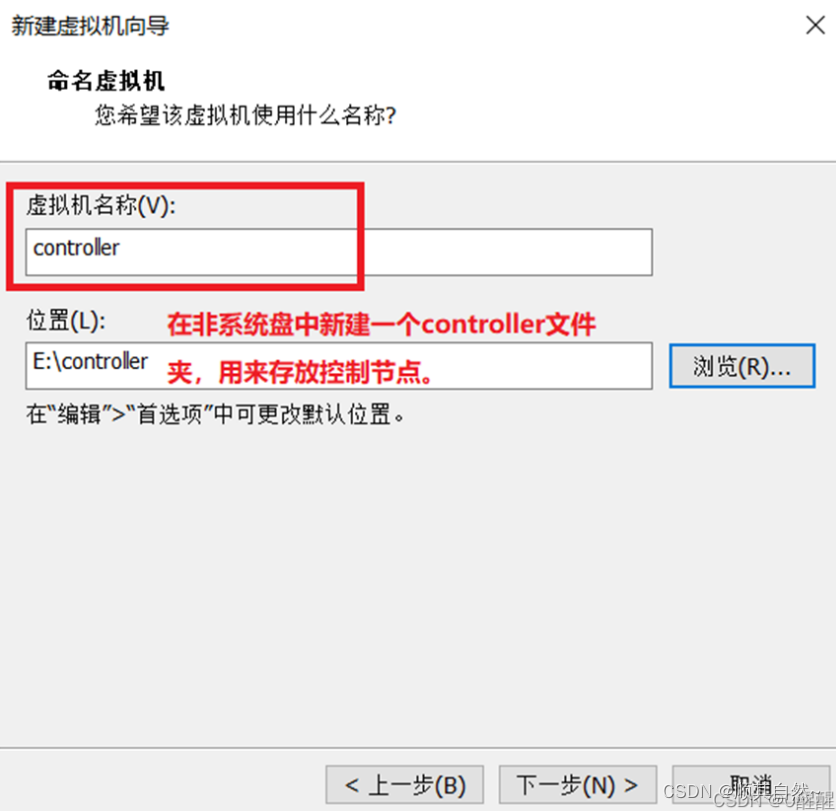
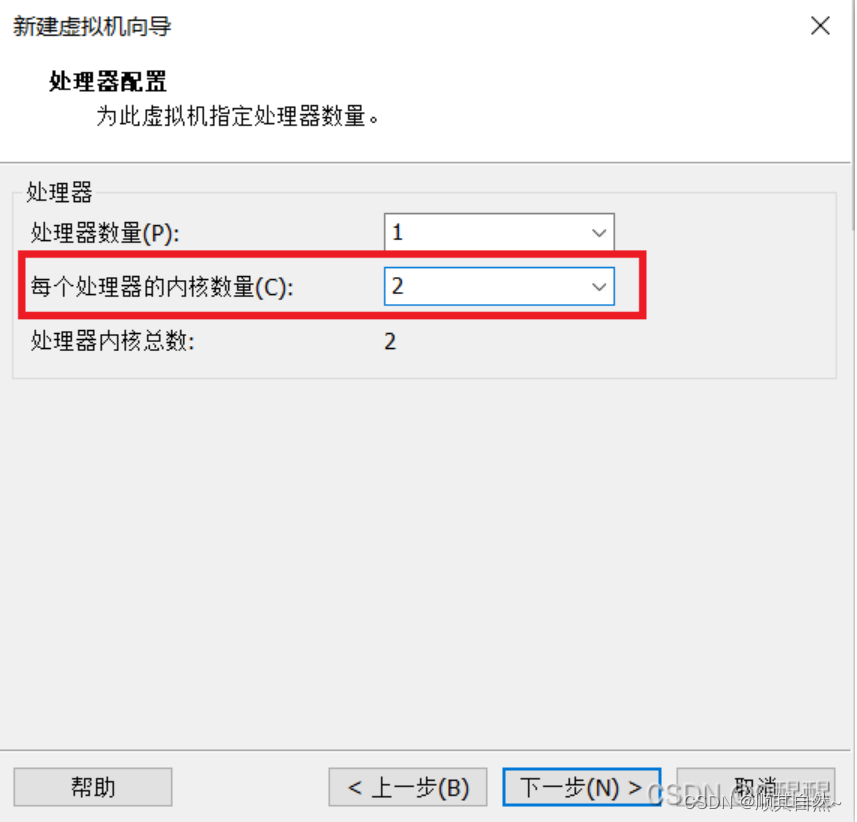
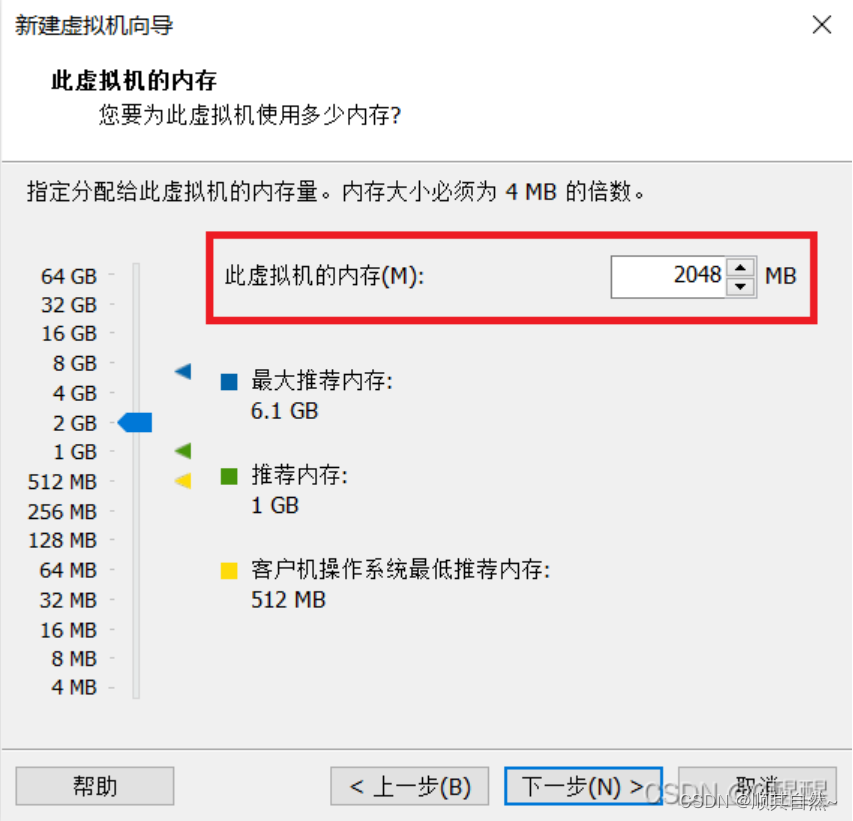
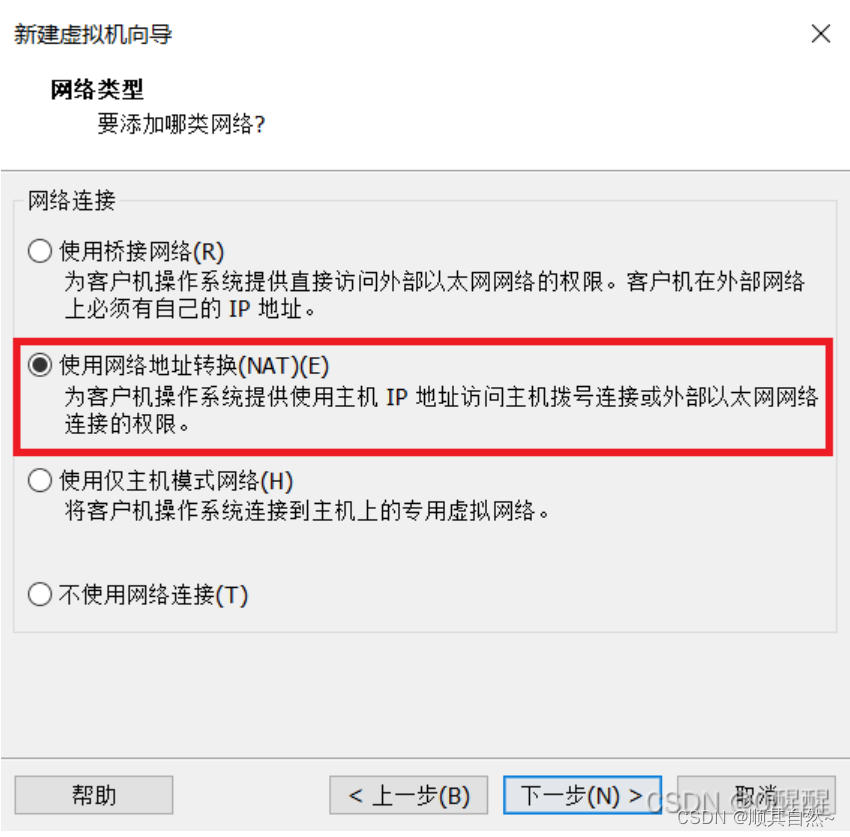
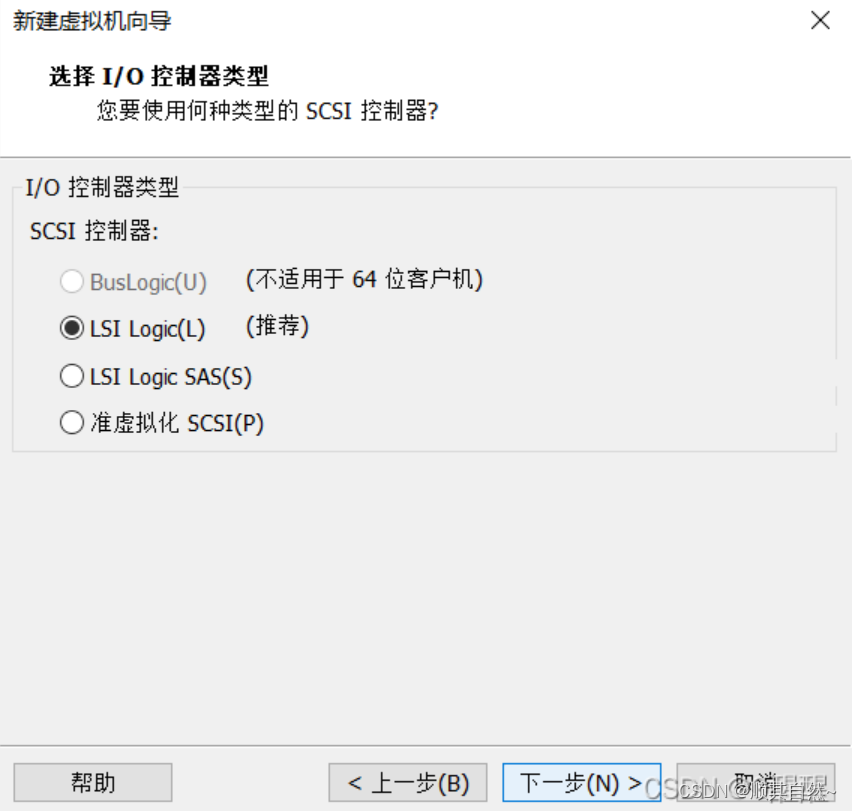
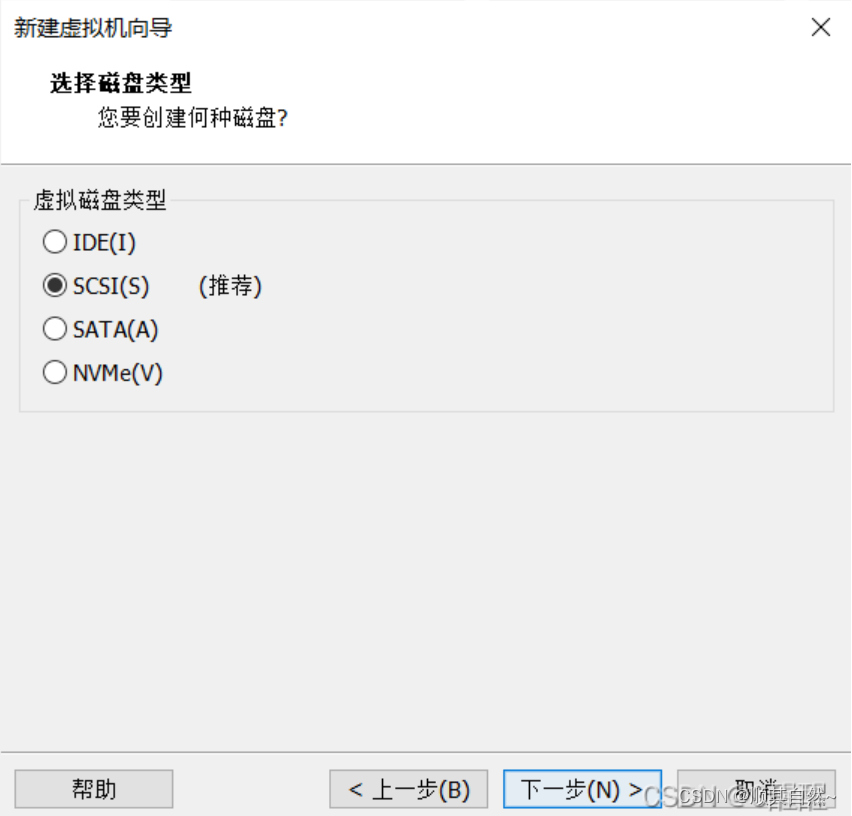
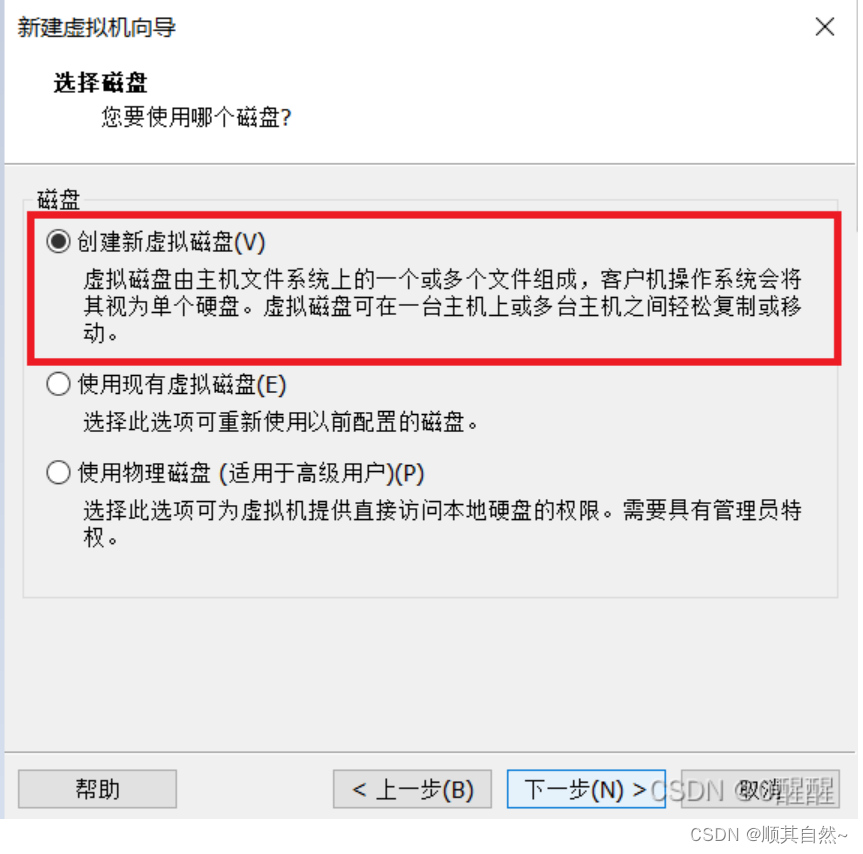
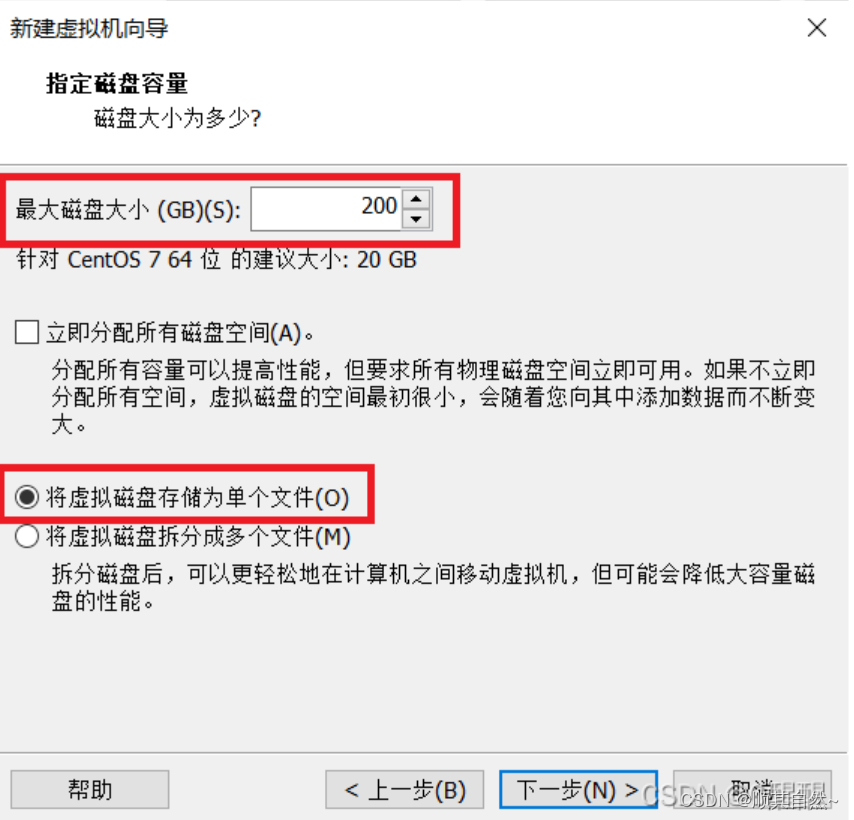
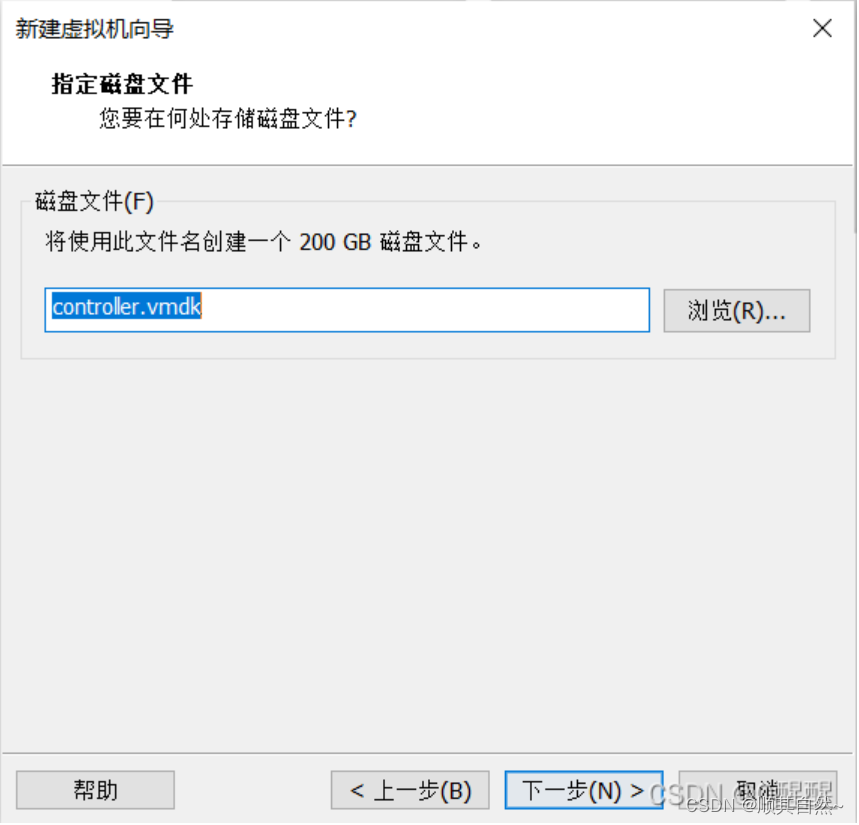
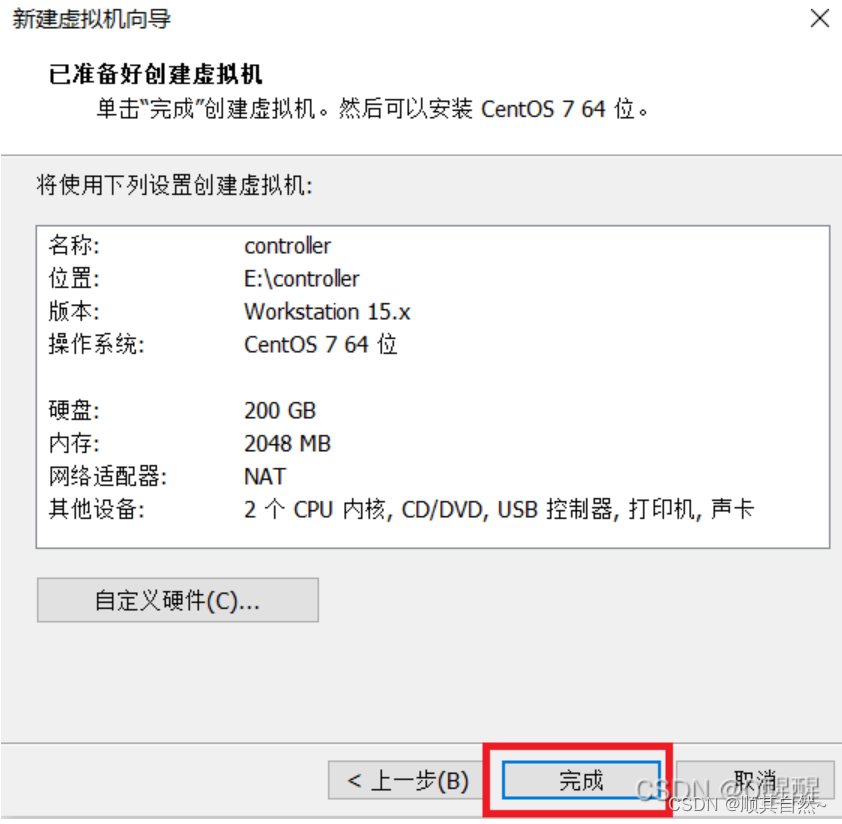
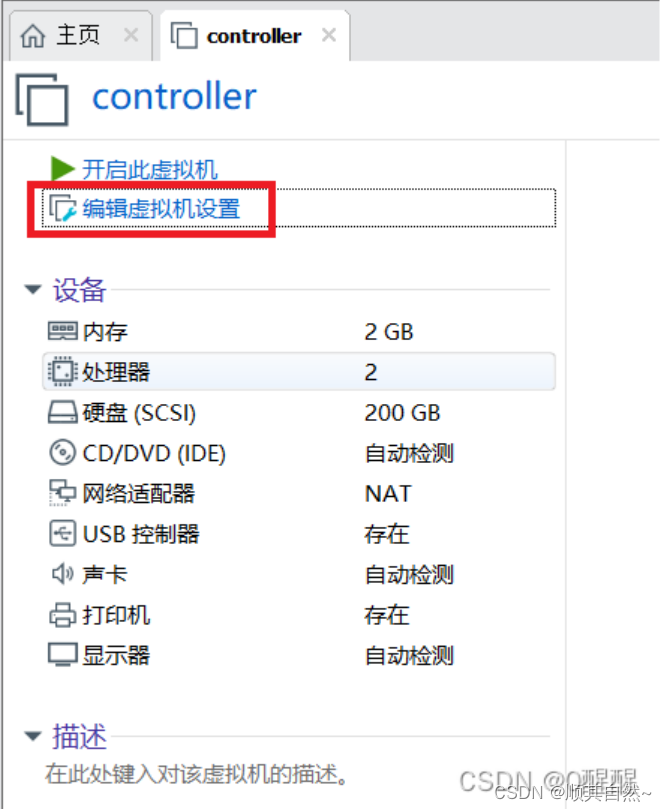

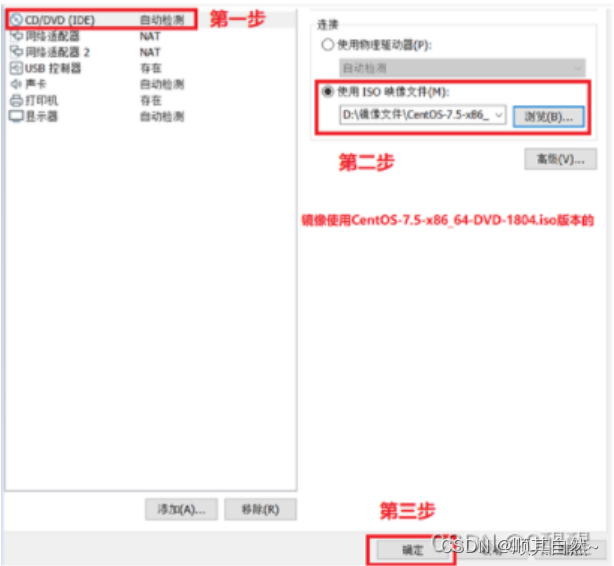
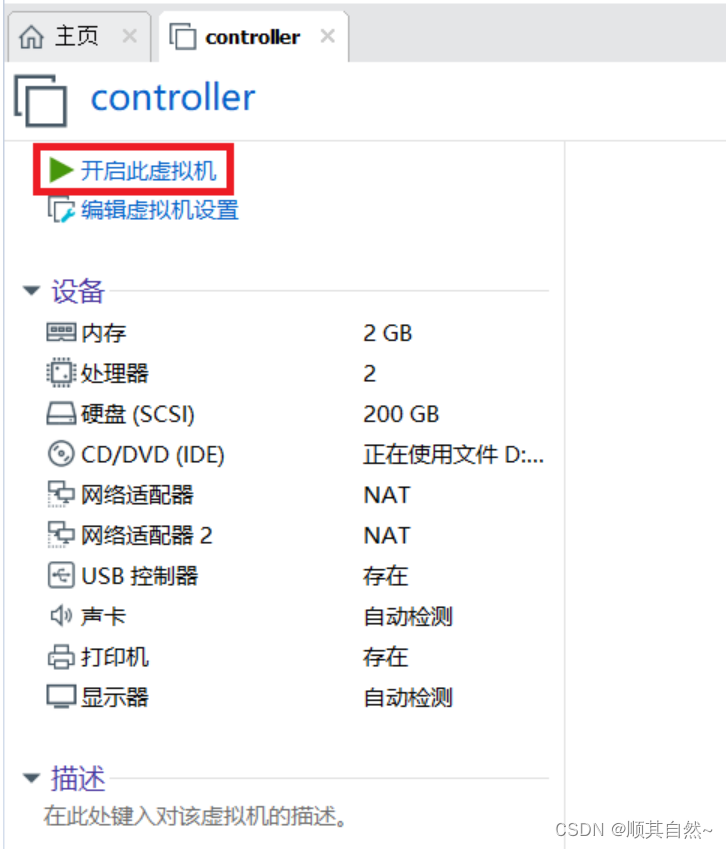
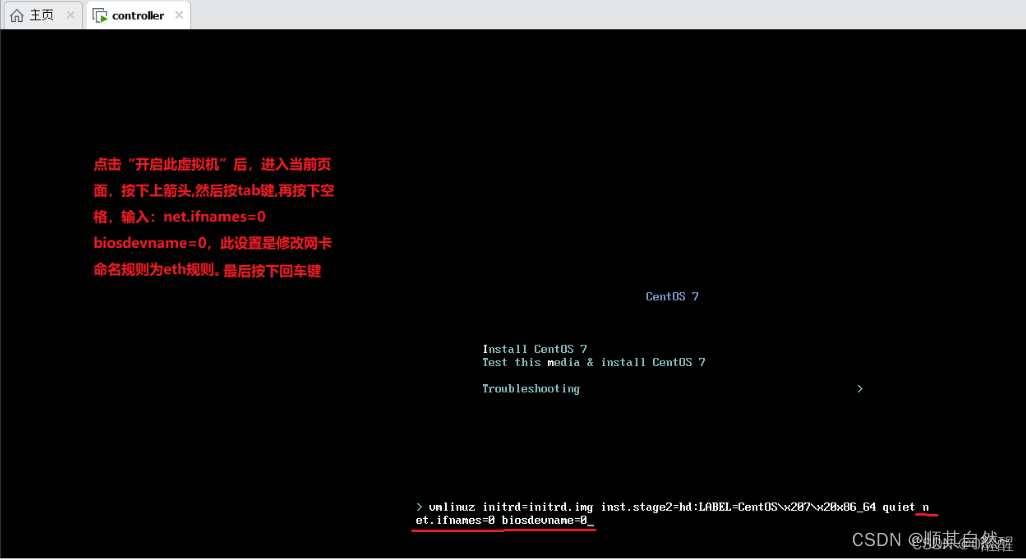
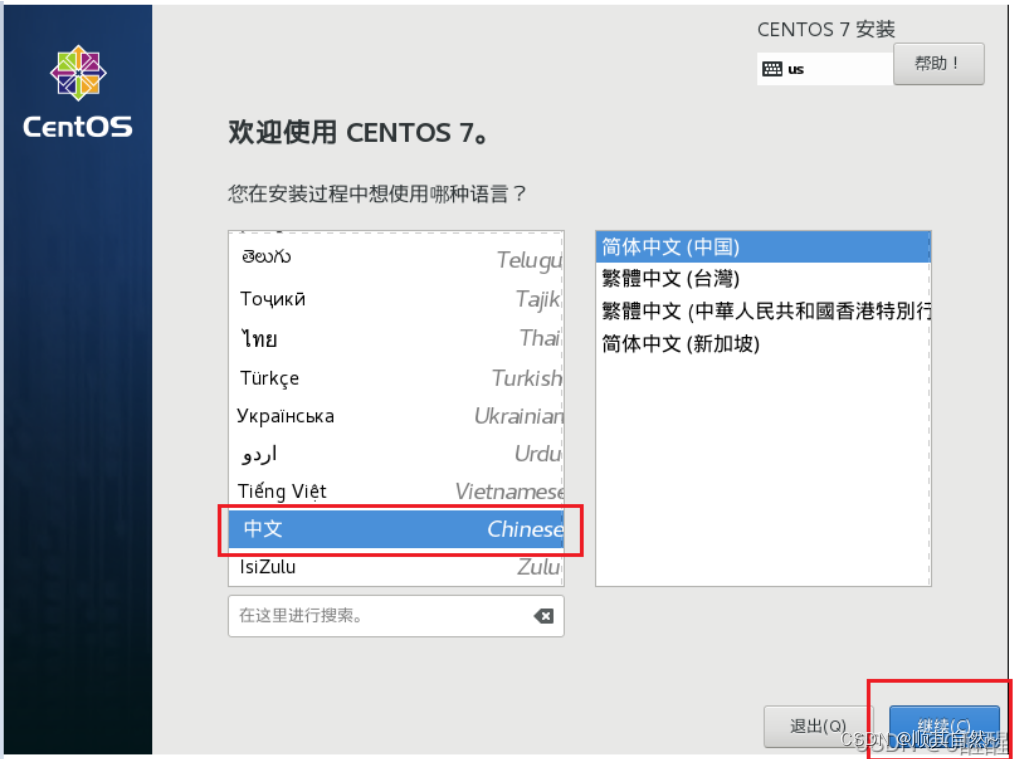

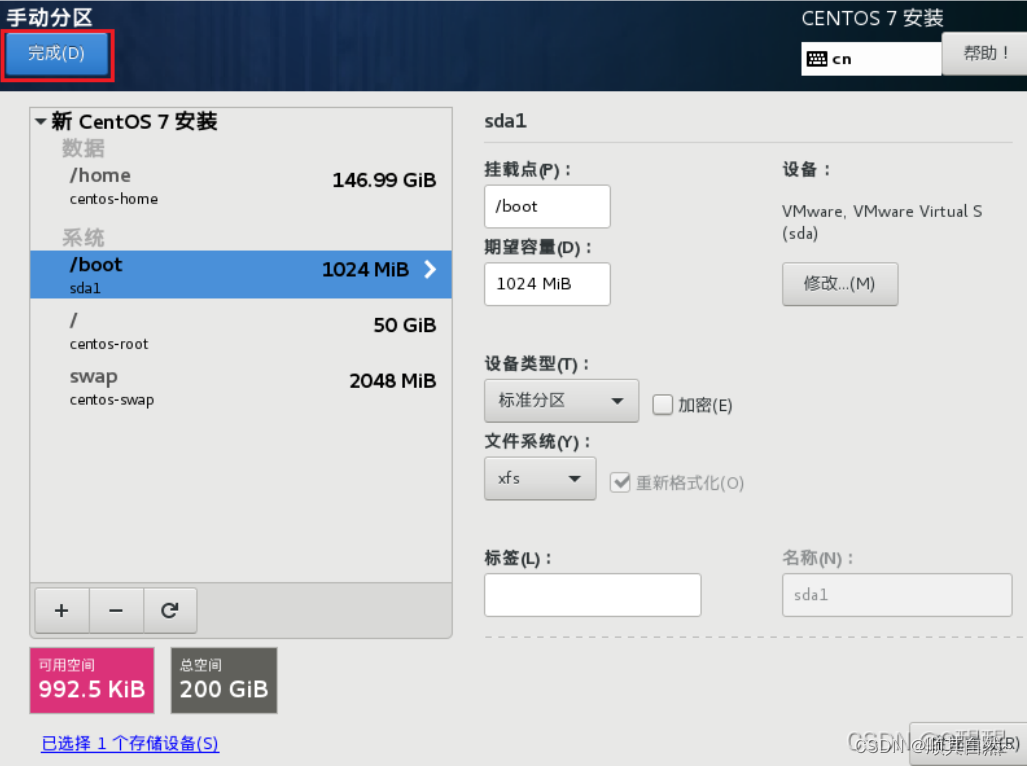
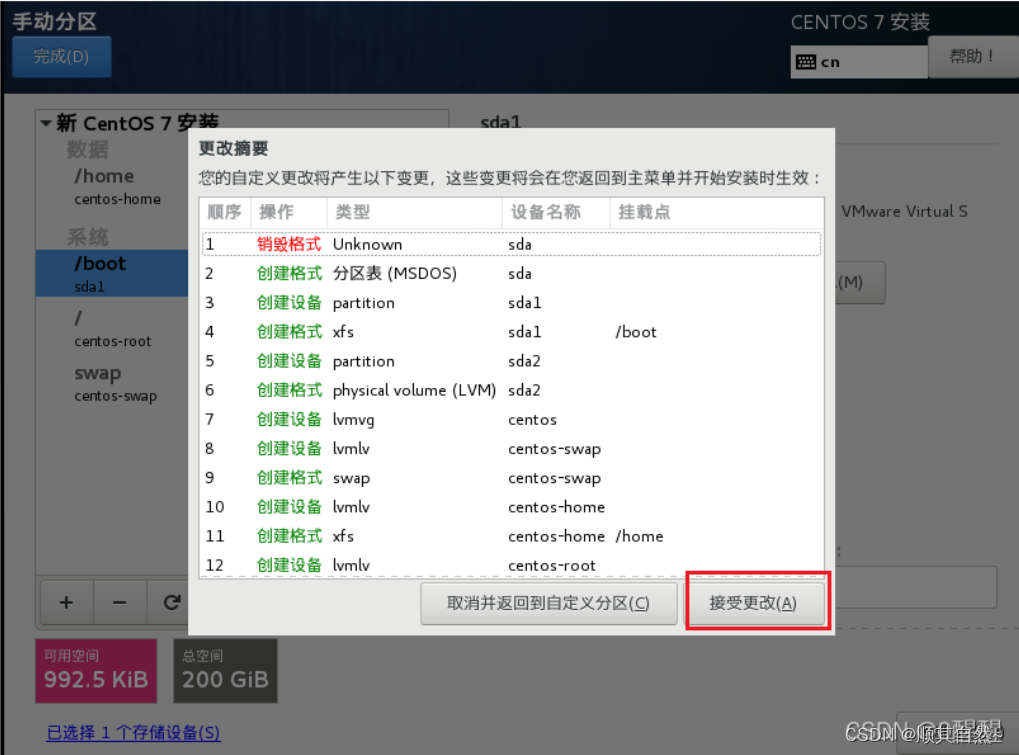
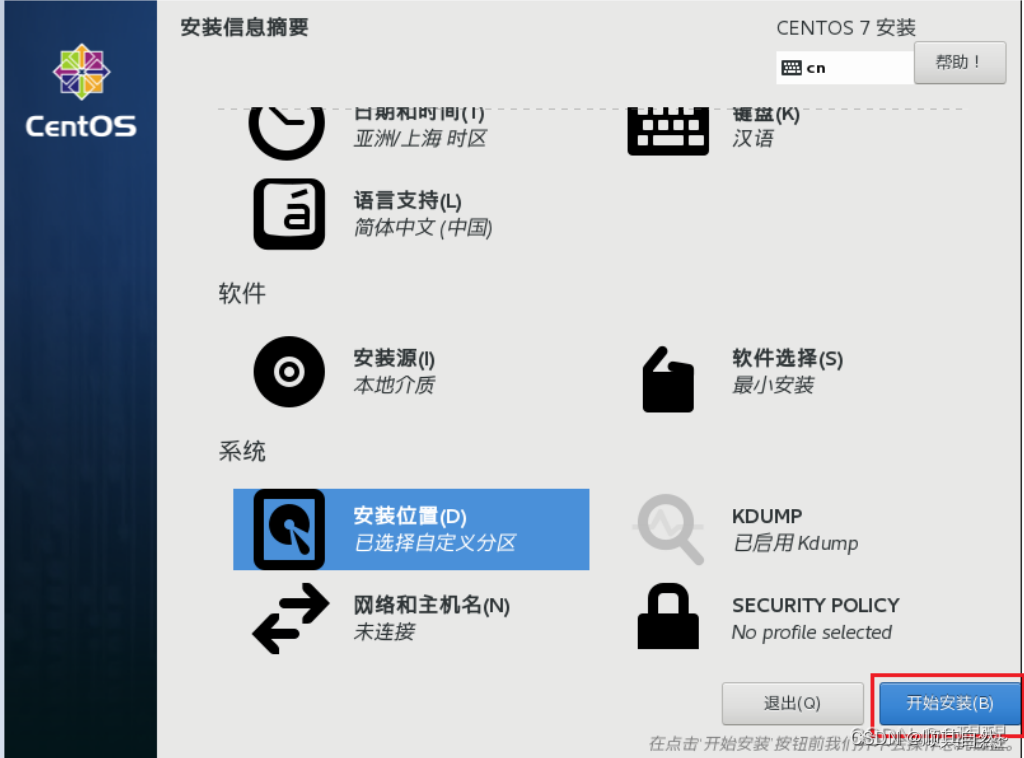
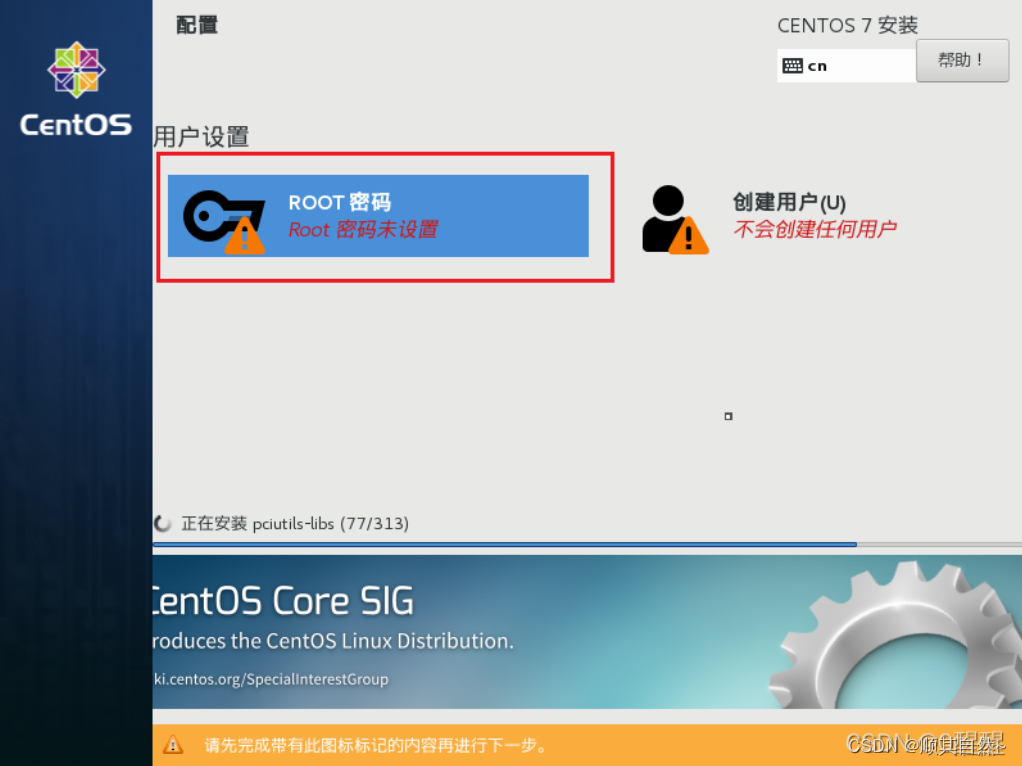
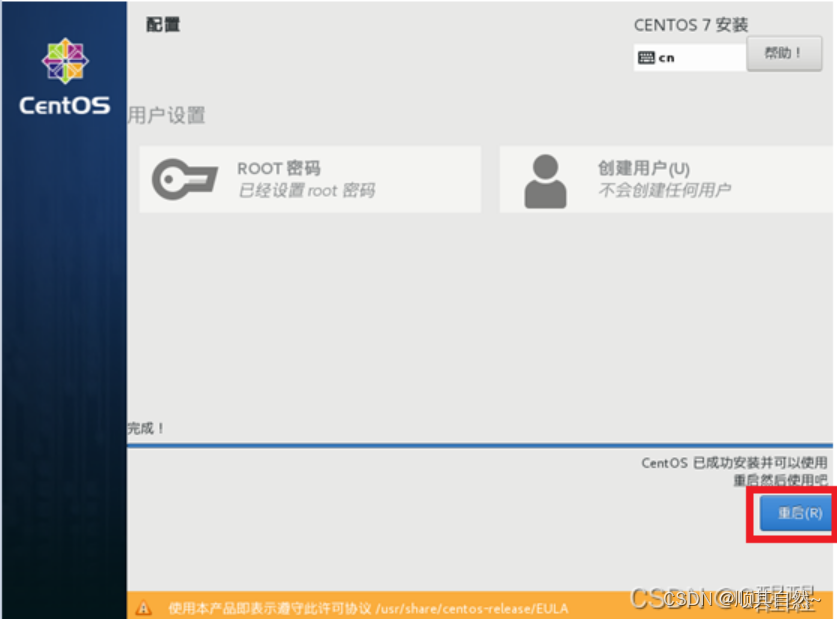
重启后使用root用户登录,然后修改主机名,配置网卡、内核。
1、修改主机名。

2、修改第一块网卡。

修改、添加内容如下 (注:按下i键进入插入模式,按下ESC键,然后输入冒号wq退出)。
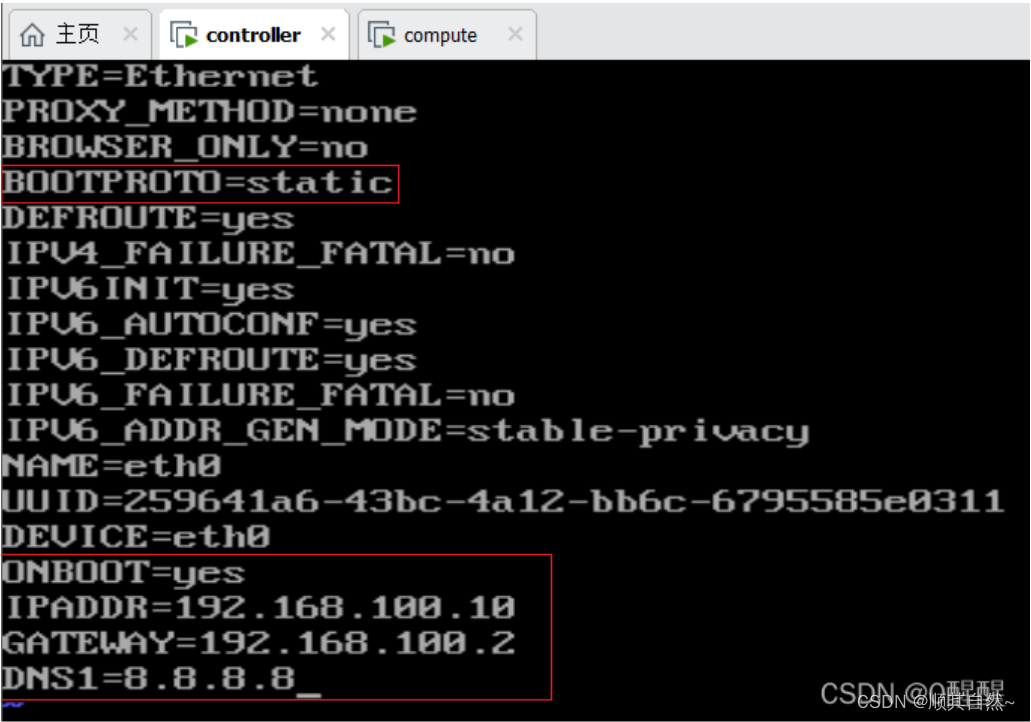
3、修改第二块网卡。

修改、添加内容如下:
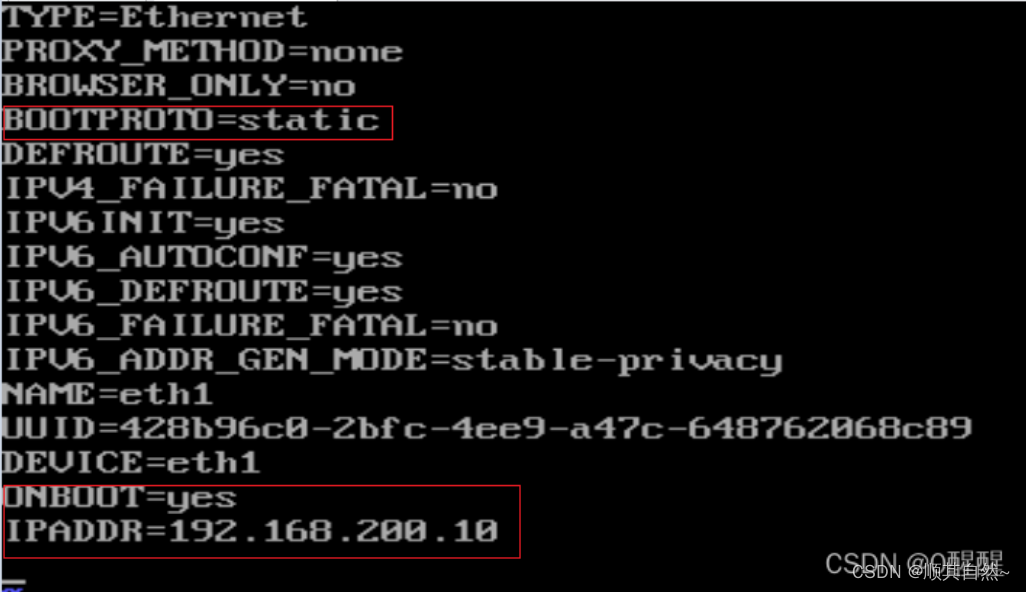
重启网卡,使配置生效。

使用ip a 命令检验配置是否生效。

4、修改内核。

添加内容如下:

刷新内核,然后重启使配置生效。

重启之后使用SecureCRT连上controller节点。(注:连接SecureCRT是为了方便)

注意:VMnet8必须跟controller节点和compute节点在同一个网段才能连接上SecureCRT。
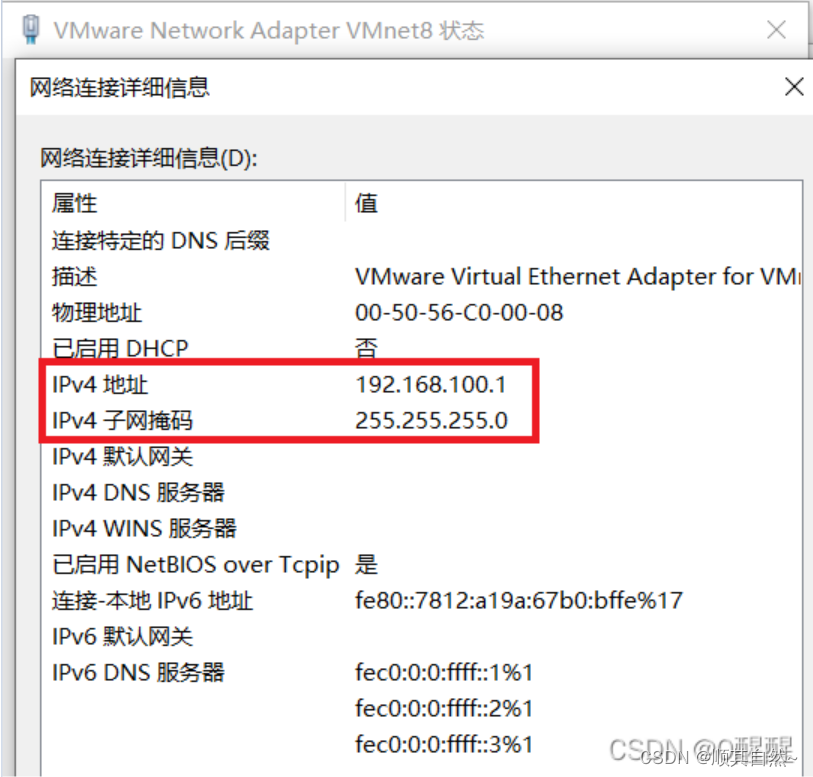
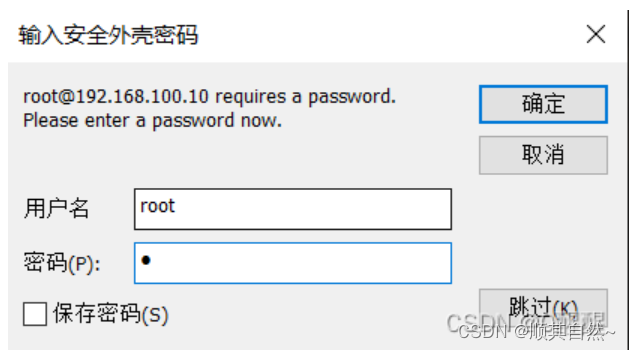
输入密码后,点击“确定”即可连接上SecureCRT。
出现以下图示表示连接成功。

2、compute计算节点
说明:compute节点与controller节点基础环境及安装系统大致相同,可参考controller节点配置,以下是稍有不同的地方。
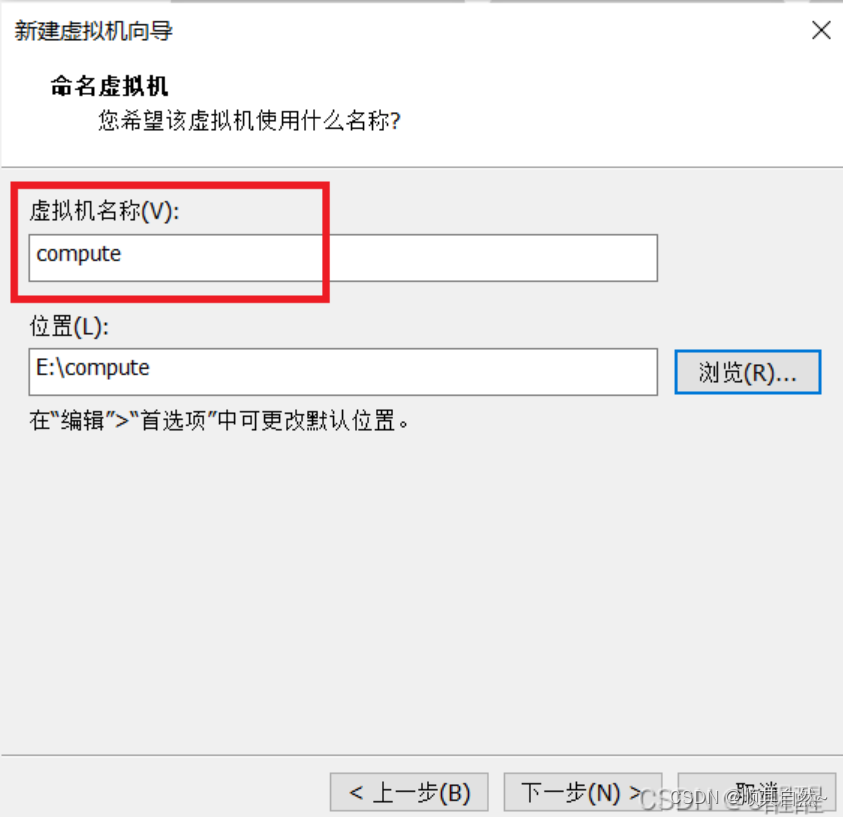
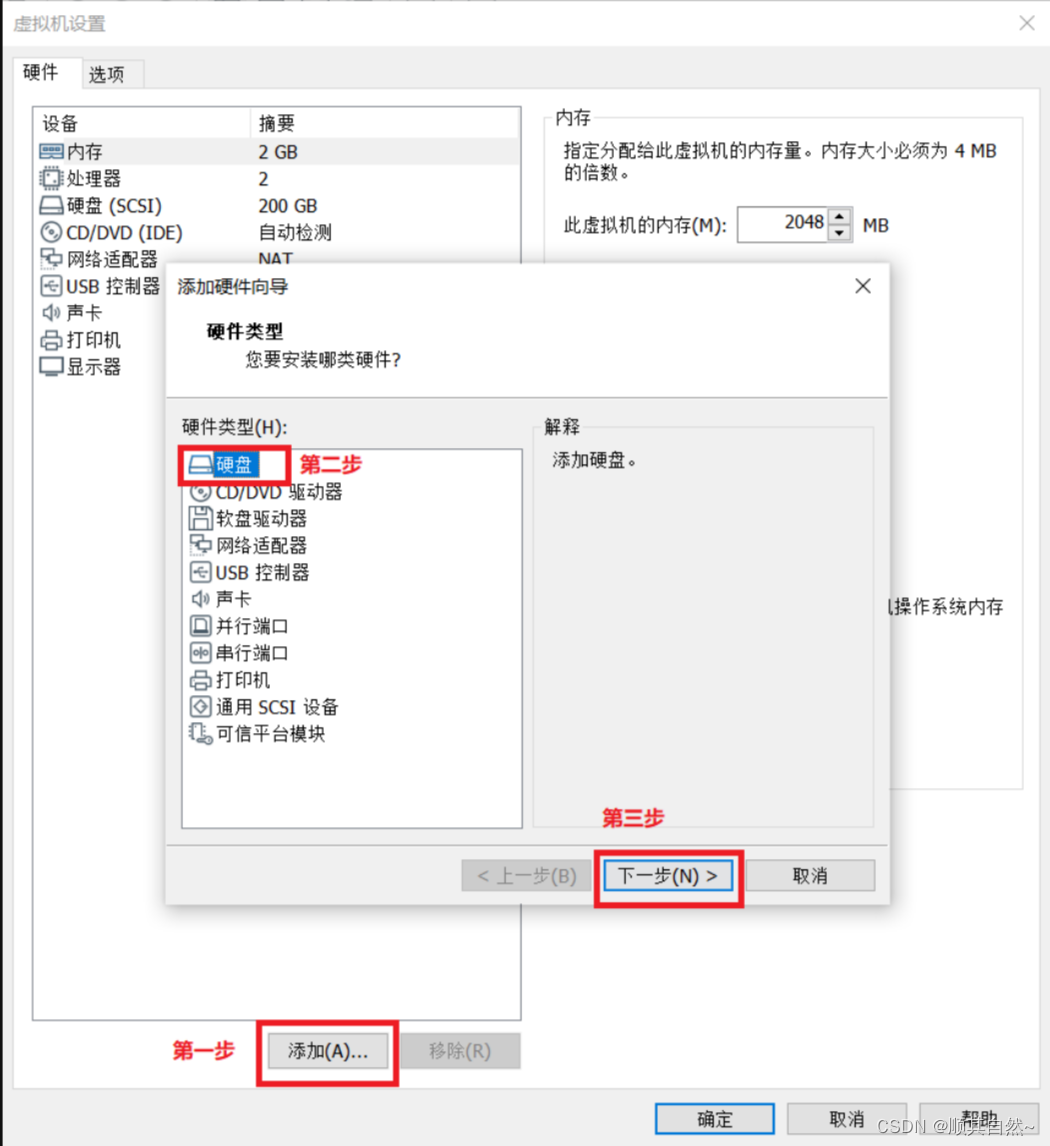


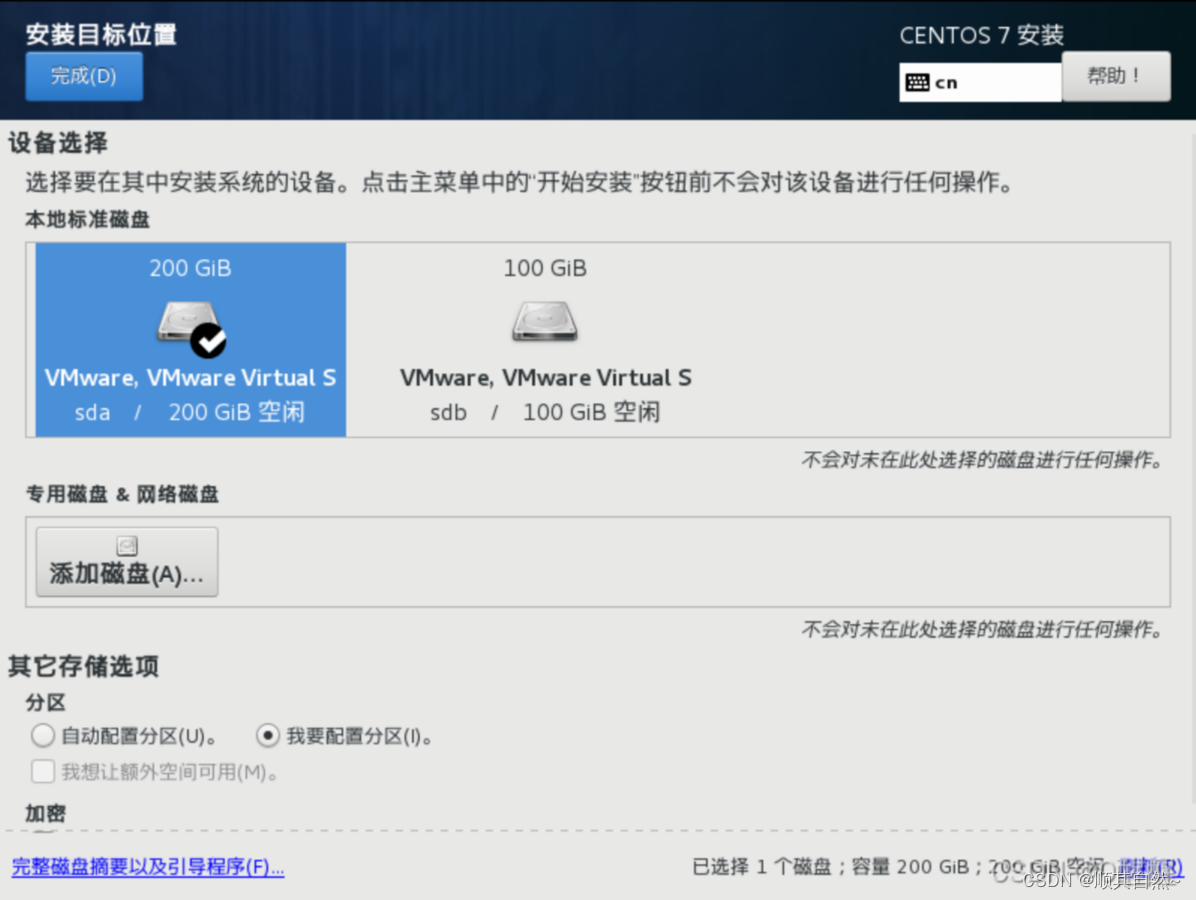

第一块网卡配置如下:

第二块网卡配置如下:

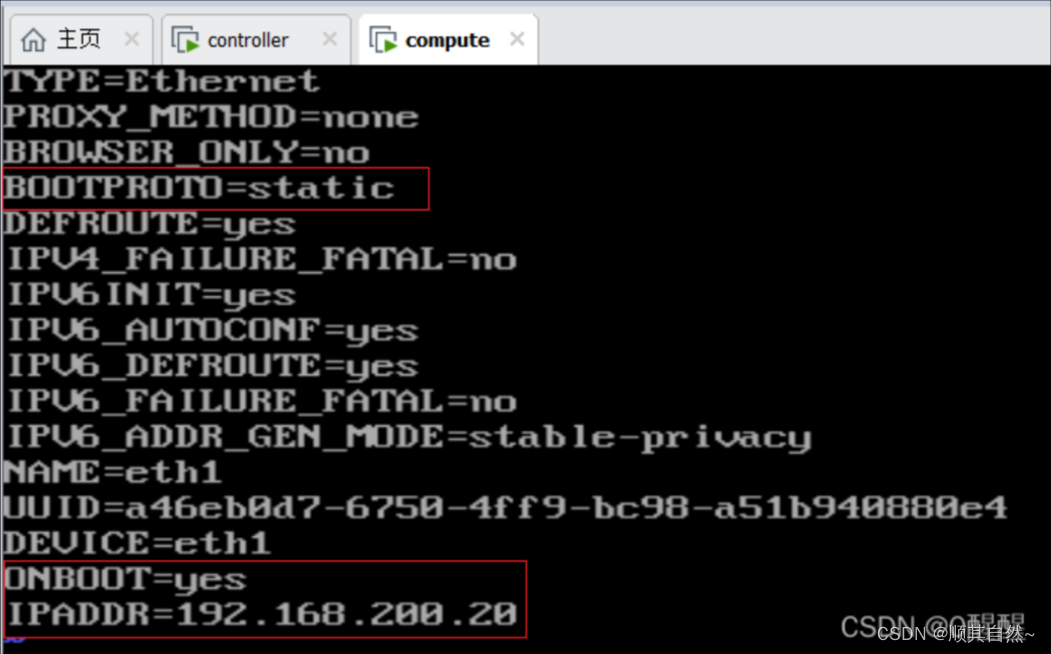
注意:compute节点也需要连上SecureCRT。
三、正式搭建OpenStack云平台
controller节点配置:
1、上传centos7.0镜像和chinaskills_cloud_iaas.iso镜像至controller节点。
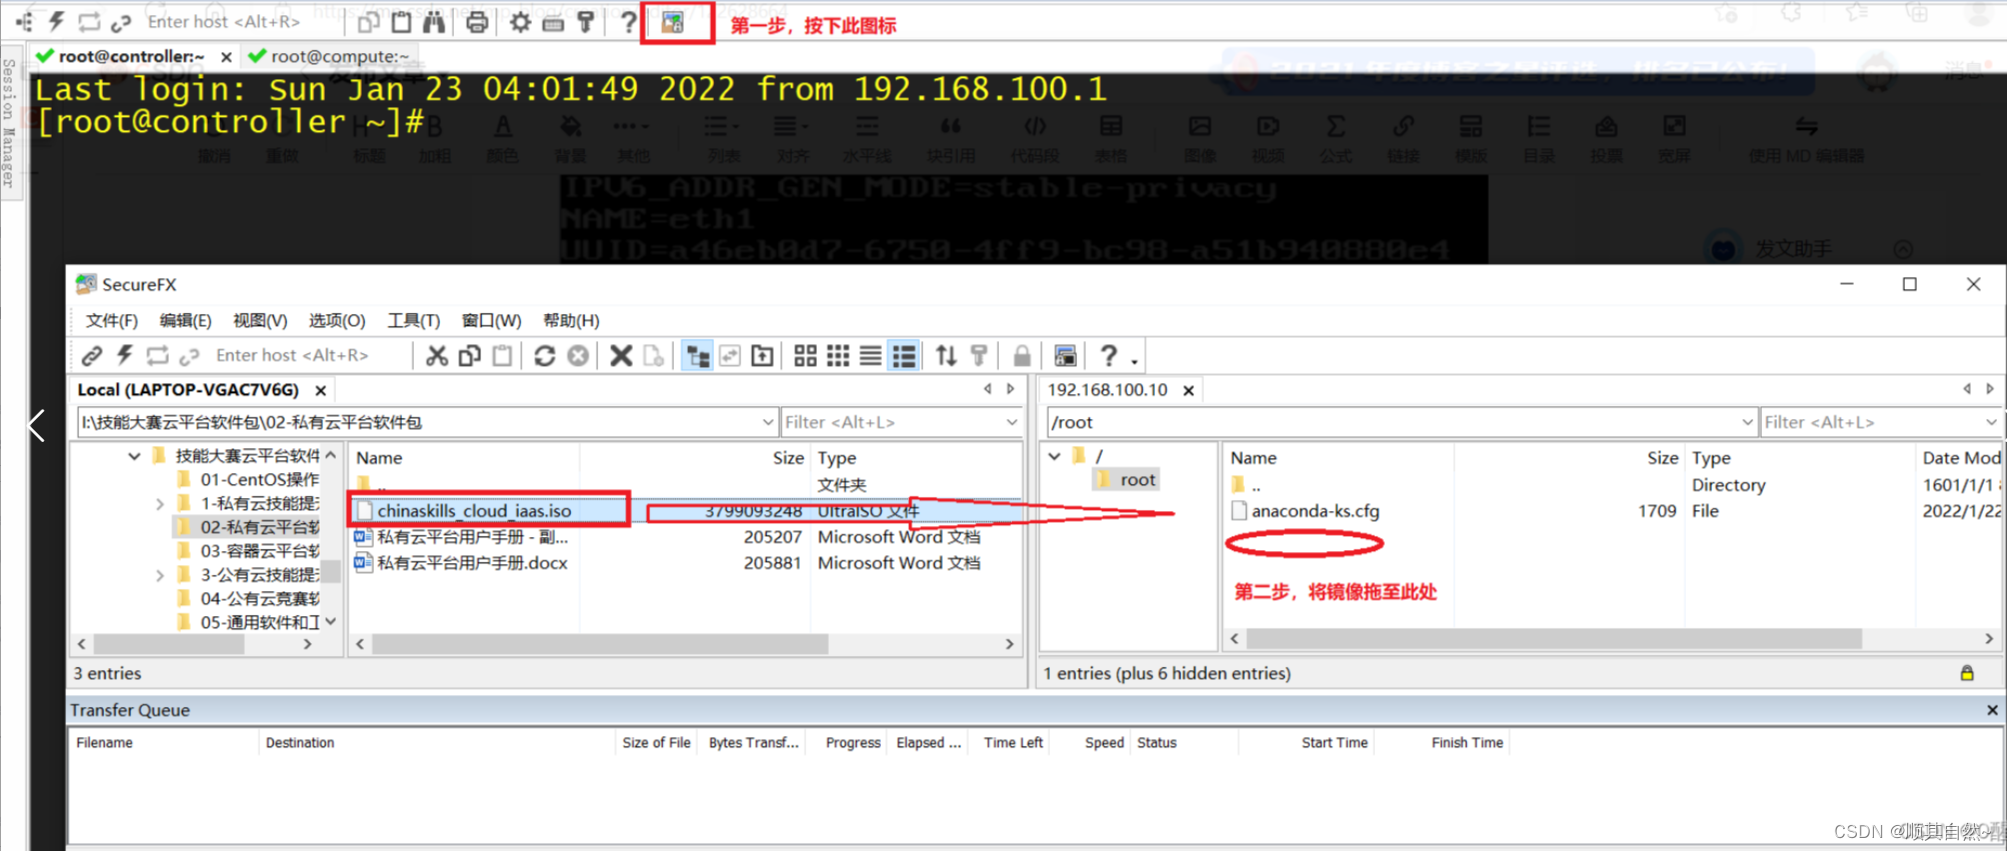
centos7.0镜像上传方式如上。
2、关闭防火墙,selinux。
- [root@controller ~]# systemctl stop firewalld #关闭防火墙
- [root@controller ~]# systemctl disable firewalld #设置防火墙开机不自启
- Removed symlink /etc/systemd/system/multi-user.target.wants/firewalld.service.
- Removed symlink /etc/systemd/system/dbus-org.fedoraproject.FirewallD1.service.
- [root@controller ~]# setenforce 0 #临时关闭selinux防火墙,0表示关闭,1表示开启
- [root@controller ~]# getenforce #查看selinux防火墙的状态
- Permissive
- [root@controller ~]# vi /etc/selinux/config #非临时性
- [root@controller ~]#
selinux配置文件内容修改如下:

3.挂载镜像
查看镜像是否已上传。


挂载镜像。
- [root@controller ~]# mount -o loop CentOS-7-x86_64-DVD-1804.iso /mnt/
- mount: /dev/loop0 写保护,将以只读方式挂载
- [root@controller ~]# mkdir /opt/centos
- [root@controller ~]# cp -rf /mnt/* /opt/centos/
- [root@controller ~]# umount /mnt/
- [root@controller ~]# mount -o loop chinaskills_cloud_iaas.iso /mnt/
- mount: /dev/loop0 写保护,将以只读方式挂载
- [root@controller ~]# cp -rf /mnt/* /opt/
- [root@controller ~]# umount /mnt/
- [root@controller ~]#
4、yum源文件处理
移除原yum源。
- [root@controller ~]# cd /etc/yum.repos.d/
- [root@controller yum.repos.d]# mv * /media/
- [root@controller yum.repos.d]# ls
- [root@controller yum.repos.d]#
写yum源文件。
- [root@controller yum.repos.d]# vi local.repo
- [root@controller yum.repos.d]# cat local.repo
- [centos]
- name=centos
- baseurl=file:///opt/centos
- gpgcheck=0
- enabled=1
-
- [iaas]
- name=iaas
- baseurl=file:///opt/iaas-repo
- gpgcheck=0
- enabled=1
- [root@controller yum.repos.d]#
清除yum源缓存,验证yum源,下载所需软件包。
- [root@controller yum.repos.d]# yum clean all #清除yum源缓存
- 已加载插件:fastestmirror
- 正在清理软件源: centos iaas
- Cleaning up everything
- Maybe you want: rm -rf /var/cache/yum, to also free up space taken by orphaned data from disabled or removed repos
- Cleaning up list of fastest mirrors
- [root@controller yum.repos.d]# yum repolist #列出所有可用的yum源
- 已加载插件:fastestmirror
- Determining fastest mirrors
- centos | 3.6 kB 00:00:00
- iaas | 2.9 kB 00:00:00
- (1/3): centos/group_gz | 166 kB 00:00:00
- (2/3): centos/primary_db | 3.1 MB 00:00:00
- (3/3): iaas/primary_db | 1.4 MB 00:00:00
- 源标识 源名称 状态
- centos centos 3,971
- iaas iaas 3,232
- repolist: 7,203
- [root@controller yum.repos.d]# yum install -y vim vsftpd iaas-xiandian #安装所需的软件包

5、配置vsftpd。
- [root@controller yum.repos.d]# echo anon_root=/opt/ >> /etc/vsftpd/vsftpd.conf #设置匿名访问
- [root@controller yum.repos.d]# systemctl restart vsftpd #重启ftp服务
- [root@controller yum.repos.d]# systemctl enable vsftpd #设置ftp服务开机自启
- Created symlink from /etc/systemd/system/multi-user.target.wants/vsftpd.service to /usr/lib/systemd/system/vsftpd.service.
- [root@controller yum.repos.d]#
6.修改脚本。
[root@controller ~]# vim /etc/xiandian/openrc.sh注:在非插入模式下按下Ctrl+v——shift+g——D可删除注释符号。
-
- #--------------------system Config--------------------##
- #Controller Server Manager IP. example:x.x.x.x
- HOST_IP=192.168.100.10 #controller节点的IP地址
-
- #Controller HOST Password. example:000000
- HOST_PASS=000000
-
- #Controller Server hostname. example:controller
- HOST_NAME=controller
-
- #Compute Node Manager IP. example:x.x.x.x
- HOST_IP_NODE=192.168.100.20 #compute节点的IP地址
-
- #Compute HOST Password. example:000000
- HOST_PASS_NODE=000000
-
- #Compute Node hostname. example:compute
- HOST_NAME_NODE=compute
-
- #--------------------Chrony Config-------------------##
- #Controller network segment IP. example:x.x.0.0/16(x.x.x.0/24)
- network_segment_IP=192.168.100.0/24 #controller节点所在的网段
-
- #--------------------Rabbit Config ------------------##
- #user for rabbit. example:openstack
- RABBIT_USER=openstack
-
- #Password for rabbit user .example:000000
- RABBIT_PASS=000000
-
- #--------------------MySQL Config---------------------##
- #Password for MySQL root user . exmaple:000000
- DB_PASS=000000
-
- #--------------------Keystone Config------------------##
- #Password for Keystore admin user. exmaple:000000
- DOMAIN_NAME=demo
- ADMIN_PASS=000000
- DEMO_PASS=000000
-
- #Password for Mysql keystore user. exmaple:000000
- KEYSTONE_DBPASS=000000
-
- #--------------------Glance Config--------------------##
- #Password for Mysql glance user. exmaple:000000
- GLANCE_DBPASS=000000
-
- #Password for Keystore glance user. exmaple:000000
- GLANCE_PASS=000000
-
- #--------------------Nova Config----------------------##
- #Password for Mysql nova user. exmaple:000000
- NOVA_DBPASS=000000
-
- #Password for Keystore nova user. exmaple:000000
- NOVA_PASS=000000
-
- #--------------------Neturon Config-------------------##
- #Password for Mysql neutron user. exmaple:000000
- NEUTRON_DBPASS=000000
-
- #Password for Keystore neutron user. exmaple:000000
- NEUTRON_PASS=000000
-
- #metadata secret for neutron. exmaple:000000
- METADATA_SECRET=000000
-
- #Tunnel Network Interface. example:x.x.x.x
- INTERFACE_IP=192.168.100.10 #本机IP地址
-
- #External Network Interface. example:eth1
- INTERFACE_NAME=eth1
-
- #External Network The Physical Adapter. example:provider
- Physical_NAME=provider
-
- #First Vlan ID in VLAN RANGE for VLAN Network. exmaple:101
- minvlan=101
-
- #Last Vlan ID in VLAN RANGE for VLAN Network. example:200
- maxvlan=200
-
- #--------------------Cinder Config--------------------##
- #Password for Mysql cinder user. exmaple:000000
- CINDER_DBPASS=000000
-
- #Password for Keystore cinder user. exmaple:000000
- CINDER_PASS=000000
-
- #Cinder Block Disk. example:md126p3
- BLOCK_DISK=sdb1 #compute节点的存储块
-
- #--------------------Swift Config---------------------##
- #Password for Keystore swift user. exmaple:000000
- SWIFT_PASS=000000
-
- #The NODE Object Disk for Swift. example:md126p4.
- OBJECT_DISK=sdb2 #compute节点的存储块
-
- #The NODE IP for Swift Storage Network. example:x.x.x.x.
- STORAGE_LOCAL_NET_IP=192.168.100.20 #compute节点的IP地址
-
- #--------------------Heat Config----------------------##
- #Password for Mysql heat user. exmaple:000000
- HEAT_DBPASS=000000
-
- #Password for Keystore heat user. exmaple:000000
- HEAT_PASS=000000
-
- #--------------------Zun Config-----------------------##
- #Password for Mysql Zun user. exmaple:000000
- ZUN_DBPASS=000000
-
- #Password for Keystore Zun user. exmaple:000000
- ZUN_PASS=000000
-
- #Password for Mysql Kuryr user. exmaple:000000
- KURYR_DBPASS=000000
-
- #Password for Keystore Kuryr user. exmaple:000000
- KURYR_PASS=000000
-
- #--------------------Ceilometer Config----------------##
- #Password for Gnocchi ceilometer user. exmaple:000000
- CEILOMETER_DBPASS=000000
-
- #Password for Keystore ceilometer user. exmaple:000000
- CEILOMETER_PASS=000000
-
- #--------------------AODH Config----------------##
- #Password for Mysql AODH user. exmaple:000000
- AODH_DBPASS=000000
-
- #Password for Keystore AODH user. exmaple:000000
- AODH_PASS=000000
-
- #--------------------Barbican Config----------------##
- #Password for Mysql Barbican user. exmaple:000000
- BARBICAN_DBPASS=000000
-
- #Password for Keystore Barbican user. exmaple:000000
- BARBICAN_PASS=000000

compute节点配置:
1、关闭防火墙,selinux。
- [root@compute ~]# systemctl stop firewalld
- [root@compute ~]# systemctl disable firewalld
- Removed symlink /etc/systemd/system/multi-user.target.wants/firewalld.service.
- Removed symlink /etc/systemd/system/dbus-org.fedoraproject.FirewallD1.service.
- [root@compute ~]# setenforce 0
- [root@compute ~]# getenforce
- Permissive
- [root@compute ~]# vi /etc/selinux/config

2、硬盘分区。
- [root@compute ~]# fdisk /dev/sdb
- 欢迎使用 fdisk (util-linux 2.23.2)。
-
- 更改将停留在内存中,直到您决定将更改写入磁盘。
- 使用写入命令前请三思。
-
- Device does not contain a recognized partition table
- 使用磁盘标识符 0x34bc5373 创建新的 DOS 磁盘标签。
-
- 命令(输入 m 获取帮助):n
- Partition type:
- p primary (0 primary, 0 extended, 4 free)
- e extended
- Select (default p):
- Using default response p
- 分区号 (1-4,默认 1):
- 起始 扇区 (2048-209715199,默认为 2048):
- 将使用默认值 2048
- Last 扇区, +扇区 or +size{K,M,G} (2048-209715199,默认为 209715199):+25G
- 分区 1 已设置为 Linux 类型,大小设为 25 GiB
-
- 命令(输入 m 获取帮助):n
- Partition type:
- p primary (1 primary, 0 extended, 3 free)
- e extended
- Select (default p):
- Using default response p
- 分区号 (2-4,默认 2):
- 起始 扇区 (52430848-209715199,默认为 52430848):
- 将使用默认值 52430848
- Last 扇区, +扇区 or +size{K,M,G} (52430848-209715199,默认为 209715199):+25G
- 分区 2 已设置为 Linux 类型,大小设为 25 GiB
-
- 命令(输入 m 获取帮助):w
- The partition table has been altered!
-
- Calling ioctl() to re-read partition table.
- 正在同步磁盘。
- [root@compute ~]# lsblk
- NAME MAJ:MIN RM SIZE RO TYPE MOUNTPOINT
- sda 8:0 0 200G 0 disk
- ├─sda1 8:1 0 1G 0 part /boot
- └─sda2 8:2 0 199G 0 part
- ├─centos-root 253:0 0 50G 0 lvm /
- ├─centos-swap 253:1 0 2G 0 lvm [SWAP]
- └─centos-home 253:2 0 147G 0 lvm /home
- sdb 8:16 0 100G 0 disk
- ├─sdb1 8:17 0 25G 0 part
- └─sdb2 8:18 0 25G 0 part
- sr0 11:0 1 4.2G 0 rom
- [root@compute ~]#

3、yum源文件处理。
移除原yum源。
- [root@compute ~]# cd /etc/yum.repos.d/
- [root@compute yum.repos.d]# mv * /media/
- [root@compute yum.repos.d]# ls
- [root@compute yum.repos.d]#
写yum源文件。
- [root@compute yum.repos.d]# vi local.repo
- [root@compute yum.repos.d]# cat local.repo
- [centos]
- name=centos
- baseurl=ftp://192.168.100.10/centos
- gpgcheck=0
- enabled=1
-
- [iaas]
- name=iaas
- baseurl=ftp://192.168.100.10/iaas-repo
- gpgcheck=0
- enabled=1
- [root@compute yum.repos.d]#
清除yum源缓存,验证yum源,下载所需软件包。
- [root@compute yum.repos.d]# yum clean all
- 已加载插件:fastestmirror
- 正在清理软件源: centos iaas
- Cleaning up everything
- Maybe you want: rm -rf /var/cache/yum, to also free up space taken by orphaned data from disabled or removed repos
- [root@compute yum.repos.d]# yum repolist
- 已加载插件:fastestmirror
- Determining fastest mirrors
- centos | 3.6 kB 00:00:00
- iaas | 2.9 kB 00:00:00
- (1/3): centos/group_gz | 166 kB 00:00:00
- (2/3): centos/primary_db | 3.1 MB 00:00:00
- (3/3): iaas/primary_db | 1.4 MB 00:00:00
- 源标识 源名称 状态
- centos centos 3,971
- iaas iaas 3,232
- repolist: 7,203
- [root@compute yum.repos.d]# yum install -y vim iaas-xiandian

4、修改脚本。
将controller节点的脚本复制至compute节点。
- [root@compute ~]# scp 192.168.100.10:/etc/xiandian/openrc.sh /etc/xiandian/openrc.sh
- The authenticity of host '192.168.100.10 (192.168.100.10)' can't be established.
- ECDSA key fingerprint is SHA256:3fUEo7XuafRBPMtY2rSnpjKOdGSrLnE68O2aZAXEp6o.
- ECDSA key fingerprint is MD5:4b:73:20:24:30:ad:6a:31:86:fa:26:55:47:92:99:cc.
- Are you sure you want to continue connecting (yes/no)? yes
- Warning: Permanently added '192.168.100.10' (ECDSA) to the list of known hosts.
- root@192.168.100.10's password:
- openrc.sh 100% 3820 1.9MB/s 00:00
- [root@compute ~]#
需要修改compute节点的脚本。
[root@compute ~]# vim /etc/xiandian/openrc.sh修改内容如下:

四、刷脚本
controller节点需要刷以下脚本。
- [root@controller ~]# iaas-pre-host.sh #刷完该脚本后需要重启
- ......
-
- [root@controller ~]# iaas-install-mysql.sh
- ......
-
- [root@controller ~]# iaas-install-keystone.sh
- ......
- [root@controller ~]# source /etc/keystone/admin-openrc.sh #使环境生效
-
- [root@controller ~]# iaas-install-glance.sh
- ......
-
- [root@controller ~]# iaas-install-nova-controller.sh
- ......
-
- [root@controller ~]# iaas-install-neutron-controller.sh
- ......
-
- [root@controller ~]# iaas-install-dashboard.sh
- ......

compute节点需要刷以下脚本。
- [root@compute ~]# iaas-pre-host.sh #刷完该脚本后需要重启
- ......
-
- [root@compute ~]# iaas-install-nova-compute.sh
- ......
-
- [root@compute ~]# iaas-install-neutron-compute.sh
- ......
五、登录OpenStack云平台
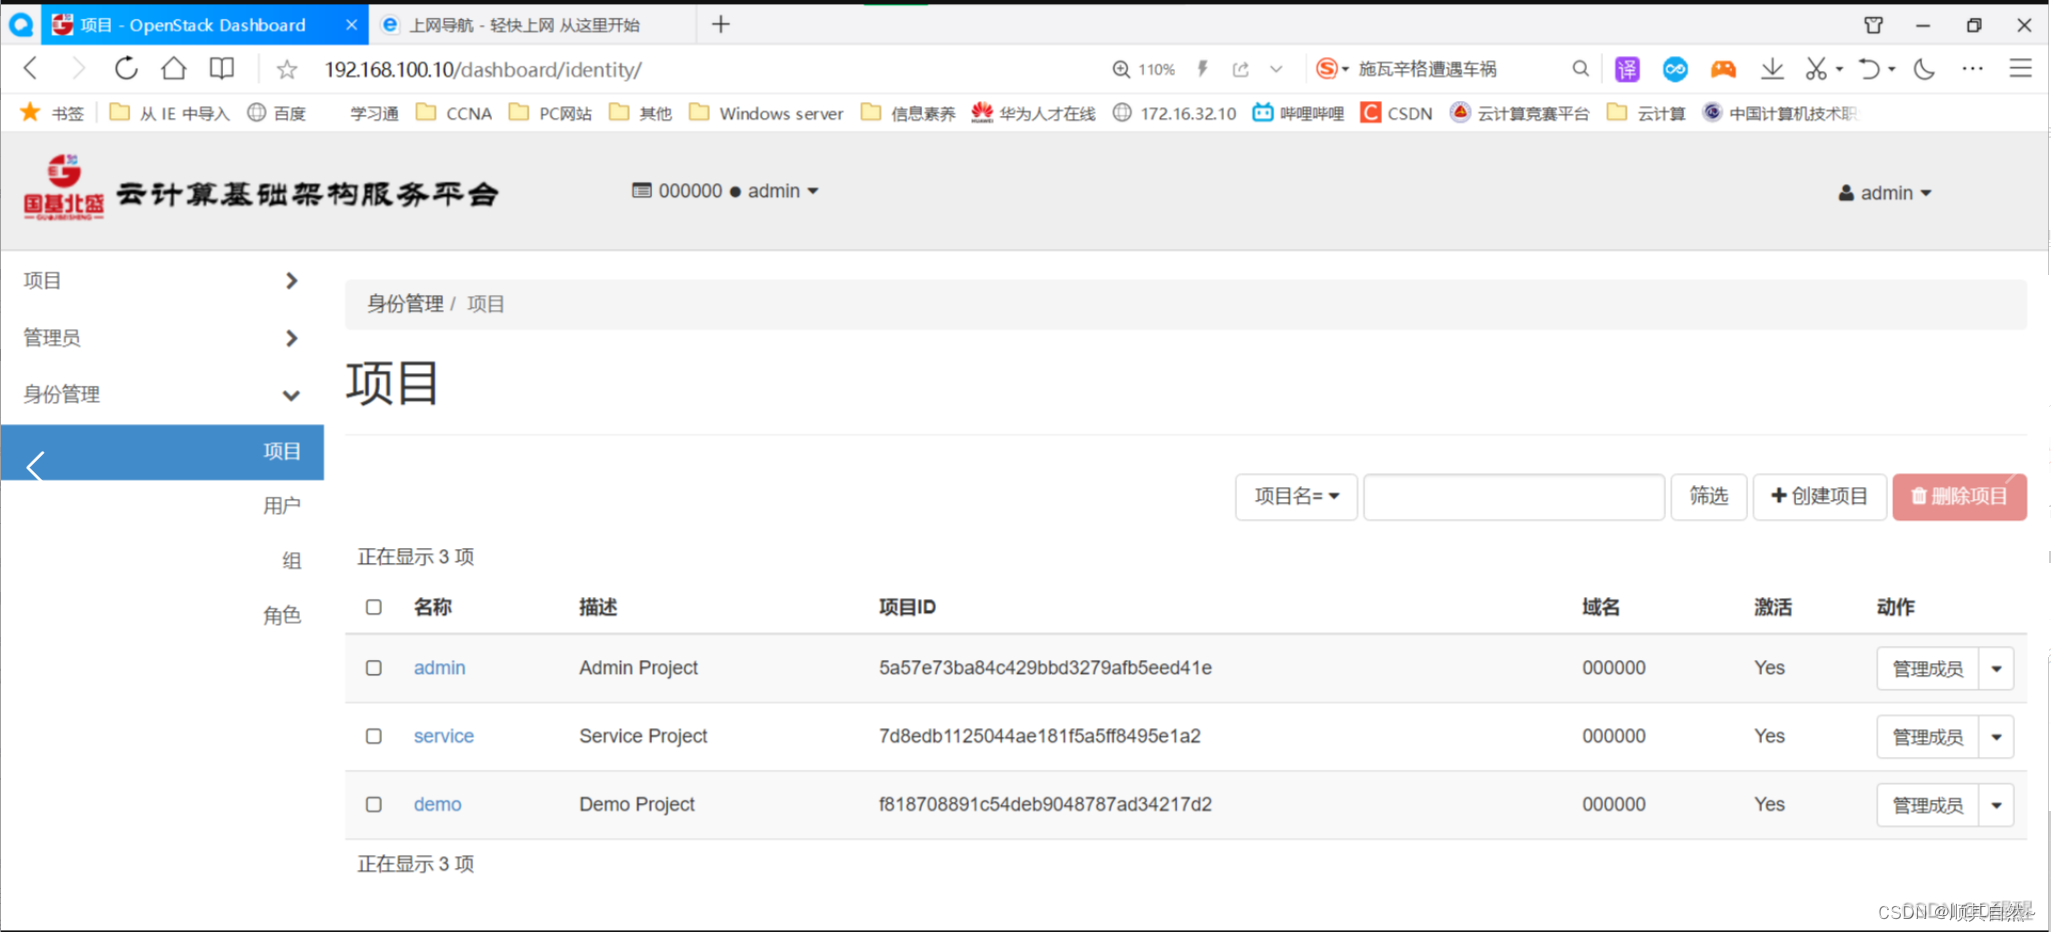
在浏览器中输入http://192.168.100.10/dashboard。
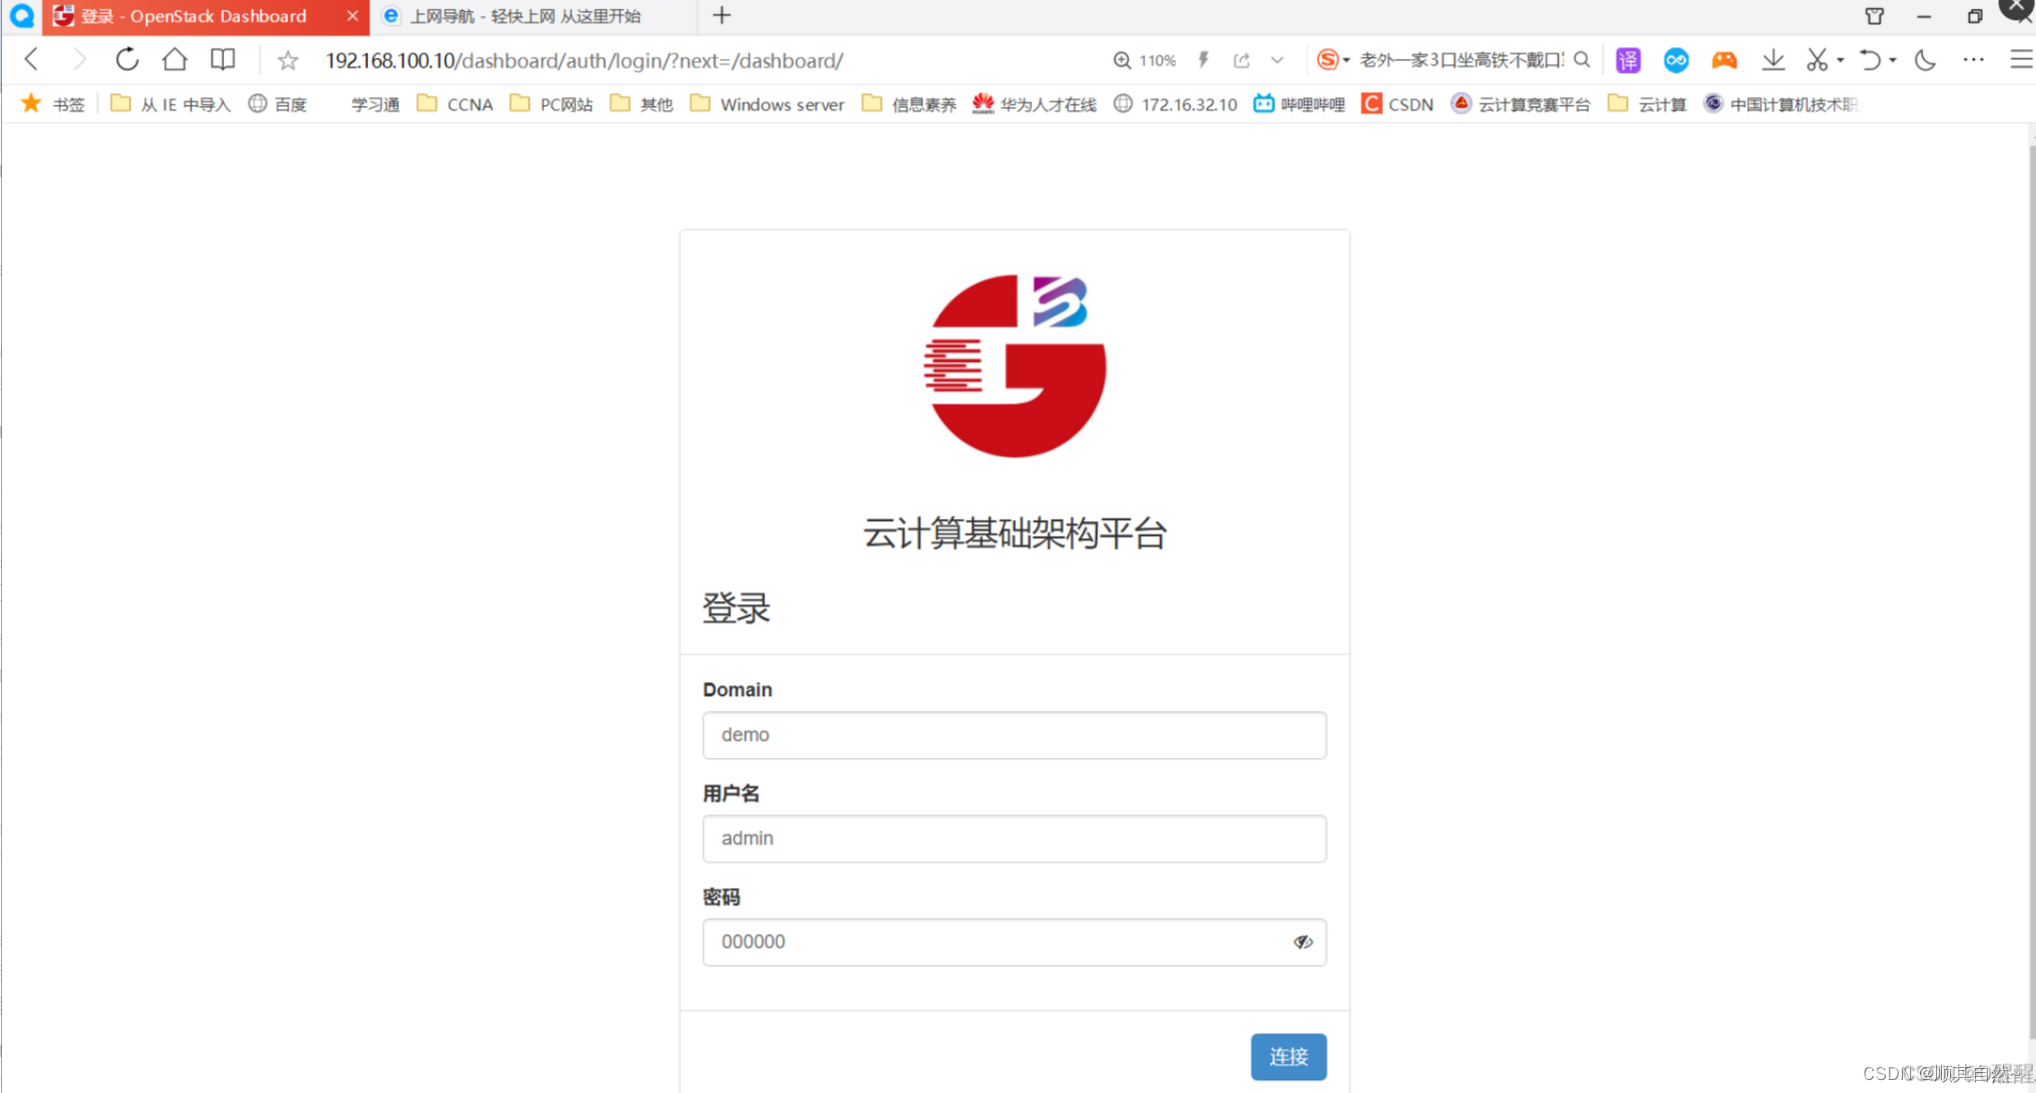
出现以下图示表示云平台搭建成功。
