- 1C#中Winform使用OpenFileDialog选择文件打开并获取文件路径_通过openfiledialog选择文件路径
- 2react项目内存溢出,加大内存的方式之一 Ineffective mark-compacts near heap limit Allocation failed - JavaScript heap_vscode的react项目内存溢出
- 3Redis实现分布式锁的原理:常见问题解析及解决方案、源码解析Redisson的使用_分布式事务redis解决方案
- 42024永久免费版CrossOver软件下载及使用方法详细的步骤_crossover安装包
- 5guitar pro 8许可证忘记了怎么办 guitar pro8谱数字可以改吗
- 6基于微信学生新生报到小程序系统设计与实现
- 7ROS Motion Planning运动规划库安装方法及进阶使用方法详细介绍
- 8pom可视化idea_GitHub - haizlin-idea/rsbi-pom: 睿思BI-数据仪表盘,开源商业智能,数据可视化系统...
- 9在CDH集群安装Flink
- 10单片机学习笔记---独立按键控制LED亮灭_单片机按键控制led灯亮灭
yolov3-tensorflow版的实现与详解(一)网络结构分析_yolo tensorflow
赞
踩
最近在学习yolo检测算法,并细读了tensorflow版的代码,现总结一下,分享给各位童鞋们。首先讲解一下yolov3的网络结构,阅读过yolov3论文的童鞋们应该有所体会,读完感觉内容并不多,讲解不是很细致,所以本人根据阅读的代码进一步分析网络,并附上相应的代码。
1.Darknet-53 network
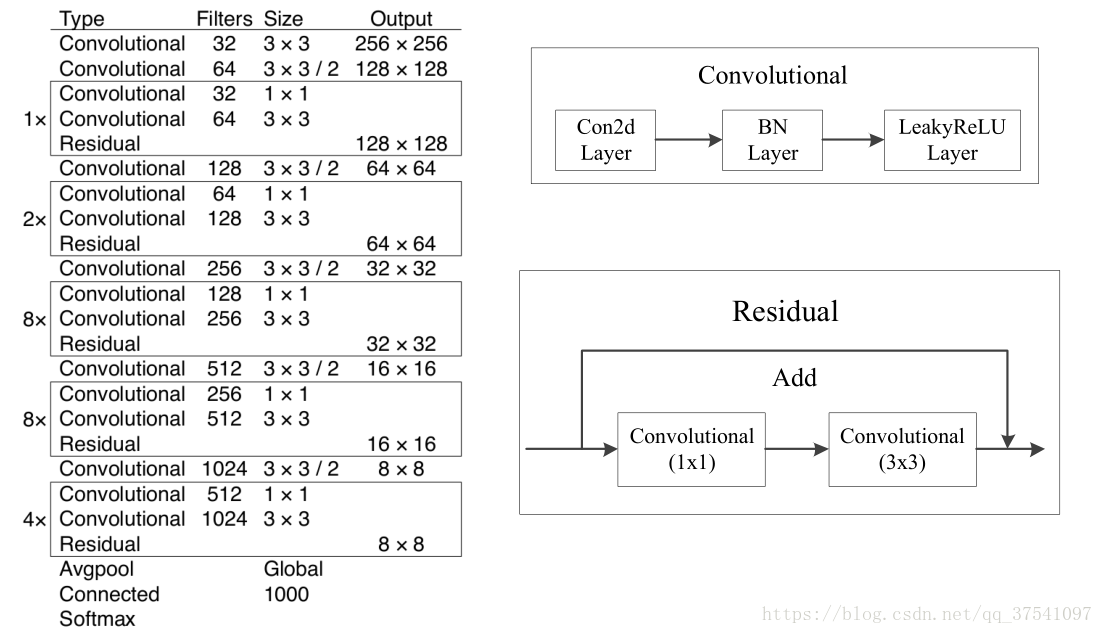
在论文中虽然有给网络的图,但我还是简单说一下。这个网络主要是由一系列的1x1和3x3的卷积层组成(每个卷积层后都会跟一个BN层和一个LeakyReLU)层,作者说因为网络中有53个convolutional layers,所以叫做Darknet-53(我数了下,作者说的53包括了全连接层但不包括Residual层)。下图就是Darknet-53的结构图,在右侧标注了一些信息方便理解。(卷积的strides默认为(1,1),padding默认为same,当strides为(2,2)时padding为valid)

看完上图应该就能自己搭建出Darknet-53的网络结构了,上图是以输入图像256 x 256进行预训练来进行介绍的,常用的尺寸是416 x 416,都是32的倍数。首先在common.py中定义卷积操作,根据srides的不同,决定是否需要padding。
import tensorflow as tf
# 构建模型的基本组件
slim = tf.contrib.slim
def _conv2d_fixed_padding(inputs, filters, kernel_size, strides=1):
    if strides > 1: inputs = _fixed_padding(inputs, kernel_size)
    inputs = slim.conv2d(inputs, filters, kernel_size, stride=strides,
                         padding=('SAME' if strides == 1 else 'VALID'))
    return inputs
@tf.contrib.framework.add_arg_scope
def _fixed_padding(inputs, kernel_size, *args, mode='CONSTANT', **kwargs):
    """
    与输入大小无关, 只有与所使用的卷积核有关,左右两边进行填充
    Args:
      inputs: A tensor of size [batch, channels, height_in, width_in] or
        [batch, height_in, width_in, channels] depending on data_format.
      kernel_size: The kernel to be used in the conv2d or max_pool2d operation.
                   Should be a positive integer.
      mode: The mode for tf.pad.
    Returns:
      A tensor with the same format as the input with the data either intact
      (if kernel_size == 1) or padded (if kernel_size > 1).
    """
    # 使得kernel完整走过边缘
    pad_total = kernel_size - 1
    pad_beg = pad_total // 2
    pad_end = pad_total - pad_beg
    padded_inputs = tf.pad(inputs, [[0, 0], [pad_beg, pad_end],
                                    [pad_beg, pad_end], [0, 0]], mode=mode)
    return padded_inputs
- 1
- 2
- 3
- 4
- 5
- 6
- 7
- 8
- 9
- 10
- 11
- 12
- 13
- 14
- 15
- 16
- 17
- 18
- 19
- 20
- 21
- 22
- 23
- 24
- 25
- 26
- 27
- 28
- 29
在yolov3.py中定义了yolov3的网络结构,首先是Darknet-53网络部分的实现:
import tensorflow as tf
from core import common
slim = tf.contrib.slim
class darknet53(object):
    #用于执行特征提取的网络
    def __init__(self, inputs):
        self.outputs = self.forward(inputs)

    def _darknet53_block(self, inputs, filters):
        """
        implement residuals block in darknet53
        """
        shortcut = inputs
        inputs = common._conv2d_fixed_padding(inputs, filters * 1, 1)
        inputs = common._conv2d_fixed_padding(inputs, filters * 2, 3)
        inputs = inputs + shortcut
        return inputs

    def forward(self, inputs):
        inputs = common._conv2d_fixed_padding(inputs, 32, 3, strides=1)
        inputs = common._conv2d_fixed_padding(inputs, 64, 3, strides=2)  # 208
        inputs = self._darknet53_block(inputs, 32)  #
        inputs = common._conv2d_fixed_padding(inputs, 128, 3, strides=2)  # 104
        for i in range(2):
            inputs = self._darknet53_block(inputs, 64)
        inputs = common._conv2d_fixed_padding(inputs, 256, 3, strides=2)  # 52
        for i in range(8):
            inputs = self._darknet53_block(inputs, 128)
        route_1 = inputs
        inputs = common._conv2d_fixed_padding(inputs, 512, 3, strides=2)  # 26
        for i in range(8):
            inputs = self._darknet53_block(inputs, 256)
        route_2 = inputs
        inputs = common._conv2d_fixed_padding(inputs, 1024, 3, strides=2)  # 13
        for i in range(4):
            inputs = self._darknet53_block(inputs, 512)
        return route_1, route_2, inputs
- 1
- 2
- 3
- 4
- 5
- 6
- 7
- 8
- 9
- 10
- 11
- 12
- 13
- 14
- 15
- 16
- 17
- 18
- 19
- 20
- 21
- 22
- 23
- 24
- 25
- 26
- 27
- 28
- 29
- 30
- 31
- 32
- 33
- 34
- 35
- 36
- 37
2.Feature Extractor
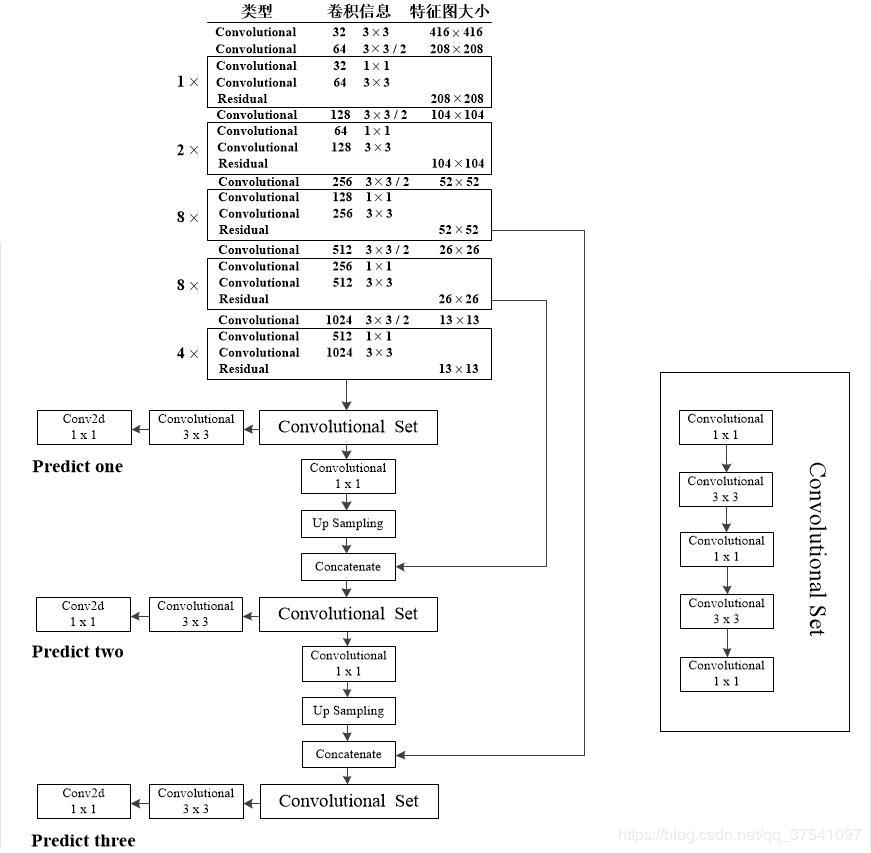
作者在论文中提到利用三个特征层进行边框的预测,具体在哪三层我感觉作者在论文中表述的并不清楚(例如文中有“添加几个卷积层”这样的表述),同样根据代码我将这部分更加详细的分析展示在下图中。注意:原Darknet53中的尺寸是在图片分类训练集上训练的,所以输入的图像尺寸是256x256,下图是以YOLO v3 416模型进行绘制的,所以输入的尺寸是416x416,预测的三个特征层大小分别是52,26,13。

在上图中我们能够很清晰的看到三个预测层分别来自的什么地方,以及Concatenate层与哪个层进行拼接。注意Convolutional是指Conv2d+BN+LeakyReLU,和Darknet53图中的一样,而生成预测结果的最后三层都只是Conv2d。通过上图小伙伴们就能更加容易地搭建出YOLOv3的网络框架了。
那么下面我们看一下源码,经过darknet53之后,会得到route_1, route_2, inputs,inputs会进入Convoltional Set,源码中在 def _yolo_block(self, inputs, filters)中定义(Convolutional3*3也在里面),然后经过Conv2d得到相应的featuremap。route_1, route_2会与经过上采样得到的结果concat再经过卷积获得相应的featuremap,涉及到的代码如下:
class yolov3(object):

    def __init__(self, num_classes, anchors,
                 batch_norm_decay=0.9, leaky_relu=0.1):
        '''
        :param num_classes: class
        :param anchors: number of anchors 列表
        :param batch_norm_decay:
        :param leaky_relu:
        '''
        # self._ANCHORS =
        #               [[10 ,13], [16 , 30], [33 , 23],
        #               [30 ,61], [62 , 45], [59 ,119],
        #               [116,90], [156,198], [373,326]]
        self._ANCHORS = anchors
        self._BATCH_NORM_DECAY = batch_norm_decay
        self._LEAKY_RELU = leaky_relu
        self._NUM_CLASSES = num_classes
        self.feature_maps = []  # [[None, 13, 13, 255], [None, 26, 26, 255], [None, 52, 52, 255]]

    def _yolo_block(self, inputs, filters):
        # if stride > 1 , padding
        inputs = common._conv2d_fixed_padding(inputs, filters * 1, 1)
        inputs = common._conv2d_fixed_padding(inputs, filters * 2, 3)
        inputs = common._conv2d_fixed_padding(inputs, filters * 1, 1)
        inputs = common._conv2d_fixed_padding(inputs, filters * 2, 3)
        inputs = common._conv2d_fixed_padding(inputs, filters * 1, 1)
        route = inputs
        inputs = common._conv2d_fixed_padding(inputs, filters * 2, 3)
        return route, inputs

    # 目标识别的层, 转换到合适的深度,以满足不同class_num数据的分类
    def _detection_layer(self, inputs, anchors):
        num_anchors = len(anchors)
        feature_map = slim.conv2d(inputs, num_anchors * (5 + self._NUM_CLASSES), 1,
                                  stride=1, normalizer_fn=None,
                                  activation_fn=None,
                                  biases_initializer=tf.zeros_initializer())
        return feature_map

    def _upsample(inputs, out_shape):  # 上采样, 放大图片
        new_height, new_width = out_shape[1], out_shape[2]
        inputs = tf.image.resize_nearest_neighbor(inputs, (new_height, new_width))  # 使用最近邻改变图像大小
        inputs = tf.identity(inputs, name='upsampled')

        return inputs
    # 前向传播,得到3个feature_map
    def forward(self, inputs, is_training=False, reuse=False):
        """
        Creates YOLO v3 model.
        :param inputs: a 4-D tensor of size [batch_size, height, width, channels].
               Dimension batch_size may be undefined. The channel order is RGB.
        :param is_training: whether is training or not.
        :param reuse: whether or not the network and its variables should be reused.
        :return:
        """
        # it will be needed later on 他在稍后将被需要
        self.img_size = tf.shape(inputs)[1:3]
        # set batch norm params
        batch_norm_params = {
            'decay': self._BATCH_NORM_DECAY,
            'epsilon': 1e-05,
            'scale': True,
            'is_training': is_training,
            'fused': None,  # Use fused batch norm if possible.
        }

        # Set activation_fn and parameters for conv2d, batch_norm.
        with slim.arg_scope([slim.conv2d, slim.batch_norm, common._fixed_padding], reuse=reuse):
            with slim.arg_scope([slim.conv2d], normalizer_fn=slim.batch_norm,
                                # 给定list(slim.conv2d)中的值设置默认值(normlizer,biase.....)
                                normalizer_params=batch_norm_params,
                                biases_initializer=None,
                                activation_fn=lambda x: tf.nn.leaky_relu(x, alpha=self._LEAKY_RELU)):
                with tf.variable_scope('darknet-53'):
                    route_1, route_2, inputs = darknet53(inputs).outputs  # 得到图片张量
                    # route_1 : 52x52x256
                    # route_2 : 26x26x512
                    # inputs  : 13x13x1024

                with tf.variable_scope('yolo-v3'):
                    # feature_map1 13x13x1024 --> 13x13x[3x(5+class_num)]
                    route, inputs = self._yolo_block(inputs, 512)
                    feature_map_1 = self._detection_layer(inputs, self._ANCHORS[6:9])
                    feature_map_1 = tf.identity(feature_map_1, name='feature_map_1')

                    # feature_map2 26x26x512 --> 26x26x[3x(5+class_num)]
                    inputs = common._conv2d_fixed_padding(route, 256, 1)
                    upsample_size = route_2.get_shape().as_list()
                    #  52x52 --> 26x26
                    inputs = self._upsample(inputs, upsample_size)  # 通过直接放大进行上采样
                    inputs = tf.concat([inputs, route_2], axis=3)  # 在axis=3 进行连接,
                    route, inputs = self._yolo_block(inputs, 256)
                    feature_map_2 = self._detection_layer(inputs, self._ANCHORS[3:6])
                    feature_map_2 = tf.identity(feature_map_2, name='feature_map_2')

                    # feature_map3 52x52x256 --> 52x52x[3x(5+class_num)]
                    inputs = common._conv2d_fixed_padding(route, 128, 1)
                    upsample_size = route_1.get_shape().as_list()
                    # 26x26 --> 52x52
                    inputs = self._upsample(inputs, upsample_size)
                    inputs = tf.concat([inputs, route_1], axis=3)
                    route, inputs = self._yolo_block(inputs, 128)
                    feature_map_3 = self._detection_layer(inputs, self._ANCHORS[0:3])
                    feature_map_3 = tf.identity(feature_map_3, name='feature_map_3')

            return feature_map_1, feature_map_2, feature_map_3
- 1
- 2
- 3
- 4
- 5
- 6
- 7
- 8
- 9
- 10
- 11
- 12
- 13
- 14
- 15
- 16
- 17
- 18
- 19
- 20
- 21
- 22
- 23
- 24
- 25
- 26
- 27
- 28
- 29
- 30
- 31
- 32
- 33
- 34
- 35
- 36
- 37
- 38
- 39
- 40
- 41
- 42
- 43
- 44
- 45
- 46
- 47
- 48
- 49
- 50
- 51
- 52
- 53
- 54
- 55
- 56
- 57
- 58
- 59
- 60
- 61
- 62
- 63
- 64
- 65
- 66
- 67
- 68
- 69
- 70
- 71
- 72
- 73
- 74
- 75
- 76
- 77
- 78
- 79
- 80
- 81
- 82
- 83
- 84
- 85
- 86
- 87
- 88
- 89
- 90
- 91
- 92
- 93
- 94
- 95
- 96
- 97
- 98
- 99
- 100
- 101
- 102
- 103
- 104
- 105
- 106
- 107


