- 1SonarQube的安装部署过程中踩过的坑_wrappersimpleapp: encountered an error running mai
- 2JDBC对Mysql utf8mb4字符集的处理_characterencoding=utf8mb4
- 3YOLOv8修改输出文件夹位置,按日期生成文件夹,包含图片标签文本_修改yolov8检测结果路径
- 4C++——继承和多态常见的面试问题_c++ 继承 面试问题
- 5渗透测试简述_penetration test
- 6Multiboot 规范_mutiboot规范
- 7Linux_MySQL 表的约束(主键,唯一键,外键,主表,从表)_主表从表约束
- 8数据结构_排序
- 9插曲:Kafka的生产者案例和消费者原理解析_生产者和消费者连接kafka的原理
- 10VMware虚拟机安装优麒麟(ubuntukylin)操作系统_优麒麟系统下载镜像
【鸿蒙ArkUI实战开发】基于RichEditor的评论编辑
赞
踩
场景描述
RichEditor是支持图文混排和文本交互式编辑的组件,在我们使用的APP中是很常见的,比如评论区编辑内容发布、对话框或者聊天室。下面列举一些遇到的场景需求:
场景一:基于文字图片以及@信息的好友评论
场景二:右下角的剩余字数
场景三:评论中携带所@的用户的附属信息
场景四:文本选择区域发生变化或编辑状态下光标位置发生变化回调
场景五:自由切换系统键盘和自定义键盘。
方案描述
场景一:基于文字图片以及@信息的好友评论
效果图

方案
1、通过addTextSpan来添加文字,2、通过addImageSpan来添加图片3、通过addBuilderSpan来实现一段内容光标不可插入的效果4、addTextSpan等支持gesture等手势操作,比如onClick点击和onLongPress长按事件
核心代码
1、由于RichEditor是支持图文混排的,所以RichEditor里面的内容也就是由Text和Image组成的,分别通过addTextSpan和addImageSpan添加,而且还可以设置字体和图片样式,如下代码1:
@Entry

@Component

struct getSpans {

editorController = new RichEditorController()

build() {

Column() {

RichEditor({ controller: this.editorController })

.width('100%')

.backgroundColor(Color.Yellow)

.onReady(() => {

this.editorController.addImageSpan($r("app.media.icon"),

{

imageStyle:

{

size: ["100px", "100px"]

}

})

this.editorController.addTextSpan('男生女生向前冲',

{

style:

{

fontColor: Color.Blue,

fontSize: 30

}

})

})

Button('getSpans-图片').onClick((event: ClickEvent) => {

let getSpans = this.editorController.getSpans({ start: 0 })

console.log('getSpans0' + JSON.stringify(getSpans[0]))

// 必须进行强转才能获取文字信息或者图片信息

let span0 = getSpans[0] as RichEditorTextSpanResult

console.log('图片相关的信息: ' + JSON.stringify(span0))

})

Button('getSpans-文字').onClick((event: ClickEvent) => {

let getSpans = this.editorController.getSpans({ start: 0 })

console.log('getSpans1' + JSON.stringify(getSpans[1]))

let span1 = getSpans[1] as RichEditorImageSpanResult

console.log('文字相关的信息: ' + JSON.stringify(span1))

})

}

}

}
- 1
- 2
- 3
- 4
- 5
- 6
- 7
- 8
- 9
- 10
- 11
- 12
- 13
- 14
- 15
- 16
- 17
- 18
- 19
- 20
- 21
- 22
- 23
- 24
- 25
- 26
- 27
- 28
- 29
- 30
- 31
- 32
- 33
- 34
- 35
- 36
- 37
- 38
- 39
- 40
- 41
- 42
- 43
- 44
- 45
- 46
- 47
- 48
- 49
- 50
- 51
- 52
- 53
- 54
- 55
- 56
- 57
- 58
- 59
- 60
- 61
- 62
- 63
- 64
- 65
- 66
- 67
- 68
- 69
- 70
- 71
- 72
- 73
- 74
- 75
- 76
- 77
- 78
- 79
- 80
- 81
- 82
- 83
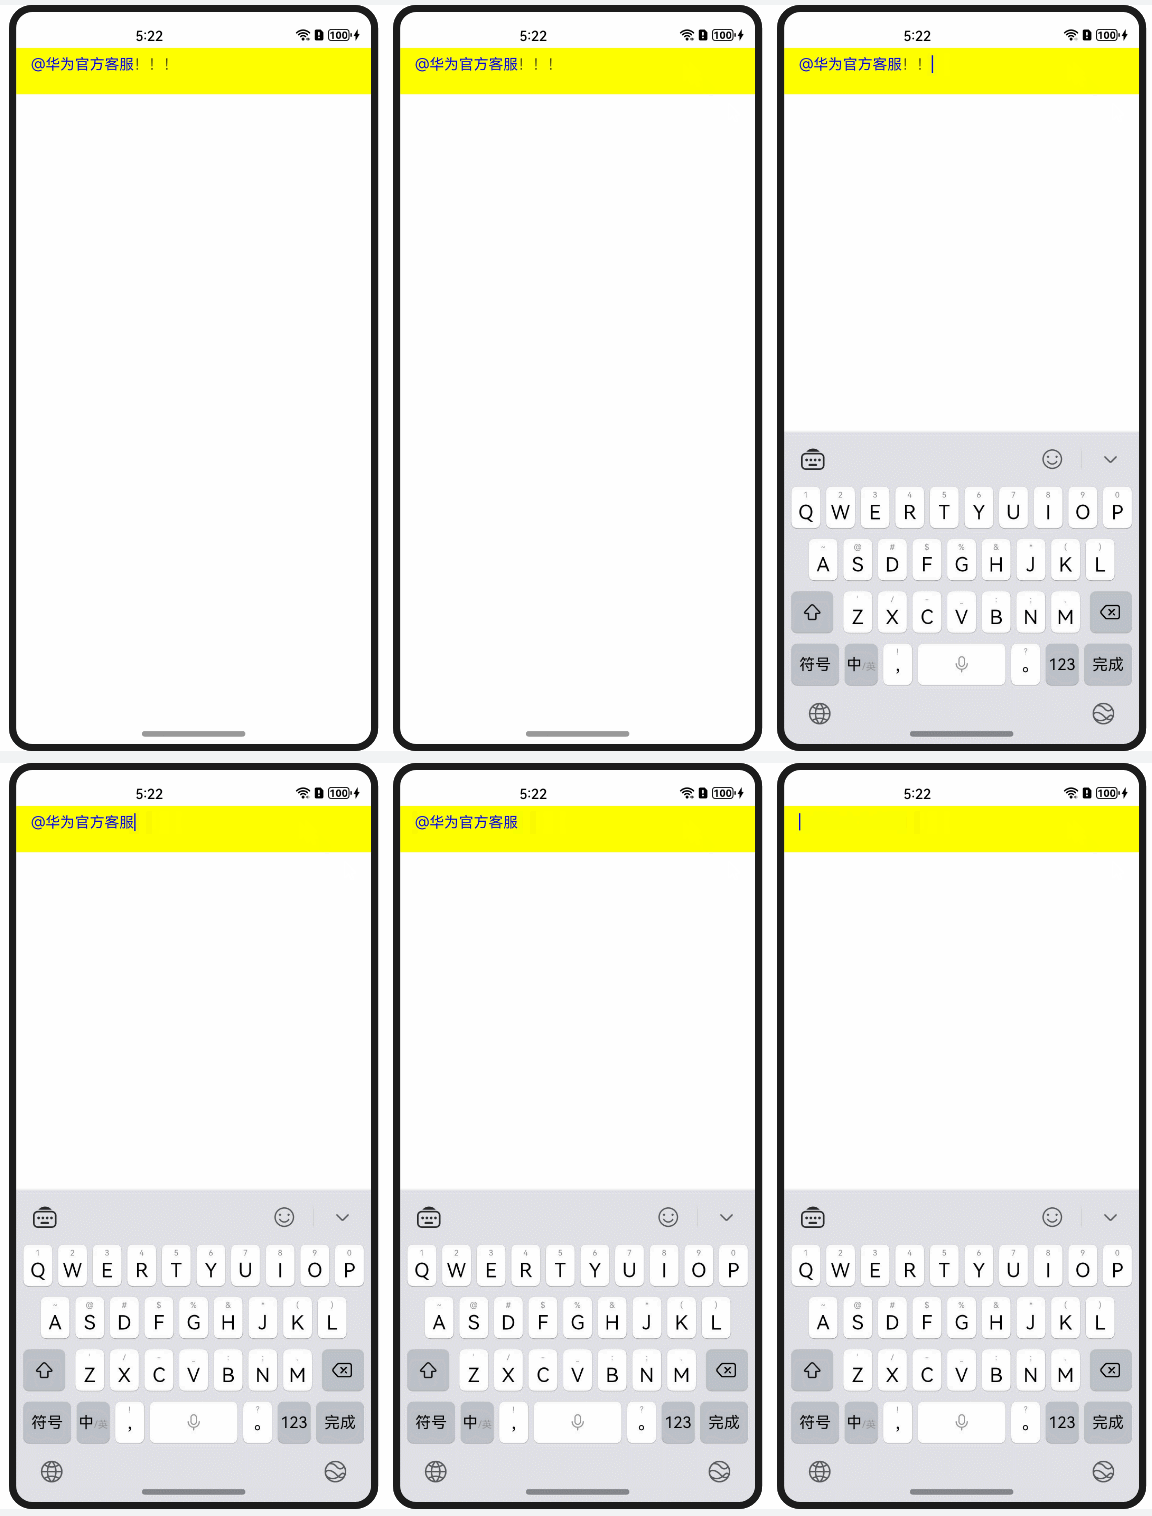
2、在常见的评论区艾特好友时,会将“@华为官方客服”视作一个整体,光标无法插入其中,且第一次按删除键时整体会高亮选中,第二次再按删除键才会删除。**需要注意的是,如果使用的全局@Builder,则需要配合bind(this)使用。**后续也可以通过事件阻止“即RichEditor控件ClickEvent/TouchEvent支持preventDefault”。
@Entry

@Component

struct BuilderSpan {

editorController = new RichEditorController()

@Builder

At(str: string) {

Stack() {

Text('@' + str).fontColor(Color.Blue)

}

}

build() {

Column() {

RichEditor({ controller: this.editorController })

.width('100%')

.height(50)

.backgroundColor(Color.Yellow)

.onReady(() => {

this.editorController.addBuilderSpan(() => {

this.At('华为官方客服')

})

this.editorController.addTextSpan('!!!')

})

}

}

}
- 1
- 2
- 3
- 4
- 5
- 6
- 7
- 8
- 9
- 10
- 11
- 12
- 13
- 14
- 15
- 16
- 17
- 18
- 19
- 20
- 21
- 22
- 23
- 24
- 25
- 26
- 27
- 28
- 29
- 30
- 31
- 32
- 33
- 34
- 35
- 36
- 37
- 38
- 39
- 40
- 41
- 42
- 43
- 44
- 45
- 46
- 47
- 48
- 49
3、发微博的时候可以输入表情、超链接、文字等一起的内容
代码3:
@Component

struct Index {

@State message: string = '#超话社区#';

controller: RichEditorController = new RichEditorController();

@State show: boolean = false;

build() {

Column() {

RichEditor({controller: this.controller})

.height(56)

.width("90%")

.borderStyle(BorderStyle.Solid)

.borderColor(Color.Black)

.borderWidth(1)

.onReady(() => {

})

Button('输入表情').onClick((event: ClickEvent) => {

this.controller.addImageSpan($r('app.media.app_icon'), {

imageStyle: {

size: ["80px", "80px"]

}

})

})

Button('超链接').onClick((event: ClickEvent) => {

this.controller.addTextSpan(this.message, {

offset: this.controller.getCaretOffset(),

style:

{

fontColor: Color.Orange,

fontSize: 16

},

gesture:

{

onClick: () => {

console.log('要跳转链接了哦')

},

onLongPress: () => {

console.log('我被长按了')

}

}

})

this.controller.setCaretOffset(this.controller.getCaretOffset() + this.message.length)

})

}

.width('100%')

}

}
- 1
- 2
- 3
- 4
- 5
- 6
- 7
- 8
- 9
- 10
- 11
- 12
- 13
- 14
- 15
- 16
- 17
- 18
- 19
- 20
- 21
- 22
- 23
- 24
- 25
- 26
- 27
- 28
- 29
- 30
- 31
- 32
- 33
- 34
- 35
- 36
- 37
- 38
- 39
- 40
- 41
- 42
- 43
- 44
- 45
- 46
- 47
- 48
- 49
- 50
- 51
- 52
- 53
- 54
- 55
- 56
- 57
- 58
- 59
- 60
- 61
- 62
- 63
- 64
- 65
- 66
- 67
- 68
- 69
- 70
- 71
- 72
- 73
- 74
- 75
- 76
- 77
- 78
- 79
- 80
- 81
- 82
- 83
- 84
- 85
- 86
- 87
- 88
- 89
- 90
- 91
场景二:右下角的剩余字数
效果图

方案
使用overlay浮层,显示“0/20”字数提示符在组件的右下角。再通过aboutToIMEInput回调(输入法输入内容前),获取插入的文本偏移位置,对输入内容进行限制。
核心代码
import promptAction from '@ohos.promptAction';

@Entry

@Component

struct MaxDemo {

@State message: string = '蜡笔小新';

controller: RichEditorController = new RichEditorController();

@State getContentLength: number = 0;

@State BOnSt:promptAction.ShowToastOptions = {'message': '已超出内容最大限制.'}

build() {

Column() {

RichEditor({ controller: this.controller })

.height(100)

.borderWidth(1)

.borderColor(Color.Red)

.width("100%")

.overlay(this.getContentLength + "/20", {

align: Alignment.BottomEnd

})

.aboutToIMEInput((value: RichEditorInsertValue) => {

console.log("insertOffset:" + JSON.stringify(value.insertValue)) // 插入的文本偏移位置。

if (this.getContentLength < 20) {

this.getContentLength = this.getContentLength + value.insertValue.length

console.log('实时的内容长度:' + this.getContentLength)

return true

}

promptAction.showToast(this.BOnSt)

return false

})

.aboutToDelete((value: RichEditorDeleteValue) => {

console.log('删除:' + JSON.stringify(value))

this.getContentLength = this.getContentLength - value.length

return true

})

}

.width('100%')

}

}
- 1
- 2
- 3
- 4
- 5
- 6
- 7
- 8
- 9
- 10
- 11
- 12
- 13
- 14
- 15
- 16
- 17
- 18
- 19
- 20
- 21
- 22
- 23
- 24
- 25
- 26
- 27
- 28
- 29
- 30
- 31
- 32
- 33
- 34
- 35
- 36
- 37
- 38
- 39
- 40
- 41
- 42
- 43
- 44
- 45
- 46
- 47
- 48
- 49
- 50
- 51
- 52
- 53
- 54
- 55
- 56
- 57
- 58
- 59
- 60
- 61
- 62
- 63
- 64
- 65
- 66
- 67
- 68
- 69
- 70
- 71
- 72
- 73
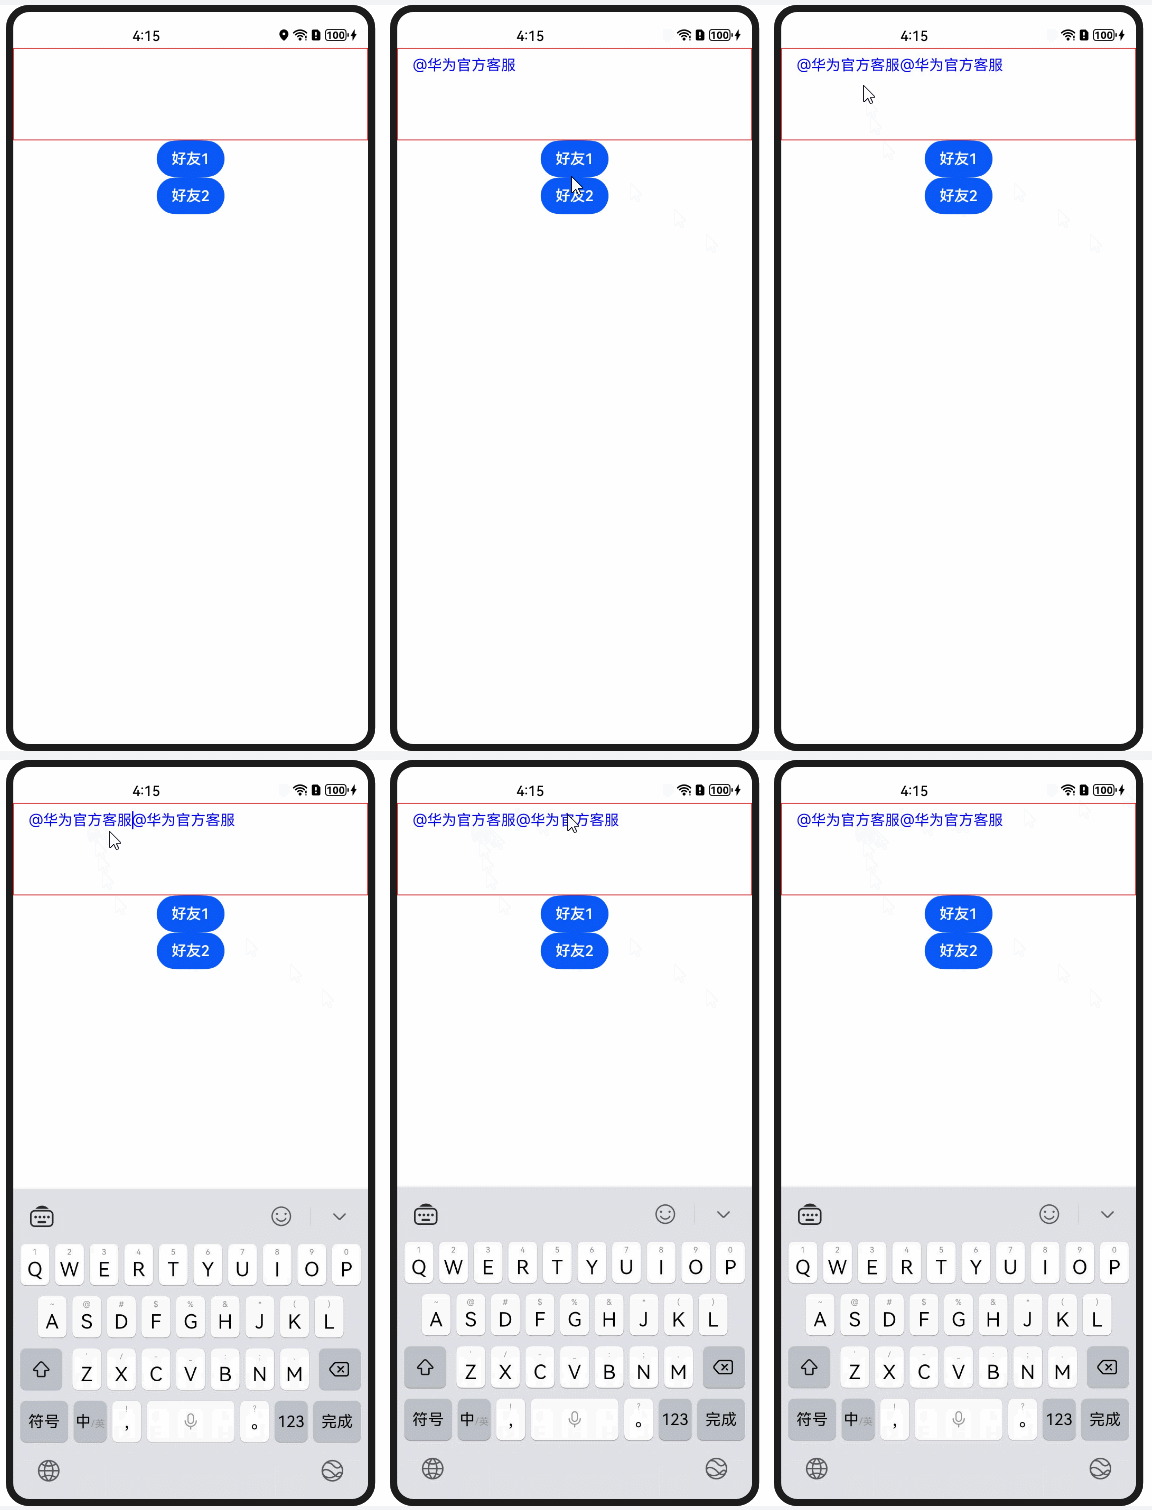
场景三:评论中携带所@的用户的附属信息
效果图


方案
使用HashMap的set向HashMap中添加或更新一组数据,使用get方法获取指定key所对应的value。
核心代码
@Entry

@Component

struct SameNameDemo {

controller: RichEditorController = new RichEditorController();

@Builder

At(str: string) {

Stack() {

Text('@' + str).fontColor(Color.Blue)

}

.onClick(() => {

// 添加不同的身份信息

const hashMap: HashMap<string, number> = new HashMap();

hashMap.set("friend1", 123);

let result = hashMap.get("friend1");

console.log('result: ' + result)

})

}

build() {

Column() {

RichEditor({ controller: this.controller })

.height(100)

.borderWidth(1)

.borderColor(Color.Red)

.width("100%")

Button('好友1').onClick((event: ClickEvent) => {

this.controller.addBuilderSpan(() => {

this.At('华为官方客服')

})

})

Button('好友2').onClick((event: ClickEvent) => {

this.controller.addBuilderSpan(() => {

this.At('华为官方客服')

})

})

}

.width('100%')

}

}
- 1
- 2
- 3
- 4
- 5
- 6
- 7
- 8
- 9
- 10
- 11
- 12
- 13
- 14
- 15
- 16
- 17
- 18
- 19
- 20
- 21
- 22
- 23
- 24
- 25
- 26
- 27
- 28
- 29
- 30
- 31
- 32
- 33
- 34
- 35
- 36
- 37
- 38
- 39
- 40
- 41
- 42
- 43
- 44
- 45
- 46
- 47
- 48
- 49
- 50
- 51
- 52
- 53
- 54
- 55
- 56
- 57
- 58
- 59
- 60
- 61
- 62
- 63
- 64
- 65
- 66
- 67
- 68
- 69
- 70
- 71
- 72
- 73
- 74
- 75
场景四:文本选择区域发生变化或编辑状态下光标位置发生变化回调
效果图

方案
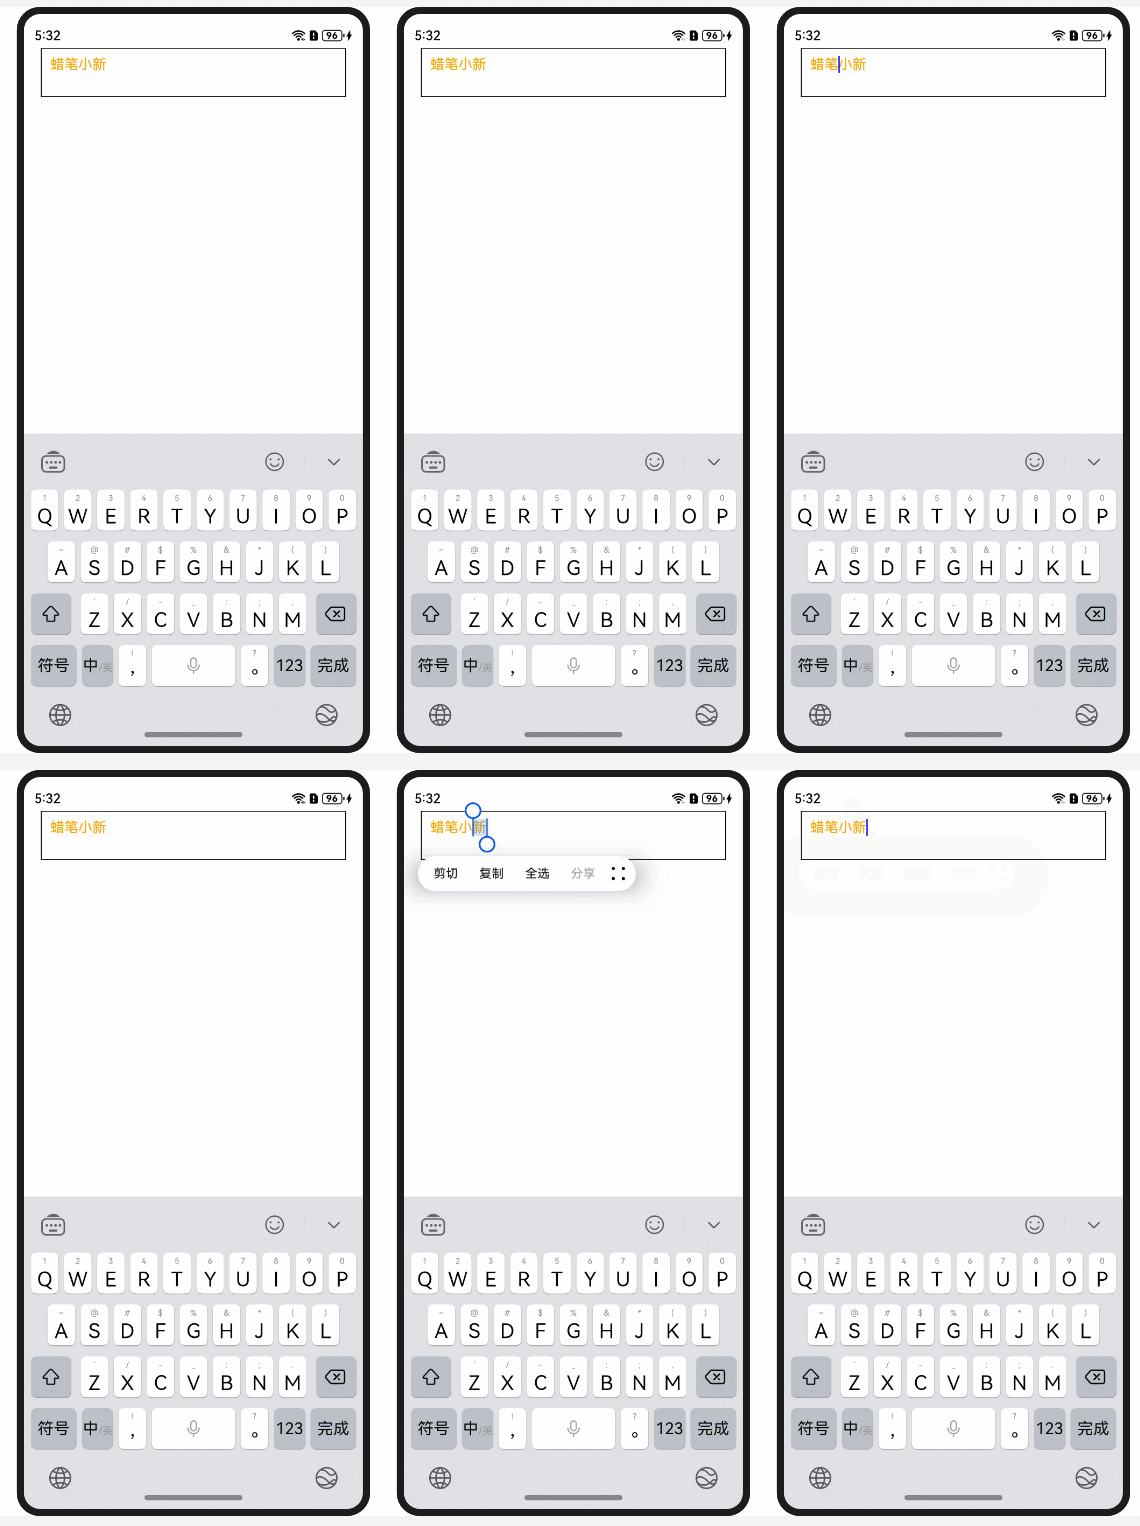
使用RichEditor组件在API 12支持的新接口 onSelectionChange,在文本选择区域发生变化或编辑状态下光标位置发生变化时触发该回调。光标位置发生变化回调时,选择区域的起始位置等于终止位置(即start = end)。
核心代码
@Entry

@Component

struct Index {

@State message: string = '蜡笔小新';

controller: RichEditorController = new RichEditorController();

@State show: boolean = false;

build() {

Column() {

RichEditor({controller: this.controller})

.defaultFocus(true)

.padding(0)

.height(56)

.width("90%")

.borderStyle(BorderStyle.Solid)

.borderColor(Color.Black)

.borderWidth(1)

.padding({left: 10})

.onReady(() => {

this.controller.addTextSpan(this.message, {

offset: this.controller.getCaretOffset(),

style:

{

fontColor: Color.Orange,

fontSize: 16

}

})

this.controller.setCaretOffset(this.controller.getCaretOffset() + this.message.length)

})

.onSelectionChange((value:RichEditorRange) => {

console.log('光标位置改变了')

console.log('start: ' + value.start)

console.log('end: ' + value.end)

})

}

.width('100%')

}

}
- 1
- 2
- 3
- 4
- 5
- 6
- 7
- 8
- 9
- 10
- 11
- 12
- 13
- 14
- 15
- 16
- 17
- 18
- 19
- 20
- 21
- 22
- 23
- 24
- 25
- 26
- 27
- 28
- 29
- 30
- 31
- 32
- 33
- 34
- 35
- 36
- 37
- 38
- 39
- 40
- 41
- 42
- 43
- 44
- 45
- 46
- 47
- 48
- 49
- 50
- 51
- 52
- 53
- 54
- 55
- 56
- 57
- 58
- 59
- 60
- 61
- 62
- 63
- 64
- 65
- 66
- 67
- 68
- 69
- 70
- 71
- 72
- 73
场景五:自由切换系统键盘和自定义键盘
效果图

方案
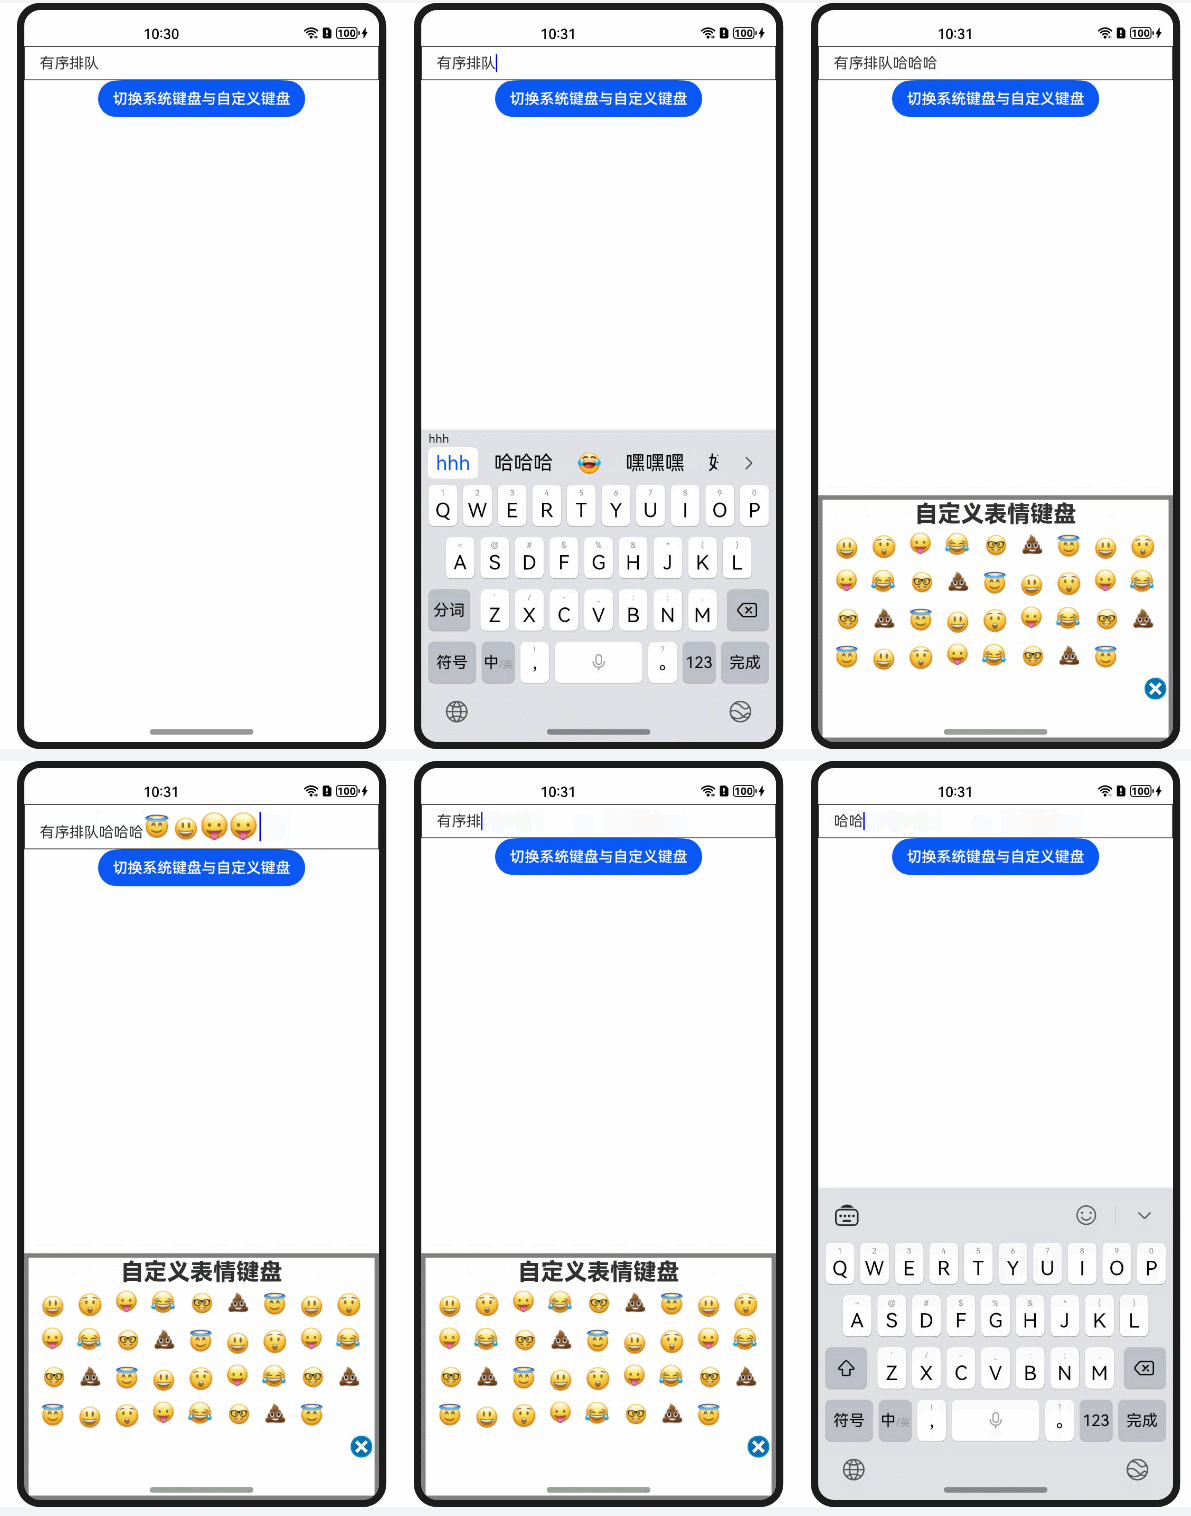
使用RichEditor的属性customKeyboard控制切换系统键盘还是自定义键盘,添加表情使用addImageSpan,删除内容使用deleteSpans,并通过获取光标所在位置进行删除。
核心代码
@Entry

@Component

struct Index {

@State message: string = 'Hello World';

controller = new RichEditorController()

@State showKeyboard:boolean = false;

private listData: (string | number | Resource)[] = [

$r('app.media.img'), $r('app.media.img_1'), $r('app.media.img_2'), $r('app.media.img_3'), $r('app.media.img_4'), $r('app.media.img_5'), $r('app.media.img_6'),

$r('app.media.img'), $r('app.media.img_1'), $r('app.media.img_2'), $r('app.media.img_3'), $r('app.media.img_4'), $r('app.media.img_5'), $r('app.media.img_6'),

$r('app.media.img'), $r('app.media.img_1'), $r('app.media.img_2'), $r('app.media.img_3'), $r('app.media.img_4'), $r('app.media.img_5'), $r('app.media.img_6'),

$r('app.media.img'), $r('app.media.img_1'), $r('app.media.img_2'), $r('app.media.img_3'), $r('app.media.img_4'), $r('app.media.img_5'), $r('app.media.img_6'),

$r('app.media.img'), $r('app.media.img_1'), $r('app.media.img_2'), $r('app.media.img_3'), $r('app.media.img_4'), $r('app.media.img_5'), $r('app.media.img_6'),

];

// 自定义键盘组件

@Builder CustomKeyboardBuilder() {

Column() {

Text('自定义表情键盘')

.fontSize(25)

.fontWeight(900)

Grid() {

ForEach(this.listData, (item: string | number | Resource) => {

GridItem() {

if (typeof item !== 'number' && typeof item !== 'string') {

Image(item)

.width(30).onClick(() => {

this.controller.addImageSpan(item, { imageStyle: { size: ['110px', '110px'] } })

})

}

}

})

}.columnsGap(10).rowsGap(10).padding(5)

Row() {

Image($r('app.media.img_7'))

.width(30)

.onClick(() => {

this.controller.deleteSpans({start: this.controller.getCaretOffset() - 1, end: this.controller.getCaretOffset()})

})

}

.width('100%')

.justifyContent(FlexAlign.End)

.margin({ bottom: 40 })

}

.borderColor(Color.Gray)

.borderWidth(5)

}

build() {

Column() {

RichEditor({ controller: this.controller })

.width('100%')

.borderWidth(1)

.borderColor(Color.Black)

.onReady(() => {

this.controller.addTextSpan('有序排队')

})

.customKeyboard(this.showKeyboard ? this.CustomKeyboardBuilder() : undefined)

Button('切换系统键盘与自定义键盘').onClick((event: ClickEvent) => {

this.showKeyboard = ! this.showKeyboard

})

}

.height('100%')

}

}
- 1
- 2
- 3
- 4
- 5
- 6
- 7
- 8
- 9
- 10
- 11
- 12
- 13
- 14
- 15
- 16
- 17
- 18
- 19
- 20
- 21
- 22
- 23
- 24
- 25
- 26
- 27
- 28
- 29
- 30
- 31
- 32
- 33
- 34
- 35
- 36
- 37
- 38
- 39
- 40
- 41
- 42
- 43
- 44
- 45
- 46
- 47
- 48
- 49
- 50
- 51
- 52
- 53
- 54
- 55
- 56
- 57
- 58
- 59
- 60
- 61
- 62
- 63
- 64
- 65
- 66
- 67
- 68
- 69
- 70
- 71
- 72
- 73
- 74
- 75
- 76
- 77
- 78
- 79
- 80
- 81
- 82
- 83
- 84
- 85
- 86
- 87
- 88
- 89
- 90
- 91
- 92
- 93
- 94
- 95
- 96
- 97
- 98
- 99
- 100
- 101
- 102
- 103
- 104
- 105
- 106
- 107
- 108
- 109
- 110
- 111
- 112
- 113
- 114
- 115
- 116
- 117
- 118
- 119
- 120
- 121
- 122
- 123
鸿蒙全栈开发全新学习指南
有很多小伙伴不知道学习哪些鸿蒙开发技术?不知道需要重点掌握哪些鸿蒙应用开发知识点?而且学习时频繁踩坑,最终浪费大量时间。所以要有一份实用的鸿蒙(HarmonyOS NEXT)学习路线与学习文档用来跟着学习是非常有必要的。
针对一些列因素,整理了一套纯血版鸿蒙(HarmonyOS Next)全栈开发技术的学习路线,包含了鸿蒙开发必掌握的核心知识要点,内容有(ArkTS、ArkUI开发组件、Stage模型、多端部署、分布式应用开发、WebGL、元服务、OpenHarmony多媒体技术、Napi组件、OpenHarmony内核、OpenHarmony驱动开发、系统定制移植等等)鸿蒙(HarmonyOS NEXT)技术知识点。
本路线共分为四个阶段:
第一阶段:鸿蒙初中级开发必备技能

第二阶段:鸿蒙南北双向高工技能基础:gitee.com/MNxiaona/733GH

第三阶段:应用开发中高级就业技术

第四阶段:全网首发-工业级南向设备开发就业技术:gitee.com/MNxiaona/733GH

《鸿蒙 (Harmony OS)开发学习手册》(共计892页)
如何快速入门?
1.基本概念
2.构建第一个ArkTS应用
3.……

开发基础知识:gitee.com/MNxiaona/733GH
1.应用基础知识
2.配置文件
3.应用数据管理
4.应用安全管理
5.应用隐私保护
6.三方应用调用管控机制
7.资源分类与访问
8.学习ArkTS语言
9.……

基于ArkTS 开发
1.Ability开发
2.UI开发
3.公共事件与通知
4.窗口管理
5.媒体
6.安全
7.网络与链接
8.电话服务
9.数据管理
10.后台任务(Background Task)管理
11.设备管理
12.设备使用信息统计
13.DFX
14.国际化开发
15.折叠屏系列
16.……

鸿蒙开发面试真题(含参考答案):gitee.com/MNxiaona/733GH

鸿蒙入门教学视频:

美团APP实战开发教学:gitee.com/MNxiaona/733GH

写在最后
- 如果你觉得这篇内容对你还蛮有帮助,我想邀请你帮我三个小忙:
- 点赞,转发,有你们的 『点赞和评论』,才是我创造的动力。
- 关注小编,同时可以期待后续文章ing声明:本文内容由网友自发贡献,版权归原作者所有,本站不承担相应法律责任。如您发现有侵权的内容,请联系我们。转载请注明出处:【wpsshop博客】
Copyright © 2003-2013 www.wpsshop.cn 版权所有,并保留所有权利。


