热门标签
热门文章
- 1Caused by: java.lang.ClassNotFoundException: org.apache.hadoop.yarn.exceptions.YarnRuntimeException
- 2Ubuntu 20.04 安装RVM
- 3LLaMA: 高效且开源的基础语言模型
- 4网易+腾讯必问题库精选 C++经典编程面试题
- 5UE5 Lightmap使用
- 6[pyqt5][python][原创]pyqt5登陆界面跳转并关闭子窗口全部退出_pyqt5 关闭子窗口
- 72022年简历石沉大海,别投了,软件测试岗位饱和了...._软件测试投简历海投吗
- 8centos7安装cuda、dudnn、Nvidia驱动[最详细的教程和报错解决方案]_no package /root/libcudnn7-7.6.5.32-1.cuda10.0.x86
- 9QGIS插件开发详细教程
- 10Unity3d C# 实现滑动条(Slider)的拖拽开始和结束、点击等事件的拓展功能(含源码)_u3d slider点击拖拽弹出提示
当前位置: article > 正文
OceanBase部署(4.0版)_在服务器上如何根据oceanbase的压缩包部署oceanbase
作者:盐析白兔 | 2024-02-29 20:01:31
赞
踩
在服务器上如何根据oceanbase的压缩包部署oceanbase
版本说明
| 组件 | 备注 |
|---|---|
| all-in-one | 从 V4.0.0 开始,OceanBase 提供统一的安装包 all-in-one package。您可以通过这个统一的安装包一次性完成 OBD、OceanBase 数据库、OBProxy、obagent、Grafana 和 Prometheus 的安装;您可以根据实际需求选择部分组件安装或者指定组件的版本 |
一、安装前检查

参考官方文档:部署环境检查项
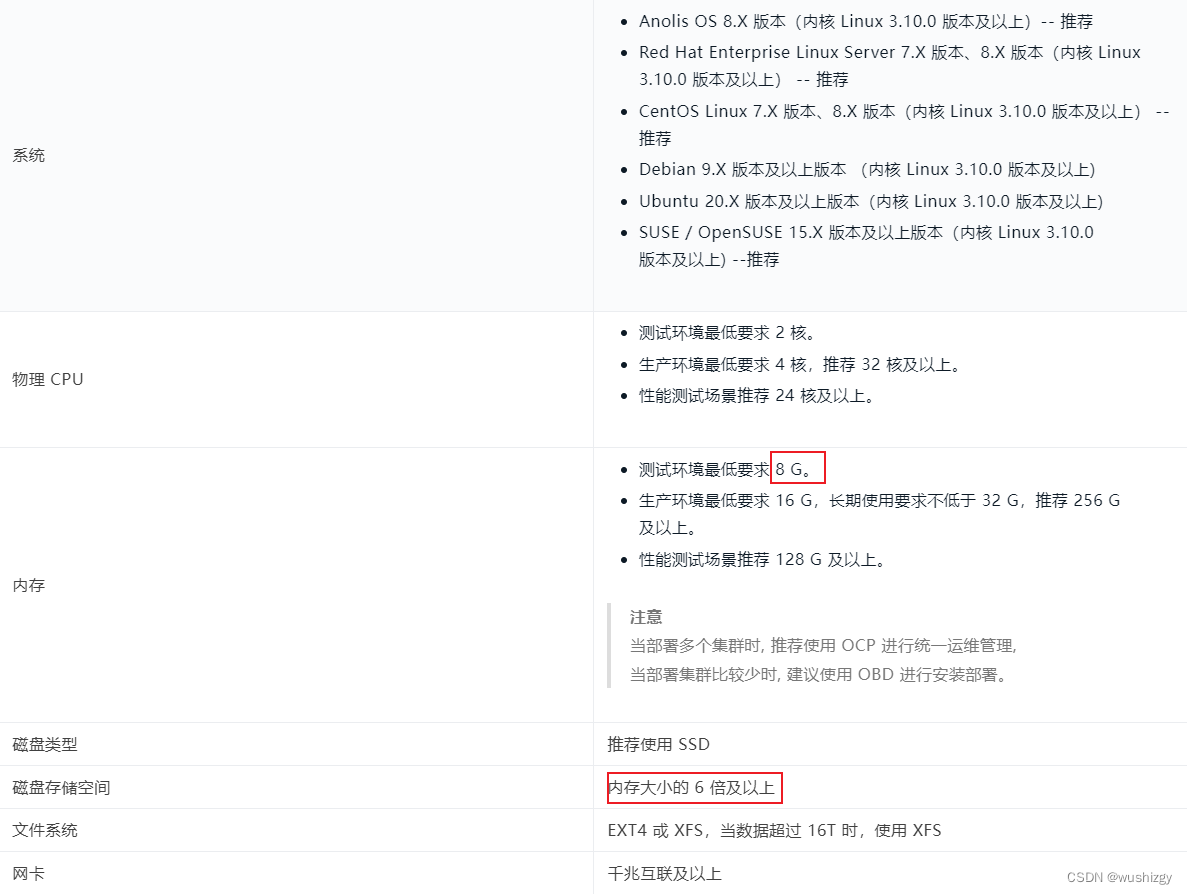
1、检查内存和磁盘空间
# 检查内存,至少需要8G
free -h
# 检查磁盘,不低于配置文件内指定size
df -h
- 1
- 2
- 3
- 4
2、配置limits
配置 /etc/security/limits.conf,退出当前会话,重新登录。
执行sysctl -p,查看配置是否生效
root soft nofile 655350
root hard nofile 655350
* soft nofile 655350
* hard nofile 655350
* soft stack 20480
* hard stack 20480
* soft nproc 655360
* hard nproc 655360
* soft core unlimited
* hard core unlimited
- 1
- 2
- 3
- 4
- 5
- 6
- 7
- 8
- 9
- 10
3、配置sysctl
/etc/sysctl.conf
echo 'fs.aio-max-nr=1048576' | sudo tee /etc/sysctl.conf
- 1
4、防火墙
检查并关闭防火墙
systemctl status firewalld
systemctl stop firewalld
- 1
- 2
5、SELinux
检查并关闭SELinux
setenforce 0 && sed -i 's/SELINUX=enforcing/SELINUX=disabled/g'/etc/selinux/config
- 1
6、创建用户
# 创建用户
useradd -U admin -d /home/admin -s /bin/bash
# 创建用户空间
mkdir -p /home/admin
# 授权用户空间
sudo chown -R admin:admin /home/admin
# 修改密码。密码设为admin123,后续步骤会用到
passwd admin
# 加入wheel组(可使用sudo)
usermod -G wheel user1
# 验证
id admin
- 1
- 2
- 3
- 4
- 5
- 6
- 7
- 8
- 9
- 10
- 11
- 12
二、安装部署
参考官方文档:OceanBase安装部署
1、安装all-in-one package
下载并安装all-in-one package。
一键安装OBD、OceanBase 数据库、OBProxy、obagent、Grafana 和 Prometheus 的安装;
您可以根据实际需求选择部分组件安装或者指定组件的版本
# 下载
wget https://obbusiness-private.oss-cn-shanghai.aliyuncs.com/download-center/opensource/oceanbase-all-in-one/7/x86_64/oceanbase-all-in-one.4.0.0.0-beta-100120221102135736.el7.x86_64.tar.gz
# 解压
tar -xzf oceanbase-all-in-one-4.xx.xx-xxx.tar.gz
# 一键安装
cd oceanbase-all-in-one/bin/
./install.sh
# 验证
which obd
/root/.oceanbase-all-in-one/obd/usr/bin/obd
which obclient
/root/.oceanbase-all-in-one/obclient/u01/obclient/bin/obclient
- 1
- 2
- 3
- 4
- 5
- 6
- 7
- 8
- 9
- 10
- 11
- 12
2、安装oceanbase数据库
a、准备目录
三台服务器依次执行
# 创建目录
sudo mkdir -p /u02/admin/oceanbase/observer/ccsit-2/home
sudo mkdir -p /u02/admin/oceanbase/observer/ccsit-2/data
sudo mkdir -p /u02/admin/oceanbase/observer/ccsit-2/redo
sudo mkdir -p /u02/admin/oceanbase/observer/ccsit-2/obproxy-sit
# 授权
sudo chown -R admin:admin /u02/admin
- 1
- 2
- 3
- 4
- 5
- 6
- 7
b、准备配置文件
obcluster-sit.yaml
- 注意使用命令
ip address查看服务器网卡名称devname
## Only need to configure when remote login is required
user:
  username: admin
  password: admin123
  #key_file: your ssh-key file path if need
  #port: your ssh port, default 22
  #timeout: ssh connection timeout (second), default 30
oceanbase-ce:
  servers:
  - name: server1
    ip: 10.95.34.37
  - name: server2
    ip: 10.95.34.38
  - name: server3
    ip: 10.95.34.39
  global:
  	# 网卡名称
    devname: ens32
    cluster_id: 1
    # please set memory limit to a suitable value which is matching resource.
    memory_limit: 8G # The maximum running memory for an observer
    system_memory: 4G # The reserved system memory. system_memory is reserved for general tenants. The default value is 30G.
    datafile_size: 20G # Size of the data file.
    log_disk_size: 24G # The size of disk space used by the clog files.
    cpu_count: 8
    production_mode: true
    syslog_level: INFO # System log level. The default value is INFO.
    enable_syslog_wf: false # Print system logs whose levels are higher than WARNING to a separate log file. The default value is true.
    enable_syslog_recycle: true # Enable auto system log recycling or not. The default value is false.
    max_syslog_file_count: 4 # The maximum number of reserved log files before enabling auto recycling. The default value is 0.
    # observer cluster name, consistent with obproxy's cluster_name
    appname: ccsit-2
    root_password: NbrcgBRHfL
  server1:
    mysql_port: 2881 # External port for OceanBase Database. The default value is 2881. DO NOT change this value after the cluster is started.
	rpc_port: 2882 # Internal port for OceanBase Database. The default value is 2882. DO NOT change this value after the cluster is started.
    #  The working directory for OceanBase Database. OceanBase Database is started under this directory. This is a required field.
    home_path: /u02/admin/oceanbase/observer/ccsit-2/home
    # The directory for data storage. The default value is $home_path/store.
    data_dir: /u02/admin/oceanbase/observer/ccsit-2/data
    # The directory for clog, ilog, and slog. The default value is the same as the data_dir value.
    redo_dir: /u02/admin/oceanbase/observer/ccsit-2/redo
    zone: zone1
    devname: ens32
    system_memory: 4G
    cpu_count: 16
    datafile_size: 41G
    log_disk_size: 24G
    production_mode: false
  server2:
    mysql_port: 2881 # External port for OceanBase Database. The default value is 2881. DO NOT change this value after the cluster is started.
    rpc_port: 2882 # Internal port for OceanBase Database. The default value is 2882. DO NOT change this value after the cluster is started.
    #  The working directory for OceanBase Database. OceanBase Database is started under this directory. This is a required field.
    home_path: /u02/admin/oceanbase/observer/ccsit-2/home
    # The directory for data storage. The default value is $home_path/store.
    data_dir: /u02/admin/oceanbase/observer/ccsit-2/data
    # The directory for clog, ilog, and slog. The default value is the same as the data_dir value.
    redo_dir: /u02/admin/oceanbase/observer/ccsit-2/redo
    zone: zone2
    devname: ens32
    system_memory: 4G
    cpu_count: 16
    datafile_size: 41G
    log_disk_size: 24G
    production_mode: false
  server3:
    mysql_port: 2881 # External port for OceanBase Database. The default value is 2881. DO NOT change this value after the cluster is started.
    rpc_port: 2882 # Internal port for OceanBase Database. The default value is 2882. DO NOT change this value after the cluster is started.
    #  The working directory for OceanBase Database. OceanBase Database is started under this directory. This is a required field.
    home_path: /u02/admin/oceanbase/observer/ccsit-2/home
    # The directory for data storage. The default value is $home_path/store.
    data_dir: /u02/admin/oceanbase/observer/ccsit-2/data
    # The directory for clog, ilog, and slog. The default value is the same as the data_dir value.
    redo_dir: /u02/admin/oceanbase/observer/ccsit-2/redo
    zone: zone3
    devname: ens32
    system_memory: 4G
    cpu_count: 16
    datafile_size: 41G
    log_disk_size: 24G
    production_mode: false
obproxy-ce:
  depends:
  - oceanbase-ce
  servers:
  - 10.95.34.39
  global:
    # The working directory for obproxy. Obproxy is started under this directory. This is a required field.
    listen_port: 2883
    prometheus_listen_port: 2884
    rs_list: 10.95.34.37:2881;10.95.34.38:2881;10.95.34.39:2881
    enable_cluster_checkout: false
    cluster_name: ccsit-2
    skip_proxy_sys_private_check: true
    home_path: /u02/admin/oceanbase/observer/ccsit-2/obproxy-sit
    enable_strict_kernel_release: false
    enable_cluster_checkout: false
- 1
- 2
- 3
- 4
- 5
- 6
- 7
- 8
- 9
- 10
- 11
- 12
- 13
- 14
- 15
- 16
- 17
- 18
- 19
- 20
- 21
- 22
- 23
- 24
- 25
- 26
- 27
- 28
- 29
- 30
- 31
- 32
- 33
- 34
- 35
- 36
- 37
- 38
- 39
- 40
- 41
- 42
- 43
- 44
- 45
- 46
- 47
- 48
- 49
- 50
- 51
- 52
- 53
- 54
- 55
- 56
- 57
- 58
- 59
- 60
- 61
- 62
- 63
- 64
- 65
- 66
- 67
- 68
- 69
- 70
- 71
- 72
- 73
- 74
- 75
- 76
- 77
- 78
- 79
- 80
- 81
- 82
- 83
- 84
- 85
- 86
- 87
- 88
- 89
- 90
- 91
- 92
- 93
- 94
- 95
- 96
- 97
c、obd部署数据库
加上-v可以输出部署日志
obd cluster autodeploy ccsit-2-c obcluster-sit.yaml -v
## 日志文件
tail -200f /u02/admin/oceanbase/observer/ccsit-2/home/log/observer.log
- 1
- 2
- 3
d、修改配置项(非必须)
如果需要修改配置项,需要修改obd已经加载的配置。这个时候修改obcluster-sit.yaml是无效的
## 查看 & 修改配置信息(和vim一样用)
obd cluster edit-config ccsit-2 -v
## 停止集群
obd cluster stop ccsit-2 -v
## 重新安装集群
obd cluster redeploy ccsit-2 -v
- 1
- 2
- 3
- 4
- 5
- 6
三、初始化配置
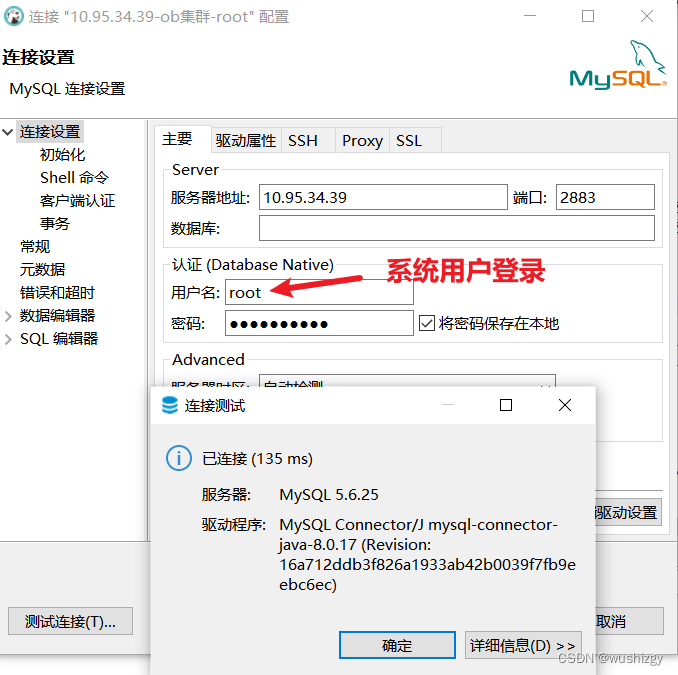
1、登录root账号
使用连接工具(navicat、dbeaver等)登录root账号,密码在配置项中,如果没有填写,默认是空
用户名:root
密码:无
- 1
- 2
2、创建资源规格
创建资源规格 unit config
参考官方文档:创建unit config
CREATE RESOURCE UNIT unit1 MAX_CPU 4, MEMORY_SIZE '2G', MAX_IOPS 1280,LOG_DISK_SIZE '10G', MIN_IOPS=1024;
CREATE RESOURCE UNIT unit2 MAX_CPU 4, MEMORY_SIZE '2G', MAX_IOPS 1280,LOG_DISK_SIZE '10G', MIN_IOPS=1024;

## 验证
SELECT * FROM oceanbase.__all_unit_config;

## 修改配置项(需要时再执行)
ALTER RESOURCE UNIT unit2 MEMORY_SIZE '2G'
- 1
- 2
- 3
- 4
- 5
- 6
- 7
- 8
3、创建资源池
关联 unit config
参考官方文档:创建pool
CREATE RESOURCE POOL pool1 UNIT='unit1',UNIT_NUM=1,ZONE_LIST=('zone1','zone2','zone3');
## 验证
SELECT * FROM oceanbase.__all_resource_pool;
- 1
- 2
- 3
4、创建租户
根据创建的 resource pool 创建租户
参考官方文档:创建租户
CREATE TENANT IF NOT EXISTS tenant1 CHARSET='utf8mb4', ZONE_LIST=('zone1','zone2','zone3'), PRIMARY_ZONE='zone1,zone2,zone3', RESOURCE_POOL_LIST=('pool1') SET ob_tcp_invited_nodes='%';
## 验证
SELECT * FROM DBA_OB_TENANTS;
- 1
- 2
- 3
5、创建用户 & 授权
参考官方文档:创建用户 & 授权
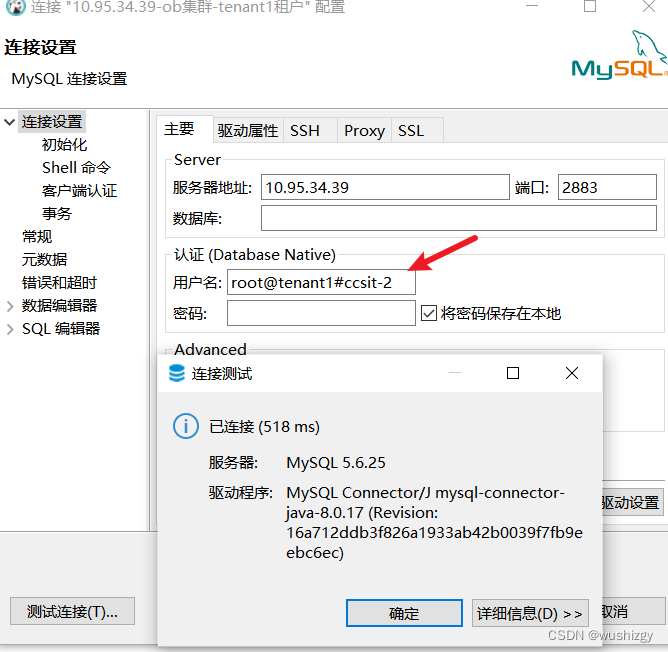
a、切换到租户登录
用户名:root@tenant1#ccsit-2
密码:无
- 1
- 2
b、创建用户
# 创建用户
CREATE USER 'sqluser01' IDENTIFIED BY '123456';
# 授权
GRANT ALL PRIVILEGES ON *.* TO sqluser01 WITH GRANT OPTION;
- 1
- 2
- 3
- 4
四、验证
1、系统用户登录

2、系统用户-租户登录
用户名格式:用户名@租户名#集群名

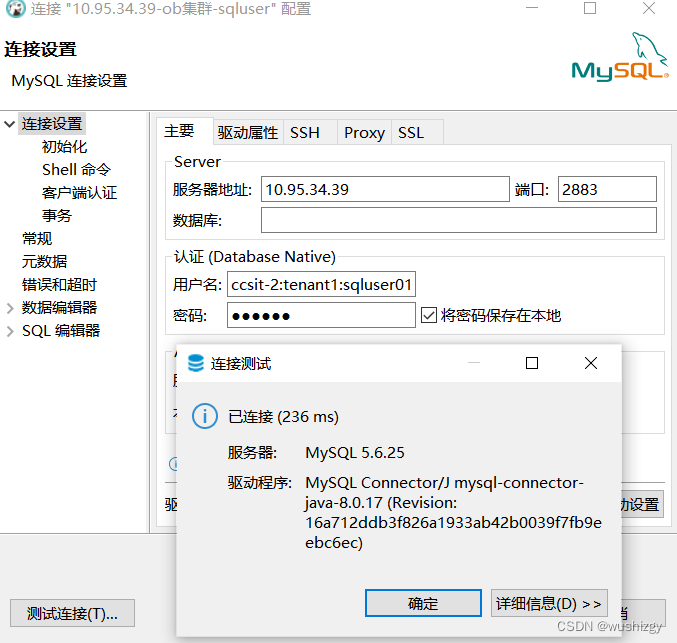
3、普通用户-租户登录
用户名格式:
1、用户名@租户名#集群名
2、集群名:租户名:用户名

声明:本文内容由网友自发贡献,不代表【wpsshop博客】立场,版权归原作者所有,本站不承担相应法律责任。如您发现有侵权的内容,请联系我们。转载请注明出处:https://www.wpsshop.cn/w/盐析白兔/article/detail/168007
推荐阅读
相关标签


