
热门标签
热门文章
- 1云计算于大数据入门实验三——熟悉常用的 HBase 操作
- 2ERROR [org.apache.hadoop.util.Shell] - Failed to locate the winutils binary in the hadoop binary pat
- 3Numpy数组与矩阵运算_在使用array函数创建数组时,数组的数据类型默认是浮点型。自定义数组数据,则可以
- 4Delphi对Excel的所有操作_在delphi 设置 excel orientation
- 5OOM异常原因几种类型分析_fd超限
- 6mac读不到内置磁盘为什么 ntfs读取不了硬盘_ntfs格式硬盘在mac无法读写
- 7听我一句劝,别去外包,干了6年,废了...._银行测试外包不是人干的
- 82017年小米春招内推面试面经_小米内推和不内推的区别
- 9日志业务从mysql数据库迁移到mongodb数据库_java 系统操作日志保存到mysql还是mongdb
- 10Cisco交换机端口安全
当前位置: article > 正文
【YOLOv5】将YOLOv5预测结果由矩形框改为透明mask_yolo mask预测
作者:盐析白兔 | 2024-06-03 10:58:33
赞
踩
yolo mask预测
【YOLOv5】将YOLOv5预测结果由矩形框改为透明mask
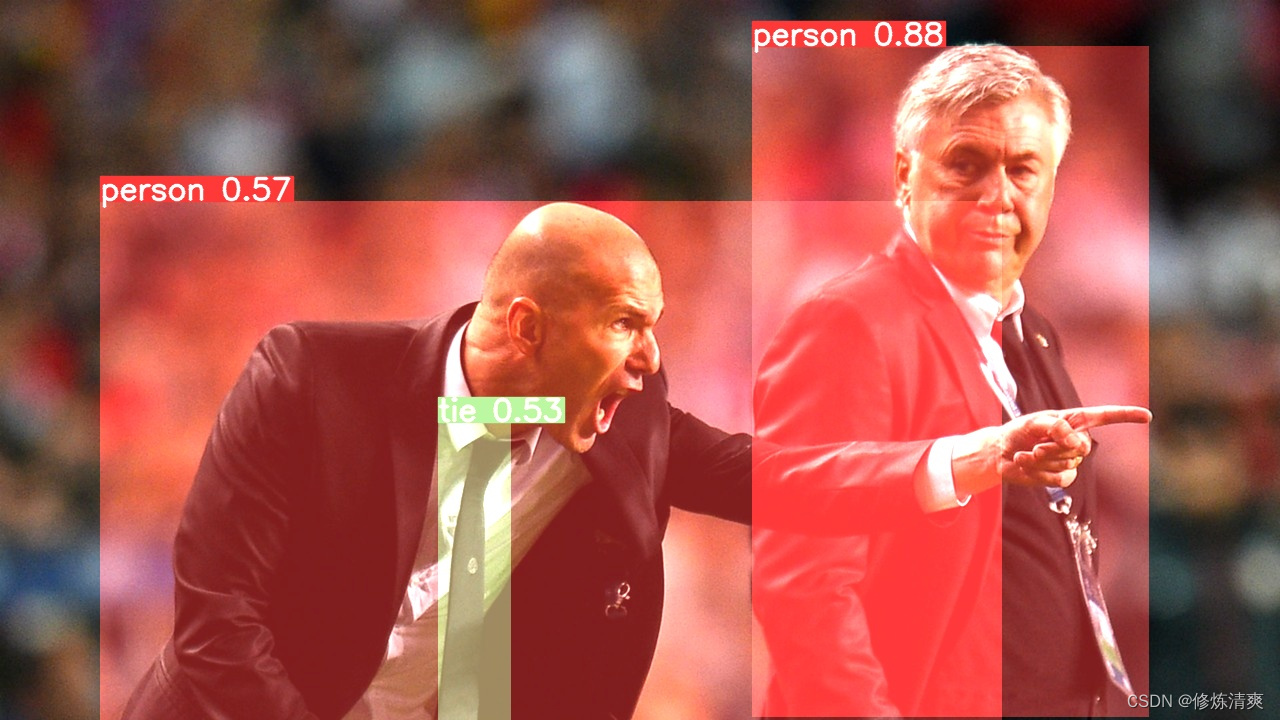
原始的YOLOv5预测结果是在图片上面绘制矩阵框,但是在视觉效果上并不明显。
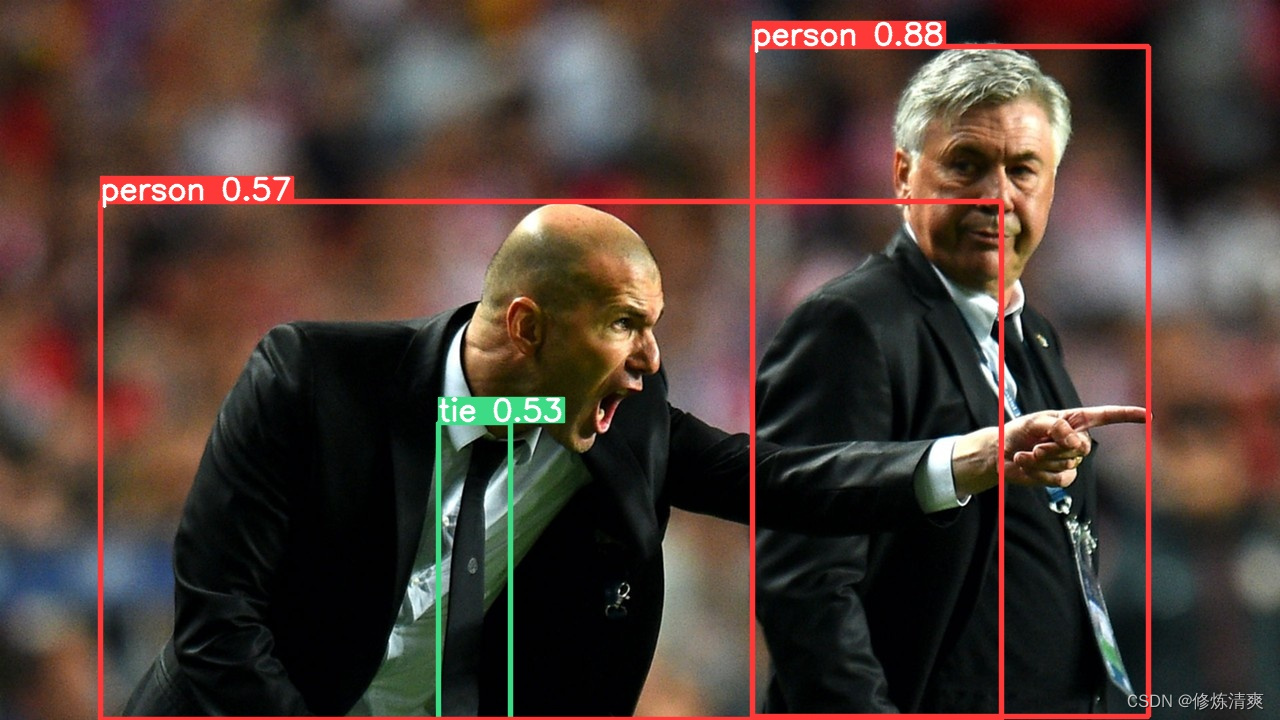
因此将矩阵框的形式改为绘制透明mask。
代码实现:
修改YOLOv5工程中的utils/plots.py部分代码,class Annotator中的函数进行如下替换,主要是两处TODO:
    def box_label(self, box, label='', color=(128, 128, 128), txt_color=(255, 255, 255)):
        # Add one xyxy box to image with label
        if self.pil or not is_ascii(label):
            self.draw.rectangle(box, width=self.lw, outline=color)  # box
            if label:
                w, h = self.font.getsize(label)  # text width, height
                outside = box[1] - h >= 0  # label fits outside box
                self.draw.rectangle(
                    (box[0], box[1] - h if outside else box[1], box[0] + w + 1,
                     box[1] + 1 if outside else box[1] + h + 1),
                    fill=color,
                )
                # self.draw.text((box[0], box[1]), label, fill=txt_color, font=self.font, anchor='ls')  # for PIL>8.0
                self.draw.text((box[0], box[1] - h if outside else box[1]), label, fill=txt_color, font=self.font)
        else:  # cv2
            p1, p2 = (int(box[0]), int(box[1])), (int(box[2]), int(box[3]))
            # TODO mask1-1
            cv2.rectangle(self.im, p1, p2, color, thickness=self.lw, lineType=cv2.LINE_AA)
            # self.im = self.mask_label(self.im, p1, p2, color)

            if label:
                tf = max(self.lw - 1, 1)  # font thickness
                w, h = cv2.getTextSize(label, 0, fontScale=self.lw / 3, thickness=tf)[0]  # text width, height
                outside = p1[1] - h >= 3
                p2 = p1[0] + w, p1[1] - h - 3 if outside else p1[1] + h + 3
                cv2.rectangle(self.im, p1, p2, color, -1, cv2.LINE_AA)  # filled
                cv2.putText(self.im,
                            label, (p1[0], p1[1] - 2 if outside else p1[1] + h + 2),
                            0,
                            self.lw / 3,
                            txt_color,
                            thickness=tf,
                            lineType=cv2.LINE_AA)
    # TODO mask1-2
    def mask_label(self, img, pos1, pos2, color, thickness=-1, alpha=1, beta=0.5, gamma=0):
        mask_zeros = np.zeros((img.shape), dtype=np.uint8)
        mask = cv2.rectangle(mask_zeros, pos1, pos2, color, thickness)
        mask_img = cv2.addWeighted(img, alpha, mask, beta, gamma)
        return mask_img

- 1
- 2
- 3
- 4
- 5
- 6
- 7
- 8
- 9
- 10
- 11
- 12
- 13
- 14
- 15
- 16
- 17
- 18
- 19
- 20
- 21
- 22
- 23
- 24
- 25
- 26
- 27
- 28
- 29
- 30
- 31
- 32
- 33
- 34
- 35
- 36
- 37
- 38
- 39
声明:本文内容由网友自发贡献,不代表【wpsshop博客】立场,版权归原作者所有,本站不承担相应法律责任。如您发现有侵权的内容,请联系我们。转载请注明出处:https://www.wpsshop.cn/w/盐析白兔/article/detail/666952
推荐阅读
相关标签

