
热门标签
热门文章
- 1Mac:TexStudio 公式对齐_textstudio中分段函数怎让对齐
- 2vue中关于apI封装 搭建,注册登录 关于token的一些理解_vue中api中的下载接口的路径在哪里注册的
- 3小白自总结【pLSA】关于“NAN”报错_plspm模型的gof显示nan
- 4云端之上的边缘:解读云计算与边缘计算的战略融合
- 5使用百度ocr识别图片文字,身份证,营业执照等,并转换为docx文件_ocr营业执照图片标注语
- 6今年面试好激烈。。。
- 7使用v-md-editor开发sql查看器--实战_前端sql编辑器插件
- 8车牌识别系统连不上服务器怎么办,高清车牌识别系统常见故障解决方案
- 9Python爬虫详解
- 102024最新python毕设选题推荐,毕业设计题目大全(文末附源码)_基于python的毕业设计题目
当前位置: article > 正文
CSS实现垂直居中(八种)_css垂直居中
作者:盐析白兔 | 2024-06-11 10:24:34
赞
踩
css垂直居中
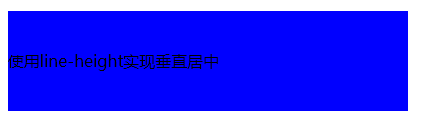
1. 使用line-height实现垂直居中
适合文本使用,子元素的line-height跟父元素的height一样即可
1.1 代码
<style>
    .div1 {
        width: 400px;
        height: 100px;
        background-color: blue;

    }

    p {
        line-height: 100px;
    }
</style>
<body>
<div class="div1">
    <p>使用line-height实现垂直居中</p>
</div>

- 1
- 2
- 3
- 4
- 5
- 6
- 7
- 8
- 9
- 10
- 11
- 12
- 13
- 14
- 15
- 16
1.2效果图
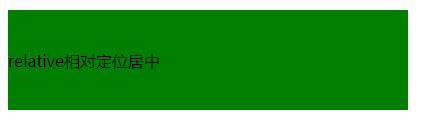
2. 使用relative相对定位居中
子元素使用相对定位 position: relative;top: 40%;,这个40%是这么来的呢?因为相对定位是根据元素的头去定位的。计算方式:(容器高度-元素自身高度)/2。(不建议使用)
2.1 代码
<style>
    .div2 {
        width: 400px;
        height: 100px;
        background-color: green;

    }
    .div2>p {
        position: relative;
        top: 40%;
    }
</style>
<body>
<div class="div2">
    <p>relative相对定位居中</p>
</div>
</body>
- 1
- 2
- 3
- 4
- 5
- 6
- 7
- 8
- 9
- 10
- 11
- 12
- 13
- 14
- 15
- 16
- 17
2.2 效果图
3. 使用absolute绝对定位居中
第三种方式跟第二种的差不多,不同的是这次使用了top: 50%; ,然后使用负值的margin解决定位差距,margin-top: -10.5px;为子元素自身高度的一半.最后注意子元素使用position: absolute;绝对布局时,要先设置父元素的position: relative为相对定位。(不建议使用,需要自己计算子元素的高度)
3.1 代码
<style>}
    .div3 {
        width: 400px;
        height: 100px;
        background-color: yellow;
        position: relative;
    }

    .div3 > p {
        position: absolute;
        top: 50%;
        margin-top: -10.5px;
    }
</style>
<body>
<div class="div3">
    <p>relative相对定位居中</p>
</div>
</body>
- 1
- 2
- 3
- 4
- 5
- 6
- 7
- 8
- 9
- 10
- 11
- 12
- 13
- 14
- 15
- 16
- 17
- 18
- 19
3.2 效果图

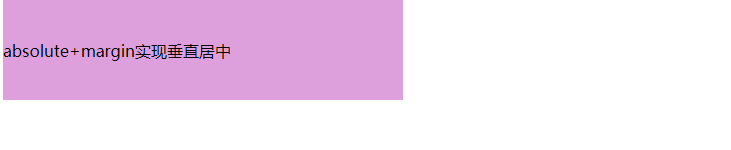
4. absolute+margin实现垂直居中
利用绝对定位top: 0;left: 0;bottom: 0;right: 0;这样子元素元素就会充满整个容器,这时候使用margin: auto 0;就能使元素居中啦。这个记得给这个元素设定高度哦。
4.1代码
<style>
    .div4 {
        width: 400px;
        height: 100px;
        background-color: plum;
        position: relative;
    }

    .div4 > p {
        position: absolute;
        top: 0;
        left: 0;
        bottom: 0;
        right: 0;
        margin: auto 0;
        height: 21px;
    }
</style>
<body>
<div class="div4">
    <p>absolute+margin实现垂直居中</p>
</div>
</body>
- 1
- 2
- 3
- 4
- 5
- 6
- 7
- 8
- 9
- 10
- 11
- 12
- 13
- 14
- 15
- 16
- 17
- 18
- 19
- 20
- 21
- 22
- 23
4.2 效果图
5. 使用table-cell实现垂直居中
第五种没什么好解释的,记住这两句代码就完事了display: table-cell;vertical-align: middle;
5.1 代码
<style>
    .div5 {
        width: 400px;
        height: 100px;
        background-color: pink;
        display: table-cell;
        vertical-align: middle;
    }

    .div5 > p {
    /*  nothing to do  */
    }
</style>
<body>
<div class="div5">
    <p>table-cell实现垂直居中</p>
</div>
</body>
- 1
- 2
- 3
- 4
- 5
- 6
- 7
- 8
- 9
- 10
- 11
- 12
- 13
- 14
- 15
- 16
- 17
- 18
5.2 效果图

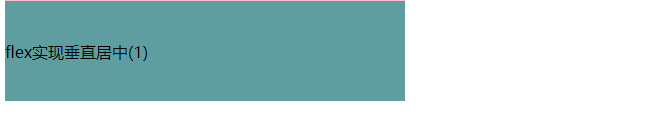
6. flex实现垂直居中(1)
第六种挺简单的,父元素设置display: flex;,然后子元素使用margin:auto 0;就可以实现居中了。
6.1 代码
<style>
    .div6 {
        width: 400px;
        height: 100px;
        background-color: cadetblue;
        display: flex;
    }

    .div6 > p {
        margin: auto 0;
    }
</style>
<body>
<div class="div6">
    <p>flex实现垂直居中(1)</p>
</div>
</body>
- 1
- 2
- 3
- 4
- 5
- 6
- 7
- 8
- 9
- 10
- 11
- 12
- 13
- 14
- 15
- 16
- 17
6.2 效果图
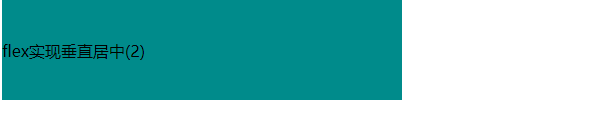
7. flex实现垂直居中(2)
同样是父元素设置display: flex;,这次子元素使用align-self: center;就可以实现居中了。
7.1 代码
<style>
    .div7 {
        width: 400px;
        height: 100px;
        background-color: darkcyan;
        display: flex;
    }

    .div7 > p {
        align-self: center;
    }
</style>
<body>
<div class="div7">
    <p>flex实现垂直居中(2)</p>
</div>
</body>
- 1
- 2
- 3
- 4
- 5
- 6
- 7
- 8
- 9
- 10
- 11
- 12
- 13
- 14
- 15
- 16
- 17
7.2 效果图
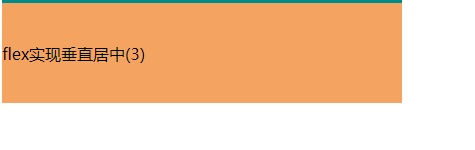
8. flex实现垂直居中(3)
这次父元素直接使用display: flex; +align-items: center;直接控制子元素垂直居中
8.3 代码
<style>
    .div8 {
        width: 400px;
        height: 100px;
        background-color: darkcyan;
        display: flex;
    }

    .div8 > p {
         /*  nothing to do  */
    }
</style>
<body>
<div class="div8">
    <p>flex实现垂直居中(2)</p>
</div>
</body>
- 1
- 2
- 3
- 4
- 5
- 6
- 7
- 8
- 9
- 10
- 11
- 12
- 13
- 14
- 15
- 16
- 17
8.2 效果图
css实现垂直居中的方法还有很多很多,我一般都是使用第八种,你们呢?欢迎在评论区留言(^U^)ノ~YO
声明:本文内容由网友自发贡献,不代表【wpsshop博客】立场,版权归原作者所有,本站不承担相应法律责任。如您发现有侵权的内容,请联系我们。转载请注明出处:https://www.wpsshop.cn/w/盐析白兔/article/detail/702794
推荐阅读
相关标签

