热门标签
热门文章
- 1亚马逊实时 AI 编程助手 CodeWhisperer使用体验
- 2AI学术界无人后继?高校毕业生纷纷进厂,全是香饽饽
- 32023最新软件测试面试题(带答案)
- 4在 Mac 中卸载 Node.js_mac node卸载
- 5Hadoop运行报ERROR: Attempting to operate on hdfs as root或者HDFS_ZKFC_USER defined错误的解决方法_starting namenodes on [master] error: attempting t
- 6C# .Net笔试题 期末试题 含答案_c#考试
- 7华为认证HCIA-HCIP-HCIEdatacom题库解析+机构视频+实验_华为hcia的题库在哪?
- 8基于决策树的区块链应用:实现去中心化智能决策与管理
- 9HarmonyOS应用开发者基础认证【满分答案】_harmonyos应用开发者基础认证(完美答案)-csdn博客
- 10HSRP(热备份路由选择协议)的概念,原理与配置实验_简述hsrp的基本原理
当前位置: article > 正文
星火认知大模型API接入Python教程,中文回答效果非常友好_星火api
作者:盐析白兔 | 2024-02-12 11:36:57
赞
踩
星火api
申请
地址大概是这个:
https://console.xfyun.cn/app/myapp
- 1
自己创建一个应用:

进入控制台:

注意:我已经申请好了,如果你需要使用,需要提交一个申请,一般第二天通过。
Python接入完整示例
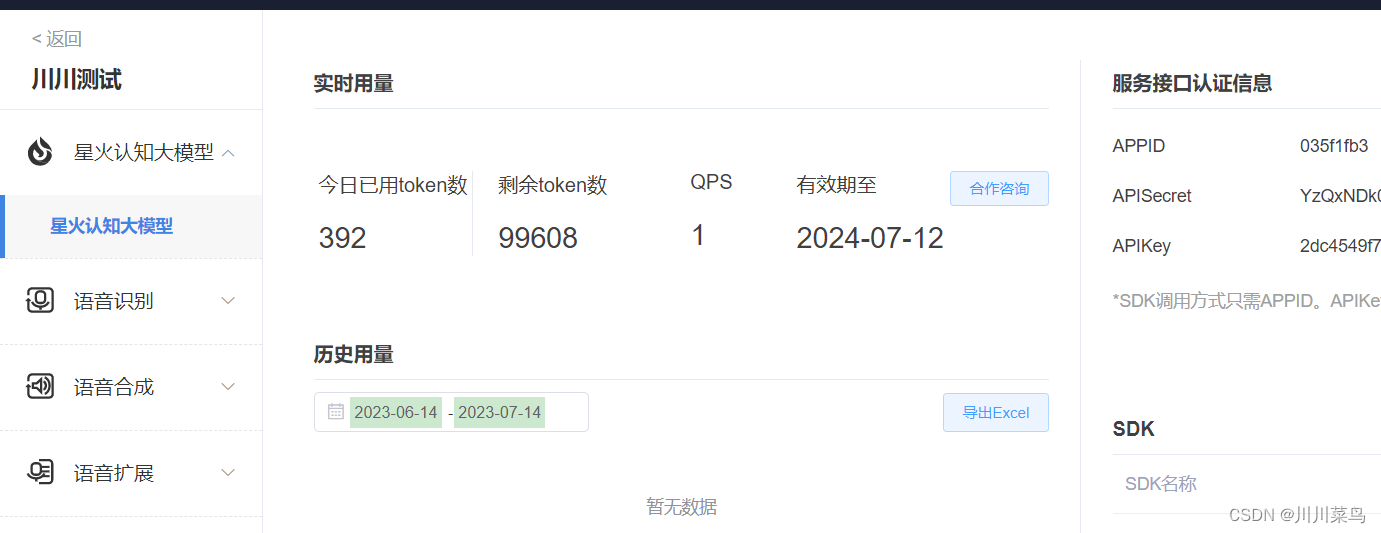
我们可以看到右侧有三个参数:APPID、APISecret、APIKey,填入下方代码的main中即可:
import _thread as thread
import base64
import datetime
import hashlib
import hmac
import json
from urllib.parse import urlparse
import ssl
from datetime import datetime
from time import mktime
from urllib.parse import urlencode
from wsgiref.handlers import format_date_time
# websocket-client
import websocket

class Ws_Param(object):
    # 初始化
    def __init__(self, APPID, APIKey, APISecret, gpt_url):
        self.APPID = APPID
        self.APIKey = APIKey
        self.APISecret = APISecret
        self.host = urlparse(gpt_url).netloc
        self.path = urlparse(gpt_url).path
        self.gpt_url = gpt_url

    # 生成url
    def create_url(self):
        # 生成RFC1123格式的时间戳
        now = datetime.now()
        date = format_date_time(mktime(now.timetuple()))

        # 拼接字符串
        signature_origin = "host: " + self.host + "\n"
        signature_origin += "date: " + date + "\n"
        signature_origin += "GET " + self.path + " HTTP/1.1"

        # 进行hmac-sha256进行加密
        signature_sha = hmac.new(self.APISecret.encode('utf-8'), signature_origin.encode('utf-8'),
                                 digestmod=hashlib.sha256).digest()

        signature_sha_base64 = base64.b64encode(signature_sha).decode(encoding='utf-8')

        authorization_origin = f'api_key="{self.APIKey}", algorithm="hmac-sha256", headers="host date request-line", signature="{signature_sha_base64}"'

        authorization = base64.b64encode(authorization_origin.encode('utf-8')).decode(encoding='utf-8')

        # 将请求的鉴权参数组合为字典
        v = {
            "authorization": authorization,
            "date": date,
            "host": self.host
        }
        # 拼接鉴权参数,生成url
        url = self.gpt_url + '?' + urlencode(v)
        # 此处打印出建立连接时候的url,参考本demo的时候可取消上方打印的注释,比对相同参数时生成的url与自己代码生成的url是否一致
        return url


# 收到websocket错误的处理
def on_error(ws, error):
    print("### error:", error)


# 收到websocket关闭的处理
def on_close(ws, status_code, reason):
    print("")


# 收到websocket连接建立的处理
def on_open(ws):
    thread.start_new_thread(run, (ws,))


def run(ws, *args):
    data = json.dumps(gen_params(appid=ws.appid, question=ws.question))
    ws.send(data)


# 收到websocket消息的处理
def on_message(ws, message):
    # print(message)
    data = json.loads(message)
    code = data['header']['code']
    if code != 0:
        print(f'请求错误: {code}, {data}')
        ws.close()
    else:
        choices = data["payload"]["choices"]
        status = choices["status"]
        content = choices["text"][0]["content"]
        print(content, end='')
        if status == 2:
            ws.close()


def gen_params(appid, question):
    """
    通过appid和用户的提问来生成请参数
    """
    data = {
        "header": {
            "app_id": appid,
            "uid": "1234"
        },
        "parameter": {
            "chat": {
                "domain": "general",
                "random_threshold": 0.5,
                "max_tokens": 2048,
                "auditing": "default"
            }
        },
        "payload": {
            "message": {
                "text": [
                    {"role": "user", "content": question}
                ]
            }
        }
    }
    return data


def main(appid, api_key, api_secret, gpt_url, question):
    wsParam = Ws_Param(appid, api_key, api_secret, gpt_url)
    websocket.enableTrace(False)
    wsUrl = wsParam.create_url()
    ws = websocket.WebSocketApp(wsUrl, on_message=on_message, on_error=on_error, on_close=on_close, on_open=on_open)
    ws.appid = appid
    ws.question = question
    ws.run_forever(sslopt={"cert_reqs": ssl.CERT_NONE})


if __name__ == "__main__":
    # 测试时候在此处正确填写相关信息即可运行
    main(appid="",
         api_secret="",
         api_key="",
         gpt_url="ws://spark-api.xf-yun.com/v1.1/chat",
         question="鲁迅和周树人是同一个人吗?")
- 1
- 2
- 3
- 4
- 5
- 6
- 7
- 8
- 9
- 10
- 11
- 12
- 13
- 14
- 15
- 16
- 17
- 18
- 19
- 20
- 21
- 22
- 23
- 24
- 25
- 26
- 27
- 28
- 29
- 30
- 31
- 32
- 33
- 34
- 35
- 36
- 37
- 38
- 39
- 40
- 41
- 42
- 43
- 44
- 45
- 46
- 47
- 48
- 49
- 50
- 51
- 52
- 53
- 54
- 55
- 56
- 57
- 58
- 59
- 60
- 61
- 62
- 63
- 64
- 65
- 66
- 67
- 68
- 69
- 70
- 71
- 72
- 73
- 74
- 75
- 76
- 77
- 78
- 79
- 80
- 81
- 82
- 83
- 84
- 85
- 86
- 87
- 88
- 89
- 90
- 91
- 92
- 93
- 94
- 95
- 96
- 97
- 98
- 99
- 100
- 101
- 102
- 103
- 104
- 105
- 106
- 107
- 108
- 109
- 110
- 111
- 112
- 113
- 114
- 115
- 116
- 117
- 118
- 119
- 120
- 121
- 122
- 123
- 124
- 125
- 126
- 127
- 128
- 129
- 130
- 131
- 132
- 133
- 134
- 135
- 136
- 137
- 138
- 139
- 140
- 141
- 142
运行如下:

似乎看起来跟GPT4.0回答差不多?总体效果还很好
声明:本文内容由网友自发贡献,不代表【wpsshop博客】立场,版权归原作者所有,本站不承担相应法律责任。如您发现有侵权的内容,请联系我们。转载请注明出处:https://www.wpsshop.cn/w/盐析白兔/article/detail/77545
推荐阅读
相关标签


