- 1【NI-DAQmx入门】LabVIEW数据采集基础应用程序框架
- 2Python--第三方库Numpy(Jupyter)_python的第三方库numpy
- 32020牛客暑期多校训练营(第六场)题解_2020牛客多校第六场 d data structure
- 4python pygame event get_pygame简单运用总结
- 5基于FPGA的数字图像处理- 图像分割【4.9】_fpga图形处理
- 6Linux|centos7操作系统|VMware虚拟机安装水星免驱USB网卡8188gu记录_centos 8188gu
- 7大模型应用在金融业务领域的发展_大模型与业务结合
- 8Xilinx的常见文档类型_xilinx官方文档分类
- 9Hdfs存储负载均衡_datanode卷选择策略平衡阀值
- 10Web Service ,WCF以及Web API的对比
入门mem0.NET
赞
踩
入门mem0.NET
安装包
如果你的项目使用了EntityFrameworkCore,那么你可以跟随这个教程走
<ItemGroup>
    <PackageReference Include="mem0.NET" Version="0.1.7" />
    <PackageReference Include="mem0.NET.Qdrant" Version="0.1.7" />
    <PackageReference Include="mem0.EntityFrameworkCore" Version="0.1.7" />
</ItemGroup>
- 1
- 2
- 3
- 4
- 5
mem0.NET是我们的核心类库,包含核心prompt和功能实现mem0.NET.Qdrant是Qdrant向量数据库的实现,目前仅支持Qdrantmem0.EntityFrameworkCore是EntityFrameworkCore的实现,因为我们需要记录AI利用Function的操作记录,当然您也可以自己实现其他的。
开始使用
我们需要先创建一个DbContext或者在现有的DbContext上也可以,
创建MasterDbContext
using mem0.NET.Service.DataAccess;
using Microsoft.EntityFrameworkCore;

namespace mem0.NET.Service;

public class MasterDbContext(DbContextOptions<MasterDbContext> options) : Mem0DbContext<MasterDbContext>(options)
{
}
- 1
- 2
- 3
- 4
- 5
- 6
- 7
- 8
DbContext需要继承Mem0DbContext,
然后打开appsettings.json
{
  "Logging": {
    "LogLevel": {
      "Default": "Information",
      "Microsoft.AspNetCore": "Warning"
    }
  },
  "AllowedHosts": "*",
  "ConnectionStrings": {
    "Default": "Host=localhost;Port=5432;Database=test;Username=token;Password=dd666666"
  },
  "Mem0": {
    "OpenAIEndpoint": "https://api.token-ai.cn",
    "OpenAIKey": "sk-asdasdaskdalksjdla",
    "OpenAIChatCompletionModel": "gpt-4o-mini",
    "OpenAITextEmbeddingModel": "text-embedding-ada-002",
    "CollectionName": "mem0-test"
  },
  "Qdrant": {
    "Host": "127.0.0.1",
    "Port": 6334,
    "Https": false,
    "ApiKey": "dd666666"
  }
}
- 1
- 2
- 3
- 4
- 5
- 6
- 7
- 8
- 9
- 10
- 11
- 12
- 13
- 14
- 15
- 16
- 17
- 18
- 19
- 20
- 21
- 22
- 23
- 24
- 25
我们需要配置一下我们的连接字符串和向量数据库的连接字符串,然后Mem0使用的AI相关的配置,我们推荐使用https://api.token-ai.cn,提供了非常多的AI模型,
创建MemoryService.cs
using mem0.Core;
using mem0.NET.Services;

#pragma warning disable SKEXP0001

namespace mem0.NET.Service.Services;

public static class ServiceCollectionExtensions
{
    public static WebApplication MapMemoryService(this WebApplication app)
    {
        var memoryService = app.MapGroup("/api/v1/memory")
            .WithTags("Memory")
            .WithDescription("Memory management")
            .WithDisplayName("Memory");

        memoryService.MapPost("/memory", async (MemoryService memoryService,
            CreateMemoryInput input) =>
        {
            await memoryService.CreateMemoryAsync(input);
        }).WithDescription("创建记忆").WithDisplayName("创建记忆").WithTags("记忆").WithName("CreateMemory");

        memoryService.MapPost("memory_tool", async (MemoryService memoryService,
            CreateMemoryToolInput input) =>
        {
            await memoryService.CreateMemoryToolAsync(input);
        }).WithDescription("创建记忆工具").WithDisplayName("创建记忆工具").WithTags("记忆");

        memoryService.MapGet("history/{memoryId}",
                async (MemoryService memoryService, string memoryId, int page, int pageSize) =>
                    await memoryService.GetHistory(memoryId, page, pageSize))
            .WithDescription("获取历史").WithDisplayName("获取历史").WithTags("记忆");

        memoryService.MapGet("memory/{memoryId}", async (MemoryService memoryService, Guid memoryId) =>
                await memoryService.GetMemory(memoryId))
            .WithDescription("获取记忆")
            .WithDisplayName("获取记忆")
            .WithTags("记忆");

        memoryService.MapGet("memory", async (MemoryService memoryService,
                    string? userId,
                    string? agentId, string? runId, uint limit) =>
                await memoryService.GetMemoryAll(userId, agentId, runId, limit))
            .WithDescription("获取所有记忆")
            .WithDisplayName("获取所有记忆")
            .WithTags("记忆");

        memoryService.MapGet("search", async (MemoryService memoryService,
                    string query,
                    string? userId,
                    string? agentId, string? runId, uint limit) =>
                await memoryService.SearchMemory(query,
                    userId,
                    agentId, runId, limit))
            .WithDescription("搜索记忆")
            .WithDisplayName("搜索记忆")
            .WithTags("记忆");

        memoryService.MapPut("memory",
                async (MemoryService memoryService, UpdateMemoryInput input) => await memoryService.Update(input))
            .WithDescription("更新记忆")
            .WithDisplayName("更新记忆")
            .WithTags("记忆");

        memoryService.MapDelete("memory/{memoryId}",
                async (MemoryService memoryService, Guid memoryId) => await memoryService.Delete(memoryId))
            .WithDescription("删除记忆")
            .WithDisplayName("删除记忆")
            .WithTags("记忆");

        memoryService.MapDelete("memory", async (MemoryService memoryService, string? userId,
                    string? agentId, string? runId) =>
                await memoryService.DeleteAll(userId, agentId, runId))
            .WithDescription("删除所有记忆")
            .WithDisplayName("删除所有记忆")
            .WithTags("记忆");

        memoryService.MapDelete("reset", async (MemoryService memoryService) =>
                await memoryService.Reset())
            .WithDescription("重置记忆")
            .WithDisplayName("重置记忆")
            .WithTags("记忆");

        return app;
    }
}
- 1
- 2
- 3
- 4
- 5
- 6
- 7
- 8
- 9
- 10
- 11
- 12
- 13
- 14
- 15
- 16
- 17
- 18
- 19
- 20
- 21
- 22
- 23
- 24
- 25
- 26
- 27
- 28
- 29
- 30
- 31
- 32
- 33
- 34
- 35
- 36
- 37
- 38
- 39
- 40
- 41
- 42
- 43
- 44
- 45
- 46
- 47
- 48
- 49
- 50
- 51
- 52
- 53
- 54
- 55
- 56
- 57
- 58
- 59
- 60
- 61
- 62
- 63
- 64
- 65
- 66
- 67
- 68
- 69
- 70
- 71
- 72
- 73
- 74
- 75
- 76
- 77
- 78
- 79
- 80
- 81
- 82
- 83
- 84
- 85
- 86
我们将mem0.NET提供的接口全部外放到WebAPI中,并且使用了MiniAPIs超级简单的实现了。
然后我们打开Program.cs
using mem0.NET.Options;
using mem0.NET.Service.Services;
using Microsoft.EntityFrameworkCore;
using Microsoft.Extensions.DependencyInjection.Options;

namespace mem0.NET.Service;

public static class Program
{
    public static async Task Main(string[] args)
    {
        var builder = WebApplication.CreateBuilder(args);

        builder.Services.AddEndpointsApiExplorer();
        builder.Services.AddSwaggerGen();

        builder.Services.AddOptions<Mem0Options>()
            .Bind(builder.Configuration.GetSection("Mem0"));

        builder.Services.AddOptions<QdrantOptions>()
            .Bind(builder.Configuration.GetSection("Qdrant"));

        var options = builder.Configuration.GetSection("Mem0")
            .Get<Mem0Options>();

        var qdrantOptions = builder.Configuration.GetSection("Qdrant")
            .Get<QdrantOptions>();

        builder.Services.AddMem0DotNet(options)
            .WithMem0EntityFrameworkCore<MasterDbContext>(optionsBuilder =>
            {
                optionsBuilder.UseNpgsql(builder.Configuration.GetConnectionString("Default"));
            })
            .WithVectorQdrant(qdrantOptions);

        var app = builder.Build();

        using (var scope = app.Services.CreateScope())
        {
            var dbContext = scope.ServiceProvider.GetRequiredService<MasterDbContext>();

            await dbContext.Database.EnsureCreatedAsync();
        }

        if (app.Environment.IsDevelopment())
        {
            app.UseSwagger();
            app.UseSwaggerUI();
        }

        app.MapMemoryService();

        await app.RunAsync();
    }
}
- 1
- 2
- 3
- 4
- 5
- 6
- 7
- 8
- 9
- 10
- 11
- 12
- 13
- 14
- 15
- 16
- 17
- 18
- 19
- 20
- 21
- 22
- 23
- 24
- 25
- 26
- 27
- 28
- 29
- 30
- 31
- 32
- 33
- 34
- 35
- 36
- 37
- 38
- 39
- 40
- 41
- 42
- 43
- 44
- 45
- 46
- 47
- 48
- 49
- 50
- 51
- 52
- 53
- 54
- 55
我们需要先将AI配置和向量配置绑定到Options中
builder.Services.AddOptions<Mem0Options>()
            .Bind(builder.Configuration.GetSection("Mem0"));
builder.Services.AddOptions<QdrantOptions>()
            .Bind(builder.Configuration.GetSection("Qdrant"));
- 1
- 2
- 3
- 4
然后添加我们的Mem0核心服务
builder.Services.AddMem0DotNet(options)
       .WithMem0EntityFrameworkCore<MasterDbContext>(optionsBuilder =>
       {
        	optionsBuilder.UseNpgsql(builder.Configuration.GetConnectionString("Default"));
       })
      .WithVectorQdrant(qdrantOptions);
- 1
- 2
- 3
- 4
- 5
- 6
在AddMem0DotNet中则是我们的核心服务,然后我们的WithMem0EntityFrameworkCore则是EntityFrameworkCore服务,
通过WithVectorQdrant则添加了向量数据库服务。
然后需要先部署好数据库和向量数据库,下面我们会使用docker-compose.yml进行部署,请先确认一下自己的环境。
部署数据库和向量数据库
docker-compose.yml
services:
  qdrant:
    image: registry.token-ai.cn/qdrant/qdrant:latest
    restart: always
    container_name: qdrant
    ports:
      - 6333:6333
      - 6334:6334
    expose:
      - 6333
      - 6334
      - 6335
    configs:
      - source: qdrant_config
        target: /qdrant/config/production.yaml
    volumes:
      - ./qdrant_data:/qdrant/storage

  postgres:
    image: registry.token-ai.cn/postgres:16
    restart: always
    container_name: qdrant_postgres
    environment:
      POSTGRES_USER: token
      POSTGRES_PASSWORD: dd666666
      POSTGRES_DB: mem0
    ports:
      - 5432:5432
    volumes:
      - ./postgres_data:/var/lib/postgresql/data

configs:
  qdrant_config:
    content: |
      log_level: INFO
- 1
- 2
- 3
- 4
- 5
- 6
- 7
- 8
- 9
- 10
- 11
- 12
- 13
- 14
- 15
- 16
- 17
- 18
- 19
- 20
- 21
- 22
- 23
- 24
- 25
- 26
- 27
- 28
- 29
- 30
- 31
- 32
- 33
- 34
- 35
执行我们的启动脚本
docker compose up -d
- 1
启动项目
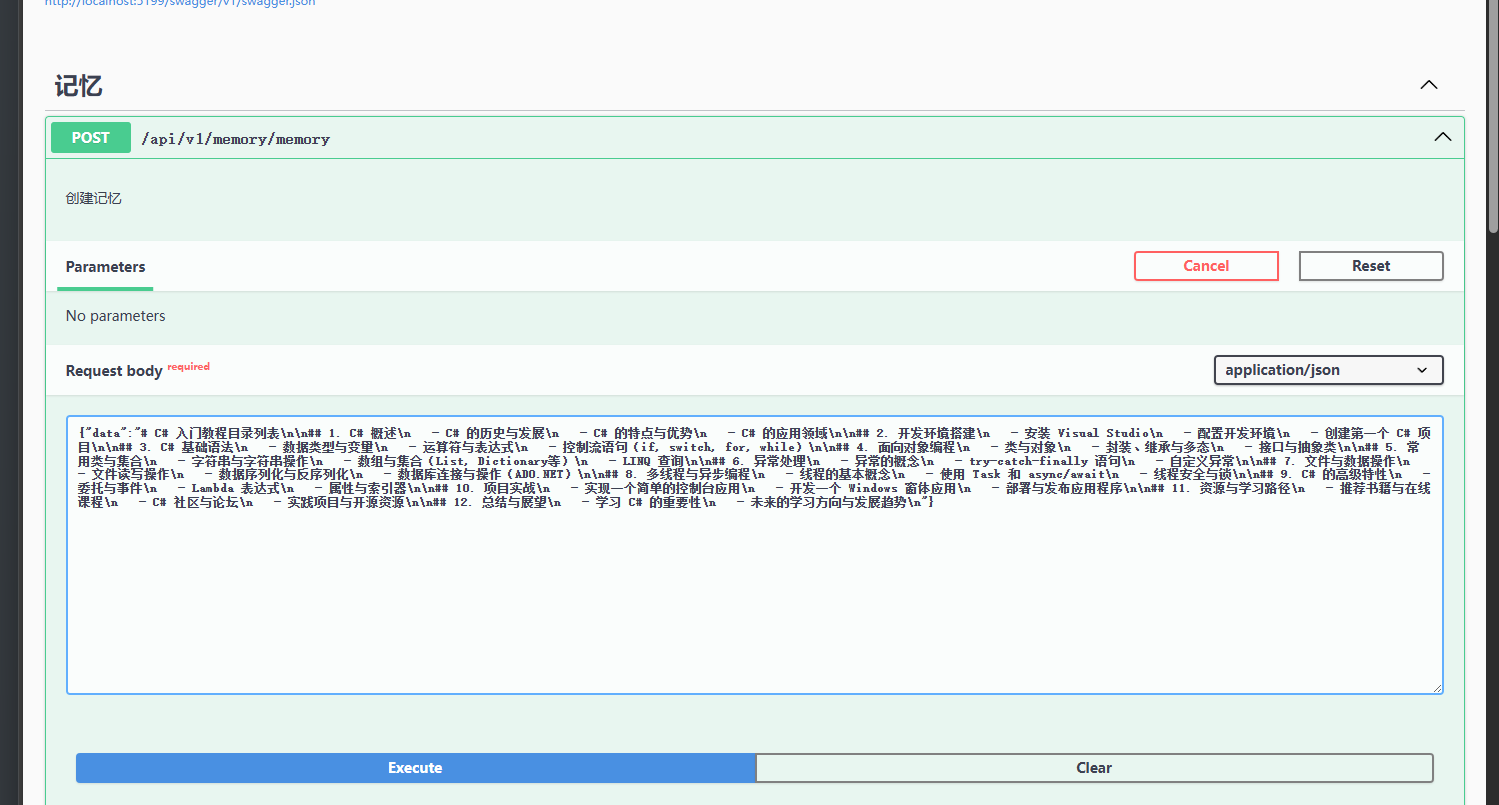
创建记忆

案例数据
{"data":"# C# 入门教程目录列表\n\n## 1. C# 概述\n - C# 的历史与发展\n - C# 的特点与优势\n - C# 的应用领域\n\n## 2. 开发环境搭建\n - 安装 Visual Studio\n - 配置开发环境\n - 创建第一个 C# 项目\n\n## 3. C# 基础语法\n - 数据类型与变量\n - 运算符与表达式\n - 控制流语句(if, switch, for, while)\n\n## 4. 面向对象编程\n - 类与对象\n - 封装、继承与多态\n - 接口与抽象类\n\n## 5. 常用类与集合\n - 字符串与字符串操作\n - 数组与集合(List, Dictionary等)\n - LINQ 查询\n\n## 6. 异常处理\n - 异常的概念\n - try-catch-finally 语句\n - 自定义异常\n\n## 7. 文件与数据操作\n - 文件读写操作\n - 数据序列化与反序列化\n - 数据库连接与操作(ADO.NET)\n\n## 8. 多线程与异步编程\n - 线程的基本概念\n - 使用 Task 和 async/await\n - 线程安全与锁\n\n## 9. C# 的高级特性\n - 委托与事件\n - Lambda 表达式\n - 属性与索引器\n\n## 10. 项目实战\n - 实现一个简单的控制台应用\n - 开发一个 Windows 窗体应用\n - 部署与发布应用程序\n\n## 11. 资源与学习路径\n - 推荐书籍与在线课程\n - C# 社区与论坛\n - 实践项目与开源资源\n\n## 12. 总结与展望\n - 学习 C# 的重要性\n - 未来的学习方向与发展趋势\n"}
- 1
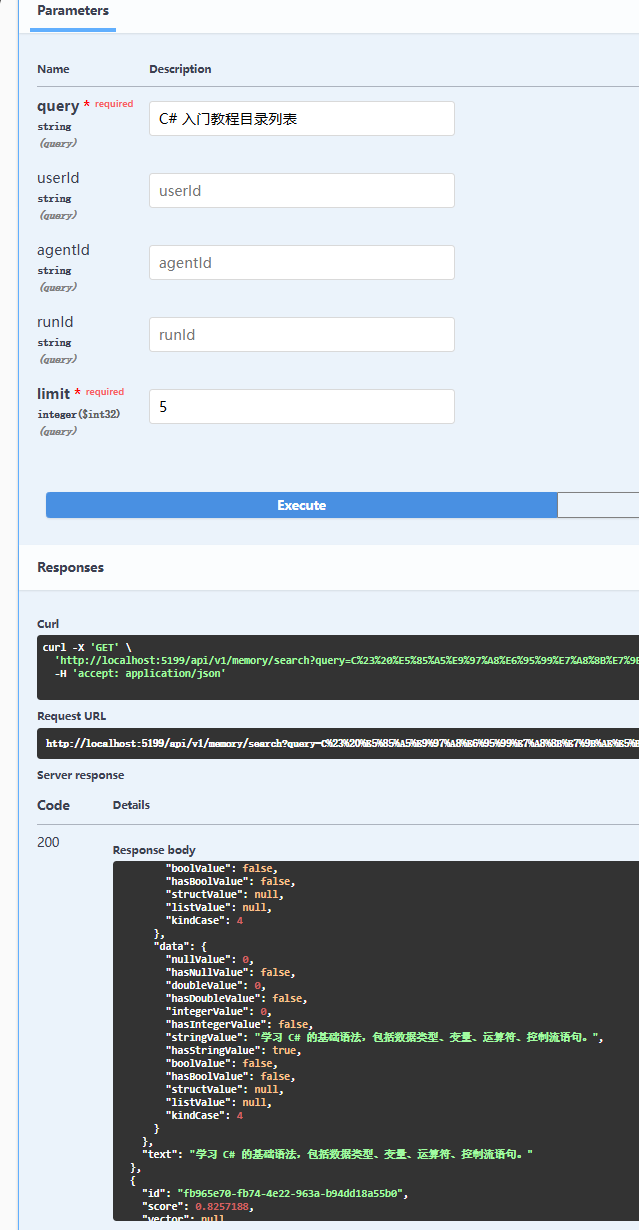
然后在等创建内存完成以后我们使用search接口查看一下搜索效果

结束
mem0的机制是什么?
mem0适合什么场景?
mem0的机制是什么?
Mem0的主要功能包括添加、更新、搜索、检索和跟踪存储在系统中的记忆历史。通过简单易用的API实现这一点,支持与各种应用的集成,确保跨平台的一致性和开发者的使用便利性。Mem0还提供不同的部署选项,包括自托管的开源版本和面向企业的托管解决方案。
当你在创建Memory的时候并不是直接添加到数据库当中,也不是直接添加到向量数据库当中,然后先利用AI将您的文本提取或说总结内容,然后利用总结的内容去向量数据库搜索,将得到的搜索结果结合您的文本一块通过定义好的提示词发送给AI,然后利用AI理解能力和执行Function的能力,让他帮我们根据新的记忆(您的文本)和旧的记忆(向量数据库操查询的数据)进行对比,然后默认提供了三个Function,一个是新增,一个是更新,一个是删除,然后自行理解去更新记忆和删除新增记忆,然后mem0的特点就在于这一点,不像普通的RAG只在创建的时候一次优化,而mem0则会在您不断的添加数据库和上传数据库的同时进行优化您之前已经上传的向量数据,并随着时间的推移不断改进,这在从客户支持到医疗保健再到内容推荐等领域都至关重要。
mem0ai/mem0: The memory layer for Personalized AI (github.com)
AIDotNet/mem0.NET (github.com)
mem0适合什么场景
Mem0 的机制特别适合于需要个性化和记忆功能的场景,这包括但不限于以下几个应用领域:
-
客户支持系统:通过记忆用户的过往交互,Mem0 可以帮助客户服务系统提供更加个性化的响应和建议,改善客户体验。
-
健康护理应用:在健康管理和患者护理领域,Mem0 可以存储和回顾患者的历史健康信息,帮助医疗专业人员提供针对性的医疗建议。
-
教育技术:Mem0 可以用于跟踪学生的学习进度和偏好,提供定制化的学习体验和资源。
-
电子商务:电商平台可以利用Mem0 记录用户的购物习惯和偏好,从而推荐更合适的产品,提高转化率。
-
内容推荐系统:对于流媒体服务,Mem0 可以帮助系统记忆用户的观看历史和喜好,用以提供更加准确的内容推荐。


