
- 1【科普贴】LDO电源详解
- 2vue+koa+ mysql 部署服务器_vue 打包后的文件部署到koa服务器上的方法
- 3知识抽取(二)_r2rml
- 4实现mnist手写数字识别_csdn (mnist)手写数字识别
- 5使用 Elastic 作为全局数据网格:将数据访问与安全性、治理和策略统一起来
- 6人体姿态识别(教程+代码)_webgl 人体识别
- 7今晚教你动手做出一个 Code Interpreter
- 8LDA主题模型Python实现_lda主题模型python代码
- 9使用.a库时,报错missing required architecture i386, 使用lipo的方法可完美解决_lipo 失败
- 10理解Java虚拟机——JVM_java jvm
esp8266 mqtt接入阿里云_ESP8266_SDK连接阿里云
赞
踩
陈拓 chentuo@ms.xab.ac.cn 2020/04/01-2020/04/10
1. 概述
- 开发环境
先看《树莓派安装ESP8266_SDK开发环境》一文。https://zhuanlan.zhihu.com/p/122246166
熟悉项目的编译和烧写过程。
- 官方例子
《Simple MQTT Client Demo》
https://gitee.com/chentuo2000/ESP8266_NONOS_SDK/tree/master/examples/esp_mqtt_proj
这个例子实现了:
MQTT发布消息
MQTT订阅主题
MQTT works with SSL/TLS
MQTT works with one-way anthentication
MQTT works with two-way anthentication
2. 阿里云平台准备
根据阿里官方文档,在阿里云平台创建产品,创建设备,同时自动产生 product key, product secert, device name, device secret。
具体操作请看文档《阿里云物联网平台基本设置-物模型》https://blog.csdn.net/chentuo2000/article/details/103559553
- 创建产品,定义属性

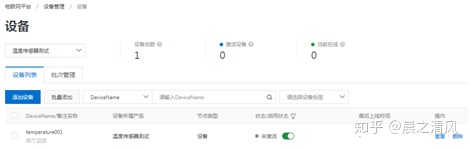
- 添加设备
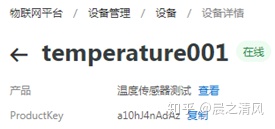
- “查看”证书
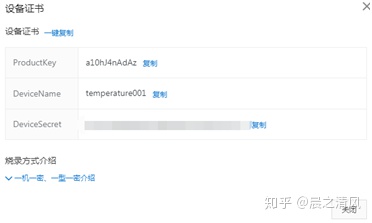
一键复制:
- {
- "ProductKey": "a10hJ4nAdAz",
- "DeviceName": "temperature001",
- "DeviceSecret": "xxxxxxxxxxxxxxxxxxxxxxxxxxxxxxxx"
- }
这个设备证书也称为“设备三元组”。
- 阿里云物联网平台的测试
为了测试MQTT客户端和服务端的通信协议,以及看懂后面的代码,需要先看看下面几篇文章:
《MQTTfx连接物联网云平台》https://blog.csdn.net/chentuo2000/article/details/104313968
《MQTT.fx脚本Scripts使用》https://blog.csdn.net/chentuo2000/article/details/104252690
《MQTT-TCP连接通信》
https://help.aliyun.com/document_detail/73742.html
sudo apt-get uninstall openssl
《自己写微信小程序MQTT模拟器》
https://blog.csdn.net/chentuo2000/article/details/102507560
3. ESP8266的SDK连接阿里云
3.1 修改官方的例子
在《树莓派安装ESP8266_SDK开发环境》一文中
https://blog.csdn.net/chentuo2000/article/details/105296166
我们已经将官方的例子esp_mqtt_proj复制到了工作目录中:
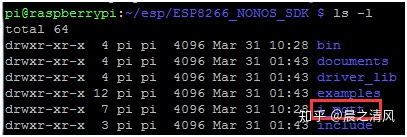
并且通过修改这个例子做了2个小练习,下面我们继续通过修改这个例子来连接到阿里云。
3.2 修改头文件
- 进入i_mqtt目录
cd i_mqtt

- 编辑头文件mqtt_config.h
nano include/mqtt_config.h

- mqtt_config.h代码
下面是改好的头文件代码,你可以和原来的头文件对比。
- #ifndef __MQTT_CONFIG_H__
- #define __MQTT_CONFIG_H__
-
- typedef enum{
- NO_TLS = 0, // 0: 禁用SSL/TLS,这是默认值,就用这个,因为我在阿里云上没有使用证书验证
- TLS_WITHOUT_AUTHENTICATION = 1, // 1: enable SSL/TLS, but there is no a certificate verify
- ONE_WAY_ANTHENTICATION = 2, // 2: enable SSL/TLS, ESP8266 would verify the SSL server certificate at the same time
- TWO_WAY_ANTHENTICATION = 3, // 3: enable SSL/TLS, ESP8266 would verify the SSL server certificate and SSL server would verify ESP8266 certificate
- }TLS_LEVEL;
-
- /*IMPORTANT: the following configuration maybe need modified*/
- /***********************************************************************************************************************/
- #define CFG_HOLDER 0x00FF55A5 /* 改变这个值,以保存配置,并在设备启动时装载保存的配置,我将0x00FF55A4改成0x00FF55A5 */
-
- /*DEFAULT CONFIGURATIONS*/
-
- /* 阿里云平台设备三元组 */
- #define PRODUCT_KEY "a10hJ4nAdAz"
- #define DEVICE_NAME "temperature001"
- #define DEVICE_SECRET "xxxxxxxxxxxxxxxxxxxxxxxxxxxxxxxx"
-
- #define DEVICE_ID PRODUCT_KEY"."DEVICE_NAME
- #define REGION_ID "cn-shanghai"
-
- #define MQTT_HOST PRODUCT_KEY".iot-as-mqtt."REGION_ID".aliyuncs.com"
- #define MQTT_PORT 1883
- #define MQTT_CLIENT_ID DEVICE_ID"|securemode=3,signmethod=hmacsha1|"
- #define MQTT_USER DEVICE_NAME"&"PRODUCT_KEY
- #define MQTT_PASS "clientId"DEVICE_ID"deviceName"DEVICE_NAME"productKey"PRODUCT_KEY
-
- #define STA_SSID "HUAWEI-BAP55C" // your AP/router SSID to config your device networking
- #define STA_PASS "ABCDE12345" // your AP/router password
-
- #define DEFAULT_SECURITY NO_TLS // very important: you must config DEFAULT_SECURITY for SSL/TLS
-
- #define CA_CERT_FLASH_ADDRESS 0x77 // CA certificate address in flash to read, 0x77 means address 0x77000
- #define CLIENT_CERT_FLASH_ADDRESS 0x78 // client certificate and private key address in flash to read, 0x78 means address 0x78000
- /***********************************************************************************************************************/
-
-
- /*Please Keep the following configuration if you have no very deep understanding of ESP SSL/TLS*/
- #define CFG_LOCATION 0x79 /* Please don't change or if you know what you doing */
- #define MQTT_BUF_SIZE 1024
- #define MQTT_KEEPALIVE 120 /*心跳second*/
- #define MQTT_RECONNECT_TIMEOUT 5 /*second*/
- #define MQTT_SSL_ENABLE //* Please don't change or if you know what you doing */
-
- #define STA_TYPE AUTH_WPA2_PSK
- #define QUEUE_BUFFER_SIZE 2048
-
- //#define PROTOCOL_NAMEv31 /*MQTT version 3.1 compatible with Mosquitto v0.15*/
- #define PROTOCOL_NAMEv311 /*MQTT version 3.11 compatible with https://eclipse.org/paho/clients/testing/*/
-
- #endif // __MQTT_CONFIG_H__

3.3 修改主程序user_main.c
- 确定POST_TOPIC
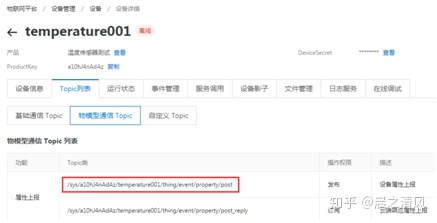
POST_TOPIC:/sys/a10hJ4nAdAz/${deviceName}/thing/event/property/post
- 确定GET_TOPIC
GET_TOPIC:/a10hJ4nAdAz/temperature001/user/get
依此写出数据下行和上行topic的宏定义:
- #define GET_TOPIC "/a10hJ4nAdAz/temperature001/user/get"
- #define POST_TOPIC "/sys/a10hJ4nAdAz/temperature001/thing/event/property/post"
发送JSON格式的数据
注意单双引号的使用规则。
- long int id = 1;
- char jsonData[256]={0};
- void ICACHE_FLASH_ATTR getJsonData(long int id, char temp[]) {
- os_sprintf(jsonData, "{'id':'%d','params':{'temperature':%s},'method':'thing.event.property.post'}", id, temp);
- os_printf(" jsonData -> %srn", jsonData);
- }
-
- void mqttConnectedCb(uint32_t *args)
- {
- MQTT_Client* client = (MQTT_Client*)args;
- INFO("MQTT: Connectedrn");
-
- MQTT_Subscribe(client, GET_TOPIC, 0);
-
- char temp[6] = {'2', '3', '.', '4', '5', '0'};
- getJsonData(id, temp);
- // 函数原型 BOOL ICACHE_FLASH_ATTR MQTT_Publish(MQTT_Client *client, const char* topic, const char* data, int data_length, int qos, int retain);
- MQTT_Publish(client, POST_TOPIC, jsonData, os_strlen(jsonData), 0, 0);
- }
- 阿里云密码加密
在入口函数void user_init(void)中有一个CFG_Load()函数需要修改。CFG_Load()函数定义在modules/config.c中实现,CFG_Load()使用了结构SYSCFG。SYSCFG在i_mqtt/include/modules/config.h中声明:
- typedef struct{
- uint32_t cfg_holder;
- uint8_t device_id[32];
-
- uint8_t sta_ssid[64];
- uint8_t sta_pwd[64];
- uint32_t sta_type;
-
- uint8_t mqtt_host[64] ;
- uint32_t mqtt_port;
- uint8_t mqtt_user[32] ;
- uint8_t mqtt_pass[32] ;
- uint32_t mqtt_keepalive;
- uint8_t security;
- } SYSCFG;
对比前面mqtt_config.h中#define定义的宏:
- device_id, MQTT_CLIENT_ID
- mqtt_host, MQTT_HOST
- mqtt_user, MQTT_USER
- mqtt_pass, MQTT_PASS
SYSCFG中对应声明的长度可能不够。下面我们重写对于这4个宏定义的处理。
在void user_init(void)前面声明一个结构i_mqtt_cfg。
在CFG_Load()函数的下面添加相关代码。
- 修改主程序user_main.c
nano user/user_main.c

将上面的修改项都写入程序。
下面是user_main.c代码,请和原来的代码对比。
- /* main.c -- MQTT client example */
-
- 在Makefile文件中添加静态链接库libssl.a
ssl_hmac_sha1()方法已经在静态链接库libssl.a内置中内置了,它和其他的库文件都放在:ESP8266_NONOS_SDK/lib目录下:

为了使用libssl.a,我们需要修改一下Makefile文件,添加libssl.a否则会出现链接错误。
nano Makefile
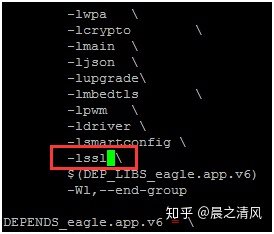
添加到这里就可以了。对于库libssl.a,只需要写-lssl,这是规则。
ssl_hmac_sha1()方法在代码中可以直接使用,不需要加头文件。
- 加密结果验证
加密结果是否正确,可以到下面的网址进行验证:
http://iot-face.oss-cn-shanghai.aliyuncs.com/tools.htm

3.4 编译项目
- 编译项目
./gen_misc.sh


输入5个参数,对于ESP8266-01/ESP8266-01S输入2 0 2 2 2

编译成功。
3.5 烧写
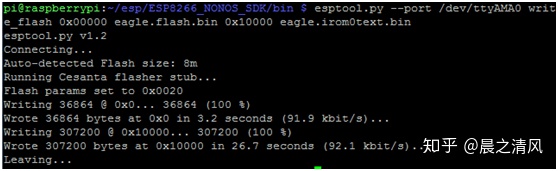
- 烧写Flash
■ 第一次烧写命令
esptool.py --port /dev/ttyAMA0 write_flash 0x00000 eagle.flash.bin 0x10000 eagle.irom0text.bin 0xfb000 blank.bin 0xfc000 esp_init_data_default_v08.bin 0xfe000 blank.bin■ 之后的烧写命令
esptool.py --port /dev/ttyAMA0 write_flash 0x00000 eagle.flash.bin 0x10000 eagle.irom0text.bin在上一篇文章中我们已经烧写过了,所以:
- 运行程序
烧写完成后ESP8266-01会自动运行。
3.6 看阿里云上设备状态的变化
- 烧写之前阿里云上的设备状态
在烧写时区先看看阿里云上的设备状态:
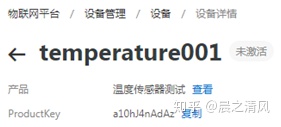
在设备未连接到阿里云之前,设备状态是“未激活”。
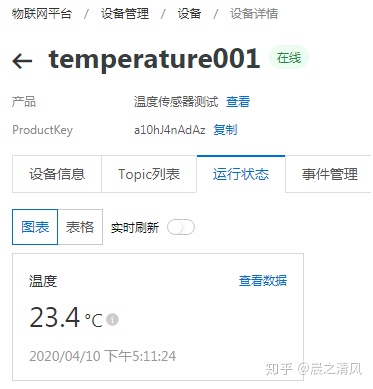
- 再看看阿里云上的设备状态
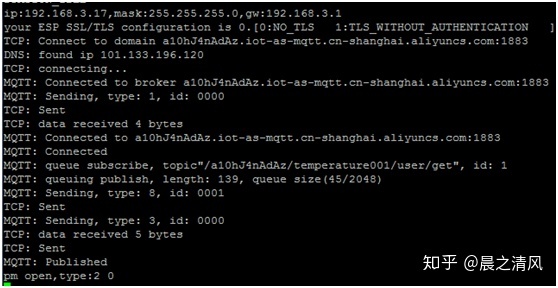
烧写完成后ESP8266会自动运行程序,如果程序正常,刷新阿里云设备页面:
可以看到,设备已经“在线”了。
3.7 查看设备发送数据和阿里云接收数据
为了看到启动状态,可以让设备重新启动一次:
1) 断电
2) 启动minicom
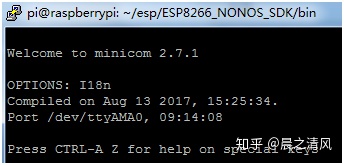
有关minicom的设置和操作请看《树莓派串口的使用》
https://blog.csdn.net/chentuo2000/article/details/104711494
3) 上电
每隔120秒可以看到心跳消息:

这是在文件include/mqtt_config.h中设置的:
#define MQTT_KEEPALIVE 120 /*心跳second*/
查看云端日志:
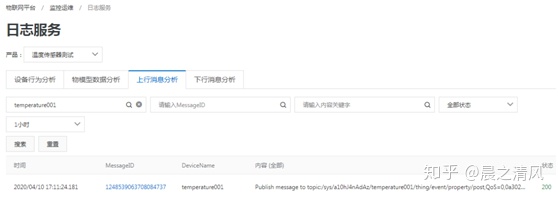
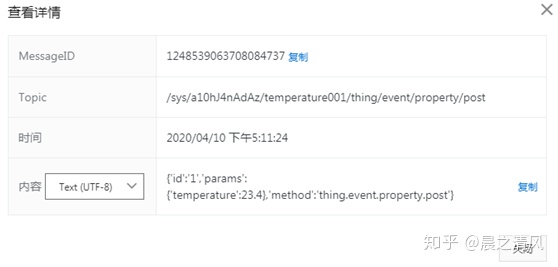
查看云端接收到的数据:
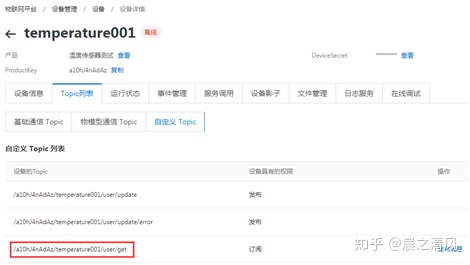
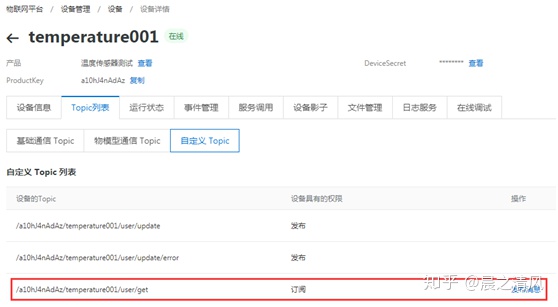
3.8 云端发送消息到客户端(客户端订阅服务端消息)
- 找到用户自定义Topic:/a10hJ4nAdAz/temperature001/user/get
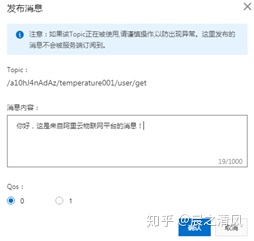
点击“发布消息”:

点击“确认”,看minicom收到的消息:

收到topic: /a10hJ4nAdAz/temperature001/user/get的消息,数据: hello,your device t
- 显示的数据不全
这只是minicom的设置问题,minicom默认不会自动换行,minicom启动后用下面的命令设置一下就好了。
Ctrl+A W:当显示的内容超过一行之后自动换行。

- 服务端发送中文消息给客户端
Minicom显示的是乱码:

用下面的命令启动minicom:
sudo env LANG=en_US minicom
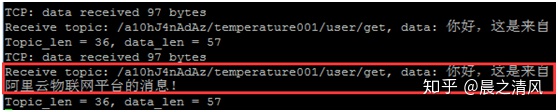
中文显示正常了。
不要忘了用Ctrl+A W将自动换行打开。
- 简化minicom启动
为了显示中文,每次运行minicom的时候输入会很麻烦,我们修改一下.bashrc文件,在.bashrc里面加上如下代码:
alias minicom='sudo env LANG=en_US minicom'
下次直接用别名minicom启动就可以了。
参考文档:
- 电脑连接树莓派3B+https://blog.csdn.net/chentuo2000/article/details/103332186
- 树莓派安装ESP8266_SDK开发环境https://blog.csdn.net/chentuo2000/article/details/105296166
- 使用ESP8266(基于官方SDK)接入阿里云物联网平台https://blog.csdn.net/yannanxiu/article/details/81334230
- 自己写微信小程序MQTT模拟器https://blog.csdn.net/chentuo2000/article/details/102507560
- 阿里云物联网平台基本设置-物模型https://blog.csdn.net/chentuo2000/article/details/103559553
- 微信小程序MQTT模拟器 阿里云物联网平台测试https://blog.csdn.net/chentuo2000/article/details/102216865
- 树莓派连接阿里云物联网平台-属性(nodejs)https://blog.csdn.net/chentuo2000/article/details/103705694
- 树莓派连接阿里云物联网平台-服务(nodejs)https://blog.csdn.net/chentuo2000/article/details/103754860
- 树莓派连接阿里云物联网平台-订阅(nodejs)https://blog.csdn.net/chentuo2000/article/details/103769449
- 树莓派连接阿里云物联网平台-事件(nodejs)https://blog.csdn.net/chentuo2000/article/details/103805559
- MQTTfx连接物联网云平台https://zhuanlan.zhihu.com/p/101104351https://blog.csdn.net/chentuo2000/article/details/104313968
- MQTT.fx脚本Scripts使用https://blog.csdn.net/chentuo2000/article/details/104252690
- MQTT.fx - HiveMQ MQTT Toolbox https://www.hivemq.com/blog/mqtt-toolbox-mqtt-fx/
- Linking the ESP8266 to a Raspberry Pi through MQTThttps://www.penninkhof.com/2015/05/linking-the-esp8266-a-raspberry-pi-through-mqtt/
- mqttfx-manualhttps://github.com/Jerady/mqttfx-manual
- linux minicom 中文乱码问题https://blog.csdn.net/dongchangc/article/details/78773210?utm_source=blogxgwz6

