- 1DOMPurify:一个只针对 DOM 的、超快的、宽容的 HTML XSS清理工具_purify.js
- 2Spring Boot 实现接口幂等性的 4 种方案
- 3记录一下hive跑spark的insert,update语句报类找不到的问题
- 45G网络入门基础--5G网络的实现流程_5g附着流程
- 5小甲鱼学python学习笔记_ccc,myqite,cn
- 6【PCIE】基于PCIE4C的数据传输(一)——PC访问FPGA_pcie fpga
- 7新鲜出炉java后端高频面经总结-持续更新中(万字长文,助君青云)_.intern().notify()
- 8keras、tensorflow安装详解-神经网络第一个脚本_比如如果我用keras搭神经网络,应该用什么软件敲代码呢
- 9SpringSecurity从入门到源码分析_spring security源码环境搭建
- 10图解R树的原理及相关操作
vue做游戏vue游戏引擎vue小游戏开发_vue中可以进行游戏设定吗
赞
踩
Vue.js 是一个构建用户界面的渐进式JavaScript框架,它同样可以用于游戏开发。使用 Vue 开发游戏通常涉及以下几个关键步骤和概念:
1. 了解 Vue 的核心概念 1
在开始使用 Vue 进行游戏开发之前,你需要理解 Vue 的一些核心概念,如组件化、响应式数据绑定、指令、生命周期钩子等。这些概念将帮助你构建可重用的游戏元素,并管理游戏状态。
2. 选择合适的游戏引擎或库 4
虽然 Vue 本身不是一个游戏引擎,但它可以与游戏引擎或库(如 Babylon.js 4、Pixi.js 等)结合使用,以便利用这些引擎的图形渲染能力和物理引擎。例如,Babylon.js 是一个强大的3D游戏开发库,可以通过 Vue 进行集成,从而利用 Vue 的响应式系统和组件化架构。
3. 设置项目结构 2
使用 Vue CLI 创建项目,并设置合适的项目结构。通常,你的游戏项目会包含多个组件,每个组件代表游戏的不同部分,如游戏逻辑、用户界面、游戏对象等。确保你的项目结构清晰,便于管理和维护。
4. 集成图形渲染 4
根据选择的游戏引擎或库,集成图形渲染到你的 Vue 应用中。例如,使用 Babylon.js 时,你需要创建一个 canvas 元素,初始化引擎,并创建游戏场景。然后,你可以在 Vue 组件中添加逻辑来控制游戏的渲染循环。
5. 实现游戏逻辑 4
编写游戏逻辑,包括玩家输入处理、游戏状态管理、碰撞检测、物理模拟等。你可以利用 Vue 的响应式系统来更新游戏状态,并自动反映到用户界面上。
6. 优化性能 51
游戏开发中性能是一个重要的考虑因素。使用 requestAnimationFrame 5 来控制游戏的渲染循环,以便更好地同步浏览器的刷新率,并优化游戏的性能。
7. 测试和调试 2
在开发过程中不断测试和调试你的游戏,确保没有错误和性能问题。Vue 提供了一些工具和技巧来帮助你进行调试,如使用开发者工具和控制台日志。
8. 部署和发布 2
最后,当你的游戏开发完成并通过测试后,你可以将其部署到服务器上,或发布为桌面应用程序。确保你的游戏可以在不同的设备和浏览器上稳定运行。
通过上述步骤,你可以利用 Vue.js 开发出具有丰富交互性和良好性能的游戏。记住,Vue 的灵活性和易用性使其成为游戏开发中一个强大的前端框架选择。

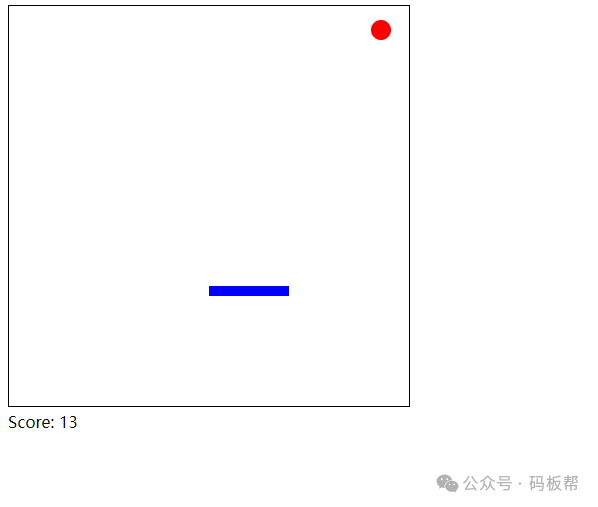
以下是一个简单的小游戏实现示例,使用了HTML、JavaScript和Vue.js框架:
- <!DOCTYPE html>
- <html lang="en">
- <head>
- <meta charset="UTF-8">
- <meta name="viewport" content="width=device-width, initial-scale=1.0">
- <title>Simple Ball Bounce Game</title>
- <script src="https://cdn.jsdelivr.net/npm/vue@2.6.14/dist/vue.js"></script>
- <style>
- canvas {
- border: 1px solid black;
- }
- </style>
- </head>
- <body>
- <div id="app">
- <game></game>
- </div>
-
- <script type="text/x-template" id="game-template">
- <div>
- <canvas ref="canvas" width="400" height="400"></canvas>
- <div>Score: {{ score }}</div>
- </div>
- </script>
-
- <script>
- Vue.component('game', {
- template: '#game-template',
- data() {
- return {
- ball: {
- x: 200,
- y: 200,
- radius: 10,
- color: 'red',
- speedX: 2,
- speedY: 2
- },
- paddle: {
- x: 200,
- y: 380,
- width: 80,
- height: 10,
- color: 'blue'
- },
- score: 0,
- gameRunning: true
- };
- },
- mounted() {
- window.addEventListener('keydown', this.handleKeyPress);
- this.gameLoop();
- },
- beforeDestroy() {
- window.removeEventListener('keydown', this.handleKeyPress);
- },
- methods: {
- gameLoop() {
- if (!this.gameRunning) return;
- this.updateGame();
- this.renderGame();
- requestAnimationFrame(this.gameLoop);
- },
- updateGame() {
- this.ball.x += this.ball.speedX;
- this.ball.y += this.ball.speedY;
- if (this.ball.x + this.ball.radius > this.$refs.canvas.width || this.ball.x - this.ball.radius < 0) { this.ball.speedX *= -1; } if (this.ball.y + this.ball.radius > this.$refs.canvas.height ||
- this.ball.y - this.ball.radius < 0) {
- this.ball.speedY *= -1;
- }
- if (this.checkCollision()) {
- this.score++;
- this.ball.speedY *= -1;
- }
- },
- renderGame() {
- const ctx = this.$refs.canvas.getContext('2d'); ctx.clearRect(0, 0, this.$refs.canvas.width, this.$refs.canvas.height); ctx.fillStyle = this.ball.color; ctx.beginPath(); ctx.arc(this.ball.x, this.ball.y, this.ball.radius, 0, Math.PI * 2); ctx.fill(); ctx.fillStyle = this.paddle.color; ctx.fillRect(this.paddle.x, this.paddle.y, this.paddle.width, this.paddle.height); }, checkCollision() { const ballHitBox = this.ball.x - this.ball.radius < this.paddle.x + this.paddle.width && this.ball.x + this.ball.radius > this.paddle.x && this.ball.y - this.ball.radius < this.paddle.y && this.ball.y + this.ball.radius > this.paddle.y - this.paddle.height; return ballHitBox; }, handleKeyPress(event) { if (event.key === 'ArrowUp' && this.paddle.y > 0) { this.paddle.y -= 5; } if (event.key === 'ArrowDown' && this.paddle.y < this.$refs.canvas.height - this.paddle.height) {
- this.paddle.y += 5;
- }
- },
- startGame() {
- this.gameRunning = true;
- this.gameLoop();
- },
- pauseGame() {
- this.gameRunning = false;
- },
- resetGame() {
- this.score = 0;
- this.ball = { x: 200, y: 200, radius: 10, color: 'red', speedX: 2, speedY: 2 };
- this.paddle = { x: 200, y: 380, width: 80, height: 10, color: 'blue' };
- this.startGame();
- }
- }
- });
-
- new Vue({
- el: '#app',
- methods: {
- initGame() {
- this.resetGame();
- this.startGame();
- }
- }
- });
- </script>
- </body>
- </html>


要实现一个完整的小游戏,你需要考虑以下功能和组件:
- 游戏循环:游戏的核心机制,负责更新游戏状态和重新渲染画面。
- 用户输入处理:监听并响应用户的键盘或鼠标操作。
- 图形渲染:使用画布(Canvas)或其他图形库来显示游戏元素。
- 游戏逻辑:定义游戏规则、得分机制、胜利条件等。
- 碰撞检测:检测游戏中的对象是否相互接触或重叠。
- 音效和背景音乐:增强游戏体验的音频元素。
- 得分和统计:跟踪玩家的得分和游戏进度。
- 游戏状态管理:管理游戏的开始、暂停、结束等状态。
- 用户界面(UI):提供游戏信息,如得分板、菜单、按钮等。
- 动画和视觉效果:使游戏更加生动和吸引人。
- 保存和加载:保存玩家的游戏进度和高分记录。
- 网络功能:如果游戏是多人游戏,需要实现网络通信功能。
- 适配不同设备:确保游戏能够在不同设备和屏幕尺寸上正常运行。


