- 1多线程之线程之间的通信_多线程交互方式
- 2网络性能测试工具 iperf3_iperf3下载
- 3SpringBoot学习之用ResponseEntity批量下载压缩文件(五)
- 4线程之间通信、进程之间通信_carlos guo 881230
- 5git学习笔记——移除文件和移动文件_.gitignore将编译后的文件,日志文件移出
- 6基于知识图谱的个性化智能教学推荐系统(论文+源码)_kaic_基于知识图谱的课程推荐
- 7YOLOv5进阶 | 利用PyQt搭建YOLOv5目标检测系统(附可视化界面+功能介绍+源代码)_yolo界面
- 8R语言中的execl数据转plink
- 9个人收集的网站,可以参考(程序员可收藏)_java 算法类题目网站
- 10十一:redis之布隆过滤器的使用与应用场景_布隆过滤器在redis中的应用
推荐算法—wide&deep原理知识总结代码实现_wide deep算法
赞
踩
今天,总结一个在业界有着巨大影响力的推荐模型,Google 的 Wide&Deep。可以说,只要掌握了 Wide&Deep,就抓住了深度推荐模型这几年发展的一个主要方向。
1. Wide&Deep 模型的结构

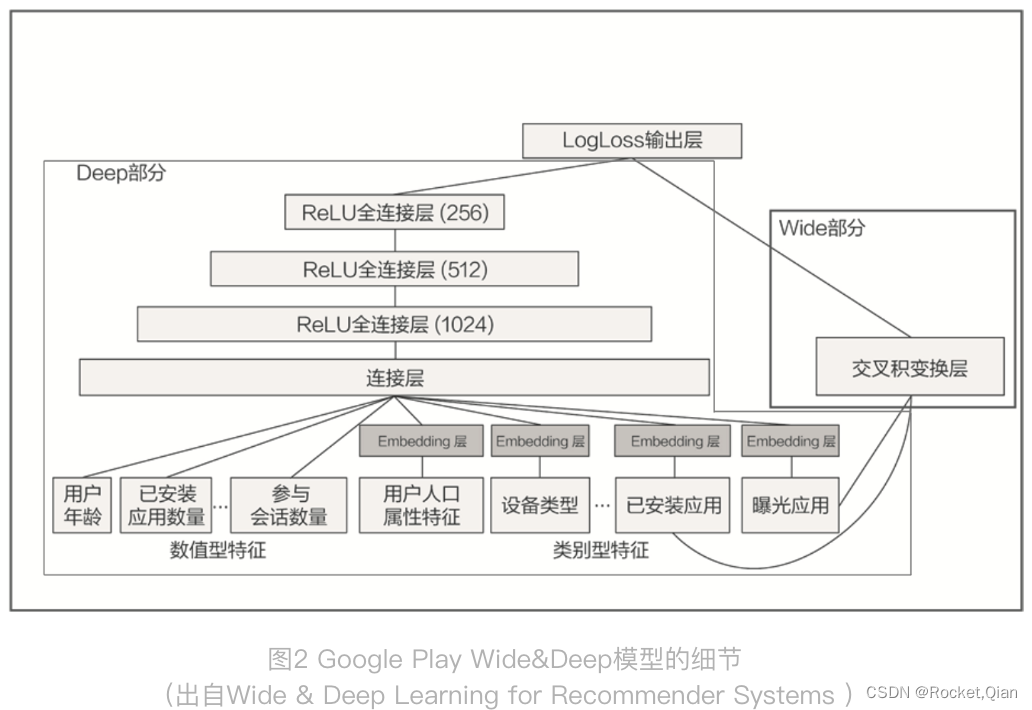
上图就是 Wide&Deep 模型的结构图,它是由左侧的 Wide 部分和右侧的 Deep 部分组成的。Wide 部分的结构很简单,就是把输入层直接连接到输出层,中间没有做任何处理。Deep 层的结构稍复杂,就是常见的Embedding+MLP 的模型结构。
Wide 部分的主要作用是让模型具有较强的“记忆能力”(Memorization),而 Deep 部分的主要作用是让模型具有“泛化能力”(Generalization),因为只有这样的结构特点,才能让模型兼具逻辑回归和深度神经网络的优点,也就是既能快速处理和记忆大量历史行为特征,又具有强大的表达能力,这就是 Google 提出这个模型的动机。
1.1 模型的记忆能力
所谓的 “记忆能力”,可以被宽泛地理解为模型直接学习历史数据中物品或者特征的“共现频率”,并且把它们直接作为推荐依据的能力。
就像我们在电影推荐中可以发现一系列的规则,比如,看了 A 电影的用户经常喜欢看电影 B,这种“因为 A 所以 B”式的规则,非常直接也非常有价值。
1.2 模型的泛化能力
“泛化能力”指的是模型对于新鲜样本、以及从未出现过的特征组合的预测能力。
看一个例子:假设,我们知道 25 岁的男性用户喜欢看电影 A,35 岁的女性用户也喜欢看电影 A。如果我们想让一个只有记忆能力的模型回答,“35 岁的男性喜不喜欢看电影 A”这样的问题,这个模型就会“说”,我从来没学过这样的知识啊,没法回答你。这就体现出泛化能力的重要性了。模型有了很强的泛化能力之后,才能够对一些非常稀疏的,甚至从未出现过的情况作出尽量“靠谱”的预测。
事实上,矩阵分解就是为了解决协同过滤“泛化能力”不强而诞生的。因为协同过滤只会“死板”地使用用户的原始行为特征,而矩阵分解因为生成了用户和物品的隐向量,所以就可以计算任意两个用户和物品之间的相似度了。这就是泛化能力强的另一个例子。
2. Wide&Deep 模型的应用场景
Wide&Deep 模型是由 Google 的应用商店团队 Google Play 提出的,在 Google Play 为用户推荐 APP 这样的应用场景下,Wide&Deep 模型的推荐目标就显而易见了,就是应该尽量推荐那些用户可能喜欢,愿意安装的应用。那具体到 Wide&Deep 模型中,Google Play 团队是如何为 Wide 部分和 Deep 部分挑选特征的呢?

先从右边 Wide 部分的特征看起,只利用了两个特征的交叉,这两个特征是“已安装应用”和“当前曝光应用”。这样一来,Wide 部分想学到的知识就非常直观,就是希望记忆好“如果 A 所以 B”这样的简单规则。在 Google Play 的场景下,就是希望记住“如果用户已经安装了应用 A,是否会安装 B”这样的规则。
再来看看左边的 Deep 部分,就是一个非常典型的 Embedding+MLP 结构。其中的输入特征很多,有用户年龄、属性特征、设备类型,还有已安装应用的 Embedding 等。把这些特征一股脑地放进多层神经网络里面去学习之后,它们互相之间会发生多重的交叉组合,这最终会让模型具备很强的泛化能力。
总的来说,Wide&Deep 通过组合 Wide 部分的线性模型和 Deep 部分的深度网络,取各自所长,就能得到一个综合能力更强的组合模型。
3. Wide&Deep 模型的代码实现
3.1 tensorflow实现
# wide and deep model architecture
# deep part for all input features
deep = tf.keras.layers.DenseFeatures(numerical_columns + categorical_columns)(inputs)
deep = tf.keras.layers.Dense(128, activation='relu')(deep)
deep = tf.keras.layers.Dense(128, activation='relu')(deep)
# wide part for cross feature
wide = tf.keras.layers.DenseFeatures(crossed_feature)(inputs)
both = tf.keras.layers.concatenate([deep, wide])
output_layer = tf.keras.layers.Dense(1, activation='sigmoid')(both)
model = tf.keras.Model(inputs, output_layer)
- 1
- 2
- 3
- 4
- 5
- 6
- 7
- 8
- 9
- 10
Deep 部分,它是输入层加两层 128 维隐层的结构,它的输入是类别型 Embedding 向量和数值型特征。
Wide 部分直接把输入特征连接到了输出层就可以了。但是,这里要重点关注一下 Wide 部分所用的特征 crossed_feature。
movie_feature = tf.feature_column.categorical_column_with_identity(key='movieId', num_buckets=1001)
rated_movie_feature = tf.feature_column.categorical_column_with_identity(key='userRatedMovie1', num_buckets=1001)
crossed_feature = tf.feature_column.crossed_column([movie_feature, rated_movie_feature], 10000)
- 1
- 2
- 3
- 4
在 Deep 部分和 Wide 部分都构建完后,要使用 concatenate layer 把两部分连接起来,形成一个完整的特征向量,输入到最终的 sigmoid 神经元中,产生推荐分数。
3.2 pytorch实现
#Wide部分
class LR_Layer(nn.Module):
    def __init__(self,enc_dict):
        super(LR_Layer, self).__init__()
        self.enc_dict = enc_dict
        self.emb_layer = EmbeddingLayer(enc_dict=self.enc_dict,embedding_dim=1)
        self.dnn_input_dim = get_dnn_input_dim(self.enc_dict, 1)
        self.fc = nn.Linear(self.dnn_input_dim,1)

    def forward(self,data):
        sparse_emb = self.emb_layer(data)
        sparse_emb = torch.stack(sparse_emb,dim=1).flatten(1) #[batch,num_sparse*emb]
        dense_input = get_linear_input(self.enc_dict, data)  #[batch,num_dense]
        dnn_input = torch.cat((sparse_emb, dense_input), dim=1) # [batch,num_sparse*emb + num_dense]
        out = self.fc(dnn_input)
        return out
- 1
- 2
- 3
- 4
- 5
- 6
- 7
- 8
- 9
- 10
- 11
- 12
- 13
- 14
- 15
- 16
#DNN部分
class MLP_Layer(nn.Module):
    def __init__(self,
                 input_dim,
                 output_dim=None,
                 hidden_units=[],
                 hidden_activations="ReLU",
                 final_activation=None,
                 dropout_rates=0,
                 batch_norm=False,
                 use_bias=True):
        super(MLP_Layer, self).__init__()
        dense_layers = []
        if not isinstance(dropout_rates, list):
            dropout_rates = [dropout_rates] * len(hidden_units)
        if not isinstance(hidden_activations, list):
            hidden_activations = [hidden_activations] * len(hidden_units)
        hidden_activations = [set_activation(x) for x in hidden_activations]
        hidden_units = [input_dim] + hidden_units
        for idx in range(len(hidden_units) - 1):
            dense_layers.append(nn.Linear(hidden_units[idx], hidden_units[idx + 1], bias=use_bias))
            if batch_norm:
                dense_layers.append(nn.BatchNorm1d(hidden_units[idx + 1]))
            if hidden_activations[idx]:
                dense_layers.append(hidden_activations[idx])
            if dropout_rates[idx] > 0:
                dense_layers.append(nn.Dropout(p=dropout_rates[idx]))
        if output_dim is not None:
            dense_layers.append(nn.Linear(hidden_units[-1], output_dim, bias=use_bias))
        if final_activation is not None:
            dense_layers.append(set_activation(final_activation))
        self.dnn = nn.Sequential(*dense_layers)  # * used to unpack list

    def forward(self, inputs):
        return self.dnn(inputs)
- 1
- 2
- 3
- 4
- 5
- 6
- 7
- 8
- 9
- 10
- 11
- 12
- 13
- 14
- 15
- 16
- 17
- 18
- 19
- 20
- 21
- 22
- 23
- 24
- 25
- 26
- 27
- 28
- 29
- 30
- 31
- 32
- 33
- 34
- 35
#Wide&Deep
class WDL(nn.Module):
    def __init__(self,
                 embedding_dim=40,
                 hidden_units=[64, 64, 64],
                 loss_fun = 'torch.nn.BCELoss()',
                 enc_dict=None):
        super(WDL, self).__init__()

        self.embedding_dim = embedding_dim
        self.hidden_units = hidden_units
        self.loss_fun = eval(loss_fun)
#         self.loss_fun = torch.nn.BCELoss()
        self.enc_dict = enc_dict

        self.embedding_layer = EmbeddingLayer(enc_dict=self.enc_dict, embedding_dim=self.embedding_dim)
        #Wide部分
        self.lr = LR_Layer(enc_dict=self.enc_dict)
        # Deep部分
        self.dnn_input_dim = get_dnn_input_dim(self.enc_dict, self.embedding_dim) # num_sprase*emb + num_dense
        self.dnn = MLP_Layer(input_dim=self.dnn_input_dim, output_dim=1, hidden_units=self.hidden_units,
                                 hidden_activations='relu', dropout_rates=0)

    def forward(self,data):
        #Wide
        wide_logit = self.lr(data) #Batch,1

        #Deep
        sparse_emb = self.embedding_layer(data)
        sparse_emb = torch.stack(sparse_emb,dim=1).flatten(1) #[Batch,num_sparse_fea*embedding_dim]

        dense_input = get_linear_input(self.enc_dict, data)
        dnn_input = torch.cat((sparse_emb, dense_input), dim=1)#[Batch,num_sparse_fea*embedding_dim+num_dense]
        deep_logit = self.dnn(dnn_input)

        #Wide+Deep
        y_pred = (wide_logit+deep_logit).sigmoid()
#         return y_pred

        #输出
        loss = self.loss_fun(y_pred.squeeze(-1),data['label'])
        output_dict = {'pred':y_pred,'loss':loss}
        return output_dict
- 1
- 2
- 3
- 4
- 5
- 6
- 7
- 8
- 9
- 10
- 11
- 12
- 13
- 14
- 15
- 16
- 17
- 18
- 19
- 20
- 21
- 22
- 23
- 24
- 25
- 26
- 27
- 28
- 29
- 30
- 31
- 32
- 33
- 34
- 35
- 36
- 37
- 38
- 39
- 40
- 41
- 42
- 43
最后,有个问题,什么样的特征应该放进wide,什么样的特征应该放进deep部分呢?


