- 1python基础知识(五):while循环、for循环、continue语句和break语句_while循环n次
- 2VJ runtime error可能的原因_vjudge runtime error
- 3电子技术课程设计—交通灯控制系统设计_555简易交通灯电路设计与装调
- 4[crash分析2]C语言在ARM64中函数调用时,栈是如何变化的?_arm函数调用中的堆栈变化
- 5AI论文精读之CSPNet—— 一种加强CNN模型学习能力的主干网络_cspnet论文
- 6JWT详解、JJWT使用、token 令牌
- 7走进前端 Vscode和插件的安装 如何在Gitee上提交代码_vscode gitee插件
- 8Java---给你一个字符串 s,由若干单词组成,单词前后用一些空格字符隔开。返回字符串中最后一个单词的长度。_给你一个字符串 s,由若干单词组成,单词前后用一些空格字符隔开。返回字符串中 最
- 9完备的 AI 学习路线,最详细的资源整理!_ai学习路线
- 10mysql学校作业(二)_查询会员表,输出e-mail是qq邮箱的会员的昵称和e-mail
kubernetes集群搭建Zabbix监控平台的详细过程_kubernetes搭建zabbix
赞
踩
文章目录
- 一、框架图
- 二、环境
- 三、监控指标
- 四、zabbix模板
- 五、主要监控方式
- 六、部署MySql8
- 七、K8S部署zabbix-server&zabbix-web
- 八、K8S部署zabbix-proxy&zabbix-agent
- 九、**样例效果**
- 十、**参考**
一、框架图
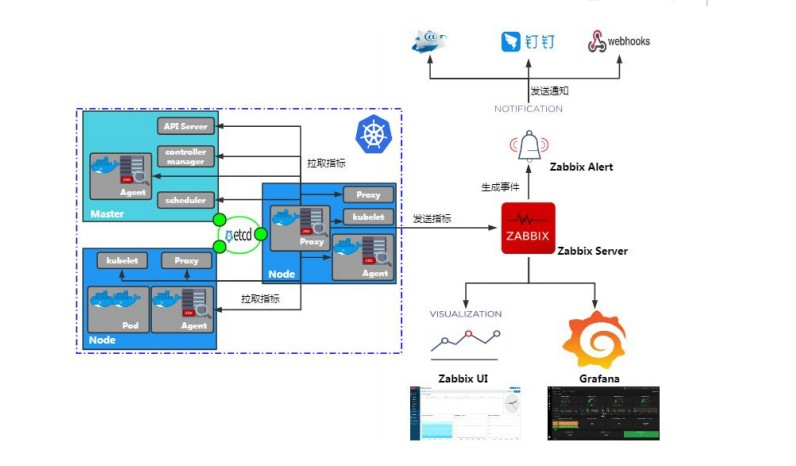
二、环境
| 名称 | 版本 | 操作系统 | IP | 备注 |
|---|---|---|---|---|
| K8S 集群 | 1.24.1 | centos7.9 | 172.16.201.30,172.16.201.31,172.16.201.32 | k8s-master01,k8s-node1, k8s-node2 |
| zabbix | 6.2.6 | centos7.9 | zabbix-server,zabbix-proxy,zabbix-agent 【部署在K8s集群zabbix命名空间内】 | |
| mysql8 | 8.0.31 | centos7.9 | 172.16.201.123 | K8S集群外部单独部署的二进制mysql8 |
| NFS | centos7.9 | 172.16.201.112 | 共享目录 /nfs |
三、监控指标
| 监控名称 | 监控对象 |
|---|---|
| 节点基础信息 | CPU,内存,磁盘 ,IO ,网络,system info … |
| 集群指标【组件】 | Api Server ,ControllerManage,SchedulerServer,kubelet … |
| 资源对象指标 | Daemonset , Deployment , Replicaset, Endpoint, Pod … |
| Pod容器指标 | Container: Menory max usage , Pod CPU: User seconds … |
四、zabbix模板
4.1 K8S集群以及组件模板
| 模板名称 | 备注 |
|---|---|
| Kubernetes API server by HTTP | K8S ApiServer组件指标模板 |
| Kubernetes cluster state by HTTP | K8S 集群指标模板 |
| Kubernetes Controller manager by HTTP | K8S ControllerManager组件指标模板 |
| Kubernetes Scheduler by HTTP | K8S Scheduler组件指标模板 |
| Kubernetes kubelet by HTTP | K8S Kubelet组件指标模板 |
| Kubernetes nodes by HTTP | K8S 集群节点发现以及状态指标模板 |
4.2 K8S节点基础信息指标模板
| 模板名称 | 备注 |
|---|---|
| Linux by Zabbix agent | OS Linux系统监控模板 |
五、主要监控方式
5.1 Agent
通过zabbix agent客户端,采集集群节点的CPU、内存、磁盘等基础信息指标。

5.2 Agentless
通过Zabbix内置的“HTTP agent”,“Script”两种类型的监控项,无需安装客户端,通过访问被监控端的API接口即可采集监控指标数据,主要用于K8S集群、服务组件、pod容器状态及性能指标的采集。

六、部署MySql8
6.1、软件包下载
通用二进制版本: 本文档采用此方式安装 https://downloads.mysql.com/archives/community/
选择版本,再选择Operating System: Linux - Generic
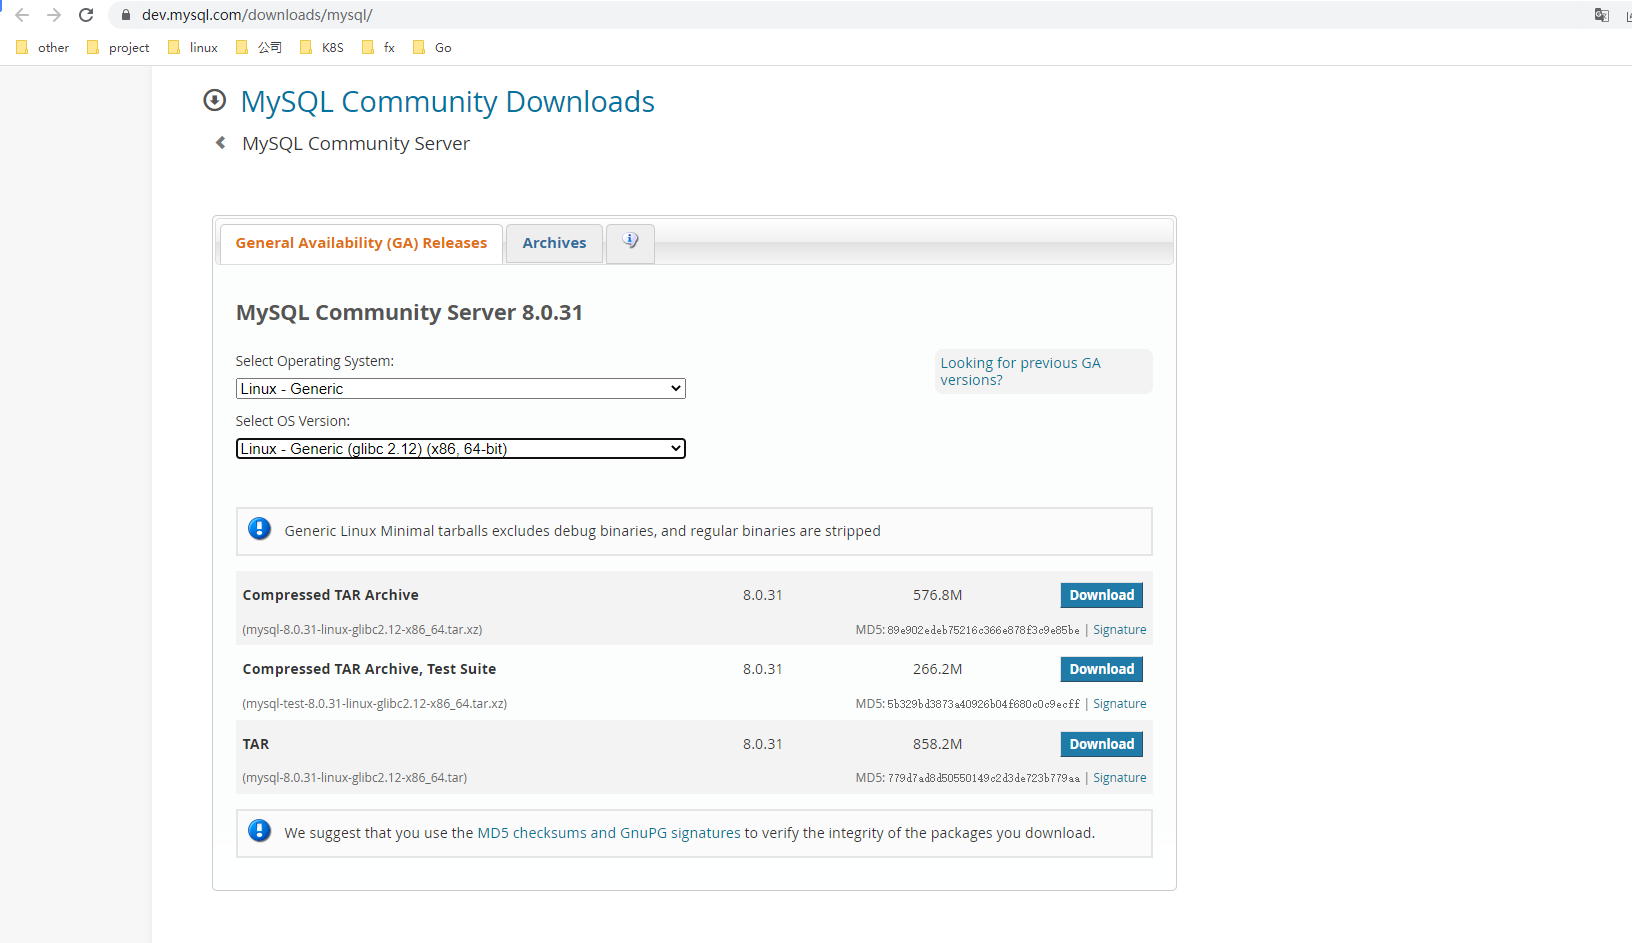
6.2、卸载MariaDB
在CentOS中默认安装有MariaDB,是MySQL的一个分支,主要由开源社区维护。CentOS 7及以上版本已经不再使用MySQL数据库,而是使用MariaDB数据库。如果直接安装MySQL,会和MariaDB的文件冲突。因此,需要先卸载自带的MariaDB,再安装MySQL。
#查看是否存在MariaDB
rpm -qa|grep mariadb

#卸载mariadb
yum remove mariadb*
- 1
- 2
- 3
- 4
- 5
6.3、MySQL二进制安装
6.3.1 创建mysql工作目录:
root@db01 ~]# mkdir -p /home/application/mysql
- 1
6.3.2、上传软件,并解压并改名为app
[root@db01 app]# tar -xf /root/mysql-8.0.31-linux-glibc2.12-x86_64.tar.xz


[root@db01 app]# mv mysql-8.0.31-linux-glibc2.12-x86_64 /home/application/mysql/app


[root@db01 app]# ls -l /home/application/mysql/app
total 36
drwxr-xr-x  2 root root   4096 Mar  4 14:55 bin
-rw-r--r--  1 7161 31415 17987 Sep 13  2017 COPYING
drwxr-xr-x  2 root root     55 Mar  4 14:55 docs
drwxr-xr-x  3 root root   4096 Mar  4 14:55 include
drwxr-xr-x  5 root root    229 Mar  4 14:55 lib
drwxr-xr-x  4 root root     30 Mar  4 14:55 man
-rw-r--r--  1 7161 31415  2478 Sep 13  2017 README
drwxr-xr-x 28 root root   4096 Mar  4 14:55 share
drwxr-xr-x  2 root root     90 Mar  4 14:55 support-files
- 1
- 2
- 3
- 4
- 5
- 6
- 7
- 8
- 9
- 10
- 11
- 12
- 13
- 14
- 15
- 16
- 17
6.3.3、修改环境变量
[root@db01 app]# vim /etc/profile
#加入一行
export PATH=$PATH:/home/application/mysql/app/bin

[root@db01 app]# source /etc/profile
- 1
- 2
- 3
- 4
- 5
6.3.4、建立mysql用户和组(如果有可忽略)
useradd -s /sbin/nologin mysql -M
- 1
6.3.5、创建mysql 数据目录,日志目录;并修改权限
mkdir -p /home/application/mysql/data
mkdir -p /home/application/mysql/data/logs

chown -Rf mysql.mysql /home/application/mysql/app
chown -Rf mysql.mysql /home/application/mysql/data
chown -Rf mysql.mysql /home/application/mysql/data/logs
- 1
- 2
- 3
- 4
- 5
- 6
6.3.6、初始化数据
[root@db01 ~]# mysqld --initialize-insecure  --user=mysql --basedir=/home/application/mysql/app --datadir=/home/application/mysql/data

2022-12-05T05:42:38.231032Z 0 [System] [MY-013169] [Server] /home/application/mysql/app/bin/mysqld (mysqld 8.0.31) initializing of server in progress as process 1796
2022-12-05T05:42:38.242323Z 1 [System] [MY-013576] [InnoDB] InnoDB initialization has started.
2022-12-05T05:42:43.737861Z 1 [System] [MY-013577] [InnoDB] InnoDB initialization has ended.
2022-12-05T05:42:45.690512Z 6 [Warning] [MY-010453] [Server] root@localhost is created with an empty password ! Please consider switching off the --initialize-insecure option.
- 1
- 2
- 3
- 4
- 5
- 6
- 7
6.4、配置mysql配置文件
[mysqld]
user=mysql
basedir=/home/application/mysql/app
datadir=/home/application/mysql/data
character_set_server=utf8
collation-server=utf8mb4_bin


#只能用IP地址检查客户端的登录,不用主机名,跳过域名解析
skip-name-resolve=1

#日志时间
log_timestamps=SYSTEM

#慢日志
long_query_time=3
slow_query_log=ON
slow_query_log_file=/home/application/mysql/data/logs/slow_query.log

#通用日志
general_log=1
general_log_file=/home/application/mysql/data/logs/mysql_general.log


#错误日志
log-error=/home/application/mysql/data/logs/mysql-error.log


# 创建新表时将使用的默认存储引擎
default-storage-engine=INNODB

# 默认使用"mysql_native_password"插件认证
default_authentication_plugin=mysql_native_password


port=3306
socket=/tmp/mysql.sock
max_connections=1000
sql_mode=STRICT_TRANS_TABLES,NO_ZERO_IN_DATE,NO_ZERO_DATE,ERROR_FOR_DIVISION_BY_ZERO,NO_ENGINE_SUBSTITUTION
max_allowed_packet=300M

[mysql]
socket=/tmp/mysql.sock
- 1
- 2
- 3
- 4
- 5
- 6
- 7
- 8
- 9
- 10
- 11
- 12
- 13
- 14
- 15
- 16
- 17
- 18
- 19
- 20
- 21
- 22
- 23
- 24
- 25
- 26
- 27
- 28
- 29
- 30
- 31
- 32
- 33
- 34
- 35
- 36
- 37
- 38
- 39
- 40
- 41
- 42
- 43
- 44
- 45
6.5、使用systemd管理mysql
vim /etc/systemd/system/mysqld.service
[Unit]
Description=MySQL Server
Documentation=man:mysqld(8)
Documentation=http://dev.mysql.com/doc/refman/en/using-systemd.html
After=network.target
After=syslog.target

[Install]
WantedBy=multi-user.target
[Service]
User=mysql
Group=mysql
ExecStart=/home/application/mysql/app/bin/mysqld --defaults-file=/etc/my.cnf
LimitNOFILE = 5000
- 1
- 2
- 3
- 4
- 5
- 6
- 7
- 8
- 9
- 10
- 11
- 12
- 13
- 14
- 15
- 16
#reload从新加载下systemd
[root@db01 mysql]#  systemctl daemon-reload
- 1
- 2
#systemd 管理相关命令
systemctl  start  mysqld
- 1
- 2
6.6、创建root用户密码,并创建zabbix数据库,定义zabbix用户
[root@db01 ~]# mysqladmin -uroot -p  #无密码,直接回车

#创建root用户密码
mysql> alter user 'root'@'localhost' IDENTIFIED WITH mysql_native_password BY 'zabbix';
Query OK, 0 rows affected (0.01 sec)

#创建数据库
mysql> CREATE DATABASE zabbix DEFAULT CHARACTER SET utf8mb4 COLLATE utf8mb4_bin;
Query OK, 1 row affected (0.00 sec)

#创建用户
mysql> CREATE USER 'zabbix'@'%' IDENTIFIED BY 'zabbix';
Query OK, 0 rows affected (0.01 sec)

#授权用户,这里注意要给zabbix授权所有权限;不然后面创建user表中数据会失败
mysql> GRANT ALL PRIVILEGES ON *.* TO 'zabbix'@'%';
Query OK, 0 rows affected (0.01 sec)

#刷新权限
mysql> flush privileges;
Query OK, 0 rows affected (0.00 sec)
- 1
- 2
- 3
- 4
- 5
- 6
- 7
- 8
- 9
- 10
- 11
- 12
- 13
- 14
- 15
- 16
- 17
- 18
- 19
- 20
- 21
- 22
七、K8S部署zabbix-server&zabbix-web
7.1 创建存储,需提前搭建好nfs环境
使用NFS 作为后端的存储,使用动态PV 的自动供给 为zabbix持久化数据。
部署NFS 服务( 172.16.201.112主机上 )
#   创建 NFS 存储目录
mkdir -p /nfs
#   安装nfs服务
yum -y install nfs-utils rpcbind
#   修改配置文件
echo "/nfs *(rw,sync,no_root_squash,no_subtree_check)" >> /etc/exports
#   启动服务
systemctl start nfs && systemctl start rpcbind
#   设置开机启动
systemctl enable nfs-server && systemctl enable rpcbind
- 1
- 2
- 3
- 4
- 5
- 6
- 7
- 8
- 9
- 10
K8S集群所有节点都要安装nfs-utils
yum -y install nfs-utils

#注意,所有节点都要安装nfs-utils,否则无法使用pv
- 1
- 2
- 3
7.2 创建动态PV
vim StorageClass-nfs.yaml
apiVersion: storage.k8s.io/v1
kind: StorageClass
metadata:
  name: managed-nfs-storage
provisioner: fuseim.pri/ifs # or choose another name, must match deployment's env PROVISIONER_NAME'
parameters:
  archiveOnDelete: "true"
---
kind: ServiceAccount
apiVersion: v1
metadata:
  name: nfs-client-provisioner
---
kind: ClusterRole
apiVersion: rbac.authorization.k8s.io/v1
metadata:
  name: nfs-client-provisioner-runner
rules:
  - apiGroups: [""]
    resources: ["persistentvolumes"]
    verbs: ["get", "list", "watch", "create", "delete"]
  - apiGroups: [""]
    resources: ["persistentvolumeclaims"]
    verbs: ["get", "list", "watch", "update"]
  - apiGroups: ["storage.k8s.io"]
    resources: ["storageclasses"]
    verbs: ["get", "list", "watch"]
  - apiGroups: [""]
    resources: ["events"]
    verbs: ["create", "update", "patch"]
---
kind: ClusterRoleBinding
apiVersion: rbac.authorization.k8s.io/v1
metadata:
  name: run-nfs-client-provisioner
subjects:
  - kind: ServiceAccount
    name: nfs-client-provisioner
    namespace: default
roleRef:
  kind: ClusterRole
  name: nfs-client-provisioner-runner
  apiGroup: rbac.authorization.k8s.io
---
kind: Role
apiVersion: rbac.authorization.k8s.io/v1
metadata:
  name: leader-locking-nfs-client-provisioner
rules:
  - apiGroups: [""]
    resources: ["endpoints"]
    verbs: ["get", "list", "watch", "create", "update", "patch"]
---
kind: RoleBinding
apiVersion: rbac.authorization.k8s.io/v1
metadata:
  name: leader-locking-nfs-client-provisioner
subjects:
  - kind: ServiceAccount
    name: nfs-client-provisioner
    # replace with namespace where provisioner is deployed
    namespace: default
roleRef:
  kind: Role
  name: leader-locking-nfs-client-provisioner
  apiGroup: rbac.authorization.k8s.io
---
apiVersion: v1
kind: ServiceAccount
metadata:
  name: nfs-client-provisioner
---
kind: Deployment
apiVersion: apps/v1
metadata:
  name: nfs-client-provisioner
spec:
  replicas: 1
  strategy:
    type: Recreate
  selector:
    matchLabels:
      app: nfs-client-provisioner
  template:
    metadata:
      labels:
        app: nfs-client-provisioner
    spec:
      serviceAccountName: nfs-client-provisioner
      containers:
        - name: nfs-client-provisioner
              image: arawak/nfs-client-provisioner
          volumeMounts:
            - name: nfs-client-root
              mountPath: /persistentvolumes
          env:
            - name: PROVISIONER_NAME
              value: fuseim.pri/ifs
            - name: NFS_SERVER
              value: 172.16.201.112  #指定nfs地址
            - name: NFS_PATH
              value: /nfs
      volumes:
        - name: nfs-client-root
          nfs:
            server: 172.16.201.112   #指定nfs地址
            path: /nfs
- 1
- 2
- 3
- 4
- 5
- 6
- 7
- 8
- 9
- 10
- 11
- 12
- 13
- 14
- 15
- 16
- 17
- 18
- 19
- 20
- 21
- 22
- 23
- 24
- 25
- 26
- 27
- 28
- 29
- 30
- 31
- 32
- 33
- 34
- 35
- 36
- 37
- 38
- 39
- 40
- 41
- 42
- 43
- 44
- 45
- 46
- 47
- 48
- 49
- 50
- 51
- 52
- 53
- 54
- 55
- 56
- 57
- 58
- 59
- 60
- 61
- 62
- 63
- 64
- 65
- 66
- 67
- 68
- 69
- 70
- 71
- 72
- 73
- 74
- 75
- 76
- 77
- 78
- 79
- 80
- 81
- 82
- 83
- 84
- 85
- 86
- 87
- 88
- 89
- 90
- 91
- 92
- 93
- 94
- 95
- 96
- 97
- 98
- 99
- 100
- 101
- 102
- 103
- 104
- 105
- 106
- 107
查看StorageClass
[root@k8s-master01 zabbix-latest]# kubectl get sc
NAME                  PROVISIONER      RECLAIMPOLICY   VOLUMEBINDINGMODE   ALLOWVOLUMEEXPANSION   AGE
managed-nfs-storage   fuseim.pri/ifs   Delete          Immediate           false                  2m
- 1
- 2
- 3
7.3 创建zabbix-server.yaml
vim zabbix-server.yaml
- 使用的是宿主机网络 hostNetwork: true
- 给zabbix-server pod 指定节点允许,因此需要给节点打上标签, zabbix-server: “true”
apiVersion: v1
kind: Namespace
metadata:
  name: zabbix
---
apiVersion: v1
kind: Service
metadata:
  name: zabbix-server
  namespace: zabbix
  labels:
    app: zabbix-server
spec:
  selector:
    app: zabbix-server
  ports:
  - name: zabbix-server
    port: 10051
    nodePort: 30051
  type: NodePort

---
apiVersion: v1
kind: PersistentVolumeClaim
metadata:
  name: zabbix-scripts
  namespace: zabbix
spec:
  storageClassName: "managed-nfs-storage"
  accessModes:
    - ReadWriteMany
  resources:
    requests:
      storage: 1Gi
---
apiVersion: apps/v1
kind: Deployment
metadata:
  labels:
    app: zabbix-server
  name: zabbix-server
  namespace: zabbix
spec:
  replicas: 1
  selector:
    matchLabels:
      app: zabbix-server
  template:
    metadata:
      labels:
        app: zabbix-server
    spec:
      nodeSelector:
        zabbix-server: "true"
      hostNetwork: true
      containers:
      - image: zabbix/zabbix-server-mysql:6.2.6-centos
        imagePullPolicy: IfNotPresent
        name: zabbix-server-mysql
        volumeMounts:
        - mountPath: /usr/lib/zabbix/alertscripts
          name: zabbix-scripts
        env:
        - name: DB_SERVER_HOST
          value: 172.16.201.123
        - name: DB_SERVER_PORT
          value: "3306"
        - name: MYSQL_DATABASE
          value: zabbix
        - name: MYSQL_USER
          value: zabbix
        - name: MYSQL_PASSWORD
          value: zabbix
        - name: ZBX_CACHESIZE
          value: "512M"
        - name: ZBX_HISTORYCACHESIZE
          value: "128M"
        - name: ZBX_HISTORYINDEXCACHESIZE
          value: "128M"
        - name: ZBX_TRENDCACHESIZE
          value: "128M"
        - name: ZBX_VALUECACHESIZE
          value: "256M"
        - name: ZBX_TIMEOUT
          value: "30"
        resources:
          requests:
            cpu: 500m
            memory: 500Mi
          limits:
            cpu: 1000m
            memory: 1Gi
      volumes:
        - name: zabbix-scripts
          persistentVolumeClaim:
            claimName: zabbix-scripts
- 1
- 2
- 3
- 4
- 5
- 6
- 7
- 8
- 9
- 10
- 11
- 12
- 13
- 14
- 15
- 16
- 17
- 18
- 19
- 20
- 21
- 22
- 23
- 24
- 25
- 26
- 27
- 28
- 29
- 30
- 31
- 32
- 33
- 34
- 35
- 36
- 37
- 38
- 39
- 40
- 41
- 42
- 43
- 44
- 45
- 46
- 47
- 48
- 49
- 50
- 51
- 52
- 53
- 54
- 55
- 56
- 57
- 58
- 59
- 60
- 61
- 62
- 63
- 64
- 65
- 66
- 67
- 68
- 69
- 70
- 71
- 72
- 73
- 74
- 75
- 76
- 77
- 78
- 79
- 80
- 81
- 82
- 83
- 84
- 85
- 86
- 87
- 88
- 89
- 90
- 91
- 92
- 93
- 94
- 95
- 96
kubectl get all -n zabbix
#给k8s-node1节点打上标签
[root@k8s-master01 ~]# kubectl label node k8s-node1  zabbix-server=true


[root@k8s-master01 zabbix-latest]# kubectl apply -f zabbix-server.yaml


[root@k8s-master01 zabbix-latest]# kubectl get all -n zabbix
NAME                                             READY   STATUS    RESTARTS   AGE
pod/zabbix-server-747bf9fc7-s8pqq                1/1     Running   0          2m25s

NAME                                    TYPE        CLUSTER-IP       EXTERNAL-IP   PORT(S)           AGE
service/zabbix-server                   NodePort    10.102.226.252   <none>        10051:30051/TCP   2m25s

NAME                                        READY   UP-TO-DATE   AVAILABLE   AGE
deployment.apps/zabbix-server               1/1     1            1           2m25s

NAME                                                   DESIRED   CURRENT   READY   AGE
replicaset.apps/zabbix-server-747bf9fc7                1         1         1       2m25s
- 1
- 2
- 3
- 4
- 5
- 6
- 7
- 8
- 9
- 10
- 11
- 12
- 13
- 14
- 15
- 16
- 17
- 18
- 19
7.4 创建zabbix-web.yaml
vim zabbix-web.yaml
apiVersion: apps/v1
kind: Deployment
metadata:
  labels:
    app: zabbix-web
  name: zabbix-web
  namespace: zabbix
spec:
  replicas: 1
  selector:
    matchLabels:
      app: zabbix-web
  template:
    metadata:
      labels:
        app: zabbix-web
    spec:
      containers:
      - image: zabbix/zabbix-web-nginx-mysql:6.2.6-centos
        imagePullPolicy: IfNotPresent
        name: zabbix-web-nginx-mysql
        env:
        - name: DB_SERVER_HOST
          value: 172.16.201.123
        - name: MYSQL_USER
          value: zabbix
        - name: MYSQL_PASSWORD
          value: zabbix
        - name: ZBX_SERVER_HOST
          value: zabbix-server
        - name: PHP_TZ
          value: Asia/shanghai
        resources:
          requests:
            cpu: 500m
            memory: 500Mi
          limits:
            cpu: 1000m
            memory: 1Gi
---
apiVersion: v1
kind: Service
metadata:
  labels:
    app: zabbix-web
  name: zabbix-web
  namespace: zabbix
spec:
  ports:
  - name: web
    port: 8080
    protocol: TCP
    targetPort: 8080
    nodePort: 30008
  selector:
    app: zabbix-web
  type: NodePort
- 1
- 2
- 3
- 4
- 5
- 6
- 7
- 8
- 9
- 10
- 11
- 12
- 13
- 14
- 15
- 16
- 17
- 18
- 19
- 20
- 21
- 22
- 23
- 24
- 25
- 26
- 27
- 28
- 29
- 30
- 31
- 32
- 33
- 34
- 35
- 36
- 37
- 38
- 39
- 40
- 41
- 42
- 43
- 44
- 45
- 46
- 47
- 48
- 49
- 50
- 51
- 52
- 53
- 54
- 55
- 56
- 57
kubectl get all -n zabbix
NAME                                             READY   STATUS    RESTARTS   AGE
pod/zabbix-server-747bf9fc7-s8pqq                1/1     Running   0          5m43s
pod/zabbix-web-66495bf485-hqgpg                  1/1     Running   0          18m

NAME                                    TYPE        CLUSTER-IP       EXTERNAL-IP   PORT(S)           AGE
service/zabbix-server                   NodePort    10.102.226.252   <none>        10051:30051/TCP   5m43s
service/zabbix-web                      NodePort    10.108.151.52    <none>        8080:30008/TCP    18m

NAME                                        READY   UP-TO-DATE   AVAILABLE   AGE
deployment.apps/zabbix-server               1/1     1            1           5m43s
deployment.apps/zabbix-web                  1/1     1            1           18m

NAME                                                   DESIRED   CURRENT   READY   AGE
replicaset.apps/zabbix-server-747bf9fc7                1         1         1       5m43s
replicaset.apps/zabbix-web-66495bf485                  1         1         1       18m
- 1
- 2
- 3
- 4
- 5
- 6
- 7
- 8
- 9
- 10
- 11
- 12
- 13
- 14
- 15
- 16
7.5 登录zabbix-dashboard
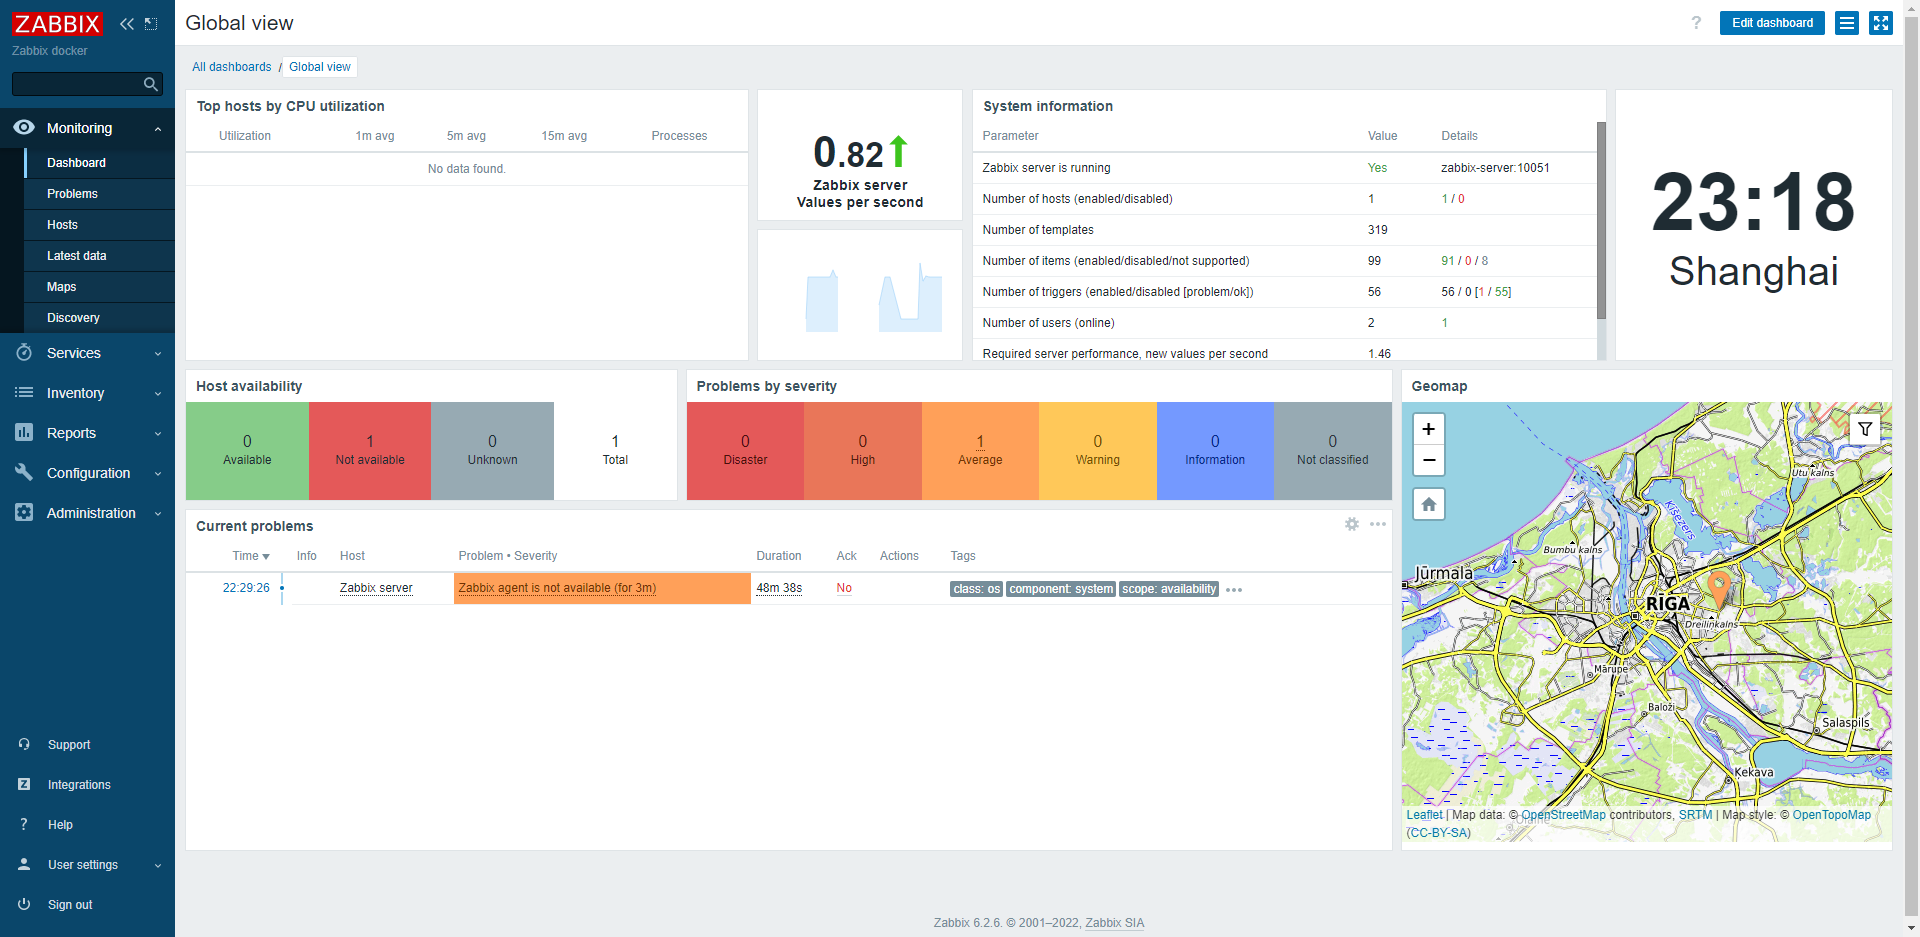
八、K8S部署zabbix-proxy&zabbix-agent
在K8S集群中部署Zabbix Proxy 与 Zabbix Agent监控组件,这里采用官方提供的Helm Chart来安装
8.1 安装Helm工具
[root@k8s-master01 ~]# wget https://get.helm.sh/helm-v3.8.1-linux-amd64.tar.gz
[root@k8s-master01 ~]# tar zxvf helm-v3.8.1-linux-amd64.tar.gz
[root@k8s-master01 ~]# cp linux-amd64/helm /usr/local/bin/helm
- 1
- 2
- 3
8.2 添加Helm Chart Repository
[root@k8s-master01 ~]# helm repo add zabbix-chart-6.2 https://cdn.zabbix.com/zabbix/integrations/kubernetes-helm/6.2/

[root@k8s-master01 ~]# helm repo list
NAME                URL
zabbix-chart-6.2    https://cdn.zabbix.com/zabbix/integrations/kubernetes-helm/6.2
- 1
- 2
- 3
- 4
- 5
8.3 下载Zabbix Helm Chart,并解压
[root@k8s-master01 ~]# helm pull zabbix-chart-6.2/zabbix-helm-chrt

[root@k8s-master01 ~]# ll
-rw-r--r--  1 root root    24698 Dec  8 10:38 zabbix-helm-chrt-1.1.1.tgz

[root@k8s-master01 ~]# tar -xf zabbix-helm-chrt-1.1.1.tgz

[root@k8s-master01 ~]# ls -l
total 40616
drwxr-xr-x  4 root root      124 Dec  8 10:39 zabbix-helm-chrt
-rw-r--r--  1 root root    24698 Dec  8 10:38 zabbix-helm-chrt-1.1.1.tgz
- 1
- 2
- 3
- 4
- 5
- 6
- 7
- 8
- 9
- 10
- 11
8.4 配置Chart.yaml
Chart.yaml主要记录的是当前Chart的基本信息,包括版本、名称、依赖
| 参数 | 解释 |
|---|---|
| apiVersion | Chart API 版本 |
| name | Chart 名称 |
| description | 描述信息 |
| home | 项目home页面的URL |
| icon | 用做icon的SVG或PNG图片URL |
| type | Chart 类型 |
| version | 语义化2 版本 |
| appVersion | 包含的应用版本 |
| dependencies | 依赖的Chart列表,缓存在同级 |
[root@k8s-master01 zabbix-helm-chrt]# vim Chart.yaml
apiVersion: v2
appVersion: 6.2.0
dependencies:
- condition: kubeStateMetrics.enabled
  name: kube-state-metrics
  repository: https://charts.bitnami.com/bitnami
  version: 3.5.*
description: A Helm chart for deploying Zabbix agent and proxy
home: https://www.zabbix.com/
icon: https://assets.zabbix.com/img/logo/zabbix_logo_500x131.png
name: zabbix-helm-chrt
type: application
version: 1.1.1
- 1
- 2
- 3
- 4
- 5
- 6
- 7
- 8
- 9
- 10
- 11
- 12
- 13
8.5 配置values.yaml
values.yaml主要为templates目录中定义K8S资源对象的配置文件变量值
8.5.1 Zabbix Proxy 与 Agent参数配置
只需要修改如下参数
| 参数 | 值 | 解释 |
|---|---|---|
| fullnameOverride | zabbix | 覆盖完全限定应用名称 |
| kubeStateMetricsEnabled | true | 部署kube-state-metrics |
| zabbixProxy.image.tag | 6.2.6-centos | ZabbixProxy Docker镜像tag,用于指定ZabbixProxy版本 |
| zabbixProxy.env.ZBX_HOSTNAME | zabbix-proxy-k8s | ZabbixProxy hostname |
| zabbixProxy.env.ZBX_SERVER_HOST | 172.16.201.31 | ZabbixServer地址 |
| zabbixAgent.image.tag | 6.2.6-centos | ZabbiAgent Docker镜像tag,用于指定 |
[root@k8s-master01 zabbix-helm-chrt]# vim values.yaml
## nameOverride -- Override name of app
nameOverride: ""
## fullnameOverride -- Override the full qualified app name
fullnameOverride: "zabbix"
## kubeStateMetricsEnabled -- If true, deploys the kube-state-metrics deployment
kubeStateMetricsEnabled: true
## Service accoun for Kubernetes API
rbac:
  ## rbac.create  Specifies whether the RBAC resources should be created
  create: true
  additionalRulesForClusterRole: []
  ##  - apiGroups: [ "" ]
  ##    resources:
  ##      - nodes/proxy
  ##    verbs: [ "get", "list", "watch" ]
serviceAccount:
  ## serviceAccount.create  Specifies whether a service account should be created
  create: true
  ## serviceAccount.name  The name of the service account to use. If not set name is generated using the fullname template
  name: zabbix-service-account


##  **Zabbix proxy** configurations
zabbixProxy:
  ## Enables use of **Zabbix proxy**
  enabled: true
  containerSecurityContext: {}
  resources: {}
  image:
    ## Zabbix proxy Docker image name
    repository: zabbix/zabbix-proxy-sqlite3
    ## Tag of Docker image of Zabbix proxy
    tag: 6.2.6-centos
    pullPolicy: IfNotPresent
    ## List of dockerconfig secrets names to use when pulling images
    pullSecrets: []

  env:
    ## The variable allows to switch Zabbix proxy mode. Bu default, value is 0 - active proxy. Allowed values are 0 and 1.
    - name: ZBX_PROXYMODE
      value: 0
    ## Zabbix proxy hostname
    - name: ZBX_HOSTNAME
      value: zabbix-proxy-k8s
    ## Zabbix server host
    ## If ProxyMode is set to active mode:
    ## IP address or DNS name of Zabbix server to get configuration data from and send data to.

    ## If ProxyMode is set to passive mode:
    ## List of comma delimited IP addresses, optionally in CIDR notation, or DNS names of Zabbix server. Incoming connections will be accepted only from the addresses listed here. If IPv6 support is enabled then '127.0.0.1', '::127.0.0.1', '::ffff:127.0.0.1' are treated equally and '::/0' will allow any IPv4 or IPv6 address. '0.0.0.0/0' can be used to allow any IPv4 address.
    ## Example: Server=127.0.0.1,192.168.1.0/24,::1,2001:db8::/32,zabbix.example.com
    - name: ZBX_SERVER_HOST
      value: "172.16.201.31"
    ## Zabbix server port
    - name: ZBX_SERVER_PORT
      value: 10051
    ## The variable is used to specify debug level. By default, value is 3
    - name: ZBX_DEBUGLEVEL
      value: 3
    ## Cache size
    - name: ZBX_CACHESIZE
      value: 128M
    ## The variable enable communication with Zabbix Java Gateway to collect Java related checks
    - name: ZBX_JAVAGATEWAY_ENABLE
      value: false
    ## How often proxy retrieves configuration data from Zabbix server in seconds. Active proxy parameter. Ignored for passive proxies.
    - name: ZBX_CONFIGFREQUENCY
      value: 60
    ## List can be extended with other environment variables listed here: https://github.com/zabbix/zabbix-docker/tree/5.4/agent/alpine#other-variables
    ## For example:
    ## The variable is list of comma separated loadable Zabbix modules.
    ## - name: ZBX_LOADMODULE
    ##   value : dummy1.so,dummy2.so


  service:
    annotations: {}
    labels: {}
    ## Type of service for Zabbix proxy
    type: ClusterIP
    ## Port to expose service
    port: 10051
    ## Port of application pod
    targetPort: 10051
    ## Zabbix proxy Ingress externalIPs with optional path
    ## Ref: https://kubernetes.io/docs/user-guide/services/#external-ips
    ## Must be provided if ProxyMode is set to passive mode
    externalIPs: []
    ## Loadbalancer IP
    ## Only use if service.type is "LoadBalancer"
    ##
    loadBalancerIP: ""
    loadBalancerSourceRanges: []


  ## Node selector for Zabbix proxy
  nodeSelector: {}

  ## Tolerations configurations for Zabbix proxy
  tolerations: {}

  ## Affinity configurations for Zabbix proxy
  affinity: {}

  persistentVolume:
    ## If true, Zabbix proxy will create/use a Persistent Volume Claim
    ##
    enabled: false

    ## Zabbix proxy data Persistent Volume access modes
    ## Must match those of existing PV or dynamic provisioner
    ## Ref: http://kubernetes.io/docs/user-guide/persistent-volumes/
    ##
    accessModes:
      - ReadWriteOnce

    ## Zabbix proxy data Persistent Volume Claim annotations
    ##
    annotations: {}

    ## Zabbix proxy data Persistent Volume existing claim name
    ## Requires zabbixProxy.persistentVolume.enabled: true
    ## If defined, PVC must be created manually before volume will be bound
    existingClaim: ""

    ## Zabbix proxy data Persistent Volume mount root path
    ##
    mountPath: /data

    ## Zabbix proxy data Persistent Volume size
    ##
    size: 2Gi

    ## Zabbix proxy data Persistent Volume Storage Class
    ## If defined, storageClassName: <storageClass>
    ## If set to "-", storageClassName: "", which disables dynamic provisioning
    ## If undefined (the default) or set to null, no storageClassName spec is
    ##   set, choosing the default provisioner.  (gp2 on AWS, standard on
    ##   GKE, AWS & OpenStack)
    ##
    storageClass: "-"

    ## Zabbix proxy data Persistent Volume Binding Mode
    ## If defined, volumeBindingMode: <volumeBindingMode>
    ## If undefined (the default) or set to null, no volumeBindingMode spec is
    ##   set, choosing the default mode.
    ##
    volumeBindingMode: ""

    ## Subdirectory of Zabbix proxy data Persistent Volume to mount
    ## Useful if the volume's root directory is not empty
    ##
    subPath: ""

## **Zabbix agent** configurations
zabbixAgent:
  ## Enables use of Zabbix agent
  enabled: true
  resources: {}
      ##  requests:
      ##   cpu: 100m
      ##   memory: 54Mi
      ##  limits:
      ##   cpu: 100m
      ##   memory: 54Mi

  securityContext: {}
    # fsGroup: 65534
    # runAsGroup: 65534
    # runAsNonRoot: true
    # runAsUser: 65534

  containerSecurityContext: {}
    ## capabilities:
    ##   add:
    ##   - SYS_TIME

  ## Expose the service to the host network
  hostNetwork: true

  # Specify dns configuration options for agent containers e.g ndots
  ## ref: https://kubernetes.io/docs/concepts/services-networking/dns-pod-service/#pod-dns-config
  dnsConfig: {}
  #  options:
  #  - name: ndots
  #    value: "1"

  ## Share the host process ID namespace
  hostPID: true
  ## If true, agent pods mounts host / at /host/root
  ##
  hostRootFsMount: true
  extraHostVolumeMounts: []
  ##  - name: <mountName>
  ##    hostPath: <hostPath>
  ##    mountPath: <mountPath>
  ##    readOnly: true|false
  ##    mountPropagation: None|HostToContainer|Bidirectional
  image:
    ## Zabbix agent Docker image name
    repository: zabbix/zabbix-agent2
    ## Tag of Docker image of Zabbix agent
    tag: 6.2.6-centos
    pullPolicy: IfNotPresent
    ## List of dockerconfig secrets names to use when pulling images
    pullSecrets: []
  env:
      ## Zabbix server host
    - name: ZBX_SERVER_HOST
      value: 0.0.0.0/0
      ## Zabbix server port
    - name: ZBX_SERVER_PORT
      value: 10051
      ## This variable is boolean (true or false) and enables or disables feature of passive checks. By default, value is true
    - name: ZBX_PASSIVE_ALLOW
      value: true
      ## The variable is comma separated list of allowed Zabbix server or proxy hosts for connections to Zabbix agent container.
    - name: ZBX_PASSIVESERVERS
      value: 0.0.0.0/0
      ## This variable is boolean (true or false) and enables or disables feature of active checks
    - name: ZBX_ACTIVE_ALLOW
      value: false
      ## The variable is used to specify debug level, from 0 to 5
    - name: ZBX_DEBUGLEVEL
      value: 3
      ## The variable is used to specify timeout for processing checks. By default, value is 4.
    - name: ZBX_TIMEOUT
      value: 4
    ## List can be extended with other environment variables listed here: https://github.com/zabbix/zabbix-docker/tree/5.4/agent/alpine#other-variables
    ## For example:
    ## The variable is comma separated list of allowed Zabbix server or proxy hosts for connections to Zabbix agent container. You may specify port.
    ## - name: ZBX_ACTIVESERVERS
    ##   value: ''
      ## The variable is list of comma separated loadable Zabbix modules. It works with volume /var/lib/zabbix/modules.
    ## - name: ZBX_LOADMODULE
    ##   value: ''

  ## Node selector for Agent. Only supports Linux.
  nodeSelector:
    kubernetes.io/os: linux

  ## Tolerations configurations
  tolerations:
    - effect: NoSchedule
      key: node-role.kubernetes.io/master
  ## Affinity configurations
  affinity: {}
  serviceAccount:
    ## Specifies whether a ServiceAccount should be created
    create: true
    ## The name of the ServiceAccount to use.
    ## If not set and create is true, a name is generated using the fullname template
    name: zabbix-agent-service-account
    annotations: {}
    imagePullSecrets: []
    automountServiceAccountToken: false

  service:
    type: ClusterIP
    port: 10050
    targetPort: 10050
    nodePort: 10050
    portName: zabbix-agent
    listenOnAllInterfaces: true
    annotations:
      agent.zabbix/monitor: "true"

  rbac:
    ## If true, create & use RBAC resources
    ##
    create: true
    ## If true, create & use Pod Security Policy resources
    ## https://kubernetes.io/docs/concepts/policy/pod-security-policy/
    ## PodSecurityPolicies disabled by default because they are deprecated in Kubernetes 1.21 and will be removed in Kubernetes 1.25.
    ## If you are using PodSecurityPolicies you can enable the previous behaviour by setting `rbac.pspEnabled: true`
    pspEnabled: false
    pspAnnotations: {}
- 1
- 2
- 3
- 4
- 5
- 6
- 7
- 8
- 9
- 10
- 11
- 12
- 13
- 14
- 15
- 16
- 17
- 18
- 19
- 20
- 21
- 22
- 23
- 24
- 25
- 26
- 27
- 28
- 29
- 30
- 31
- 32
- 33
- 34
- 35
- 36
- 37
- 38
- 39
- 40
- 41
- 42
- 43
- 44
- 45
- 46
- 47
- 48
- 49
- 50
- 51
- 52
- 53
- 54
- 55
- 56
- 57
- 58
- 59
- 60
- 61
- 62
- 63
- 64
- 65
- 66
- 67
- 68
- 69
- 70
- 71
- 72
- 73
- 74
- 75
- 76
- 77
- 78
- 79
- 80
- 81
- 82
- 83
- 84
- 85
- 86
- 87
- 88
- 89
- 90
- 91
- 92
- 93
- 94
- 95
- 96
- 97
- 98
- 99
- 100
- 101
- 102
- 103
- 104
- 105
- 106
- 107
- 108
- 109
- 110
- 111
- 112
- 113
- 114
- 115
- 116
- 117
- 118
- 119
- 120
- 121
- 122
- 123
- 124
- 125
- 126
- 127
- 128
- 129
- 130
- 131
- 132
- 133
- 134
- 135
- 136
- 137
- 138
- 139
- 140
- 141
- 142
- 143
- 144
- 145
- 146
- 147
- 148
- 149
- 150
- 151
- 152
- 153
- 154
- 155
- 156
- 157
- 158
- 159
- 160
- 161
- 162
- 163
- 164
- 165
- 166
- 167
- 168
- 169
- 170
- 171
- 172
- 173
- 174
- 175
- 176
- 177
- 178
- 179
- 180
- 181
- 182
- 183
- 184
- 185
- 186
- 187
- 188
- 189
- 190
- 191
- 192
- 193
- 194
- 195
- 196
- 197
- 198
- 199
- 200
- 201
- 202
- 203
- 204
- 205
- 206
- 207
- 208
- 209
- 210
- 211
- 212
- 213
- 214
- 215
- 216
- 217
- 218
- 219
- 220
- 221
- 222
- 223
- 224
- 225
- 226
- 227
- 228
- 229
- 230
- 231
- 232
- 233
- 234
- 235
- 236
- 237
- 238
- 239
- 240
- 241
- 242
- 243
- 244
- 245
- 246
- 247
- 248
- 249
- 250
- 251
- 252
- 253
- 254
- 255
- 256
- 257
- 258
- 259
- 260
- 261
- 262
- 263
- 264
- 265
- 266
- 267
- 268
- 269
- 270
- 271
- 272
- 273
- 274
- 275
- 276
- 277
8.5.2 kube-state-metrics 依赖Chart参数配置
只需要修改如下参数
| 参数 | 值 | 解释 |
|---|---|---|
| Image.repository | bitnami/kube-state-metrics | kube-state-metrics 镜像库配置**[helm中的镜像地址国内无法下载,需要替换]** |
| Image.tag | 2.2.0 | kube-state-metrics容器镜像本版本 |
vim /root/zabbix-helm-chrt/charts/kube-state-metrics/values.yaml
# Default values for kube-state-metrics.
prometheusScrape: true
image:
  repository: bitnami/kube-state-metrics
  tag: 2.2.0
  pullPolicy: IfNotPresent

imagePullSecrets: []
# - name: "image-pull-secret"

# If set to true, this will deploy kube-state-metrics as a StatefulSet and the data
# will be automatically sharded across <.Values.replicas> pods using the built-in
# autodiscovery feature: https://github.com/kubernetes/kube-state-metrics#automated-sharding
# This is an experimental feature and there are no stability guarantees.
autosharding:
  enabled: false

replicas: 1

# List of additional cli arguments to configure kube-state-metrics
# for example: --enable-gzip-encoding, --log-file, etc.
# all the possible args can be found here: https://github.com/kubernetes/kube-state-metrics/blob/master/docs/cli-arguments.md
extraArgs: []

service:
  port: 8080
  # Default to clusterIP for backward compatibility
  type: ClusterIP
  nodePort: 0
  loadBalancerIP: ""
  annotations: {}

customLabels: {}

hostNetwork: false

rbac:
  # If true, create & use RBAC resources
  create: true

  # Set to a rolename to use existing role - skipping role creating - but still doing serviceaccount and rolebinding to it, rolename set here.
  # useExistingRole: your-existing-role

  # If set to false - Run without Cluteradmin privs needed - ONLY works if namespace is also set (if useExistingRole is set this name is used as ClusterRole or Role to bind to)
  useClusterRole: true

serviceAccount:
  # Specifies whether a ServiceAccount should be created, require rbac true
  create: true
  # The name of the ServiceAccount to use.
  # If not set and create is true, a name is generated using the fullname template
  name:
  # Reference to one or more secrets to be used when pulling images
  # ref: https://kubernetes.io/docs/tasks/configure-pod-container/pull-image-private-registry/
  imagePullSecrets: []
  # ServiceAccount annotations.
  # Use case: AWS EKS IAM roles for service accounts
  # ref: https://docs.aws.amazon.com/eks/latest/userguide/specify-service-account-role.html
  annotations: {}

prometheus:
  monitor:
    enabled: false
    additionalLabels: {}
    namespace: ""
    honorLabels: false
    metricRelabelings: []
    relabelings: []

## Specify if a Pod Security Policy for kube-state-metrics must be created
## Ref: https://kubernetes.io/docs/concepts/policy/pod-security-policy/
##
podSecurityPolicy:
  enabled: false
  annotations: {}
    ## Specify pod annotations
    ## Ref: https://kubernetes.io/docs/concepts/policy/pod-security-policy/#apparmor
    ## Ref: https://kubernetes.io/docs/concepts/policy/pod-security-policy/#seccomp
    ## Ref: https://kubernetes.io/docs/concepts/policy/pod-security-policy/#sysctl
    ##
    # seccomp.security.alpha.kubernetes.io/allowedProfileNames: '*'
    # seccomp.security.alpha.kubernetes.io/defaultProfileName: 'docker/default'
    # apparmor.security.beta.kubernetes.io/defaultProfileName: 'runtime/default'

  additionalVolumes: []

securityContext:
  enabled: true
  runAsGroup: 65534
  runAsUser: 65534
  fsGroup: 65534

## Specify security settings for a Container
## Allows overrides and additional options compared to (Pod) securityContext
## Ref: https://kubernetes.io/docs/tasks/configure-pod-container/security-context/#set-the-security-context-for-a-container
containerSecurityContext: {}

## Node labels for pod assignment
## Ref: https://kubernetes.io/docs/user-guide/node-selection/
nodeSelector: {}

## Affinity settings for pod assignment
## Ref: https://kubernetes.io/docs/concepts/configuration/assign-pod-node/
affinity: {}

## Tolerations for pod assignment
## Ref: https://kubernetes.io/docs/concepts/configuration/taint-and-toleration/
tolerations: []

# Annotations to be added to the pod
podAnnotations: {}

## Assign a PriorityClassName to pods if set
# priorityClassName: ""

# Ref: https://kubernetes.io/docs/tasks/run-application/configure-pdb/
podDisruptionBudget: {}

# Comma-separated list of metrics to be exposed.
# This list comprises of exact metric names and/or regex patterns.
# The allowlist and denylist are mutually exclusive.
metricAllowlist: []

# Comma-separated list of metrics not to be enabled.
# This list comprises of exact metric names and/or regex patterns.
# The allowlist and denylist are mutually exclusive.
metricDenylist: []

# Comma-separated list of additional Kubernetes label keys that will be used in the resource's
# labels metric. By default the metric contains only name and namespace labels.
# To include additional labels, provide a list of resource names in their plural form and Kubernetes
# label keys you would like to allow for them (Example: '=namespaces=[k8s-label-1,k8s-label-n,...],pods=[app],...)'.
# A single '*' can be provided per resource instead to allow any labels, but that has
# severe performance implications (Example: '=pods=[*]').
metricLabelsAllowlist: []
  # - namespaces=[k8s-label-1,k8s-label-n]

# Comma-separated list of Kubernetes annotations keys that will be used in the resource'
# labels metric. By default the metric contains only name and namespace labels.
# To include additional annotations provide a list of resource names in their plural form and Kubernetes
# annotation keys you would like to allow for them (Example: '=namespaces=[kubernetes.io/team,...],pods=[kubernetes.io/team],...)'.
# A single '*' can be provided per resource instead to allow any annotations, but that has
# severe performance implications (Example: '=pods=[*]').
metricAnnotationsAllowList: []
  # - pods=[k8s-annotation-1,k8s-annotation-n]

# Available collectors for kube-state-metrics.
# By default, all available resources are enabled, comment out to disable.
collectors:
  - certificatesigningrequests
  - configmaps
  - cronjobs
  - daemonsets
  - deployments
  - endpoints
  - horizontalpodautoscalers
  - ingresses
  - jobs
  - limitranges
  - mutatingwebhookconfigurations
  - namespaces
  - networkpolicies
  - nodes
  - persistentvolumeclaims
  - persistentvolumes
  - poddisruptionbudgets
  - pods
  - replicasets
  - replicationcontrollers
  - resourcequotas
  - secrets
  - services
  - statefulsets
  - storageclasses
  - validatingwebhookconfigurations
  - volumeattachments
  # - verticalpodautoscalers # not a default resource, see also: https://github.com/kubernetes/kube-state-metrics#enabling-verticalpodautoscalers

# Enabling kubeconfig will pass the --kubeconfig argument to the container
kubeconfig:
  enabled: false
  # base64 encoded kube-config file
  secret:

# Comma-separated list of namespaces to be enabled for collecting resources. By default all namespaces are collected.
namespaces: ""

## Override the deployment namespace
##
namespaceOverride: ""

resources: {}
  # We usually recommend not to specify default resources and to leave this as a conscious
  # choice for the user. This also increases chances charts run on environments with little
  # resources, such as Minikube. If you do want to specify resources, uncomment the following
  # lines, adjust them as necessary, and remove the curly braces after 'resources:'.
  # limits:
  #  cpu: 100m
  #  memory: 64Mi
  # requests:
  #  cpu: 10m
  #  memory: 32Mi

## Provide a k8s version to define apiGroups for podSecurityPolicy Cluster Role.
## For example: kubeTargetVersionOverride: 1.14.9
##
kubeTargetVersionOverride: ""

# Enable self metrics configuration for service and Service Monitor
# Default values for telemetry configuration can be overridden
selfMonitor:
  enabled: false
  # telemetryHost: 0.0.0.0
  # telemetryPort: 8081
- 1
- 2
- 3
- 4
- 5
- 6
- 7
- 8
- 9
- 10
- 11
- 12
- 13
- 14
- 15
- 16
- 17
- 18
- 19
- 20
- 21
- 22
- 23
- 24
- 25
- 26
- 27
- 28
- 29
- 30
- 31
- 32
- 33
- 34
- 35
- 36
- 37
- 38
- 39
- 40
- 41
- 42
- 43
- 44
- 45
- 46
- 47
- 48
- 49
- 50
- 51
- 52
- 53
- 54
- 55
- 56
- 57
- 58
- 59
- 60
- 61
- 62
- 63
- 64
- 65
- 66
- 67
- 68
- 69
- 70
- 71
- 72
- 73
- 74
- 75
- 76
- 77
- 78
- 79
- 80
- 81
- 82
- 83
- 84
- 85
- 86
- 87
- 88
- 89
- 90
- 91
- 92
- 93
- 94
- 95
- 96
- 97
- 98
- 99
- 100
- 101
- 102
- 103
- 104
- 105
- 106
- 107
- 108
- 109
- 110
- 111
- 112
- 113
- 114
- 115
- 116
- 117
- 118
- 119
- 120
- 121
- 122
- 123
- 124
- 125
- 126
- 127
- 128
- 129
- 130
- 131
- 132
- 133
- 134
- 135
- 136
- 137
- 138
- 139
- 140
- 141
- 142
- 143
- 144
- 145
- 146
- 147
- 148
- 149
- 150
- 151
- 152
- 153
- 154
- 155
- 156
- 157
- 158
- 159
- 160
- 161
- 162
- 163
- 164
- 165
- 166
- 167
- 168
- 169
- 170
- 171
- 172
- 173
- 174
- 175
- 176
- 177
- 178
- 179
- 180
- 181
- 182
- 183
- 184
- 185
- 186
- 187
- 188
- 189
- 190
- 191
- 192
- 193
- 194
- 195
- 196
- 197
- 198
- 199
- 200
- 201
- 202
- 203
- 204
- 205
- 206
- 207
- 208
- 209
- 210
- 211
- 212
- 213
- 214
8.5.3 Helm 安装Zabbix Chart
[root@k8s-master01 ~]# cd zabbix-helm-chrt
[root@k8s-master01 zabbix-helm-chrt]# helm install zabbix . --dependency-update -n zabbix

NAME: zabbix
LAST DEPLOYED: Thu Dec  8 11:43:22 2022
NAMESPACE: zabbix
STATUS: deployed
REVISION: 1
TEST SUITE: None
NOTES:
Thank you for installing zabbix-helm-chrt.

Your release is named zabbix.
Zabbix agent installed:  "zabbix/zabbix-agent2:6.2.6-centos"
Zabbix proxy installed:  "zabbix/zabbix-proxy-sqlite3:6.2.6-centos"

Annotations:
app.kubernetes.io/name: zabbix
helm.sh/chart: zabbix-helm-chrt-1.1.1
app.kubernetes.io/version: "6.2.0"
app.kubernetes.io/managed-by: Helm


Service account created:
    zabbix-service-account

To learn more about the release, try:

  $ helm status zabbix
  $ helm get all zabbix
- 1
- 2
- 3
- 4
- 5
- 6
- 7
- 8
- 9
- 10
- 11
- 12
- 13
- 14
- 15
- 16
- 17
- 18
- 19
- 20
- 21
- 22
- 23
- 24
- 25
- 26
- 27
- 28
- 29
- 30
- 31
查看K8S Zabbix Pod
[root@k8s-master01 ~]# kubectl get pods -n zabbix
NAME                                         READY   STATUS    RESTARTS   AGE
zabbix-agent-c2tpt                           1/1     Running   0          39m
zabbix-agent-chjlw                           1/1     Running   0          39m
zabbix-agent-z7mc6                           1/1     Running   0          39m
zabbix-kube-state-metrics-7649877dd4-dtrlj   1/1     Running   0          39m
zabbix-proxy-79dcdc48bd-m5kf8                1/1     Running   0          39m
zabbix-server-747bf9fc7-s8pqq                1/1     Running   0          13h
zabbix-web-66495bf485-hqgpg                  1/1     Running   0          13h
- 1
- 2
- 3
- 4
- 5
- 6
- 7
- 8
- 9
获取API接口访问Token,后面配置Zabbix需要使用到
[root@k8s-master01 ~]# kubectl get secret zabbix-service-account -n zabbix -o jsonpath={.data.token} | base64 -d

exxxxxxxciOiJSUzI1NiIsxxxxxxxxxxxxxxxxxxxxxxxDQifQ.eyJpc3MiOiJrdWJlcm5ldGVzxxxxxxxxxxxxxxxxxxxxxZXJuZXRlcy5pby9zZXJ2aWNlYWNjb3VudC9uYW1lc3BhY2UiOixxxxxxxxxxxxxxxxxxx3NlcnZpY2VhY2NvdW50L3NlY3JldCxxxxxxxxxlcnZpY2UtYWNjbxxxxC9zZXJ2aWNlLWFjY291bnQudWlkIjoiMGM1ZTc3YmMtZTM3OC00NzNjLWEzNxxxxxxiwic3ViIjoixxxxxxxxxxxxxxxxxxxJpeDp6YWJiaXgtxxxxxxxxml
- 1
- 2
- 3
8.6 登录Zabbix页面创建Zabbix Proxy
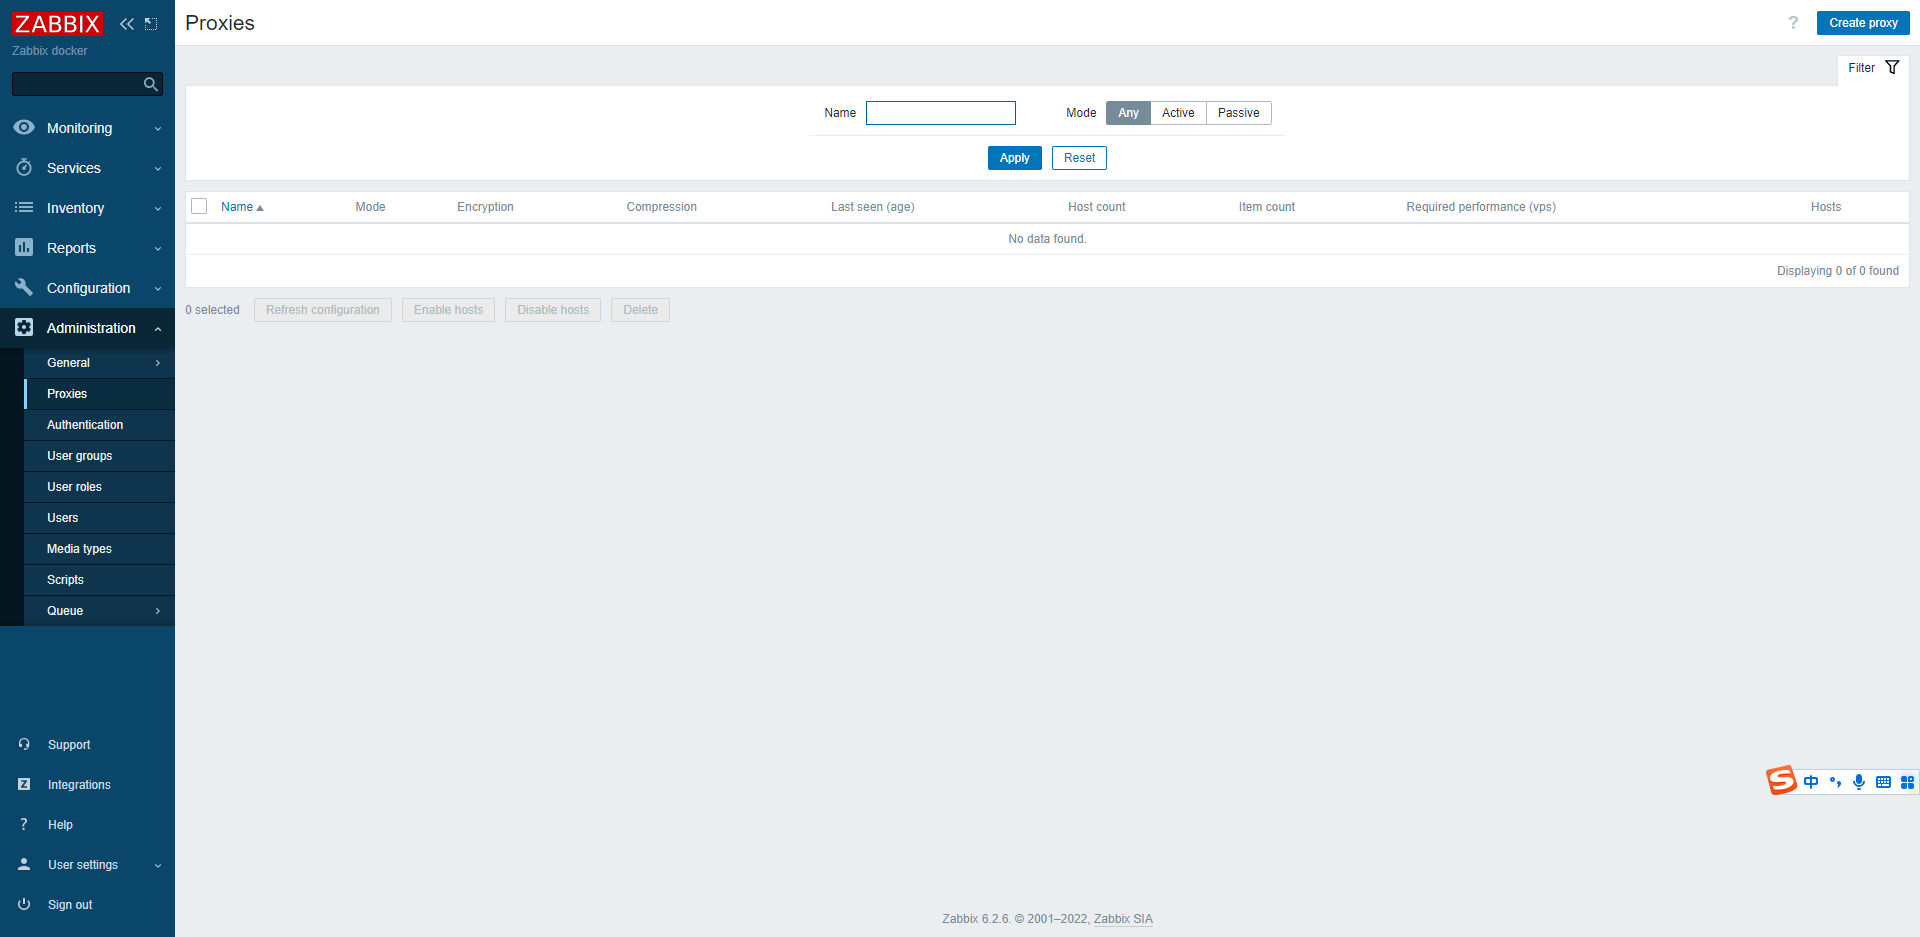
- Proxy name:zabbix-proxy-k8s
- Proxy mode: Active
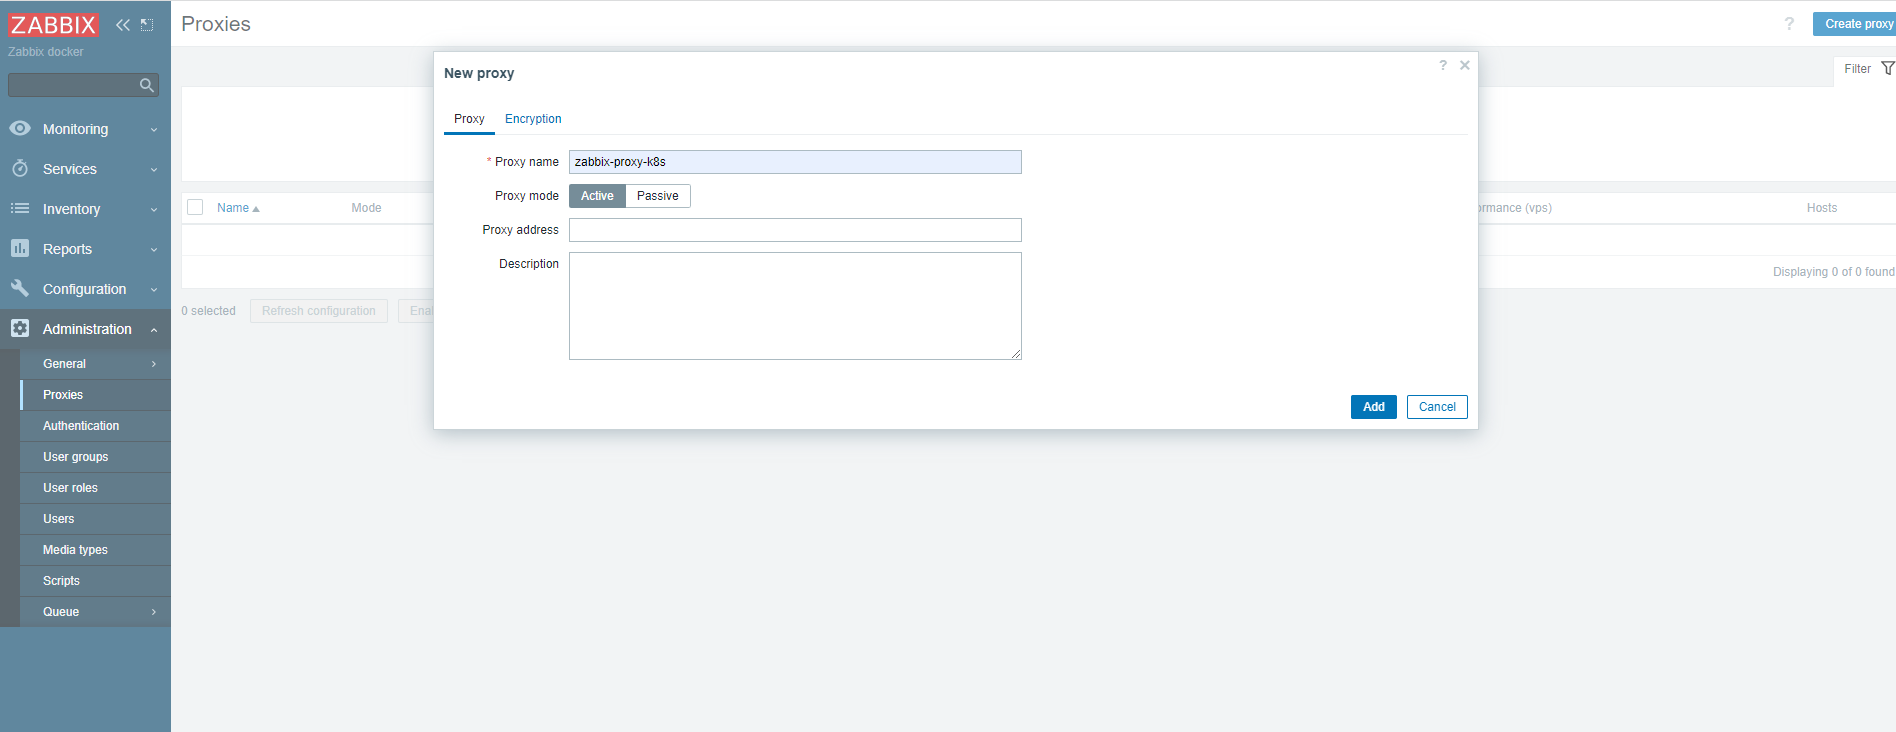
如果长时间等待,Last seen (age) 这边还是爆红 ,就表示proxy 没有主动注册到zabbix-server;需要把zabbix-agent 的pod 删除重建即可
[root@k8s-master01 ~]# kubectl delete pod -n zabbix zabbix-proxy-79dcdc48bd-m5kf8
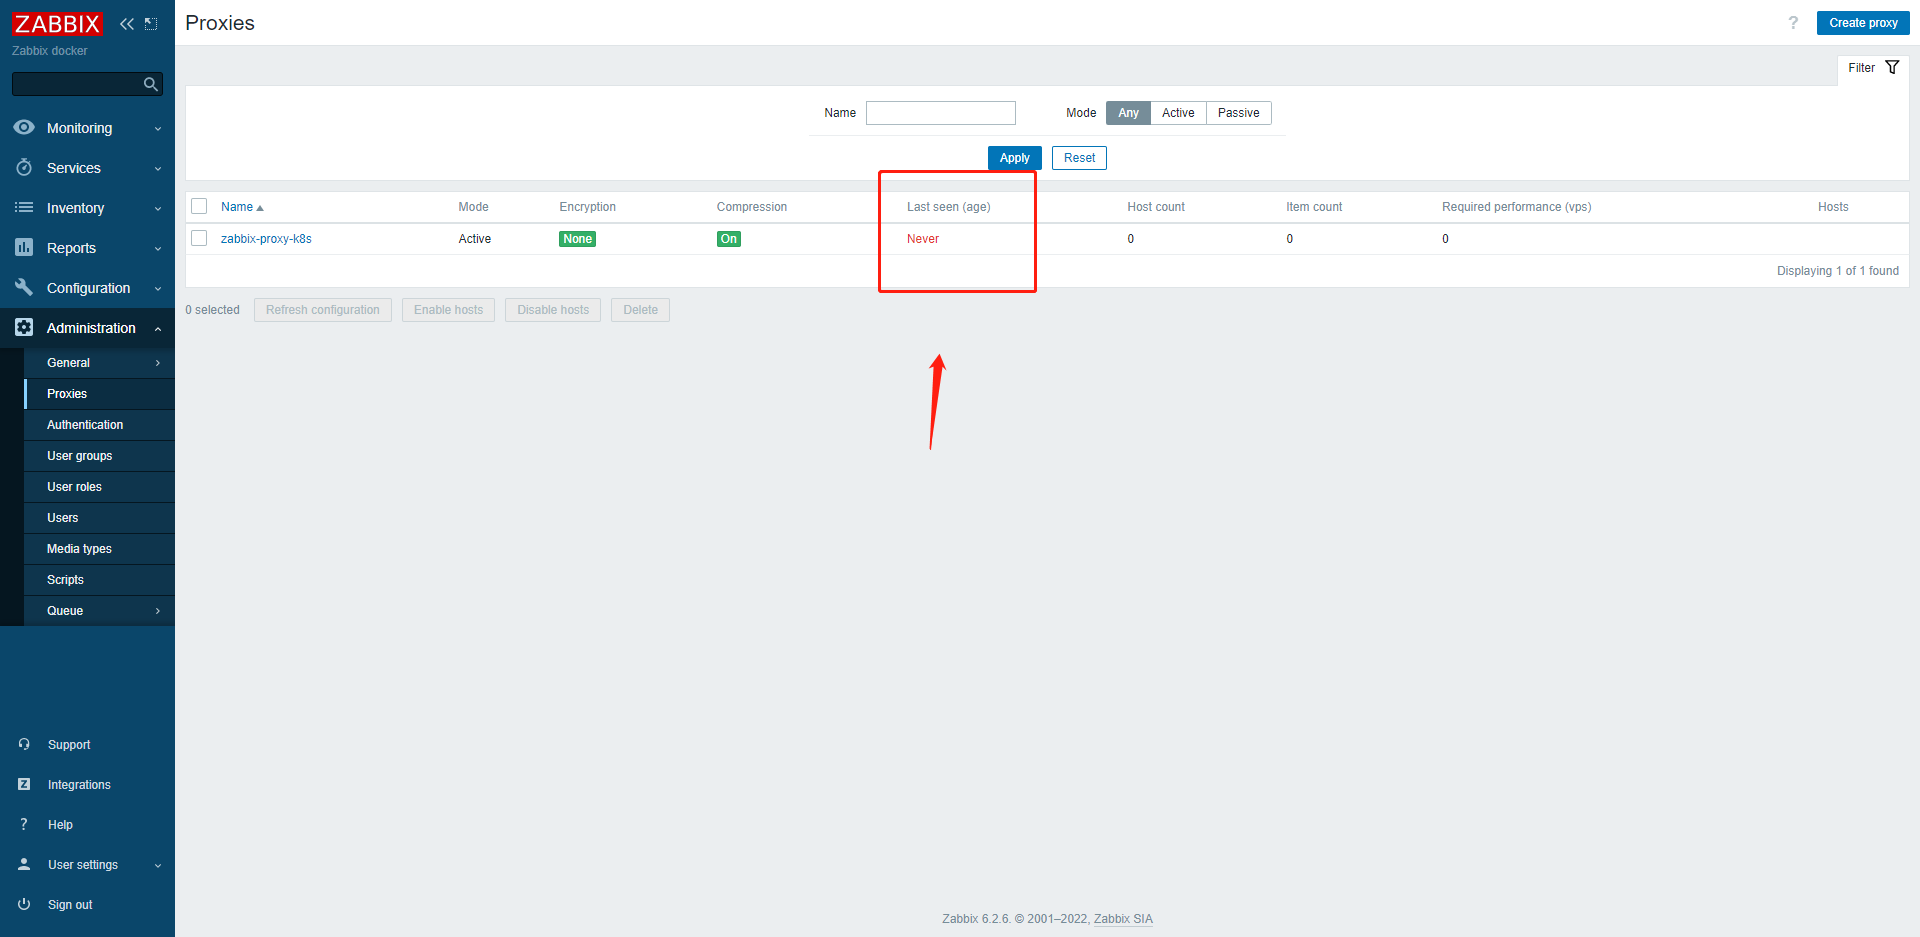
正常状态下的proxy
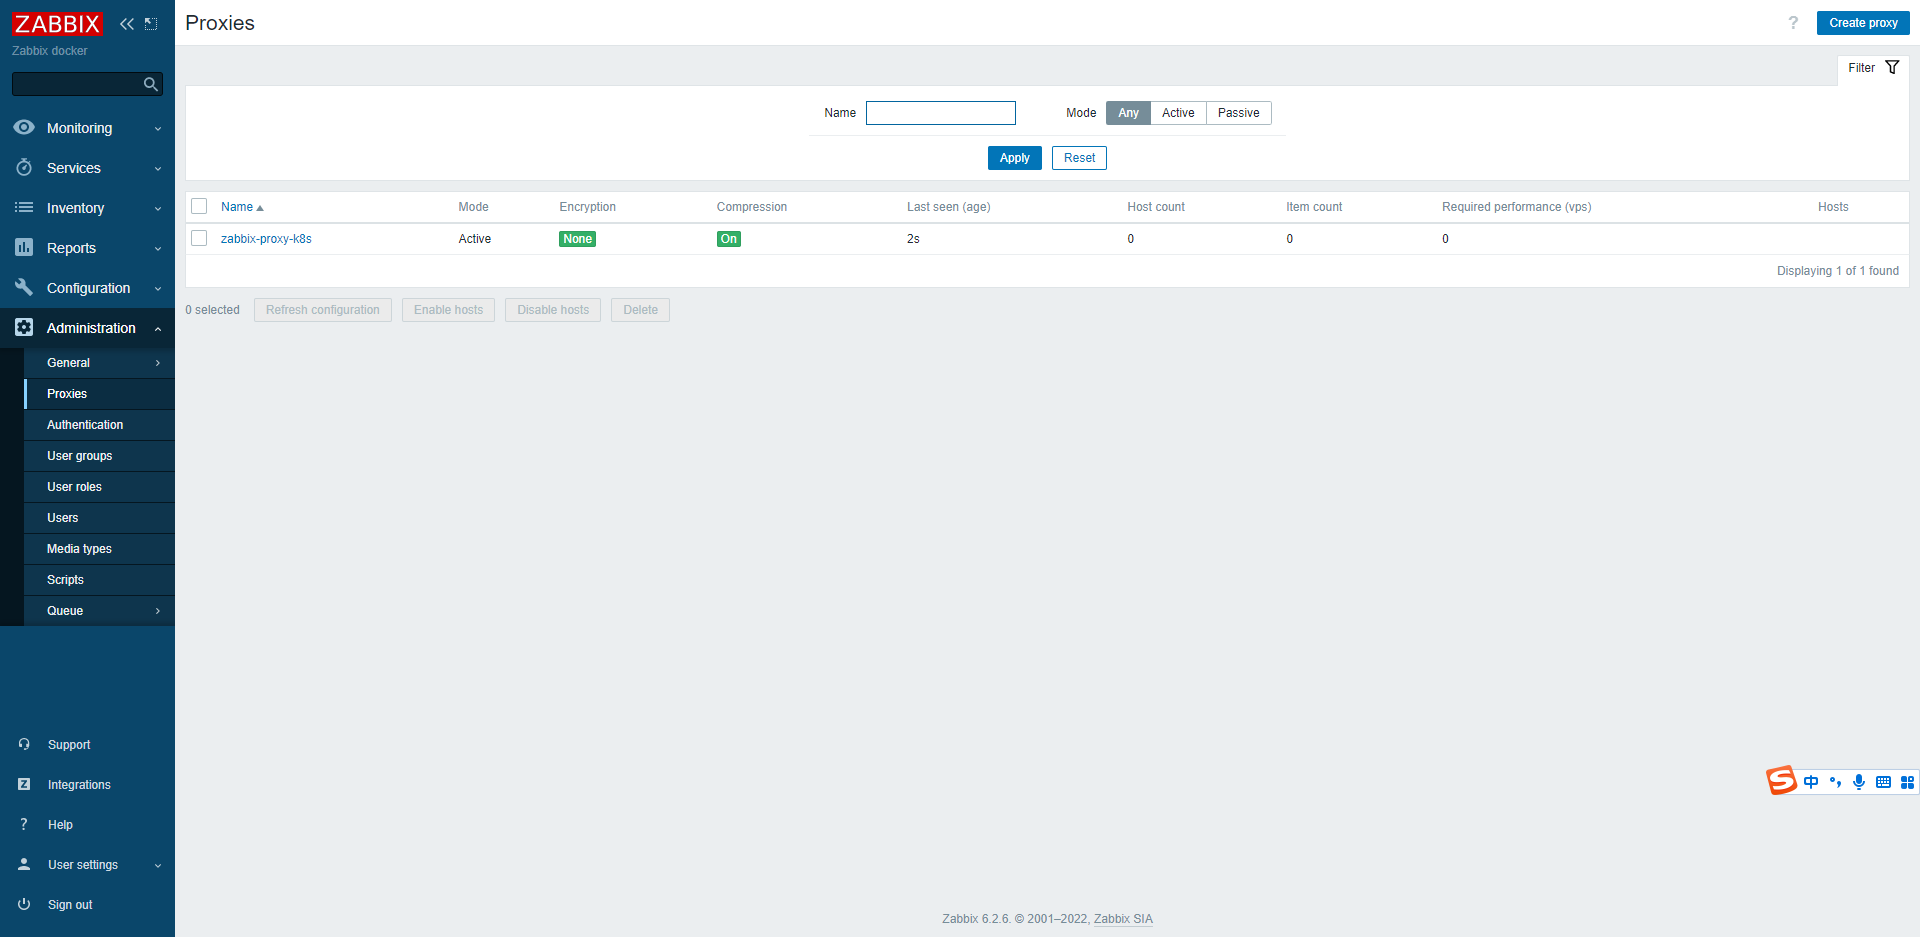
8.6 创建K8S主机群组
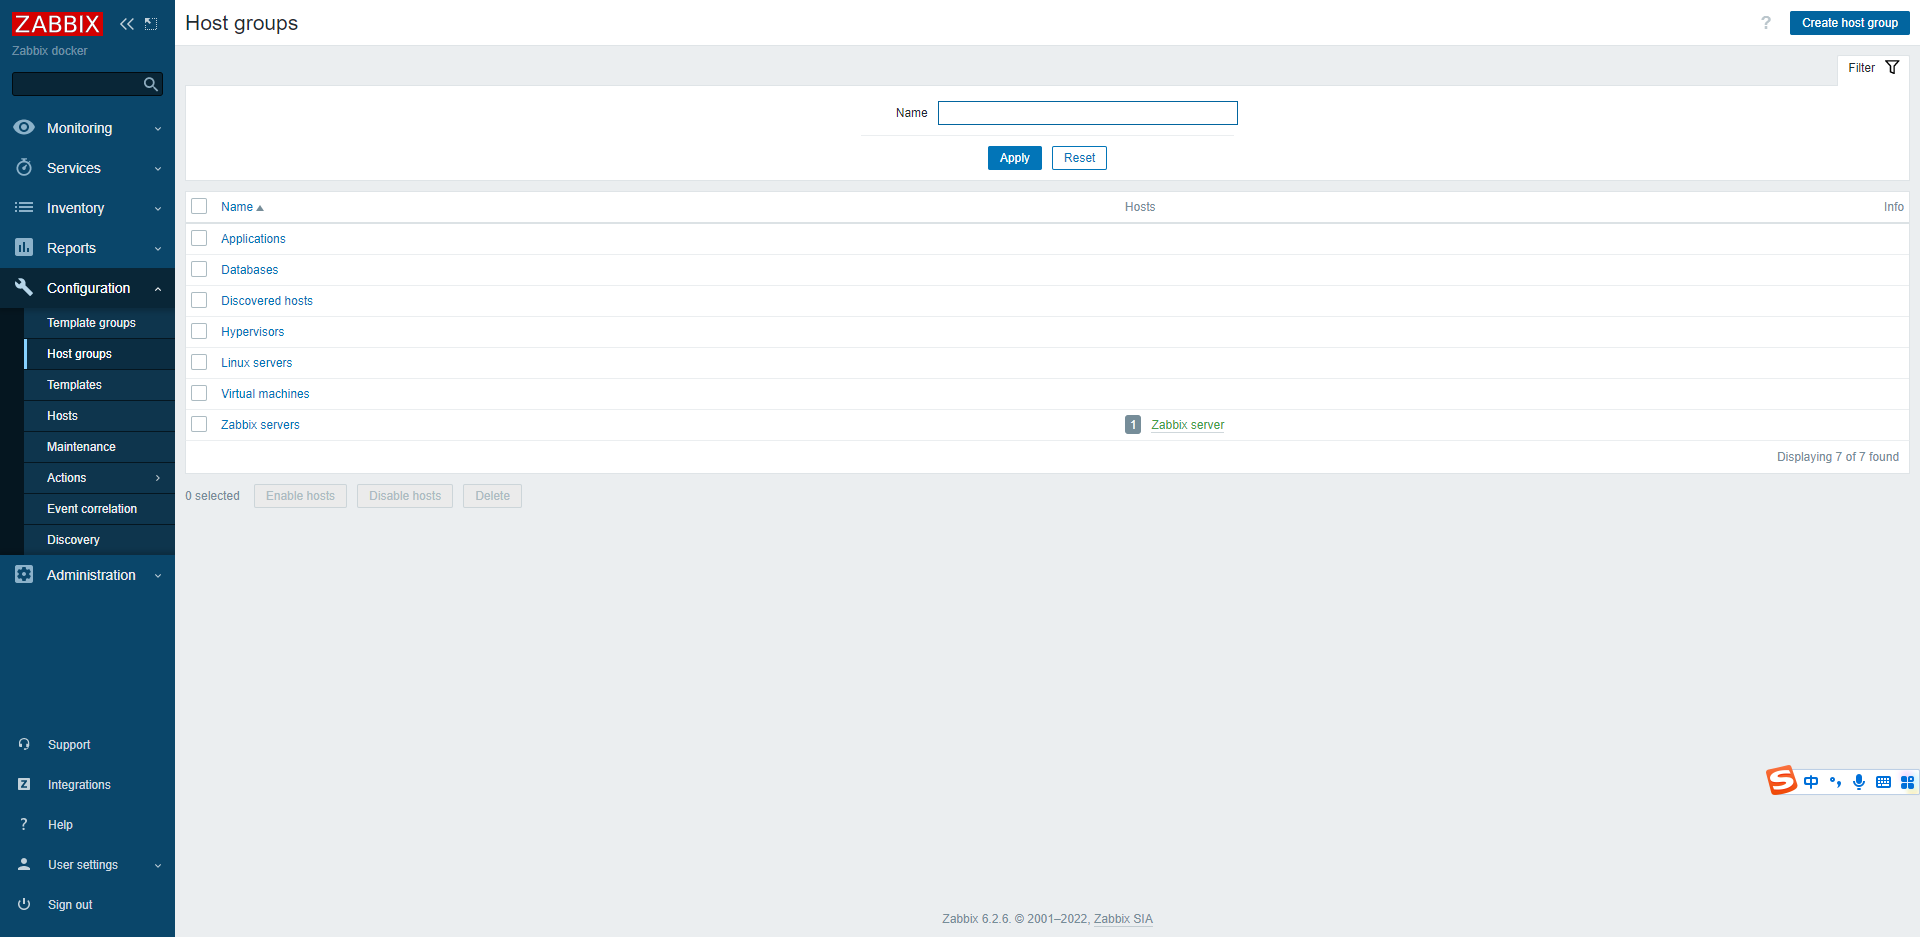
Group name: K8S Server

8.7 创建k8s-node主机,用于自动发现K8S节点主机
8.7.1 查看K8S服务endpoint信息
[root@k8s-master01 ~]# kubectl get endpoints -n zabbix
NAME                        ENDPOINTS                                                     AGE
zabbix-agent                172.16.201.30:10050,172.16.201.31:10050,172.16.201.32:10050   82m
zabbix-kube-state-metrics   10.244.36.74:8080                                             82m
zabbix-proxy                10.244.36.91:10051                                            82m
zabbix-server               172.16.201.31:10051                                           13h
zabbix-web                  10.244.169.157:8080                                           14h
- 1
- 2
- 3
- 4
- 5
- 6
- 7
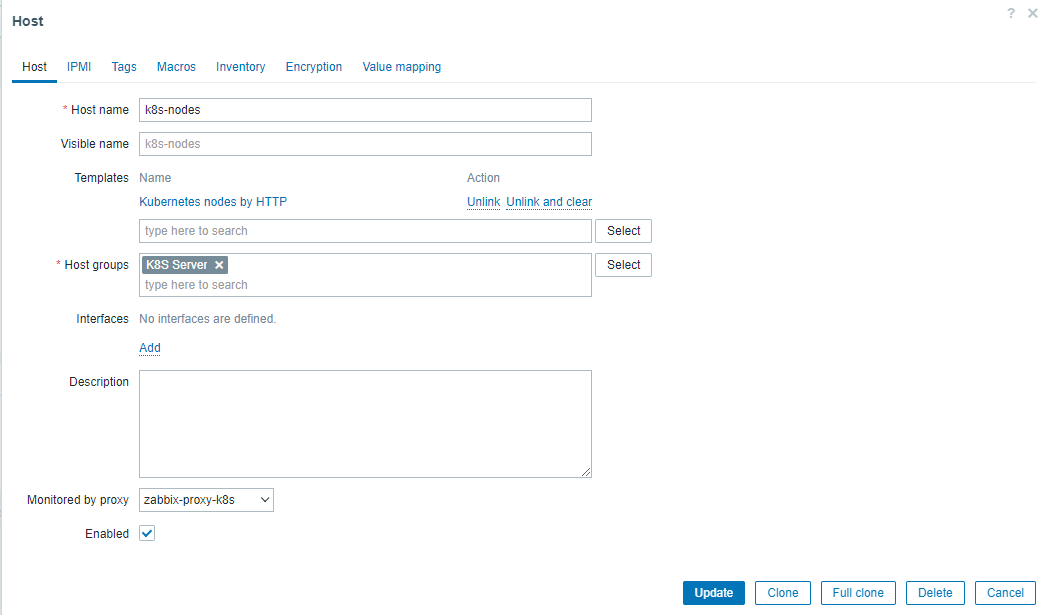
8.7.2 创建主机
Host name: k8s-nodes
Templates: 选择Template group 中 Templates 下的 Kubernetes nodes by HTTP 模板,用于自动发现K8S节点主机
Host groups: K8S Server
Monitored by proxy: 选择 zabbix-proxy-k8s 代理节点
8.7.3 定义宏变量
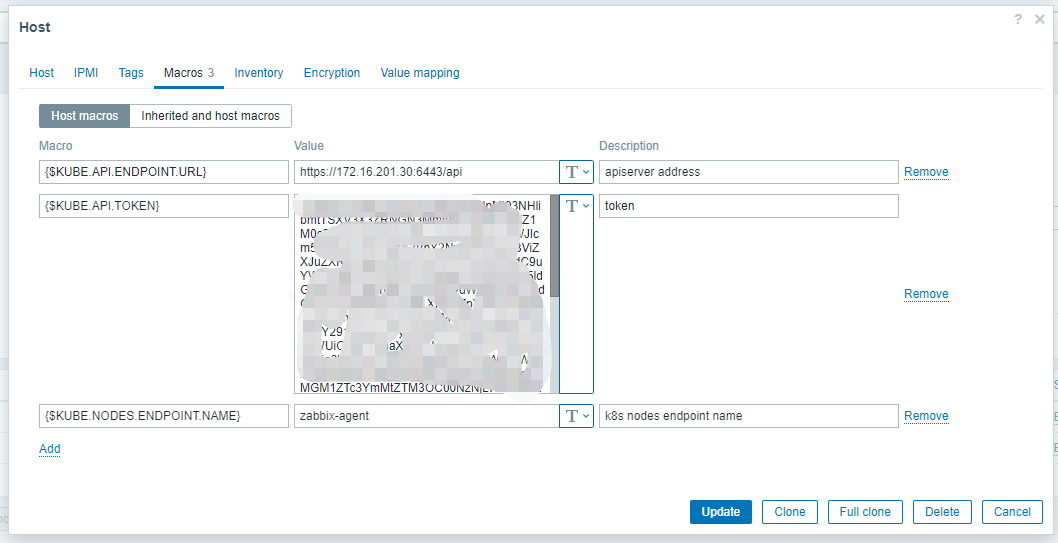
- 定义三个宏变量
- {$KUBE.API.ENDPOINT.URL} : https://172.16.201.30:6443/api
- {$KUBE.API.TOKEN}: XXXXXXXX [上面获取到的token]
- {$KUBE.NODES.ENDPOINT.NAME}: zabbix-agent 【通过kubectl get ep -n zabbix 获取到】
8.8 创建k8s-cluster主机,用于自动发现服务组件
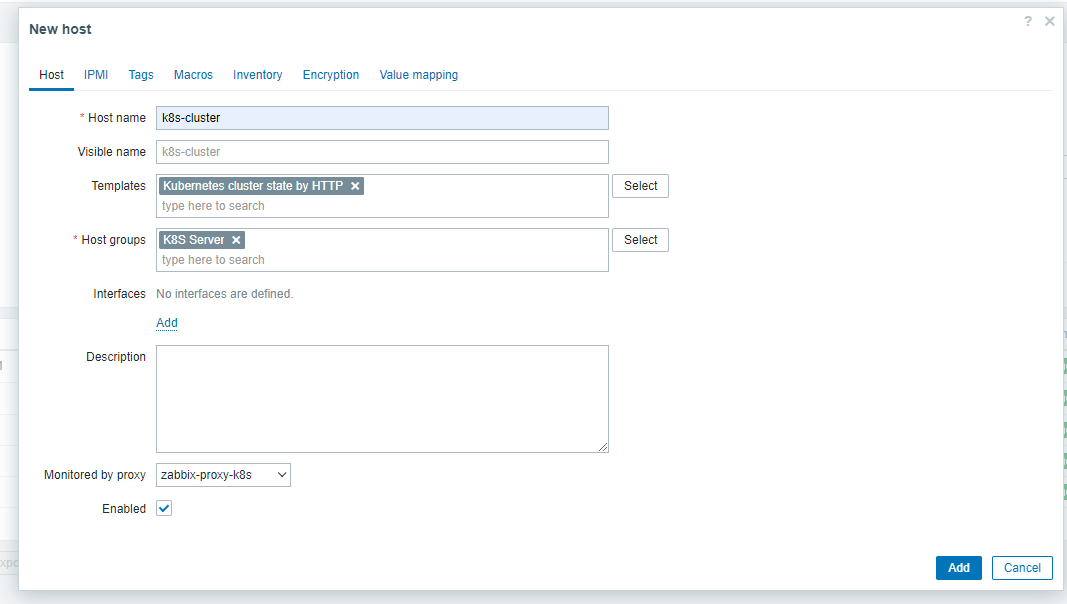
8.8.1 创建主机
Host name: k8s-cluster
Templates: 选择Template group 中 Templates 下的Kubernetes cluster state by HTTP 模板,用于自动发现K8S节点主机
Host groups: K8S Server
Monitored by proxy: 选择 zabbix-proxy-k8s 代理节点
8.8.2 定义宏变量
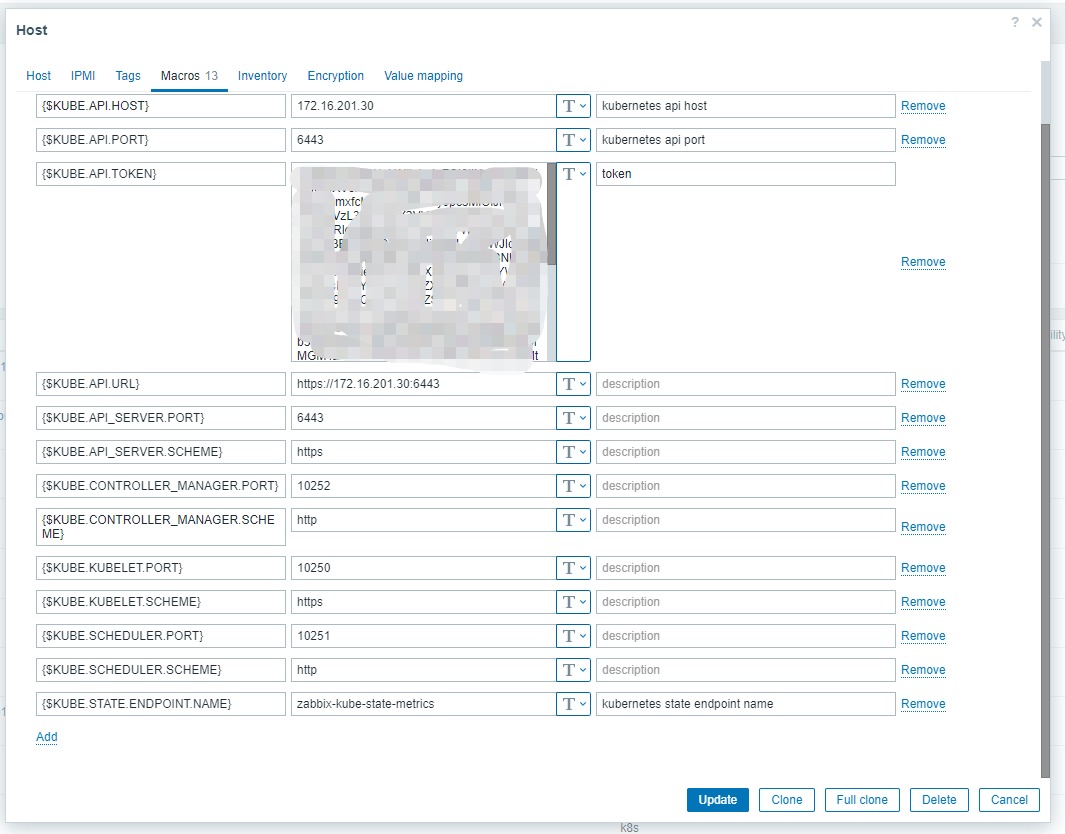
- 定义13个宏变量
- {$KUBE.API.HOST}: 172.16.201.30
- {$KUBE.API.PORT}:6443
- {$KUBE.API.TOKEN}: XXXXX [上面获取到的token]
- {$KUBE.API.URL} : https://172.16.201.30:6443
- {$KUBE.API_SERVER.PORT}:6443
- {$KUBE.API_SERVER.SCHEME}:https
- {$KUBE.CONTROLLER_MANAGER.PORT}:10252
- {$KUBE.CONTROLLER_MANAGER.SCHEME}:http
- {$KUBE.KUBELET.PORT}:10250
- {$KUBE.KUBELET.SCHEME}:https
- {$KUBE.SCHEDULER.PORT}:10251
- {$KUBE.SCHEDULER.SCHEME}:http
- {$KUBE.STATE.ENDPOINT.NAME}:zabbix-kube-state-metrics 【通过kubectl get ep -n zabbix 获取到】
九、样例效果
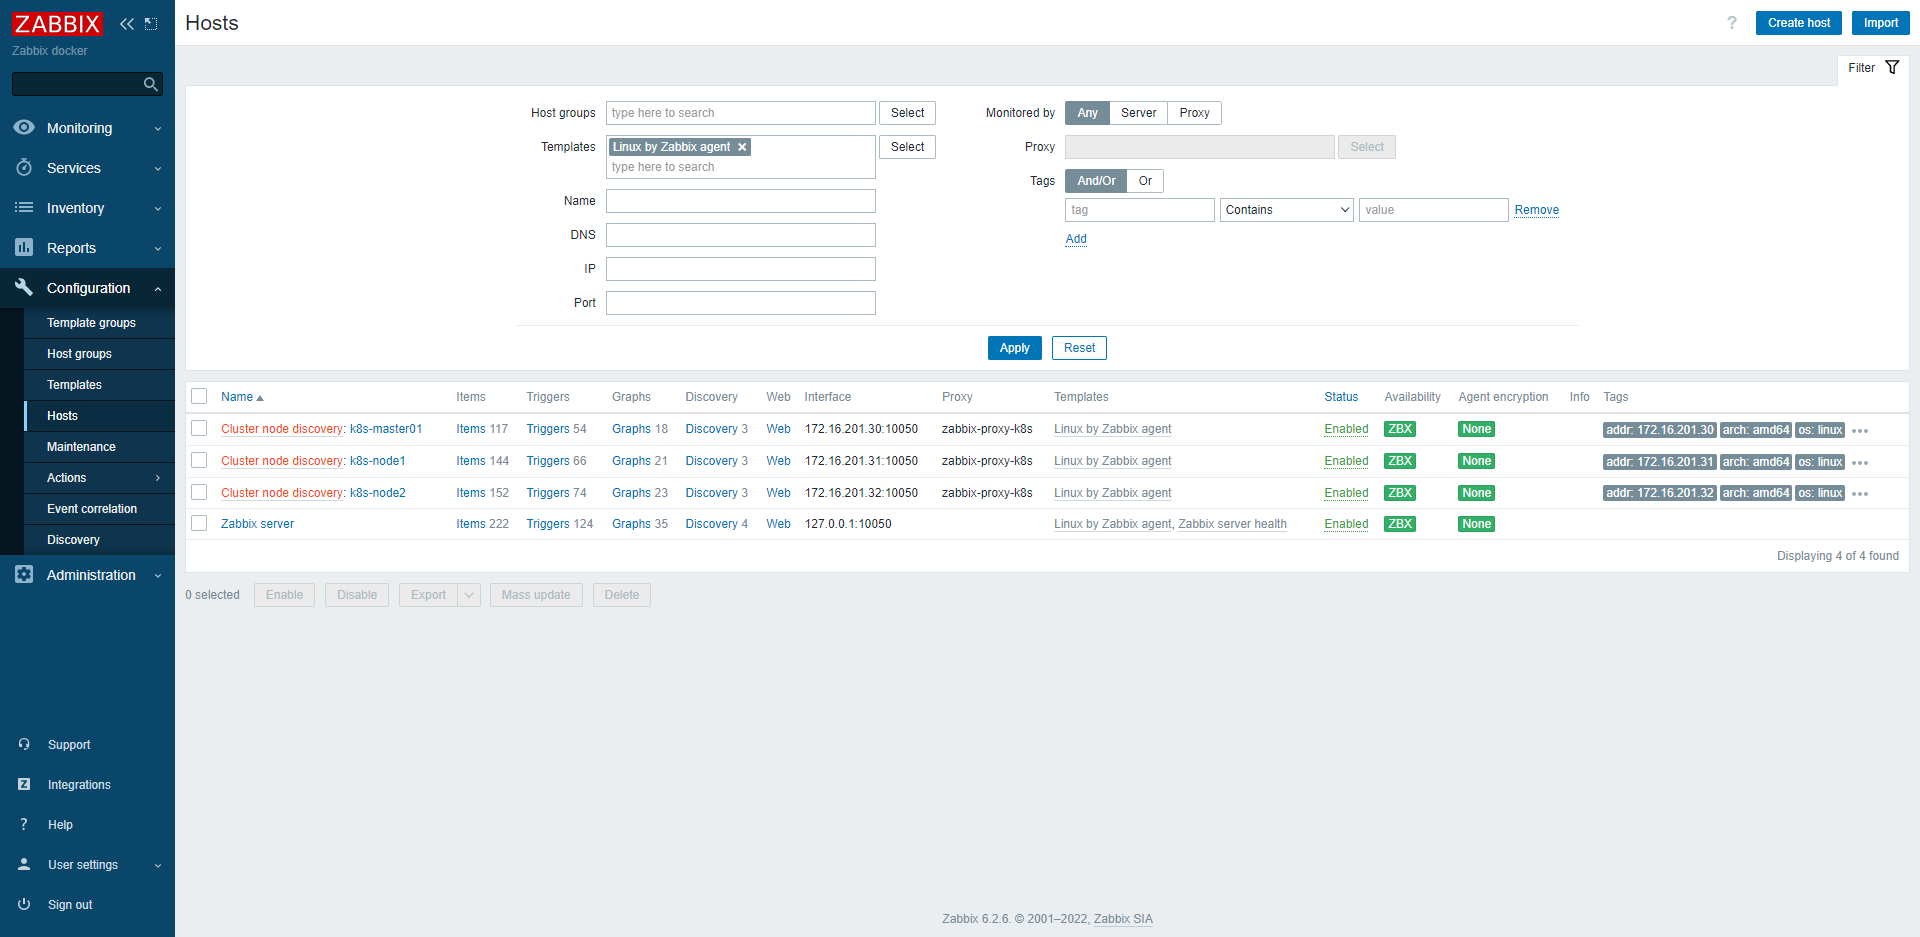
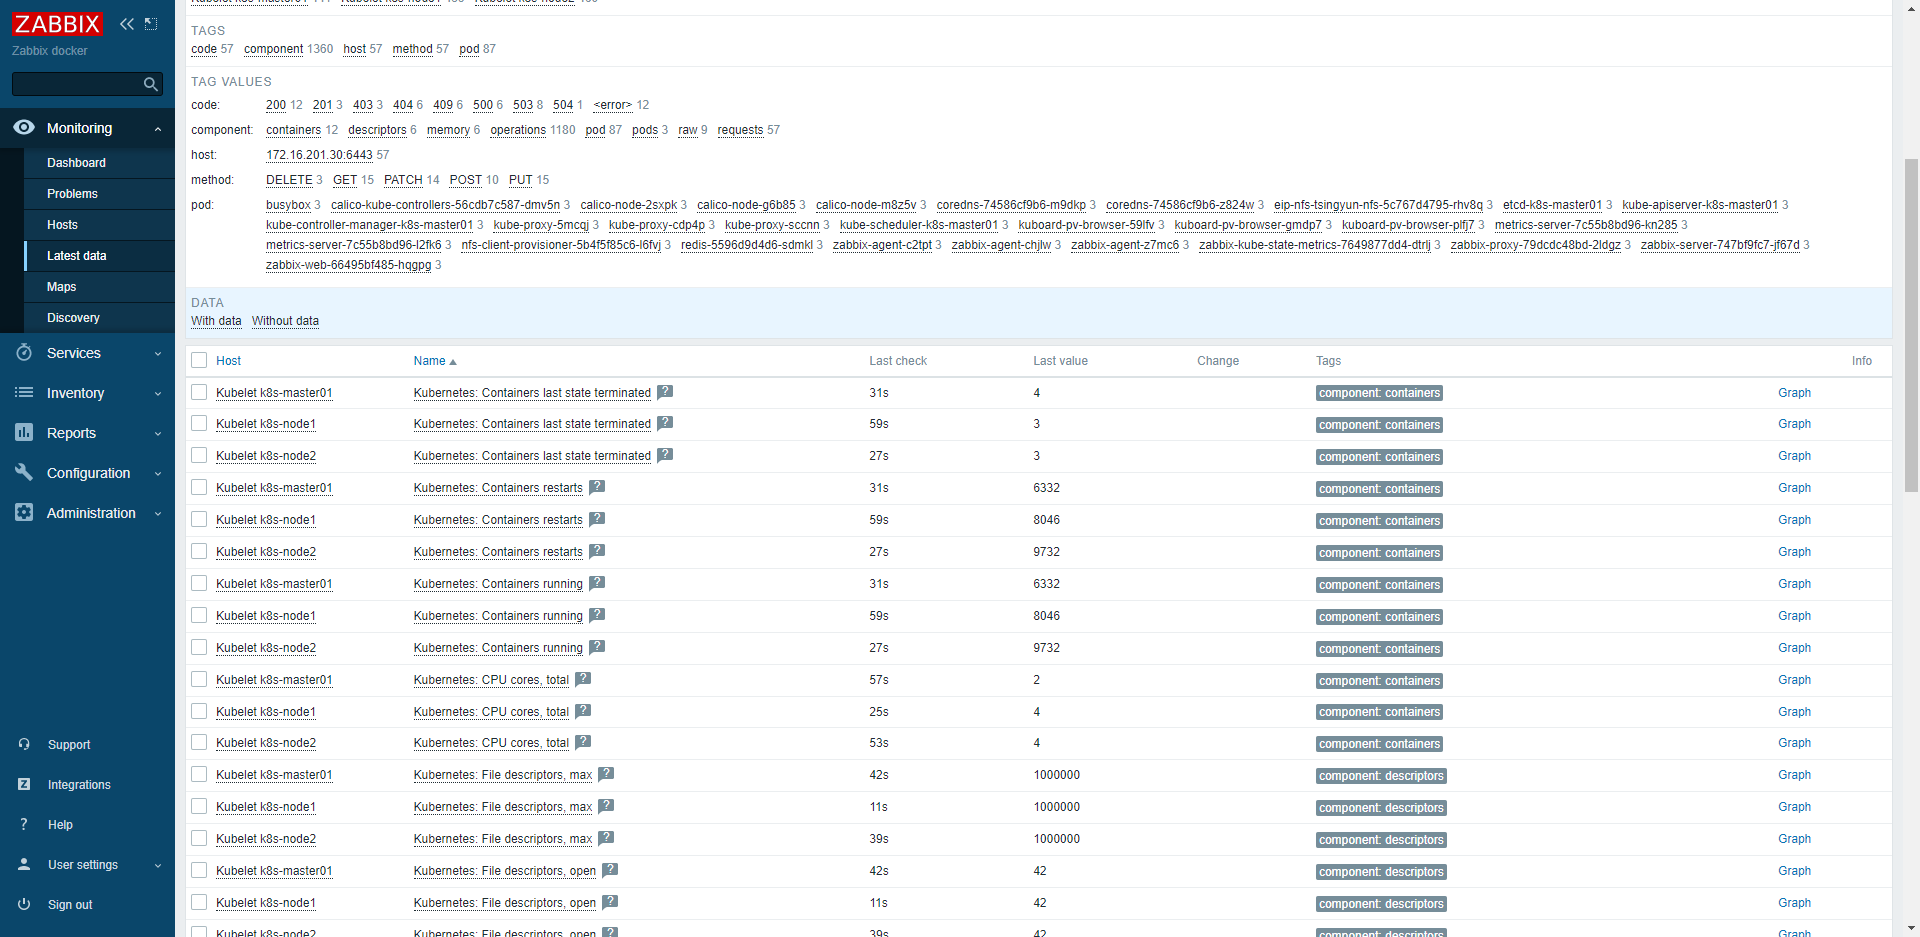
9.1 自动发现的节点主机
最新数据
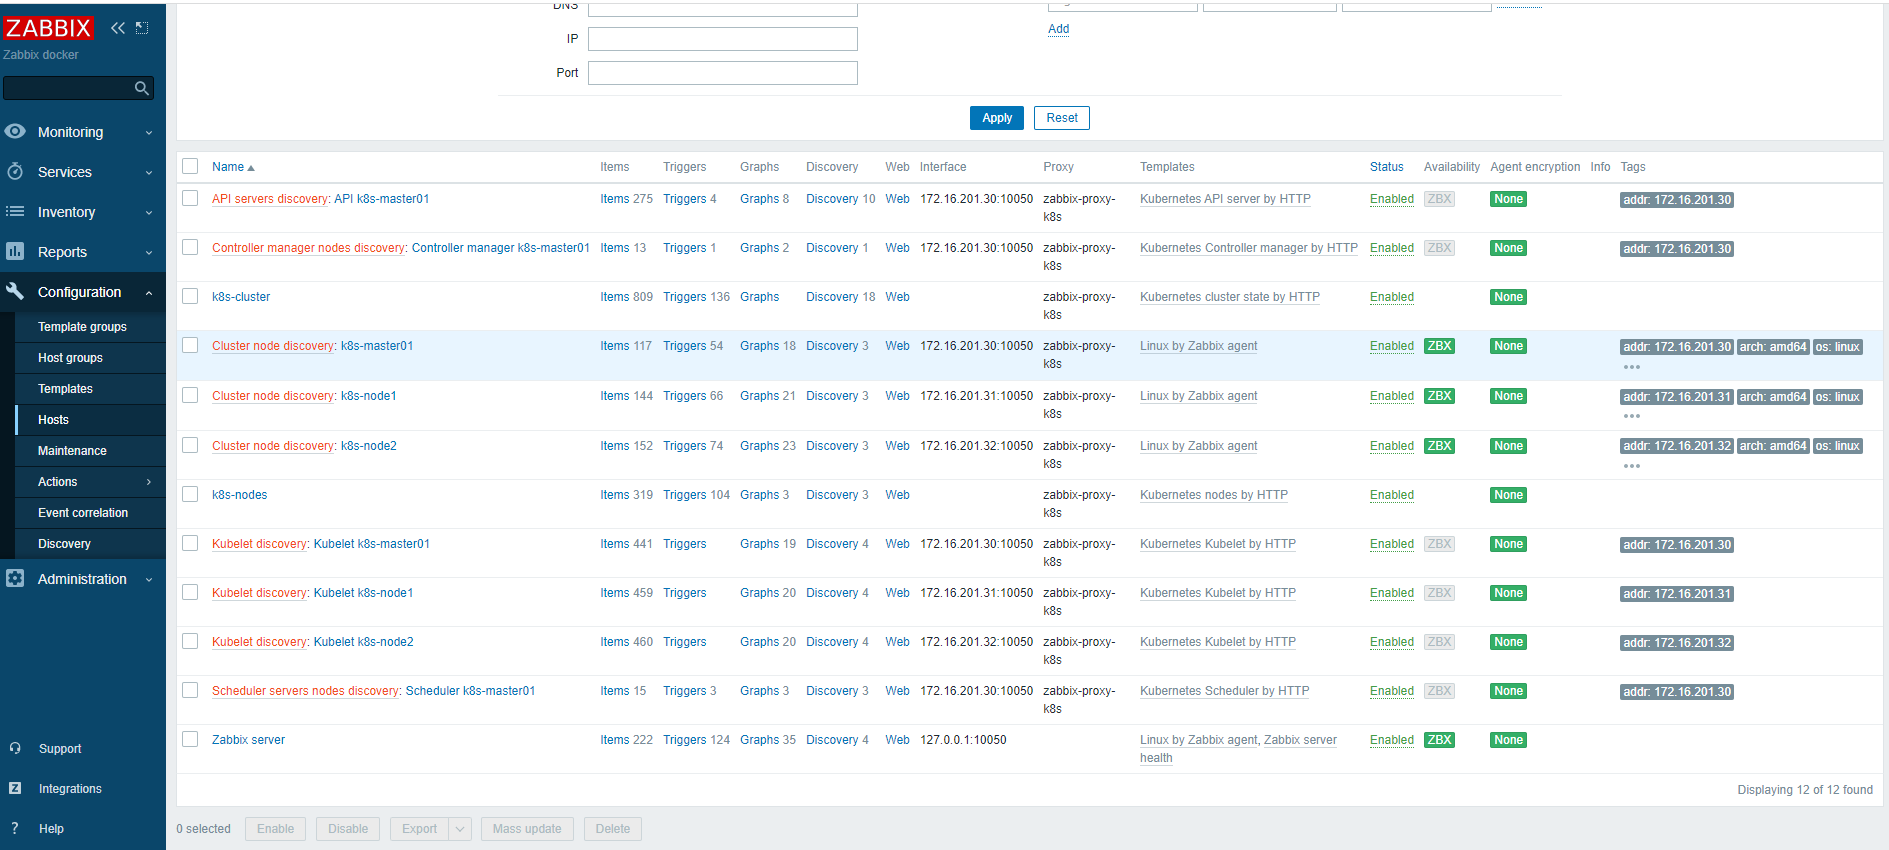
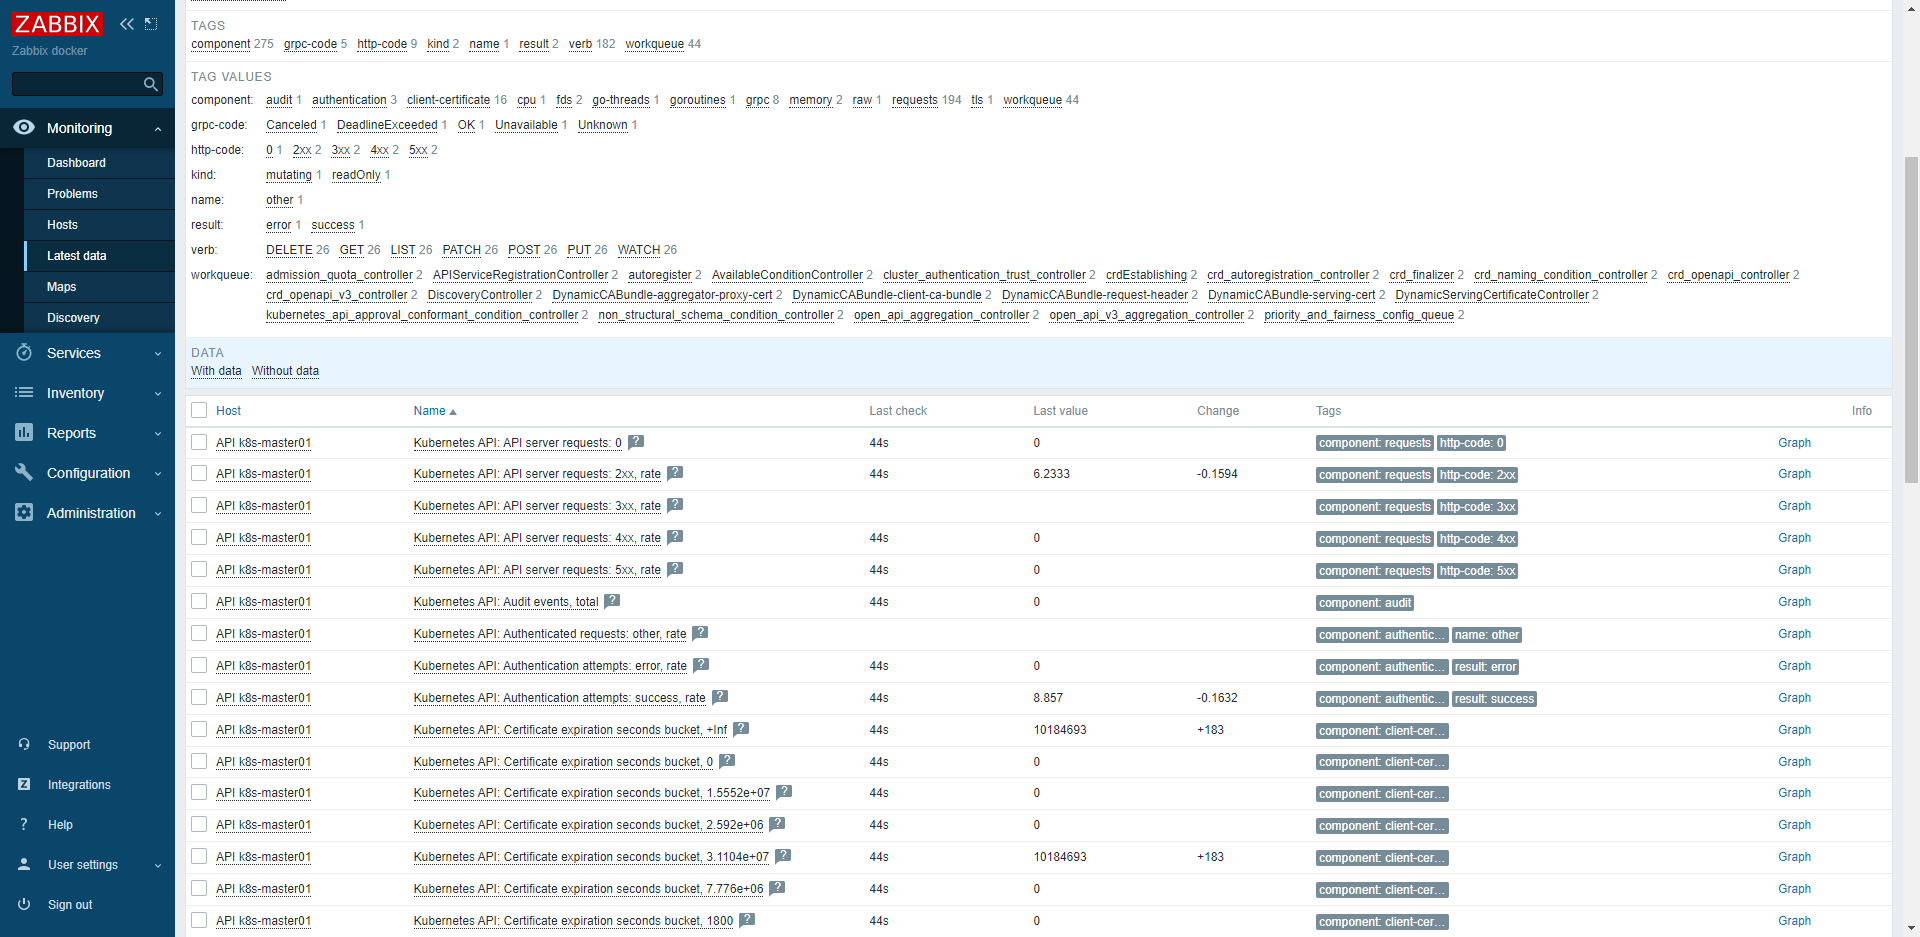
9.2 自动发现的集群服务组件主机
最新数据
十、参考
- https://www.cnblogs.com/likaifei/p/16709332.html
- https://git.zabbix.com/projects/ZT/repos/kubernetes-helm/browse?at=refs%2Fheads%2Frelease%2F6.2


