- 1Unity ML-agents 参数设置解明_ml-agent configuration参数含义
- 2Anaconda环境下OpenCV的三种安装方法_opencv安装教程anaconda
- 3Scrum敏捷项目管理_在spring planing 会议上scrummaster说:我来安排一下,需求a有张同学负责,需
- 4vivado工程板级调试调用ISE的chipscope软件查看波形_chipscope中设置观察模拟波形
- 501-IDEA使用技巧_idea查询todo
- 6hive on spark
- 7unity渲染篇:画面亮度、饱和度、对比度调整_unity怎么修改饱和度
- 8core-js介绍及安装使用_corejs
- 9postman前置脚本加密(java script)_postman sm3
- 10【Linux网络编程】传输层中的TCP和UDP(TCP篇)
鸿蒙系统的自定义手势密码功能实现
赞
踩
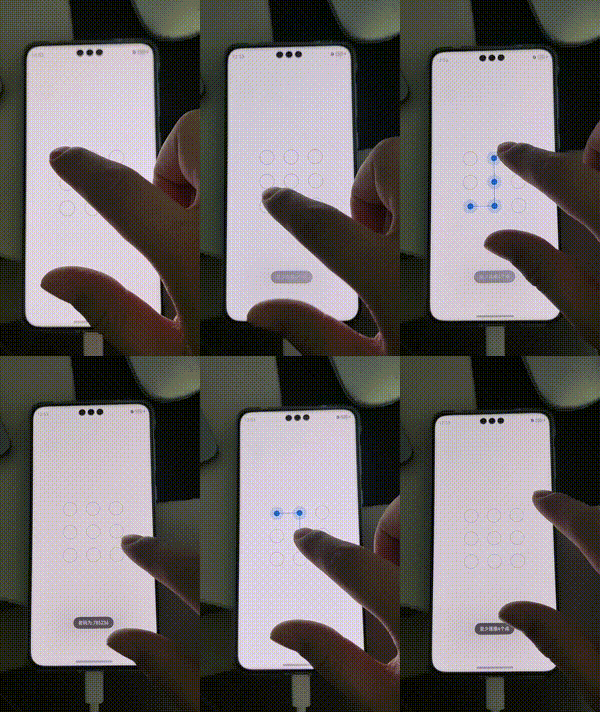
简述:在最经开发鸿蒙app的过程中,需要做一个手势密码登录页面,虽然鸿蒙官网上提供了相应的组件,但是并不能满足我们的业务需求,所有我们只能自己自定义控件。先来看看我自己自定义手势密码页面的效果,大体满足了实际的业务需求。
先看下效果图

具体的实现步骤如下:
1. 确定ui容器的选择
手势密码一般都是九宫格的方式排列,很明显这里最优的选择容器是RelativeContainer
这个容器就相当于Android的RelativeLayout,用法也很相似,不清楚的朋友可以自行去官网查看
用法,这里就不一一讲解了。
大致的布局模型图如下

一般情况下手势密码都是9个点,但是不排除有二班的情况,为了防止设置的的4*4或者5*5的情况出现,所以我在布局的地方采用了一种更灵活的方式,逻辑可能有些许绕,不过静下心来也是很容易看懂的,直接上代码:
-
- ForEach(this.ViewArr, (item: ChildViewModel, index: number) => {
- GestureLockView({
- clickImage: this.clickImage,
- defaultImage: this.defaultImage,
- mGestureLockViewWidth: this.mGestureLockViewWidth,
- mMarginBetweenLockView: this.mMarginBetweenLockView,
- childViewModel: item
-
- })
- .alignRules({
- top: {
- //如果是第一行,则以自身为基础,如果不是第一行,为在上一行元素的底部
- anchor: (index < this.mCount ? '__container__' : ('view_' + (index - this.mCount))),
- //如果是第一行则头部为VerticalAlign.Top,否则头部与前一行尾部对齐
- align: (index < this.mCount ? VerticalAlign.Top : VerticalAlign.Bottom)
- },
- //如果是第一列则为以自身为基础,如果不是,则以前一个元素为基础,在他的右侧
- left: {
- anchor: (index % this.mCount === 0 ? '__container__' : ('view_' + (index - 1))),
- //如果是第一列那么头对应HorizontalAlign.Start,否则头部就与前面一列的尾部对齐
- align: (index % this.mCount === 0 ? HorizontalAlign.Start : HorizontalAlign.End)
- }
-
- })
- .margin({
- left: this.mMarginBetweenLockView,
- top: this.mMarginBetweenLockView,
- right: this.mMarginBetweenLockView,
- bottom: this.mMarginBetweenLockView,
- })
-
- .id(item.viewId)
- .onAreaChange((oldValue: Area, newValue: Area) => {
- item.left = newValue.position.x?.valueOf() as number;
- item.top = newValue.position.y?.valueOf() as number;
- item.right = item.left + (newValue.width.valueOf() as number)
- item.bottom = item.top + (newValue.height.valueOf() as number)
- item.centX = ((item.left + item.right) / 2.0) + ""
- item.centY = ((item.top + item.bottom) / 2.0) + ""
- })
-
- ;
-
- })

注释也详细,这里就不讲解了
2.自定义画布和path组件的摆放
通过上面的步骤我们实现了手势密码的布局,接下来我们需要实现手指与屏幕交互的功能(画连接线)。这里需要通过画布和path组件来实现来实现,首先我们需定义一个画布组件
- Canvas(this.canvasContext)
- .width(this.mWidth)
- .height(this.mWidth)
- .id("Canvas")
拿到画布组件后,需要将画布组件盖在RelativeContainer上,紧着这我们需要获取一个path组件,然后将path组件盖在画布组件上面
- Line()
- .startPoint([this.startPointX, this.startPointY])
- .endPoint([this.endPointX, this.endPointY])
- .strokeWidth(px2vp(5))
- .stroke(this.lineColor)
- .id("line")
这样我们所有的组件摆放动作就完成了。
3.实现手指与屏幕的交互
我们想要在屏幕上的画布上画线,我们必须要直到我们所画直线的起点坐标和终点坐标,鸿蒙系统给我们提供了组件的触摸事件,我们只需要从触摸事件的回调函数中获取手指点击屏幕的坐标值,然后再将这两个值作为path的起点。
那么怎么实现两个按钮之间的连线呢?这就需要通过画布来实现了,这里我熟悉两个特别重要的api,一个是moveTo,一个是LineTo,这两个api和Android中path中的moveTo,pathTo含义基本一样。moveTo(x,y)的意思是将路径的起点设置为这个函数的x,y中,我们需要画的路劲就需要这个x,y为起点,LineTo这个函数的意思是设计此path的终点,并且将此终点设置为下一段path的起点。熟悉了这两个重要的api,我们就可以接着就可以干活了
当手指触碰到第一个按钮的时候,记下按钮的圆心的坐标值,然后将它通过画布设置到moveTo(x,y)函数中,当手指滑动到第二手势密码按钮时,我们再将第二个手势密码的按钮的坐标传入到LineTo(x,y)中,这就完成了两个按钮之间的连线,当手指触碰到第三个按钮时,我们将第三个按钮的坐标的值设置到LineTo(x,y)中,这样就实现了第二个点和第三个点相连。以此类推,这样就实现了手势密码之间各个按钮之间的连线。
当然这这只是实现了各个按钮之间的连线,我们经常使用手势密码的时候,会看到一个引导线,也就是我们经常说的方向线。这个功能的实现我们需要用到Line组件了。
同样当手指触碰到第一个按钮的时候,记下按钮的圆心的坐标值,然后将此坐标值设置到Line组件的startPoint,当手指触碰的实时坐标传入到Line的endPoint中,这样就实现了引导线的功能。
还是直接上代码吧。
- .onTouch((event: TouchEvent) => {
- let x: number = ((event.touches[0].x) < 0 ? 0 : (event.touches[0].x))
- x = (x > this.mWidth ? this.mWidth : x)
- let y: number = ((event.touches[0].y) < 0 ? 0 : (event.touches[0].y))
- y = (y > this.mWidth ? this.mWidth : y)
- switch (event.type) {
- //按下
- case TouchType.Down:
- this.reset();
- this.canvasContext.beginPath()
- this.canvasContext.lineWidth = px2vp(5)
- this.canvasContext.strokeStyle = this.lineColor
- break;
- //移动
- case TouchType.Move:
- //获取当前的点击的ChildViewModel
- let childViewModel: ChildViewModel | undefined = this.getChildIdByPos(x, y, this.ViewArr)
- if (childViewModel != undefined) {
- let passWord: number = childViewModel.password;
- this.ViewArr[childViewModel.indexView].isClick = true;
- if (!this.passwordArr.includes(passWord)) {
-
- this.passwordArr.push(passWord)
- this.mLastPathX = childViewModel.left / 2 + childViewModel.right / 2;
- this.mLastPathY = childViewModel.top / 2 + childViewModel.bottom / 2;
-
- // 设置引线的起点坐标
- this.startPointX = this.mLastPathX;
- this.startPointY = this.mLastPathY;
-
- if (this.passwordArr.length == 1) // 当前添加为第一个
- {
-
- this.canvasContext.moveTo(this.mLastPathX, this.mLastPathY);
- } else
- // 非第一个,将两者使用线连上
- {
- this.canvasContext.lineTo(this.mLastPathX, this.mLastPathY);
-
- this.canvasContext.stroke()
- }
- }
- }
- //设置引导线的终点坐标
- this.endPointX = (this.startPointX == 0 ? 0 : x);
- this.endPointY = (this.startPointY == 0 ? 0 : y);
- break;
- //抬起
- case TouchType.Up:
- //设置引导线的终点坐标
- this.endPointX = (this.startPointX == 0 ? 0 : this.mLastPathX);
- this.endPointY = (this.startPointY == 0 ? 0 : this.mLastPathY);
-
- if (this.passwordArr.length < this.minLength) {
- if (this.passwordArr.length > 0) {
- if (this.callBack != undefined) {
- this.callBack(ResultCode.fail, "至少连接" + this.minLength + "个点");
- }
-
- }
- this.reset();
- } else {
- let passWord: string = "";
- for (let passwordArrElement of this.passwordArr) {
- passWord += passwordArrElement;
- }
- if (this.callBack != undefined) {
- this.callBack(ResultCode.success, passWord);
- }
-
- }
- break;
- }

至此自定义手势密码控件的大体功能就实现了,如有错误欢迎各位大佬指点


