
热门标签
热门文章
- 1android log.d 格式化,如何去掉android.Log.d?
- 2./configure: error: SSL modules require the OpenSSL library. You can either do not enable the module
- 3C语言完整版笔记(初阶,进阶,深刨,初阶数据结构)_c语言代码速记
- 401:WebGL简介、示例、应用场景
- 5【漏洞复现】SpringBlade export-user接口存在SQL注入漏洞_springblade漏洞进阶利用
- 6【0基础入门Python Web笔记】四、python 之计算器的进阶之路_python web 计算器代码
- 7人工智能导论/人工智能及其应用 期末练习题_把下列谓词公式化成子句集:( x)( y)(p(x,y)∧q(x,y))
- 8大数据-计算引擎-Spark(三):RDD编程【离线分析;替代MapReduce编程,使用RDD(弹性分布式数据集)编程;处理非结构化数据;RDD操作算子:transformation、Action】_非结构化数据计算引擎有哪些
- 9珠联壁合地设天造|M1 Mac os(Apple Silicon)基于vscode(arm64)配置搭建Java开发环境(集成web框架Springboot)_m1芯片适配的swt
- 10Elasticsearch机器学习初探:智能数据洞察
当前位置: article > 正文
基于GEC6818开发板的华为云物联网数据监控项目整理_gec6818怎么重置密码
作者:神奇cpp | 2024-06-23 16:05:36
赞
踩
gec6818怎么重置密码
点击下载设备演示包,就会下载一个华为云为你写好的SDK

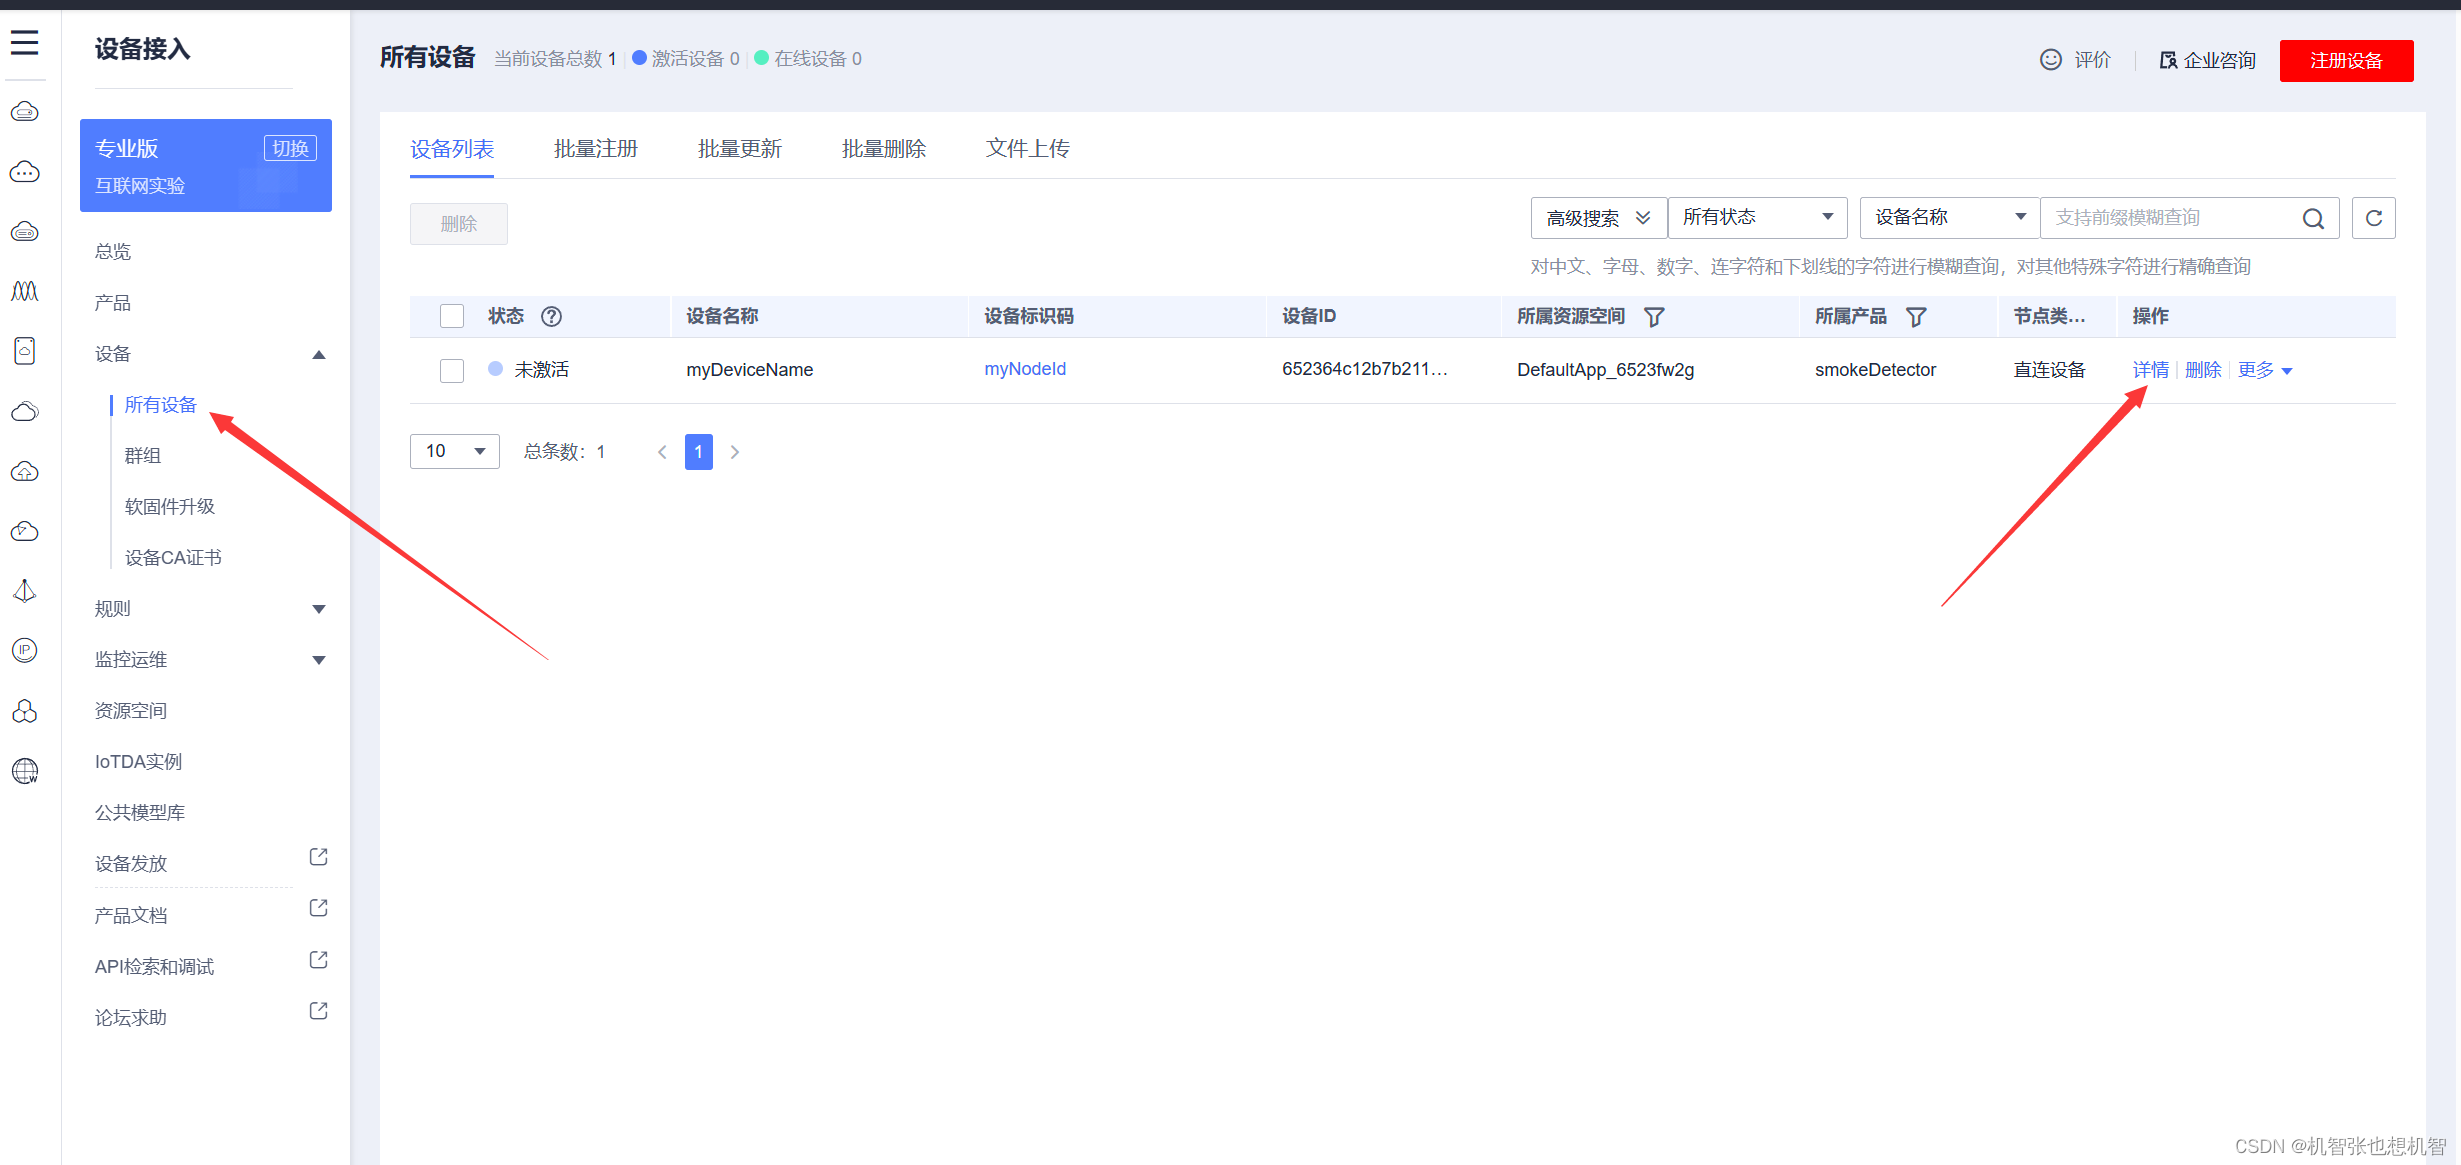
到此,我们需要回头改一些我们匆匆创建好的设备信息,先修改一下设备的密码:
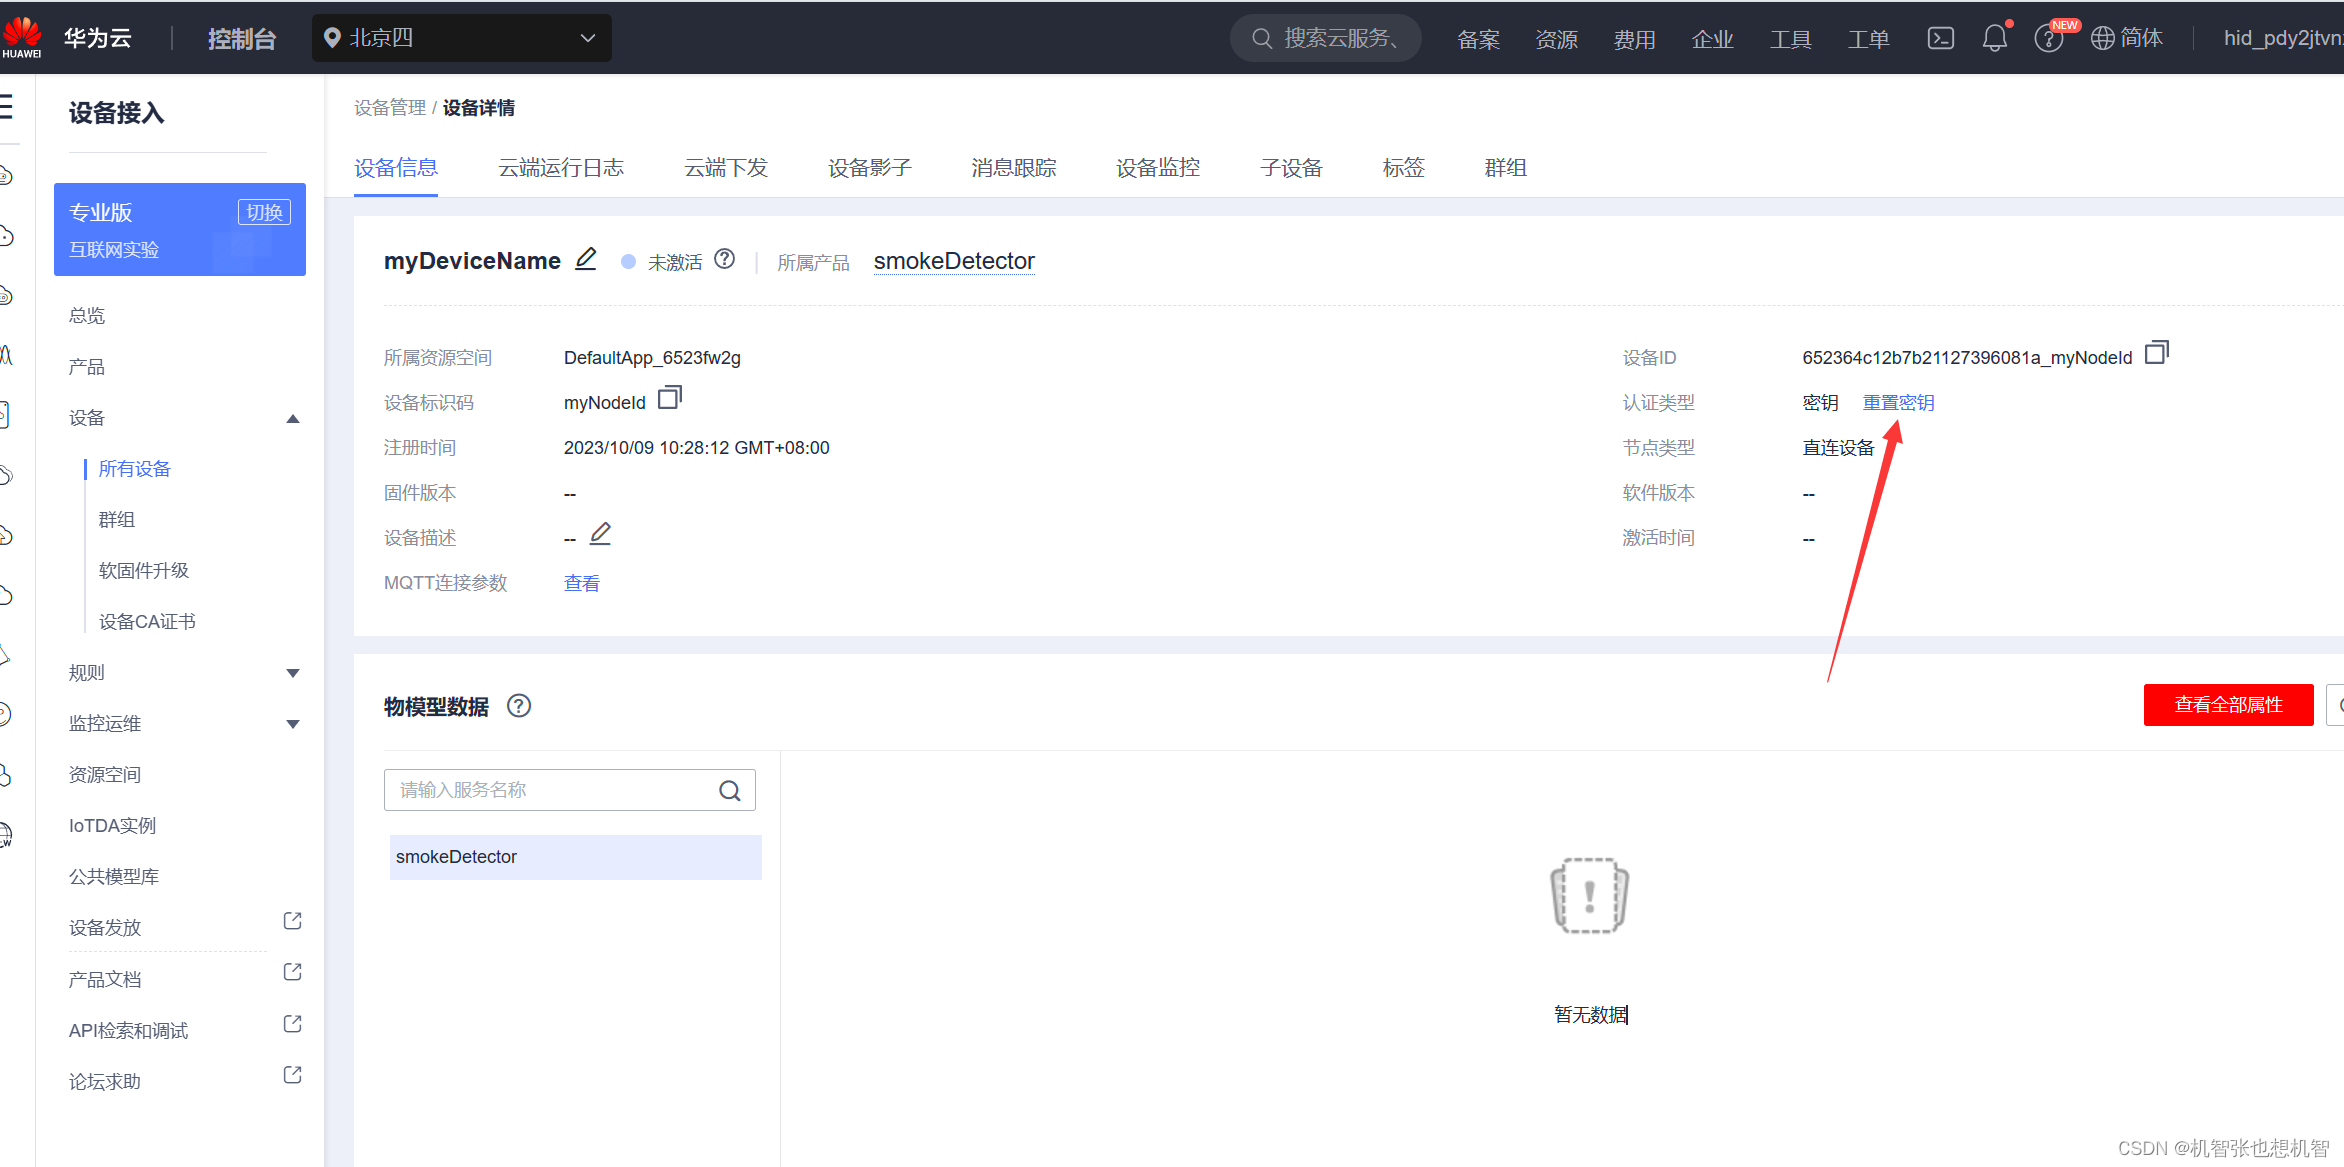

修改完后点确定
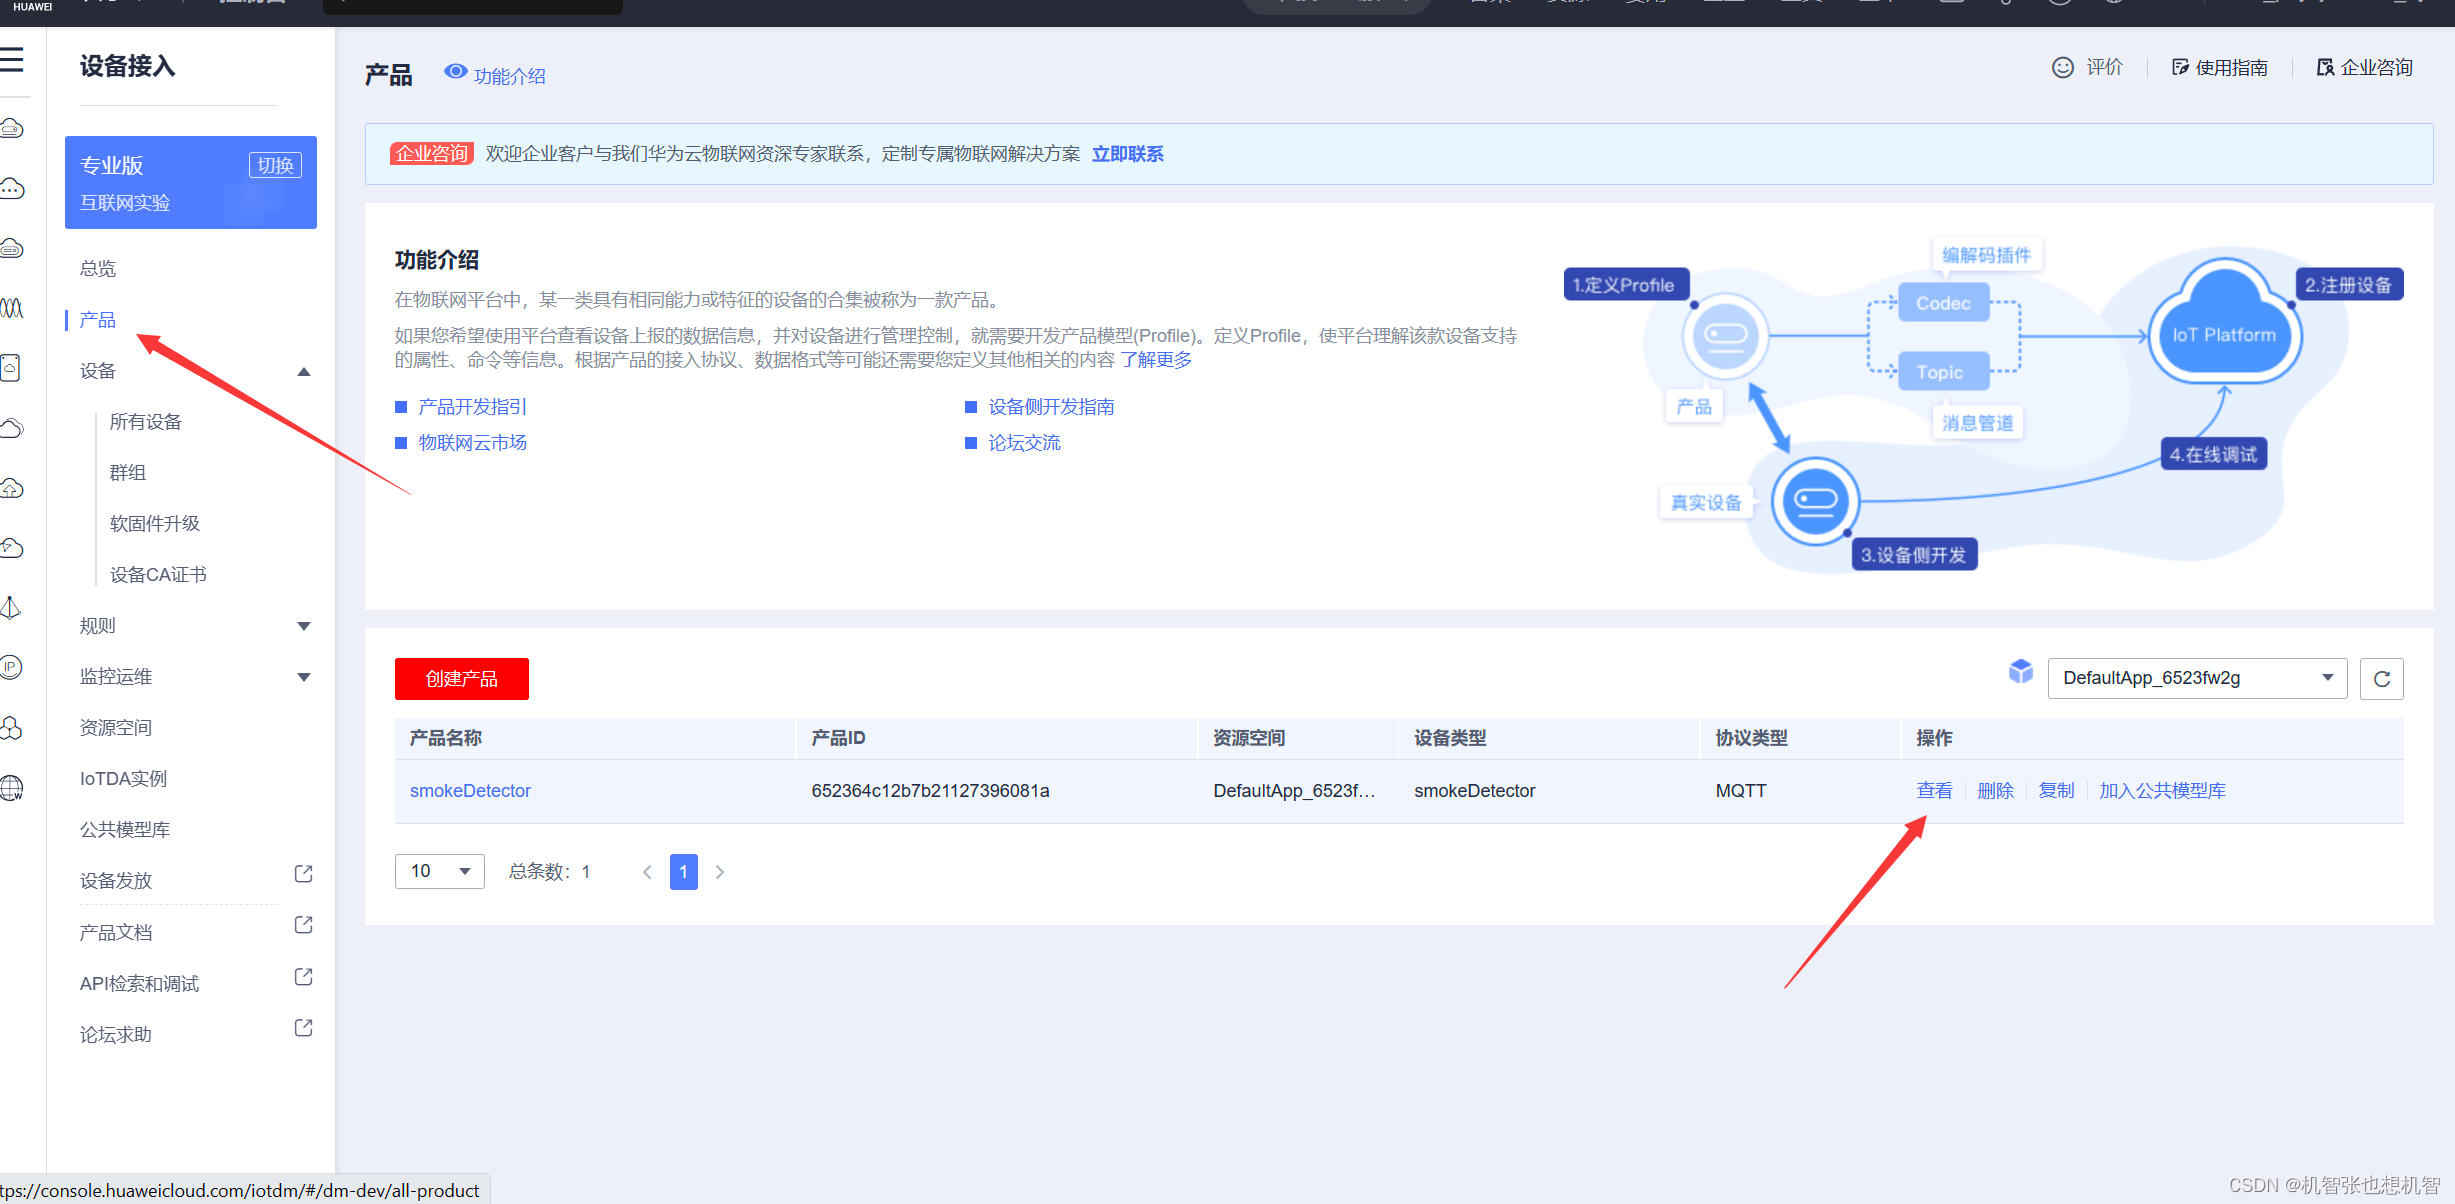
修改完密码后我们需要修改一下设备的属性,把它改成我们需要的属性:

命令可以像这样子设置,也可以发送不同的数据类型,笔者是发的bool型数据用于开关灯,如果命令有多种情况,就需要发送别的数据类型。


这个是笔者已经弄好的设备,可以作为对照

好了,到了这一步,我们在云端的工作就已经做好了。
5、打通SDK和华为云的通信,激活云端设备
既然我们已经在云端创建了一个设备,也就是一个云设备,并不是真实的设备,我们需要利用华为云给我们提供的SDK,并修改一下代码,然后放到Ubuntu运行,建立与云端的通信,才能激活我们刚刚在华为云创建的设备。首先,我们把文件放到vscode上:

文件总体是这样子的,这里我们主要对AgentLiteDemo.c还有ClientConf.json进行修改:
先改ClientConf.json:

按照自己的设备id,密码修改

把后面的端口号删除,还有那两个冒号,因为如果固定端口的话,可能出现连不上的情况。
网址跟这个一样:

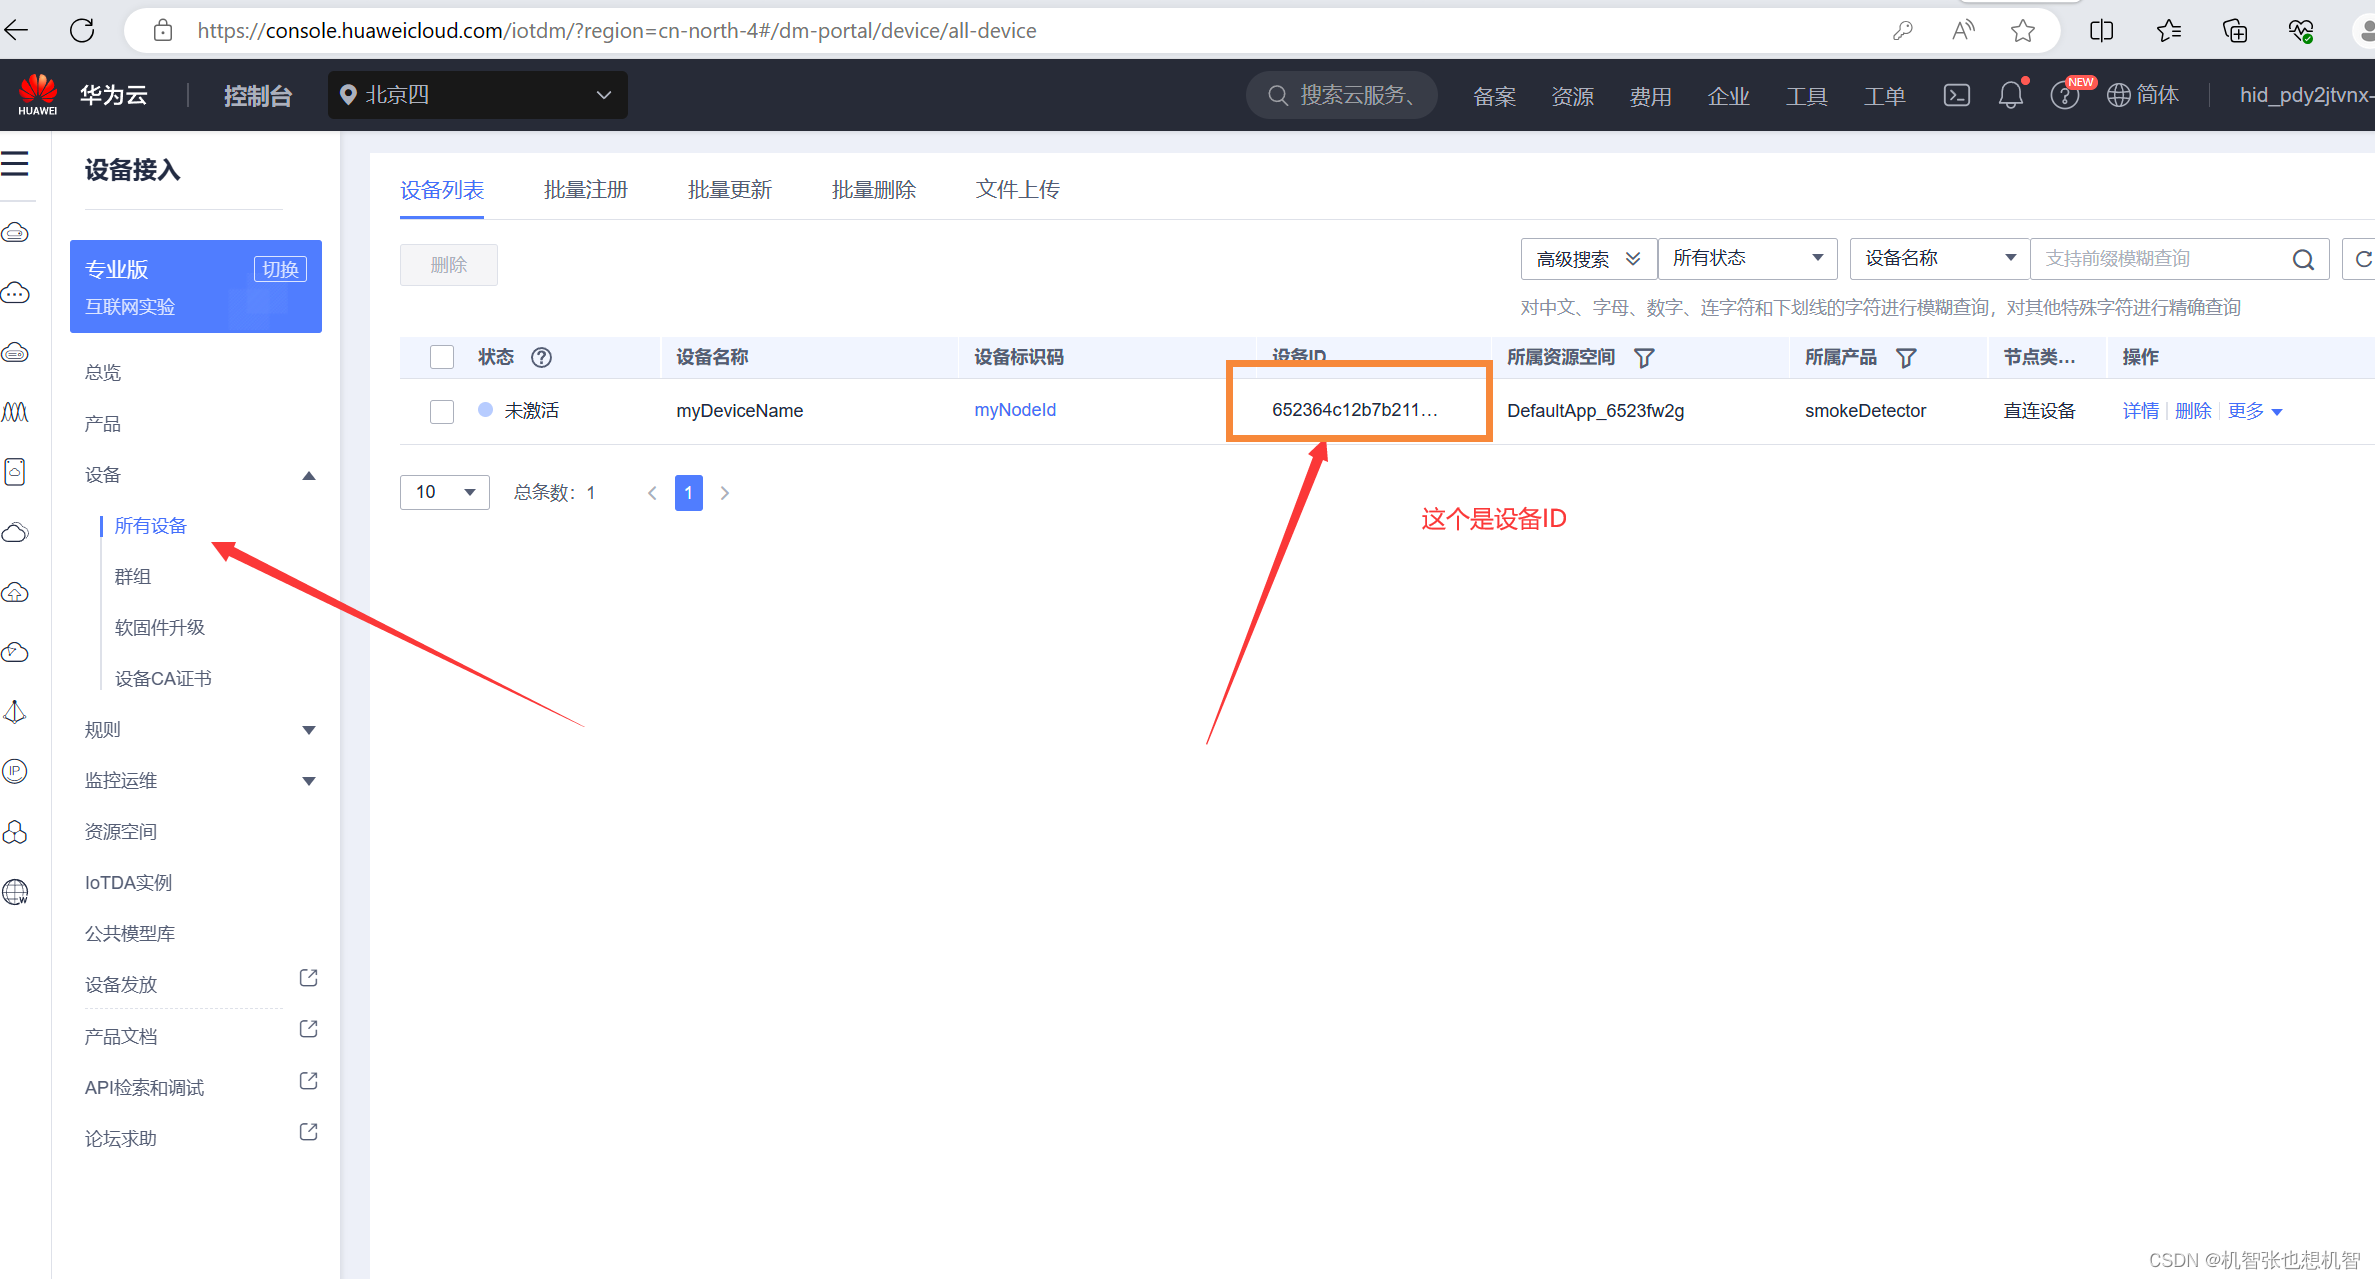
设备ID在这:
然后再修改AgentLiteDemo.c:
#include "stdio.h"
#include "signal.h"

#if defined(WIN32) || defined(WIN64)
#include "windows.h"
#endif

#include "pthread.h"

#include <math.h>
#include "hw_type.h"
#include "iota_init.h"
#include "iota_cfg.h"
#include <stdlib.h>
#include <stdbool.h>
#include <unistd.h>
#include <stdlib.h>
#include <string.h>
#include <strings.h>
#include <errno.h>
#include <pthread.h>
#include <semaphore.h>
#include <sys/types.h>
#include <sys/socket.h>
#include <netinet/in.h>
#include <arpa/inet.h>
#include <net/if.h>
#include "LogUtil.h"
#include "JsonUtil.h"
#include "StringUtil.h"
#include "iota_login.h"
#include "iota_datatrans.h"
#include "string.h"
#include "cJSON.h"
#include "sys/types.h"
#include "unistd.h"
#include "iota_error_type.h"

/* if you want to use syslog,you should do this:
 *
 * #include "syslog.h"
 * #define _SYS_LOG
 *
 * */

char* workPath = ".";
char* gatewayId = NULL;

int alarmValue = 0;

char* serverIp_ = "";
int port_ = 1883;//原本是8883,需要把端口改成1883,不然与华为云的tcp会连接失败

char* username_ = "64f82801a266cb7f6e6abfd1_gec6818";//deviceId,这个需要根据自己的情况做修改
char* password_ = "12345678";//这也也需要根据自己的情况做修改

int disconnected_ = 0;

char *subDeviceId = "f6cd4bbb1a8ab53acbb595efd0e90199_ABC123456789";//这个一般不用改

int sleepTime = 5000;

void timeSleep(int ms)
{
#if defined(WIN32) || defined(WIN64)
    Sleep(ms);
#else
    usleep(ms * 1000);
#endif
}

- 1
- 2
- 3
- 4
- 5
- 6
- 7
- 8
- 9
- 10
- 11
- 12
- 13
- 14
- 15
- 16
- 17
- 18
- 19
- 20
- 21
- 22
- 23
- 24
- 25
- 26
- 27
- 28
- 29
- 30
- 31
- 32
- 33
- 34
- 35
- 36
- 37
- 38
- 39
- 40
- 41
- 42
- 43
- 44
- 45
- 46
- 47
- 48
- 49
- 50
- 51
- 52
- 53
- 54
- 55
- 56
- 57
- 58
- 59
- 60
- 61
- 62
- 63
- 64
- 65
- 66
- 67
- 68
- 69
- 70
上面的代码中我已经加入了许多我需要用到的头文件,如果编译出现缺少头文件的情况,需要你加上对应的头文件。
void Test_propertiesReport()
{
    int serviceNum = 1;//此处是上报的服务个数
    ST_IOTA_SERVICE_DATA_INFO services[serviceNum];


    cJSON *root;
    root = cJSON_CreateObject();

    //设置一个p操作,如果没有资源会在此处阻塞等待
    sem_wait(&s);

    //需要根据自己的设备进行修改,中间的是你的云端设备属性,第三个是值,这里笔者已经用变量代替,原本的只是一个随机数,后面你需要用变量替换
    cJSON_AddNumberToObject(root, "led", LED_value);
    cJSON_AddNumberToObject(root, "adc", ADC_value);
    cJSON_AddNumberToObject(root, "pwm", BEEP_value);

    char *payload;
    payload = cJSON_Print(root);
    cJSON_Delete(root);

    services[0].event_time = getEventTimeStamp(); //if event_time is set to NULL, the time will be the iot-platform's time.
    services[0].service_id = "开发板数据监控系统";//这里是一开始弄的那个产品名称,需要根据自己的情况修改
    services[0].properties = payload;

    int messageId = IOTA_PropertiesReport(services, serviceNum);
    if(messageId != 0)
    {
        printfLog(EN_LOG_LEVEL_ERROR, "AgentLiteDemo: Test_batchPropertiesReport() failed, messageId %d\n", messageId);
    }
    free(payload);
}
- 1
- 2
- 3
- 4
- 5
- 6
- 7
- 8
- 9
- 10
- 11
- 12
- 13
- 14
- 15
- 16
- 17
- 18
- 19
- 20
- 21
- 22
- 23
- 24
- 25
- 26
- 27
- 28
- 29
- 30
- 31
- 32
void setConnectConfig(){

    FILE *file;
    long length;
    char *content;
    cJSON *json;

    file=fopen("./ClientConf.json","rb");
    fseek(file,0,SEEK_END);
    length = ftell(file);
    fseek(file,0,SEEK_SET);
    content = (char*)malloc(length+1);
    fread(content,1,length,file);
    fclose(file);

    json = cJSON_Parse(content);

    username_ = JSON_GetStringFromObject(json, "deviceId", NULL);
    password_ = JSON_GetStringFromObject(json, "secret", NULL);
    char *url = JSON_GetStringFromObject(json, "serverUri", NULL);

    deleteSubStr(url,"ssl://");
    deleteSubStr(url,":1883");//把这个地方的端口改成1883

    serverIp_ = url;
}
- 1
- 2
- 3
- 4
- 5
- 6
- 7
- 8
- 9
- 10
- 11
- 12
- 13
- 14
- 15
- 16
- 17
- 18
- 19
- 20
- 21
- 22
- 23
- 24
- 25
- 26
把上面的端口改一改
如果你需要弄云端下发命令,那么还需要修改一处:
这是原本的代码:
void handleCommandRequest(void* context, int messageId, int code, char *message, char *requestId)
{
printfLog(EN_LOG_LEVEL_INFO, "AgentLiteDemo: handleCommandRequest(), messageId %d, code %d, messsage %s, requestId %s\n", messageId, code, messa- 1
- 2
声明:本文内容由网友自发贡献,不代表【wpsshop博客】立场,版权归原作者所有,本站不承担相应法律责任。如您发现有侵权的内容,请联系我们。转载请注明出处:https://www.wpsshop.cn/w/神奇cpp/article/detail/750010
推荐阅读

相关标签

