
- 1【技术科普】一文说清:机器学习与深度学习的联系与区别!_机器学习 深度学习
- 2码云实战(一)——idea实现将本地的项目推送到码云上_idea git push 到码云
- 3使用OAK-D双目深度相机为turtlebot3小型移动机器人添加视觉系统_oak相机同步激光雷达
- 4Manifest merger failed with multiple errors, see logs解决方案
- 5uni-app 3D模型 360°全景展示流程_uniapp 3d模型展示
- 6使用OpenCV的cv2.imread函数读取图像介绍_cv2imread函数
- 7基于Python机器学习、深度学习技术提升气象、海洋、水文领域实践应用能力_海洋 数据 python
- 8【Text2SQL 论文】DIN-SQL:分解任务 + 自我纠正 + in-context 让 LLM 完成 Text2SQL
- 9大数据导论(四:大数据的存储)_大数据存储
- 10联想 lenovoTab 拯救者平板 Y700 二代_TB320FC原厂ZUI_15.0.677 firmware 线刷包9008固件ROM root方法_拯救者y700二代rom包
安卓开发实例:高德地图_高德地图安卓开发
赞
踩
想要在app里面显示高德地图,遇到了很多问题,开始想显示百度地图的,个人感觉不喜欢百度地图,跟高德地图有缘,所以就弄个高德地图。
当然你可以直接看开发文档啊,慢走不送,谢谢。
https://lbs.amap.com/api/android-sdk/summary
示例代码我也下载了,也还是不行呢。首先当然不是新建一个页面啊!
1.下载并安装 Android Studio
我没用Android Studio,我用的是IntelliJ IDEA 2021.3.1
新建一个应用
2.获取高德Key
https://lbs.amap.com/dev/#/
点击进入
控制台,首页,应用管理,我的应用,创建应用,应用名称随便填,应用类型也随便填。
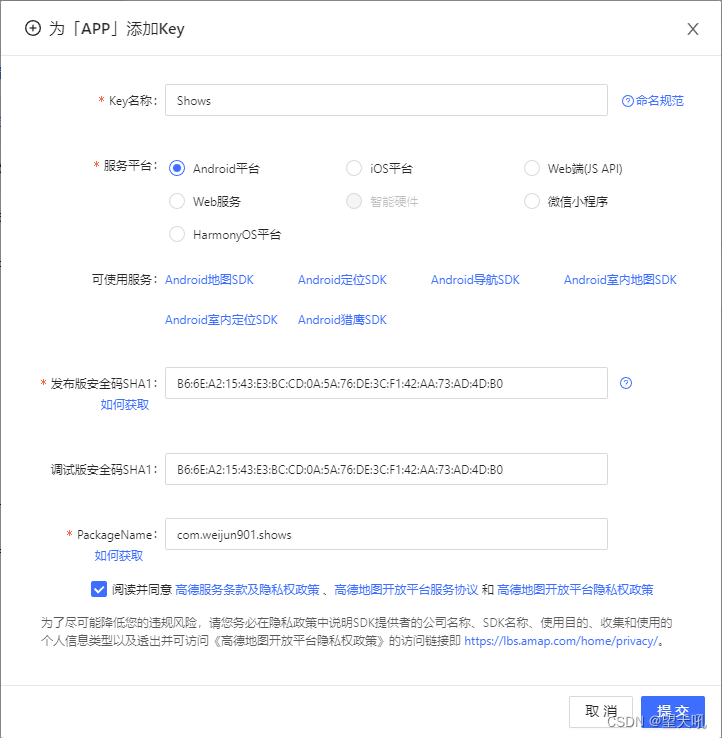
添加Key
发布版(release)安全码SHA1如何获取?
调试版(debug)安全码SHA1如何获取?
双击这个方框就出来了呢
然后就给个Key

3.下载并安装地图开发包
https://lbs.amap.com/api/android-sdk/download/
我并没有下载,主要是下载的几个都不对。具体也不知道是哪里不对,反正是报错。
当时想可能是跟版本啥的有关系,因为有的库里面没有,提示库里找不到,Amap这个。
一共有这几种包:3D地图包,2D地图包,轻量地图包,导航包,定位包。
这几个我都下了一遍,但是好像都是有问题,运行不起来。
4.修改配置文件AndroidManifest.xml
4.1 在AndroidManifest.xml的application标签中配置Key:
    <meta-data
      android:name="com.amap.api.v2.apikey"
      android:value="8464b99ee529f07ddfa00df8c2edee72"/>
- 1
- 2
- 3
4.2 在AndroidManifest.xml中配置权限:
<!--允许访问网络,必选权限-->
<uses-permission android:name="android.permission.INTERNET" />

<!--允许获取粗略位置,若用GPS实现定位小蓝点功能则必选-->
<uses-permission android:name="android.permission.ACCESS_COARSE_LOCATION" />

<!--允许获取设备和运营商信息,用于问题排查和网络定位,若无gps但仍需实现定位小蓝点功能则此权限必选-->
<uses-permission android:name="android.permission.READ_PHONE_STATE" />

<!--允许获取网络状态,用于网络定位,若无gps但仍需实现定位小蓝点功能则此权限必选-->
<uses-permission android:name="android.permission.ACCESS_NETWORK_STATE" />

<!--允许获取wifi网络信息,用于网络定位,若无gps但仍需实现定位小蓝点功能则此权限必选-->
<uses-permission android:name="android.permission.ACCESS_WIFI_STATE" />

<!--允许获取wifi状态改变,用于网络定位,若无gps但仍需实现定位小蓝点功能则此权限必选-->
<uses-permission android:name="android.permission.CHANGE_WIFI_STATE" />

<!--允许写入扩展存储,用于数据缓存,若无此权限则写到私有目录-->
<uses-permission android:name="android.permission.WRITE_EXTERNAL_STORAGE" />

<!--允许写设备缓存,用于问题排查-->
<uses-permission android:name="android.permission.WRITE_SETTINGS" />

<!--允许读设备等信息,用于问题排查-->
<uses-permission android:name="android.permission.READ_EXTERNAL_STORAGE" />

- 1
- 2
- 3
- 4
- 5
- 6
- 7
- 8
- 9
- 10
- 11
- 12
- 13
- 14
- 15
- 16
- 17
- 18
- 19
- 20
- 21
- 22
- 23
- 24
- 25
- 26
4.3 配置XML布局文件 在布局xml文件中添加地图控件:
  <com.amap.api.maps.MapView
    android:id="@+id/map"
    android:layout_height="match_parent"
    android:layout_width="match_parent"/>
- 1
- 2
- 3
- 4
AndroidManifest.xml文件
<?xml version="1.0" encoding="utf-8"?>
<manifest xmlns:android="http://schemas.android.com/apk/res/android"
          xmlns:tools="http://schemas.android.com/tools" package="com.weijun901.shows">
  <!--允许程序打开网络套接字-->
  <uses-permission android:name="android.permission.INTERNET" />
  <!--允许程序设置内置sd卡的写权限-->
  <uses-permission android:name="android.permission.WRITE_EXTERNAL_STORAGE" />
  <!--允许程序获取网络状态-->
  <uses-permission android:name="android.permission.ACCESS_NETWORK_STATE" />
  <!--允许程序访问WiFi网络信息-->
  <uses-permission android:name="android.permission.ACCESS_WIFI_STATE" />
  <!--允许程序读写手机状态和身份-->
  <uses-permission android:name="android.permission.READ_PHONE_STATE" />
  <!--允许程序访问CellID或WiFi热点来获取粗略的位置-->
  <uses-permission android:name="android.permission.ACCESS_COARSE_LOCATION" />
  <application
    android:allowBackup="true"
    android:icon="@mipmap/ic_launcher"
    android:label="@string/app_name"
    android:roundIcon="@mipmap/ic_launcher_round"
    android:supportsRtl="true"
    android:theme="@style/Theme.Shows">
    <activity
      android:name=".Location"
      android:exported="true"/>
    <activity
      android:name=".Sensor"
      android:exported="true"/>
    <activity
      android:name=".DateTime"
      android:exported="true"/>
    <activity
      android:name=".RandomNumber"
      android:exported="true"/>
    <activity
      android:name=".MainActivity"
      android:exported="true">
      <intent-filter>
        <action android:name="android.intent.action.MAIN"/>

        <category android:name="android.intent.category.LAUNCHER"/>
      </intent-filter>
    </activity>
    <meta-data
      android:name="com.amap.api.v2.apikey"
      android:value="8464b99ee529f07ddfa00df8c2edee72"/>
  </application>
</manifest>
- 1
- 2
- 3
- 4
- 5
- 6
- 7
- 8
- 9
- 10
- 11
- 12
- 13
- 14
- 15
- 16
- 17
- 18
- 19
- 20
- 21
- 22
- 23
- 24
- 25
- 26
- 27
- 28
- 29
- 30
- 31
- 32
- 33
- 34
- 35
- 36
- 37
- 38
- 39
- 40
- 41
- 42
- 43
- 44
- 45
- 46
- 47
- 48
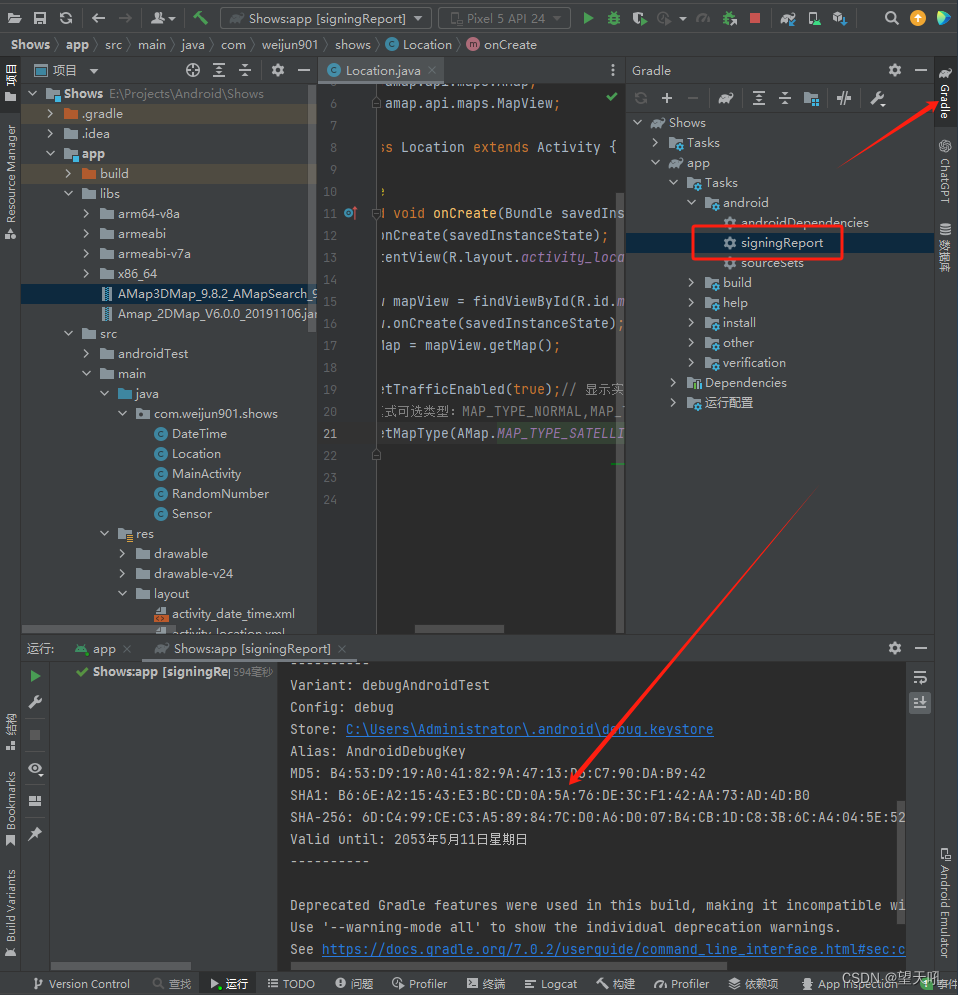
我的Location.java文件是这样写的
package com.weijun901.shows;

import android.app.Activity;
import android.os.Bundle;
import com.amap.api.maps.AMap;
import com.amap.api.maps.MapView;

public class Location extends Activity {

  @Override
  protected void onCreate(Bundle savedInstanceState) {
    super.onCreate(savedInstanceState);
    setContentView(R.layout.activity_location);

    MapView mapView = findViewById(R.id.map);
    mapView.onCreate(savedInstanceState);// 此方法必须重写
    AMap aMap = mapView.getMap();

    aMap.setTrafficEnabled(true);// 显示实时交通状况
    //地图模式可选类型:MAP_TYPE_NORMAL,MAP_TYPE_SATELLITE,MAP_TYPE_NIGHT
    aMap.setMapType(AMap.MAP_TYPE_NORMAL);// 卫星地图模式
  }
}
- 1
- 2
- 3
- 4
- 5
- 6
- 7
- 8
- 9
- 10
- 11
- 12
- 13
- 14
- 15
- 16
- 17
- 18
- 19
- 20
- 21
- 22
- 23
完整的activity_location.xml文件
<?xml version="1.0" encoding="utf-8"?>
<androidx.constraintlayout.widget.ConstraintLayout
  xmlns:android="http://schemas.android.com/apk/res/android"
  xmlns:tools="http://schemas.android.com/tools"
  android:layout_width="match_parent"
  android:layout_height="match_parent"
  tools:context=".Location">
  <com.amap.api.maps.MapView
    android:id="@+id/map"
    android:layout_height="match_parent"
    android:layout_width="match_parent"/>

</androidx.constraintlayout.widget.ConstraintLayout>
- 1
- 2
- 3
- 4
- 5
- 6
- 7
- 8
- 9
- 10
- 11
- 12
- 13
- 14
还有一个重中之重app文件夹下面的build.gradle文件
依赖要写对,依赖写不对也是白费
plugins {
  id 'com.android.application'
}

android {
  compileSdk 33

  defaultConfig {
    applicationId "com.weijun901.shows"
    minSdk 24
    targetSdk 33
    versionCode 1
    versionName "1.0"

    testInstrumentationRunner "androidx.test.runner.AndroidJUnitRunner"
  }

  buildTypes {
    debug {
      applicationIdSuffix ".debug"
      debuggable true
    }
    release {
      minifyEnabled true
      proguardFiles getDefaultProguardFile('proguard-android-optimize.txt'), 'proguard-rules.pro'
    }

  }
  compileOptions {
    sourceCompatibility JavaVersion.VERSION_1_8
    targetCompatibility JavaVersion.VERSION_1_8
  }
}

dependencies {
  implementation 'androidx.appcompat:appcompat:1.4.1'
  implementation 'com.google.android.material:material:1.4.0'
  implementation 'androidx.constraintlayout:constraintlayout:2.1.4'
  implementation 'com.amap.api:map2d:2.9.0'
  implementation 'com.amap.api:3dmap:5.0.0'
  testImplementation 'junit:junit:4.13.2'
  androidTestImplementation 'androidx.test.ext:junit:1.1.5'
  androidTestImplementation 'androidx.test.espresso:espresso-core:3.5.1'
}
- 1
- 2
- 3
- 4
- 5
- 6
- 7
- 8
- 9
- 10
- 11
- 12
- 13
- 14
- 15
- 16
- 17
- 18
- 19
- 20
- 21
- 22
- 23
- 24
- 25
- 26
- 27
- 28
- 29
- 30
- 31
- 32
- 33
- 34
- 35
- 36
- 37
- 38
- 39
- 40
- 41
- 42
- 43
- 44
- 45
然后地图就显示在模拟器上面了啊


