- 1python可视化——热力图heatmap seaborn库_python sns.heatmap
- 2图像识别经典模型的发展_图片识别模型
- 32024美赛数学建模赛题解读常用模型算法
- 4前沿科技速递——YOLOv9
- 5【MySQL】在云服务器上安装配置mysql,并使用IDEA连接_mysql server.cnf client.cnf
- 6YoloV8的安装和训练_yelov5和v8能同时安装吗
- 7.Net Core AutoFac 使用方法讲解大全,具体详细使用知识总结
- 8lua modue、 require、 package 区别_package.preload
- 9java springboot 微信小程序开发框架源码_java转微信小程序原生代码开发
- 10LINUX笔记
【SpringBoot】| SpringBoot 集成 Redis_springboot集成redis
赞
踩
目录
二:对比 StringRedisTemplate 和 RedisTemplate
tips:前些天突然发现了一个巨牛的人工智能学习网站,通俗易懂,风趣幽默,忍不住分享一下给大家,感兴趣的同学可以点击网站进行学习人工智能学习网站
一:SpringBoot 集成 Redis
①Redis是一个 NoSQL(not only)数据库, 常作用缓存 Cache 使用。
②Redis是一个中间件、是一个独立的服务器;常用的数据类型: string , hash ,set ,zset , list
③通过Redis客户端可以使用多种语言在程序中,访问 Redis 数据;java 语言中使用的客户端库有 Jedis,lettuce, Redisson 等。
④SpringBoot中使用 RedisTemplate(和StringRedisTemplate) 模版类操作 Redis 数据。
⑤Redis只要是运用在Linux服务器上,其中有两个重要的二进制文件
redis-server:服务端:在src目录下,执行./redis-server启动服务器端,不要关闭。
redis-cli:客户端: 在src目录下,执行./redis-cli启动客户端,访问redis中的数据。
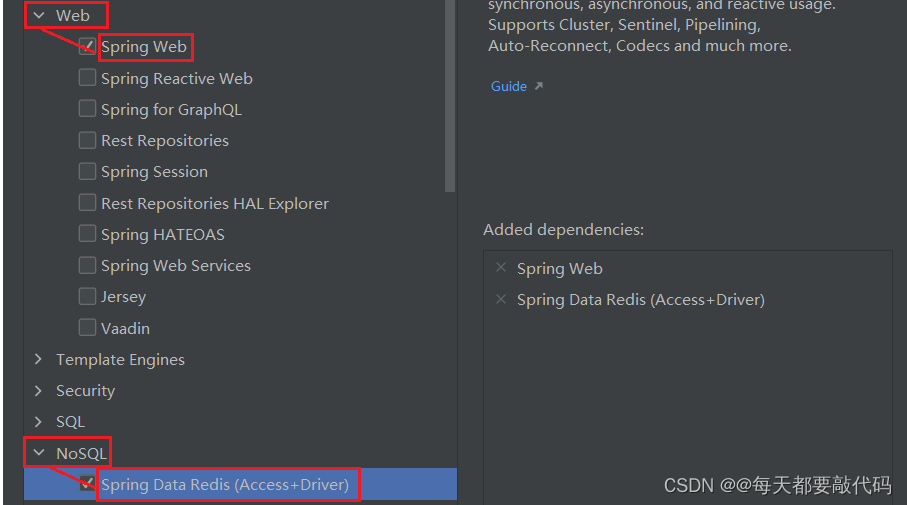
第一步:创建SpingBoot项目,选择Web、Redis模块
pom.xml配置
- <?xml version="1.0" encoding="UTF-8"?>
- <project xmlns="http://maven.apache.org/POM/4.0.0" xmlns:xsi="http://www.w3.org/2001/XMLSchema-instance"
- xsi:schemaLocation="http://maven.apache.org/POM/4.0.0 https://maven.apache.org/xsd/maven-4.0.0.xsd">
- <modelVersion>4.0.0</modelVersion>
- <parent>
- <groupId>org.springframework.boot</groupId>
- <artifactId>spring-boot-starter-parent</artifactId>
- <version>2.7.9</version>
- <relativePath/>
- </parent>
- <groupId>com.zl</groupId>
- <artifactId>study-springboot-redis</artifactId>
- <version>0.0.1-SNAPSHOT</version>
-
- <properties>
- <java.version>1.8</java.version>
- </properties>
- <dependencies>
- <!--redis起步依赖:直接在项目中使用RedisTemplate(或者StringRedisTemplate)-->
- <dependency>
- <groupId>org.springframework.boot</groupId>
- <artifactId>spring-boot-starter-data-redis</artifactId>
- </dependency>
- <!--web起步依赖-->
- <dependency>
- <groupId>org.springframework.boot</groupId>
- <artifactId>spring-boot-starter-web</artifactId>
- </dependency>
-
- <dependency>
- <groupId>org.springframework.boot</groupId>
- <artifactId>spring-boot-starter-test</artifactId>
- <scope>test</scope>
- </dependency>
- </dependencies>
-
- <build>
- <plugins>
- <plugin>
- <groupId>org.springframework.boot</groupId>
- <artifactId>spring-boot-maven-plugin</artifactId>
- </plugin>
- </plugins>
- </build>
-
- </project>
Redis使用是lettuce客户端
在程序中使用RedisTemplate类的方法去操作redis数据, 实际就是调用的lettuce客户端的中的方法!

第二步:配置核心配置文件 application.properties
主要配置三个部分:host(ip地址)、port(端口号)、password(密码)
- server.port=8082
- server.servlet.context-path=/myredis
-
- #指定redis(host/port/password)
- spring.redis.host=192.168.2.129 #windows系统就使用localhost,Linux就适应虚拟地址的IP
- spring.redis.port=6379
- #spring.redis.password=123456 没有密码就不用设置
第三步:Linux中进行处理
①首先关闭防火墙
- systemctl status firewalld.service #查看关闭防火墙
- systemctl disable firewalld.service #永久关闭防火墙
②打开redis.conf修改配置
- 将bind中的#去掉,并改为bind 0.0.0.0
- protected-mode yes改为no
③杀死已经开启的redis
- ps -ef | grep redis #查出进程
- kiil -9 进程id #根据进程强制杀死已经开启的redis
④重启服务,让修改的配置生效,重新开启redis服务
src/redis-server ./redis.conf #在redis目录下执行该命令,开启redis服务即可具体更加详细的redis配置与启动可以参考这篇博客:http://t.csdn.cn/P71zi
第四步:编写Controller
在controller中执行两个操作:添加数据到redis、从redis获取数据!
- package com.zl.controller;
-
- import org.springframework.data.redis.core.RedisTemplate;
- import org.springframework.data.redis.core.ValueOperations;
- import org.springframework.web.bind.annotation.GetMapping;
- import org.springframework.web.bind.annotation.PostMapping;
- import org.springframework.web.bind.annotation.RestController;
-
- import javax.annotation.Resource;
-
- @RestController
- public class RedisController {
-
- // 使用RedisTemplate模板,泛型有三种形式:全是Object、全是String、不写
- @Resource
- private RedisTemplate redisTemplate;
-
- // 添加数据到redis
- @PostMapping("/redis/add")
- public String addToRedis(String name,String value){
- // 获取ValueOperations对象,这个对象是用来处理String类型的对象添加和取出
- ValueOperations valueOperations = redisTemplate.opsForValue();
- // 添加数据到redis
- valueOperations.set("myname",name);
- return "向redis添加数据";
- }
-
- // 从redis取出数据
- @GetMapping("/redis/get")
- public String getToRedis(String key){
- ValueOperations valueOperations = redisTemplate.opsForValue();
- Object value = valueOperations.get(key);
- return "向redis获取数据:"+key+"=="+value;
-
- }
- }
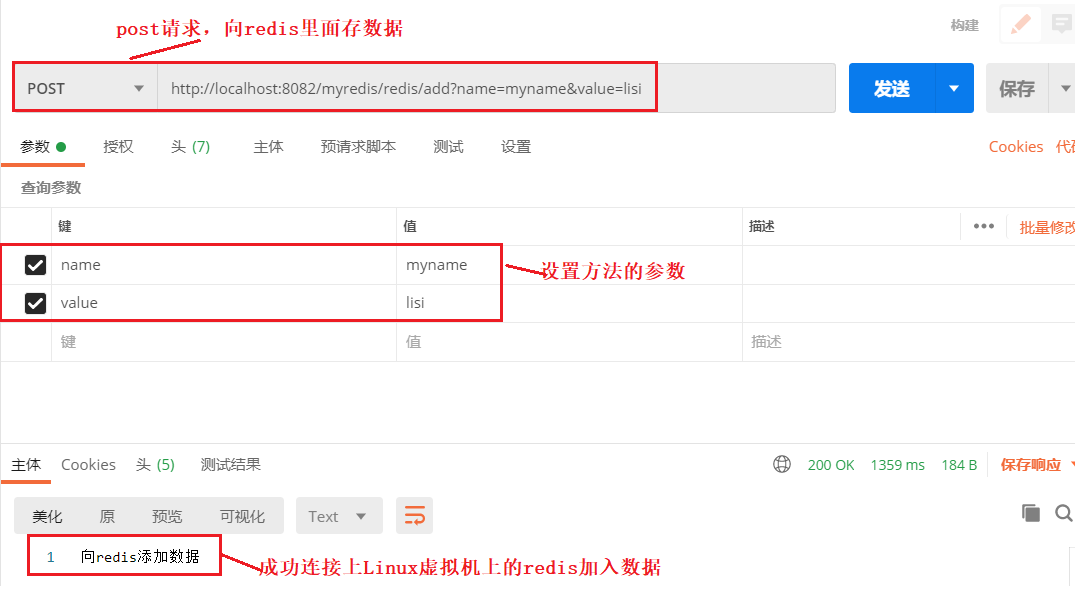
添加数据
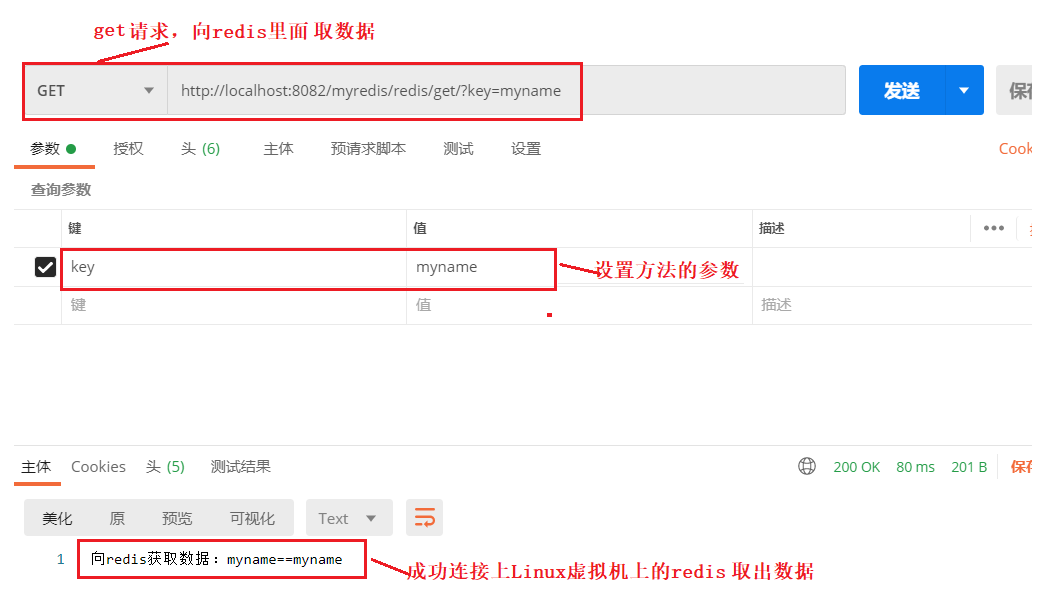
取出数据
查看客户端的数据(查出的是key)

通过key获取value
![]()
二:对比 StringRedisTemplate 和 RedisTemplate
通过Restful风格编写例子直观感受StringRedisTemplate 和 RedisTemplate存储数据的区别!
第一种:使用RedisTemplate存储数据
- package com.zl.controller;
-
- import org.springframework.data.redis.core.RedisTemplate;
- import org.springframework.web.bind.annotation.PathVariable;
- import org.springframework.web.bind.annotation.PostMapping;
- import org.springframework.web.bind.annotation.RestController;
-
- import javax.annotation.Resource;
-
- @RestController
- public class ControllerRedis {
-
- @Resource
- private RedisTemplate redisTemplate;
- // restful风格
- @PostMapping("/redis/template/{key}/{value}")
- public String addByRedisTemplate(@PathVariable String key, @PathVariable String value){
- // 使用使用RedisTemplate添加数据
- redisTemplate.opsForValue().set(key,value);
- return "使用RedisTemplate添加数据";
- }
-
- }
发送请求,进行数据的存储

通过key取出value数据;无论是key还是value可读性都很差!

第二种:使用StringRedisTemplate存储数据
- package com.zl.controller;
-
- import org.springframework.data.redis.core.StringRedisTemplate;
- import org.springframework.web.bind.annotation.PathVariable;
- import org.springframework.web.bind.annotation.PostMapping;
- import org.springframework.web.bind.annotation.RestController;
-
- import javax.annotation.Resource;
-
- @RestController
- public class ControllerRedis {
-
- @Resource
- private StringRedisTemplate stringRedisTemplate;
-
- @PostMapping("/redis/template/{key}/{value}")
- public String addByStringRedisTemplate(@PathVariable String key, @PathVariable String value){
- // 使用使用stringRedisTemplate添加数据
- stringRedisTemplate.opsForValue().set(key,value);
- return "使用stringRedisTemplate添加数据";
- }
-
- }
发送请求,进行数据的存储

通过key取出value数据;无论是key还是value都很直观,可读性好

对比 StringRedisTemplate 和 RedisTemplate
StringRedisTemplate:把k,v 都是作为String类型处理,使用的是String的序列化 ,可读性好。
RedisTemplate: 把k,v 经过了序列化存到redis;k,v 是序列化后的内容, 不能直接识别,可读性差。
(1)序列化定义
序列化:把对象转化为可传输的字节序列过程称为序列化。
反序列化:把字节序列还原为对象的过程称为反序列化。
注:默认使用的jdk序列化, 可以修改为其它的序列化!
(2)为什么需要序列化?
序列化最终的目的是为了对象可以跨平台存储,和进行网络传输!而我们进行跨平台存储和网络传输的方式就是IO,而我们的IO支持的数据格式就是字节数组。我们必须在把对象转成字节数组的时候就制定一种规则(序列化),那么我们从IO流里面读出数据的时候再以这种规则把对象还原回来(反序列化)。
(3)序列化的方式
序列化只是一种拆装组装对象的规则,那么这种规则肯定也可能有多种多样,比如现在常见的序列化方式有:JDK(不支持跨语言)、JSON(常用)、XML、Hessian、Kryo(高性能)、Thrift、Protofbuff。
java的序列化:把java对象转为byte[], 二进制数据。
json序列化:json序列化功能将对象转换为 JSON 格式或从 JSON 格式转换对象。例如把一个Student对象转换为JSON字符串{"name":"李四", "age":29} ),反序列化(将JSON字符串 {"name":"李四", "age":29} 转换为Student对象)
(4)设置RedisTemplate或者StringRedisTemplate的序列化方式
注:默认采用的是JDK的序列化机制,引入spring-boot-starter-data-redis依赖后由SpringBoot创建RedisTemplate或者StringRedisTemplate对象!可以设置Key的序列化,可以设置value的序列化,也可以同时设置。
- package com.zl.controller;
-
- import org.springframework.data.redis.core.RedisTemplate;
- import org.springframework.data.redis.serializer.Jackson2JsonRedisSerializer;
- import org.springframework.data.redis.serializer.StringRedisSerializer;
- import org.springframework.web.bind.annotation.PostMapping;
- import org.springframework.web.bind.annotation.RestController;
-
- import javax.annotation.Resource;
-
- @RestController
- public class RedisController {
- @Resource
- private RedisTemplate redisTemplate;
-
- @PostMapping("/redis/addrstr")
- public String addString(String key,String value){
- // 修改序列化方式
- // 设置key,value为String的序列化
- redisTemplate.setKeySerializer(new StringRedisSerializer());
- redisTemplate.setValueSerializer(new StringRedisSerializer());
- // 存数据
- redisTemplate.opsForValue().set(key,value);
- return "定义RedisTemplate对象的key,value的序列化";
- }
- }
调用setKeySerializer设置key的序列化,参数是RedisSerializer接口对象
这个接口有很多实现类,其中一个就是默认采用的JDK序列化。

总结:实际上RedisTemplate使用范围比StringRedisTemplate要大。后者采用的就是String的序列化,专门用来处理字符串的。前者比较通用比如当前是一个Java对象,就需要使用RedisTemplate,然后修改序列化的方式即可!
(5) json序列化
第一步:准备一个可序列化的Java类,设置IDEA自动生成
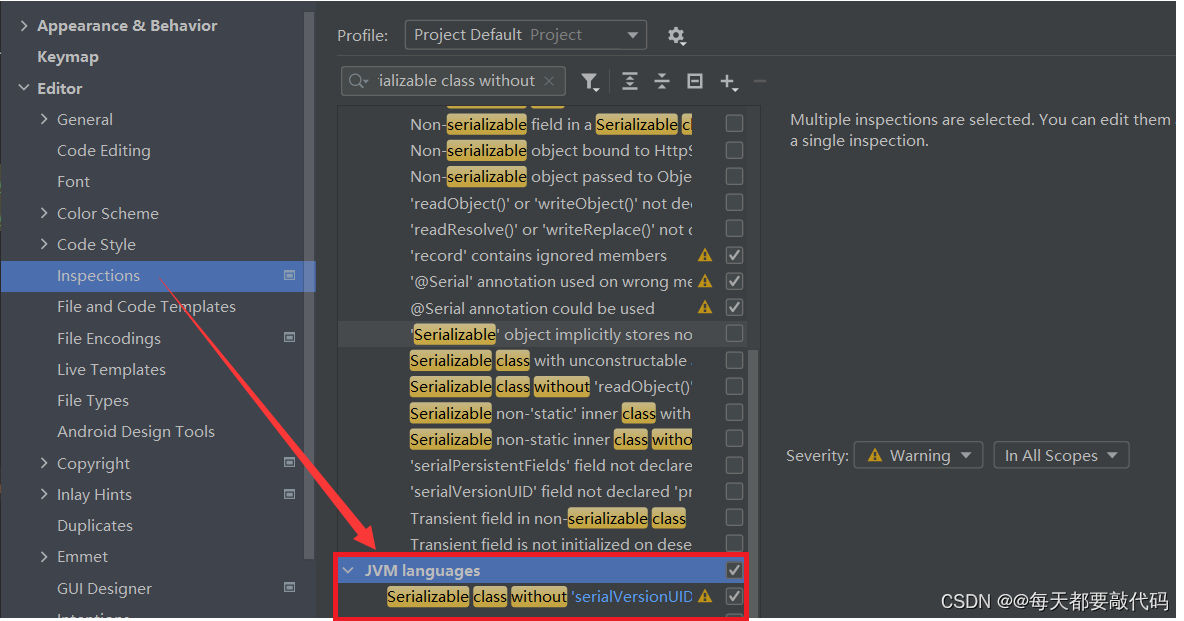
如果我们不想手动输入序列化版本号,想让IDEA自动给我们生成一个怎们办呢?需要进行设置:File--->Settings--->Editor--->Code Style--->Inspections--->JVM languages--->把下面这个打上对勾--->Apply--->OK最终回到我们继承Serializable接口的类名上,alt+Enter即可自动生成序列版本号!
- package com.zl.pojo;
-
- import java.io.Serializable;
-
-
- public class Student implements Serializable {
- private static final long serialVersionUID = -8589050940385007834L;
- private Integer id;
- private String name;
- private Integer age;
-
- public Student() {
- }
-
- public Student(Integer id, String name, Integer age) {
- this.id = id;
- this.name = name;
- this.age = age;
- }
-
- public Integer getId() {
- return id;
- }
-
- public void setId(Integer id) {
- this.id = id;
- }
-
- public String getName() {
- return name;
- }
-
- public void setName(String name) {
- this.name = name;
- }
-
- public Integer getAge() {
- return age;
- }
-
- public void setAge(Integer age) {
- this.age = age;
- }
- }
第二步:把Java对象以json格式存储到redis
- package com.zl.controller;
-
- import com.zl.pojo.Student;
- import org.springframework.data.redis.core.RedisTemplate;
- import org.springframework.data.redis.core.ValueOperations;
- import org.springframework.data.redis.serializer.Jackson2JsonRedisSerializer;
- import org.springframework.data.redis.serializer.StringRedisSerializer;
- import org.springframework.web.bind.annotation.PostMapping;
- import org.springframework.web.bind.annotation.RestController;
-
- import javax.annotation.Resource;
-
-
- @RestController
- public class RedisController {
- @Resource
- private RedisTemplate redisTemplate;
-
- // Java对象序列化为json格式
- @PostMapping("/redis/addjson")
- public String javaBeanToJson(){
- Student student = new Student(100,"zhangsan",20);
- // key使用String的序列化
- redisTemplate.setKeySerializer(new StringRedisSerializer());
- // value使用json的序列化
- redisTemplate.setValueSerializer(new Jackson2JsonRedisSerializer(Student.class));
- // 存储到redis当中
- ValueOperations valueOperations = redisTemplate.opsForValue();
- valueOperations.set("mystudent",student);
- return "json序列化";
-
- }
- }
第三步:postman进行访问
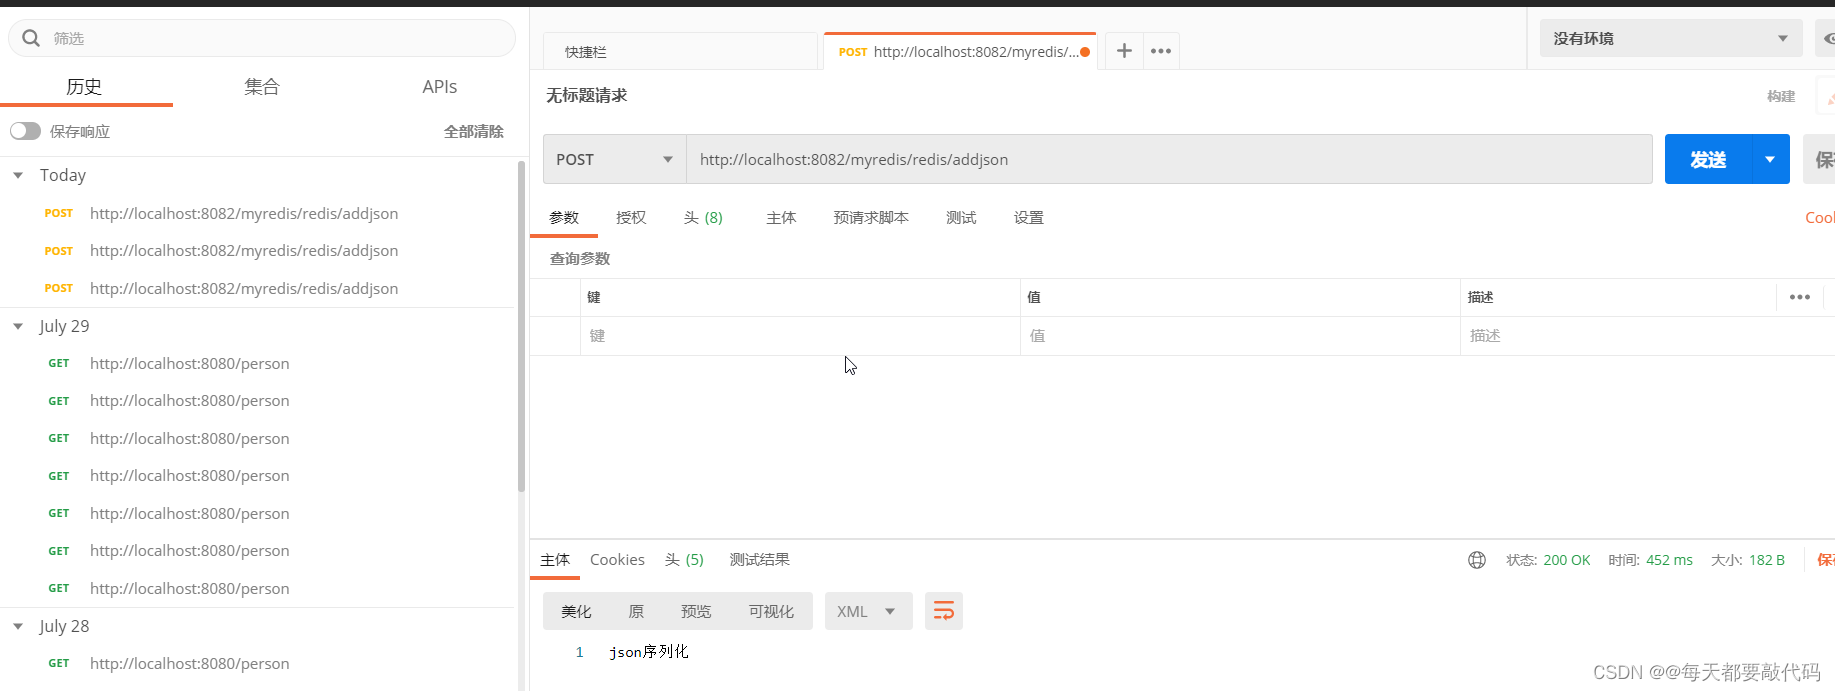
成功存储后,使用redis的图形化界面进行查看

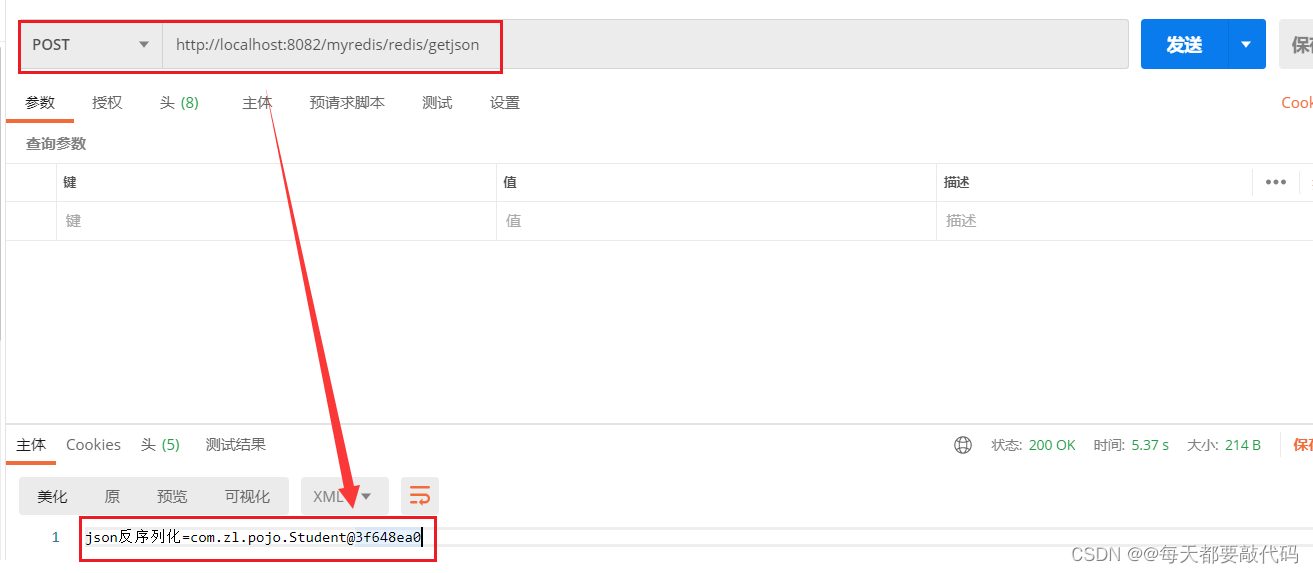
第四步:进行反序列化
- // 反序列化
- @PostMapping("/redis/getjson")
- public String JsonTojavaBean(){
- // key使用String的序列化
- redisTemplate.setKeySerializer(new StringRedisSerializer());
- // value使用json的序列化
- redisTemplate.setValueSerializer(new Jackson2JsonRedisSerializer(Student.class));
- // 进行反序列化
- Object obj = redisTemplate.opsForValue().get("mystudent");
- return "json反序列化="+obj;
- }
成功反序列化为Java对象
图书推荐:《MySQL 8查询性能优化》
参与方式:
本次送书 2 本!
活动时间:截止到 2023-09-21 00:00:00。抽奖方式:利用程序进行抽奖。
参与方式:关注博主(只限粉丝福利哦)、点赞、收藏,评论区随机抽取,最多三条评论!
推荐理由
性能不佳的查询将影响用户的体验,导致业务收入下降;本书将帮助你在日常工作中更好地识别、分析和改进此类查询。本书详述涉及多个步骤的处理过程,包括监控查询执行时间、识别需要优化的查询、分析当前的性能表现以及进行优化等,还介绍相关的数据源和工具,帮助你更快地提交结果,降低系统开销。
《MySQL 8查询性能优化》描述多种可提升查询性能的策略,讲述如何使用传统的EXPLAIN命令以及新的EXPLAIN ANALYZE工具来分析查询、如何使用Visual Explain功能来获得执行计划的可视化视图、如何用直方图获得关于“桶”数据的分布信息。此外,将介绍锁以及解决锁问题的相关知识;讨论MySQL优化器的工作原理,包括新的哈希联接算法,以及在必要时改变优化器行为来缩短查询的执行时间。通过本书,你将掌握必备技术,能用合适工具提高用户满意度,从公司的计算资源中获取更大价值。
内容简介:
主要内容
● 监控性能,找出效果不佳的查询;
● 选取要优化的查询,**限度地提高收益;
● 使用EXPLAIN ANALYZE和Visual Explain等工具来分析查询;
● 借助多种策略改进慢查询;
● 正确使用索引和直方图,创建快速的执行计划;
● 了解并分析锁,从而解决争用问题,提升系统吞吐量;
