热门标签
热门文章
- 1树莓派系统的安装教程_树莓派系统安装
- 2grafana导入promethus node模板_grafana 添加node面板
- 3HarmonyOS之在工程中导入Sample工程和添加Module_通过【import harmonyos sample】导入的示例【jshelloworld】可以pr
- 4linux7添加端口过程,CentOS7安装firewalld防火墙添加放行端口简单演示过程
- 5Flutter状态管理——InheritedWidget数据共享的原理分析_flutter inheritedwidget原理
- 6spring使用内置jetty创建提供http接口服务
- 7实现语音识别系统:手把手教你使用STM32C8T6和LD3320(SPI通信版)实现语音识别_multinet语音识别框架stm32
- 8人大高领人工智能学院发布AI自主智能体综述!32个AI Agent的综合分析
- 9计算机网络 day14 DNS域名劫持、DNS域名污染 - CDN的工作流程 - DNS的记录类型 - 搭建DNS缓存/主域名服务器 - DNAT-SNAT实验项目_dns劫持工具
- 10ElasticSearch 最全详细使用教程_怎么看elasticsearch是否可用
当前位置: article > 正文
Android Studio入门级UI界面设计(图文+解析)_android studio ui demo
作者:繁依Fanyi0 | 2024-04-07 07:35:52
赞
踩
android studio ui demo
本文以图片加上解析,希望小白可以理解通透
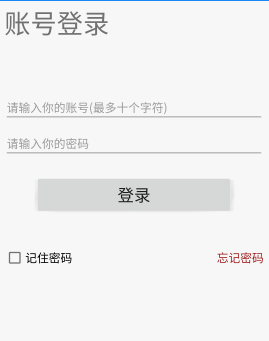
下面配上本次试验UI界面

- 1.首先设置成线性布局,添加orientation属性,设置成垂直
android:orientation="vertical"
- 1
- 设置padding为8dp(Padding 为内边框,指该控件内部内容,如文本/图片距离该控件的边距)
android:padding="8dp"
- 1
- 2.建立一个testview写标题
<TextView
    android:layout_width="match_parent"
    android:layout_height="wrap_content"
    android:text="账号登录"
    android:textSize="40dp"/>
- 1
- 2
- 3
- 4
- 5
标题字体大小 40dp(android:textSize=“40dp”)
-3. 建立两个editview,输入框
要让Edittext单行显示
android:maxLines="1"
- 1
限制显示文本长度,超出不显示
android:maxLength="10"
- 1
文本为空时候显示的文本
android:hint="请输入你的账号(最多十个字符)"
- 1
文本过长时,省略号显示在结尾
android:ellipsize="end"
- 1
距离顶部的距离
android:layout_marginTop="80dp"
- 1
-4. 建立登录按钮,button
android:layout_gravity是用来设置该view相对与父view 的位置.比如一个button 在linearlayout里,你想把该button放在linearlayout里靠左、靠右等位置就可以通过该属性设置
android:layout_gravity="center"
- 1
-5. 添加一个相对布局RelativeLayout,在里面建立CheckBox控件
<CheckBox
    android:id="@+id/cb_rm"
    android:layout_width="wrap_content"
    android:layout_height="wrap_content"
       android:text="记住密码"
       android:textSize="18dp"
        />
- 1
- 2
- 3
- 4
- 5
- 6
- 7
-6.再在里面建立一个testview(忘记密码)
<TextView
            android:layout_width="wrap_content"
            android:layout_height="wrap_content"
            android:layout_alignParentRight="true"
            android:text="忘记密码"
            android:textColor="#9E2222"
            android:layout_centerVertical="true"
            android:textSize="18dp" />
- 1
- 2
- 3
- 4
- 5
- 6
- 7
- 8
将控件的右边缘和父控件的右边缘对齐
android:layout_alignParentRight="true"
- 1
将控件置于垂直方向的中心位置
android:layout_centerVertical="true"
- 1
-试验成功,代码如下
<?xml version="1.0" encoding="utf-8"?>
<LinearLayout
    xmlns:android="http://schemas.android.com/apk/res/android"
    android:orientation="vertical"
    android:layout_width="match_parent"
    android:layout_height="match_parent"
    android:padding="8dp"
    android:background="#F8F7F7">
    <TextView
    android:layout_width="match_parent"
    android:layout_height="wrap_content"
    android:text="账号登录"
    android:textSize="40dp"/>
    <EditText
        android:layout_width="match_parent"
        android:layout_height="wrap_content"
        android:hint="请输入你的账号(最多十个字符)"
        android:id="@+id/et_username"
        android:layout_marginTop="80dp"
        android:textColor="#9ACCA7"
        android:maxLines="1"
        android:ellipsize="end"
        android:maxLength="10"/>
    <EditText
        android:id="@+id/et_pw"
        android:layout_width="match_parent"
        android:layout_height="wrap_content"
        android:hint="请输入你的密码"
        android:layout_marginTop="10dp"
        android:textColor="#DAC3E0"
        android:maxLines="1"
        android:ellipsize="end"/>
    <Button
        android:layout_marginTop="25dp"
        android:layout_width="300dp"
        android:layout_height="60dp"
        android:text="登录"
        android:textSize="25dp"
        android:layout_gravity="center"/>
    <RelativeLayout
        android:layout_marginTop="50dp"
        android:layout_width="match_parent"
        android:layout_height="wrap_content">
    <CheckBox
        android:id="@+id/cb_rm"
        android:layout_width="wrap_content"
        android:layout_height="wrap_content"
        android:text="记住密码"
        android:textSize="18dp"/>
        <TextView
            android:layout_width="wrap_content"
            android:layout_height="wrap_content"
            android:layout_alignParentRight="true"
            android:text="忘记密码"
            android:textColor="#9E2222"
            android:layout_centerVertical="true"
            android:textSize="18dp" />
    </RelativeLayout>
</LinearLayout>
- 1
- 2
- 3
- 4
- 5
- 6
- 7
- 8
- 9
- 10
- 11
- 12
- 13
- 14
- 15
- 16
- 17
- 18
- 19
- 20
- 21
- 22
- 23
- 24
- 25
- 26
- 27
- 28
- 29
- 30
- 31
- 32
- 33
- 34
- 35
- 36
- 37
- 38
- 39
- 40
- 41
- 42
- 43
- 44
- 45
- 46
- 47
- 48
- 49
- 50
- 51
- 52
- 53
- 54
- 55
- 56
- 57
- 58
- 59
如果是新入门的同学可以参考之前的文章哦
Android Studio 安装配置完整教程
Android Studio入门级教程
Android 布局 天气预报demo
声明:本文内容由网友自发贡献,不代表【wpsshop博客】立场,版权归原作者所有,本站不承担相应法律责任。如您发现有侵权的内容,请联系我们。转载请注明出处:https://www.wpsshop.cn/w/繁依Fanyi0/article/detail/377251
推荐阅读
相关标签


