
热门标签
热门文章
- 1语音算法论文中frame-level,segment-level,utterance-level fearure
- 2阿里云产品介绍_阿里云产品 其他云
- 3情感分析的未来趋势:AI与人工智能的融合
- 4应用程序开发(ArkTS)_arkts单例模式
- 5Python之Django 基本使用_django python
- 6GPT-4:模型架构、训练方法与 Fine-tuning 详解_gpt4 finetune
- 7python 之jieba分词
- 8数据增强技术在智能客服中的应用:了解如何将数据集用于训练和评估智能客服模型_电商客服机器人训练数据集
- 9SAP 将smartforms的报表转成PDF_abap编程 smartforms 自动打印为pdf
- 10百度 文心一言 sdk 试用_wenxin-sdk-java
当前位置: article > 正文
Vue3+SpringBoot实现文件上传详细教程_vue3 文件上传
作者:羊村懒王 | 2024-04-08 08:07:14
赞
踩
vue3 文件上传
文件上传的功能实现是我们做Web应用时候最为常见的应用场景,比如:实现头像的上传,Excel文件数据的导入等功能,都需要我们先实现文件的上传,然后再做图片的裁剪,excel数据的解析入库等后续操作。
今天通过这篇文章,我们就来一起学习一下如何在Vue3+SpringBoot中实现文件的上传,这篇文章主要使用图片上传进行讲解。
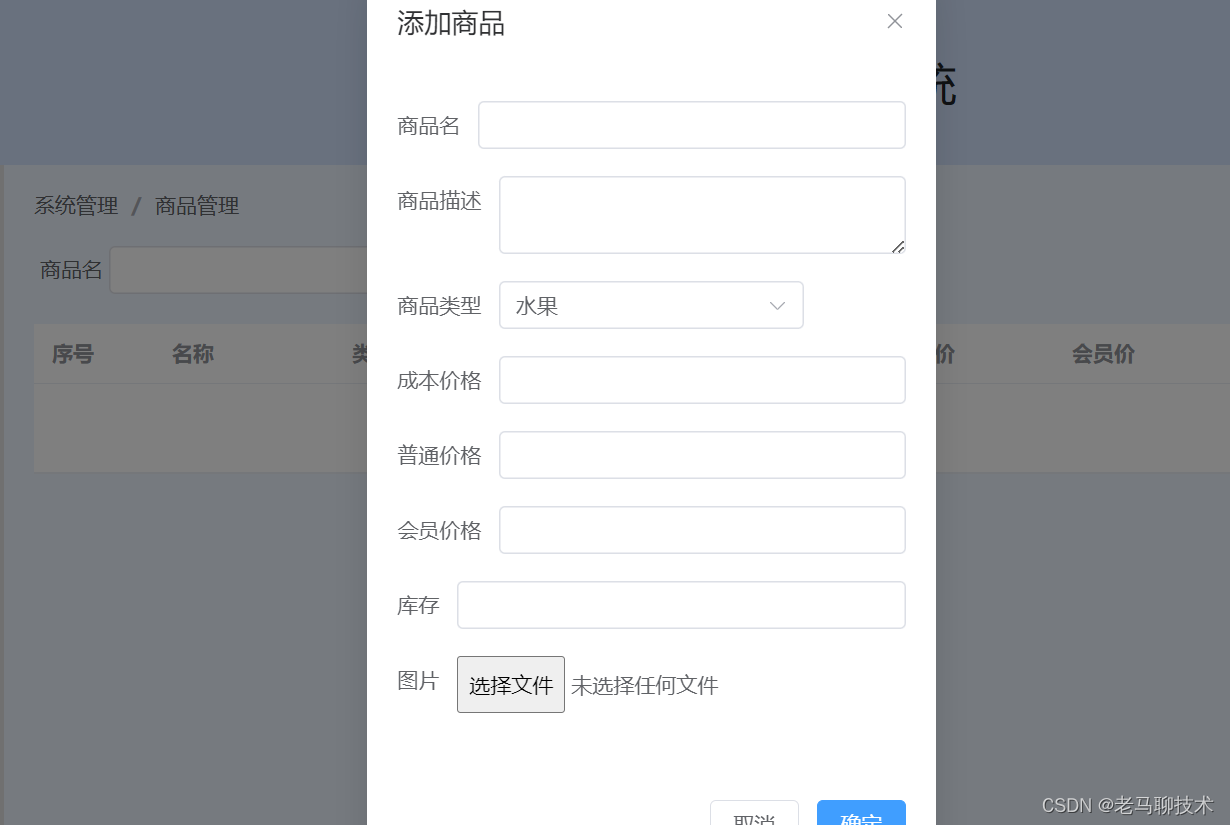
主要逻辑为:本案例实现商品信息的上传功能,包含商品的文字信息及商品图片
如下图显示:

点击“新增”
具体核心代码,如下
1. SpringBoot 中核心代码
- @RestController
- @RequestMapping("/bg/product")
- public class ProductController {
- @Autowired
- private ProductService productService;
- @RequestMapping("/queryall")
- private Message queryAll(){
- return productService.queryall();
- }
-
- @RequestMapping("/save")
- private Message addProduct(@RequestBody Product product){
- return productService.save(product);
- }
-
- @RequestMapping("/upload")
- private String ImageUpload(@RequestParam MultipartFile file, HttpServletRequest request)throws Exception{
-
- // 综合考虑:两个位置都上传文件
- //2. 指定文件上传的目录(target/classes/xxx)
- //2.1 文件存储到此位置,可以提供页面的访问(当前target中的内容不会打包上传到服务器上)
- String path_target = ClassUtils.getDefaultClassLoader().getResource("static").getPath()+"/upload/";
- //2. 指定文件上传的目录(当前项目的src/main/resources/static/upload 下)
- //2.1 文件存储到此位置,可以保存上传的图片,并打包上传到服务器上(在项目中执行 install 就可以生成target中的所有内容)
- String path = System.getProperty("user.dir")+"/src/main/resources/static/upload";
- //3. 判断此目录是否存在
- File fileDir_target = new File(path_target);
- if(!fileDir_target.exists()){
- fileDir_target.mkdirs();
- }
- File fileDir = new File(path);
- if(!fileDir.exists()){
- fileDir.mkdirs();
- }
- //4. 生成新的名字
- String oldName = file.getOriginalFilename();
- String newName = UUID.randomUUID().toString().replaceAll("-","")+oldName.substring(oldName.lastIndexOf("."),oldName.length());
- //5. 指定生成的文件
- File file_target = new File(fileDir_target.getAbsolutePath()+File.separator+newName);
- File file_1 = new File(fileDir.getAbsolutePath()+File.separator+newName);
- //6. 文件的生成
- file.transferTo(file_1);
- FileCopyUtils.copy(file_1,file_target);
- //7. 生成http的访问路径
- String httpPath = request.getScheme()+"://"+request.getServerName()+":"+request.getServerPort()+"/"
- + request.getContextPath()+"upload/"+newName;
-
- System.out.println("path:"+path);
- System.out.println("path_target:"+path_target);
- System.out.println("httpPath:"+httpPath);
-
- return httpPath;
- }
- }

2. vue中核心代码
流程为:先将图片上传到Springboot服务器上,服务器返回给图片的http访问地址,将http访问地址与商品的信息再一起上传到服务器上
- <template>
- <el-breadcrumb separator="/" style="margin-bottom: 20px;">
- <el-breadcrumb-item>系统管理</el-breadcrumb-item>
- <el-breadcrumb-item>商品管理</el-breadcrumb-item>
- </el-breadcrumb>
- <div>
- <el-text class="mx-1">商品名</el-text>
- <el-input v-model="input" style="width: 200px; margin-right: 10px;" />
- <el-button type="primary">搜索</el-button>
- <el-button type="warning" @click="dialogVisible = true">新增</el-button>
- </div>
- <el-table :data="tableData" style="width: 100%;margin-top: 20px;">
- <el-table-column type="index" label="序号" width="80" />
- <el-table-column prop="productName" label="名称" width="120" />
- <el-table-column prop="categoryName" label="类型" width="120" />
- <el-table-column prop="productPath" label="图片" width="120" >
- <template #default="scope">
- <img :src="scope.row.productPath" min-width="50" height="50"/>
- </template>
- </el-table-column>
- <el-table-column prop="costPrice" label="进价" width="120" />
- <el-table-column prop="generalPrice" label="普通价" width="120" />
- <el-table-column prop="superPrice" label="会员价" width="120" />
- <el-table-column prop="stock" label="库存" width="120" />
- <el-table-column prop="address" label="操作" >
- <template #default="scope">
- <el-button
- size="mini"
- @click="handleEdit(scope.$index, scope.row)">编辑</el-button>
-
- <el-button
- size="mini"
- @click="handleDelete(scope.$index, scope.row)">删除</el-button>
- </template>
- </el-table-column>
- </el-table>
-
- <!--商品新增的对话框-->
- <el-dialog
- v-model="dialogVisible"
- title="添加商品"
- width="30%"
- >
- <el-form-item label="商品名">
- <el-input v-model="product.productName" />
- </el-form-item>
- <el-form-item label="商品描述">
- <el-input v-model="product.productDescription" type="textarea"/>
- </el-form-item>
- <el-form-item label="商品类型">
- <el-select v-model="product.categoryId" placeholder="请选择类别">
- <el-option
- v-for="item in categoryData"
- :key="item.id"
- :label="item.categoryName"
- :value="item.id"
- />
- </el-select>
- </el-form-item>
- <el-form-item label="成本价格">
- <el-input v-model="product.costPrice" />
- </el-form-item>
- <el-form-item label="普通价格">
- <el-input v-model="product.generalPrice" />
- </el-form-item>
- <el-form-item label="会员价格">
- <el-input v-model="product.superPrice" />
- </el-form-item>
- <el-form-item label="库存">
- <el-input v-model="product.stock" />
- </el-form-item>
- <el-form-item label="图片">
- <input type="file" name="myfile" @change="handleFileUpload"/>
- </el-form-item>
- <template #footer>
- <span class="dialog-footer">
- <el-button @click="dialogVisible = false">取消</el-button>
- <el-button type="primary" @click="saveProduct">
- 确定
- </el-button>
- </span>
- </template>
- </el-dialog>
-
- </template>
- <script setup>
- import {reactive, ref} from 'vue'
- import http from '../api/request'
- import { ElMessage } from 'element-plus'
-
- const dialogVisible = ref(false)
- const categoryData = ref([])
- const tableData = ref([])
- const product = reactive({
- productName:'',
- productDescription: '',
- categoryId: null,
- generalPrice: null,
- superPrice: null,
- costPrice: null,
- stock: null,
- productPath: null,
- myfile: null
- })
-
- //-获取所有商品信息
- function getProductData(){
- http.post('/bg/product/queryall')
- .then(response=>{
- return response.data.data
- }).then(data=>{
- console.log(data)
- tableData.value = data
- })
- }
- getProductData()
- //-获取商品分类信息
- function getCategoryData(){
- http.post('/bg/category/queryall')
- .then(response=>{
- return response.data.data
- }).then(data=>{
- console.log(data)
- categoryData.value = data
- })
- }
- getCategoryData()
- //-图片上传
- const handleFileUpload =(event)=>{
- const file = event.target.files[0];
- let formData = new FormData();
- formData.append('file',file);
- http.post('/bg/product/upload',formData,{
- headers: {
- 'Content-Type':'multipart/form-data'
- }
- }).then(response=>{
- product.productPath = response.data
- })
- }
- //-商品上传
- const saveProduct =()=>{
- //-:对话框的关闭
- dialogVisible.value = false
- http.post('/bg/product/save',{
- productName: product.productName,
- productDescription: product.productDescription,
- categoryId: product.categoryId,
- generalPrice: product.generalPrice,
- superPrice: product.superPrice,
- costPrice: product.costPrice,
- stock: product.stock,
- productPath: product.productPath
- }).then(function(response){
- return response.data.data
- }).then((data)=>{
- ElMessage.success('添加成功');
- //-:查询商品列表
- getProductData()
- })
- }
- </script>
- <style>
-
- </style>
到此,此案例整理完毕!
声明:本文内容由网友自发贡献,不代表【wpsshop博客】立场,版权归原作者所有,本站不承担相应法律责任。如您发现有侵权的内容,请联系我们。转载请注明出处:https://www.wpsshop.cn/w/羊村懒王/article/detail/384010
推荐阅读
Copyright © 2003-2013 www.wpsshop.cn 版权所有,并保留所有权利。

