- 1CSDN原力值解析:功能作用、获取方法、积分对应等级关系详解
- 2iVX低代码平台系列详解 -- 概述篇(二)_ivx低代码平台 怎么 回调
- 3docker安装教程(详解)
- 4三分钟手把手带你 CleanMyMac X for Ma v4.15.1中文破解版安装激活图文教程_cleanmymacx 4.15
- 5【PHP】PHP代码审计基础知识
- 6探索Gin框架:快速构建高性能的Golang Web应用_gin 框架
- 7BGP/MPLS IP VPN跨域解决方案
- 8Flutter beta 1 重磅发布:开发精美的原生应用(1)
- 9ZooKeeper中节点的操作命令(查看、创建、删除节点)_zk创建节点命令
- 10Stable Diffusion安装教程、model导入教程以及精品promt指令_stable diffusion model
OpenCV实现SfM(三):多目三维重建_opencv多目三维重建
赞
踩
转载地址:https://blog.csdn.net/AIchipmunk/article/details/51232861
注意:本文中的代码必须使用OpenCV3.0或以上版本进行编译,因为很多函数是3.0以后才加入的。
目录:
问题简化
终于有时间来填坑了,这次一口气将双目重建扩展为多目重建吧。首先,为了简化问题,我们要做一个重要假设:用于多目重建的图像是有序的,即相邻图像的拍摄位置也是相邻的。多目重建本身比较复杂,我会尽量说得清晰,如有表述不清的地方,还请见谅并欢迎提问。
求第三个相机的变换矩阵
由前面的文章我们知道,两个相机之间的变换矩阵可以通过findEssentialMat以及recoverPose函数来实现,设第一个相机的坐标系为世界坐标系,现在加入第三幅图像(相机),如何确定第三个相机(后面称为相机三)到到世界坐标系的变换矩阵呢?
最简单的想法,就是沿用双目重建的方法,即在第三幅图像和第一幅图像之间提取特征点,然后调用findEssentialMat和recoverPose。那么加入第四幅、第五幅,乃至更多呢?随着图像数量的增加,新加入的图像与第一幅图像的差异可能越来越大,特征点的提取变得异常困难,这时就不能再沿用双目重建的方法了。
那么能不能用新加入的图像和相邻图像进行特征匹配呢?比如第三幅与第二幅匹配,第四幅与第三幅匹配,以此类推。当然可以,但是这时就不能继续使用findEssentialMat和recoverPose来求取相机的变换矩阵了,因为这两个函数求取的是相对变换,比如相机三到相机二的变换,而我们需要的是相机三到相机一的变换。有人说,既然知道相机二到相机一的变换,又知道相机到三到相机二的变换,不就能求出相机三到相机一的变换吗?实际上,通过这种方式,你只能求出相机三到相机一的旋转变换(旋转矩阵R),而他们之间的位移向量T,是无法求出的。这是因为上面两个函数求出的位移向量,都是单位向量,丢失了相机之间位移的比例关系。
说了这么多,我们要怎么解决这些问题?现在请出本文的主角——solvePnP和solvePnPRansac。根据opencv的官方解释,该函数根据空间中的点与图像中的点的对应关系,求解相机在空间中的位置。也就是说,我知道一些空间当中点的坐标,还知道这些点在图像中的像素坐标,那么solvePnP就可以告诉我相机在空间当中的坐标。solvePnP和solvePnPRansac所实现的功能相同,只不过后者使用了随机一致性采样,使其对噪声更鲁棒,本文使用后者。
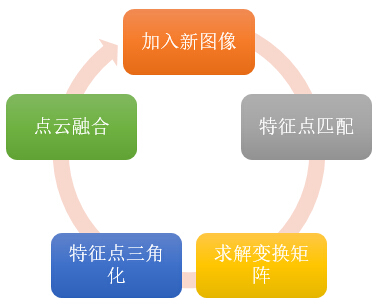
好了,有这么好的函数,怎么用于我们的三维重建呢?首先,使用双目重建的方法,对头两幅图像进行重建,这样就得到了一些空间中的点,加入第三幅图像后,使其与第二幅图像进行特征匹配,这些匹配点中,肯定有一部分也是图像二与图像一之间的匹配点,也就是说,这些匹配点中有一部分的空间坐标是已知的,同时又知道这些点在第三幅图像中的像素坐标,嗯,solvePnP所需的信息都有了,自然第三个相机的空间位置就求出来了。由于空间点的坐标都是世界坐标系下的(即第一个相机的坐标系),所以由solvePnP求出的相机位置也是世界坐标系下的,即相机三到相机一的变换矩阵。
加入更多图像
通过上面的方法得到相机三的变换矩阵后,就可以使用上一篇文章提到的triangulatePoints方法将图像三和图像二之间的匹配点三角化,得到其空间坐标。为了使之后的图像仍能使用以上方法求解变换矩阵,我们还需要将新得到的空间点和之前的三维点云融合。已经存在的空间点,就没必要再添加了,只添加在图像二和三之间匹配,但在图像一和图像三中没有匹配的点。如此反复。

为了方便点云的融合以及今后的扩展,我们需要存储图像中每个特征点在空间中的对应点。在代码中我使用了一个二维列表,名字为correspond_struct_idx,correspond_struct_idx[i][j]代表第i幅图像第j个特征点所对应的空间点在点云中的索引,若索引小于零,说明该特征点在空间当中没有对应点。通过此结构,由特征匹配中的queryIdx和trainIdx就可以查询某个特征点在空间中的位置。
代码实现
前一篇文章的很多代码不用修改,还可以继续使用,但是程序的流程有了较大变化。首先是初始化点云,也就是通过双目重建方法对图像序列的头两幅图像进行重建,并初始化correspond_struct_idx。
void init_structure(
Mat K,
vector<vector<KeyPoint>>& key_points_for_all,
vector<vector<Vec3b>>& colors_for_all,
vector<vector<DMatch>>& matches_for_all,
vector<Point3f>& structure,
vector<vector<int>>& correspond_struct_idx,
vector<Vec3b>& colors,
vector<Mat>& rotations,
vector<Mat>& motions
)
{
//计算头两幅图像之间的变换矩阵
vector<Point2f> p1, p2;
vector<Vec3b> c2;
Mat R, T; //旋转矩阵和平移向量
Mat mask; //mask中大于零的点代表匹配点,等于零代表失配点
get_matched_points(key_points_for_all[0], key_points_for_all[1], matches_for_all[0], p1, p2);
get_matched_colors(colors_for_all[0], colors_for_all[1], matches_for_all[0], colors, c2);
find_transform(K, p1, p2, R, T, mask);
//对头两幅图像进行三维重建
maskout_points(p1, mask);
maskout_points(p2, mask);
maskout_colors(colors, mask);
Mat R0 = Mat::eye(3, 3, CV_64FC1);
Mat T0 = Mat::zeros(3, 1, CV_64FC1);
reconstruct(K, R0, T0, R, T, p1, p2, structure);
//保存变换矩阵
rotations = { R0, R };
motions = { T0, T };
//将correspond_struct_idx的大小初始化为与key_points_for_all完全一致
correspond_struct_idx.clear();
correspond_struct_idx.resize(key_points_for_all.size());
for (int i = 0; i < key_points_for_all.size(); ++i)
{
correspond_struct_idx[i].resize(key_points_for_all[i].size(), -1);
}
//填写头两幅图像的结构索引
int idx = 0;
vector<DMatch>& matches = matches_for_all[0];
for (int i = 0; i < matches.size(); ++i)
{
if (mask.at<uchar>(i) == 0)
continue;
correspond_struct_idx[0][matches[i].queryIdx] = idx;
correspond_struct_idx[1][matches[i].trainIdx] = idx;
++idx;
}
}
初始点云得到后,就可以使用增量方式重建剩余图像,注意,在代码中为了方便实现,所有图像之间的特征匹配已经事先完成了,并保存在matches_for_all这个列表中。增量重建的关键是调用solvePnPRansac,而这个函数需要空间点坐标和对应的像素坐标作为参数,有了correspond_struct_idx,实现这个对应关系的查找还是很方便的,如下。
void get_objpoints_and_imgpoints(
vector<DMatch>& matches,
vector<int>& struct_indices,
vector<Point3f>& structure,
vector<KeyPoint>& key_points,
vector<Point3f>& object_points,
vector<Point2f>& image_points)
{
object_points.clear();
image_points.clear();
for (int i = 0; i < matches.size(); ++i)
{
int query_idx = matches[i].queryIdx;
int train_idx = matches[i].trainIdx;
int struct_idx = struct_indices[query_idx];
if (struct_idx < 0) continue;
object_points.push_back(structure[struct_idx]);
image_points.push_back(key_points[train_idx].pt);
}
}
之后调用solvePnPRansac得到相机的旋转向量和位移,由于我们使用的都是旋转矩阵,所以这里要调用opencv的Rodrigues函数将旋转向量变换为旋转矩阵。之后,使用上一篇文章中用到的reconstruct函数对匹配点进行重建(三角化),不过为了适用于多目重建,做了一些简单修改。
void reconstruct(Mat& K, Mat& R1, Mat& T1, Mat& R2, Mat& T2, vector<Point2f>& p1, vector<Point2f>& p2, vector<Point3f>& structure)
{
//两个相机的投影矩阵[R T],triangulatePoints只支持float型
Mat proj1(3, 4, CV_32FC1);
Mat proj2(3, 4, CV_32FC1);
R1.convertTo(proj1(Range(0, 3), Range(0, 3)), CV_32FC1);
T1.convertTo(proj1.col(3), CV_32FC1);
R2.convertTo(proj2(Range(0, 3), Range(0, 3)), CV_32FC1);
T2.convertTo(proj2.col(3), CV_32FC1);
Mat fK;
K.convertTo(fK, CV_32FC1);
proj1 = fK*proj1;
proj2 = fK*proj2;
//三角重建
Mat s;
triangulatePoints(proj1, proj2, p1, p2, s);
structure.clear();
structure.reserve(s.cols);
for (int i = 0; i < s.cols; ++i)
{
Mat_<float> col = s.col(i);
col /= col(3); //齐次坐标,需要除以最后一个元素才是真正的坐标值
structure.push_back(Point3f(col(0), col(1), col(2)));
}
}
最后,将重建结构与之前的点云进行融合。
void fusion_structure(
vector<DMatch>& matches,
vector<int>& struct_indices,
vector<int>& next_struct_indices,
vector<Point3f>& structure,
vector<Point3f>& next_structure,
vector<Vec3b>& colors,
vector<Vec3b>& next_colors
)
{
for (int i = 0; i < matches.size(); ++i)
{
int query_idx = matches[i].queryIdx;
int train_idx = matches[i].trainIdx;
int struct_idx = struct_indices[query_idx];
if (struct_idx >= 0) //若该点在空间中已经存在,则这对匹配点对应的空间点应该是同一个,索引要相同
{
next_struct_indices[train_idx] = struct_idx;
continue;
}
//若该点在空间中已经存在,将该点加入到结构中,且这对匹配点的空间点索引都为新加入的点的索引
structure.push_back(next_structure[i]);
colors.push_back(next_colors[i]);
struct_indices[query_idx] = next_struct_indices[train_idx] = structure.size() - 1;
}
}
整个增量方式重建图像的代码大致如下。
//初始化结构(三维点云)
init_structure(
K,
key_points_for_all,
colors_for_all,
matches_for_all,
structure,
correspond_struct_idx,
colors,
rotations,
motions
);
//增量方式重建剩余的图像
for (int i = 1; i < matches_for_all.size(); ++i)
{
vector<Point3f> object_points;
vector<Point2f> image_points;
Mat r, R, T;
//Mat mask;
//获取第i幅图像中匹配点对应的三维点,以及在第i+1幅图像中对应的像素点
get_objpoints_and_imgpoints(
matches_for_all[i],
correspond_struct_idx[i],
structure,
key_points_for_all[i+1],
object_points,
image_points
);
//求解变换矩阵
solvePnPRansac(object_points, image_points, K, noArray(), r, T);
//将旋转向量转换为旋转矩阵
Rodrigues(r, R);
//保存变换矩阵
rotations.push_back(R);
motions.push_back(T);
vector<Point2f> p1, p2;
vector<Vec3b> c1, c2;
get_matched_points(key_points_for_all[i], key_points_for_all[i + 1], matches_for_all[i], p1, p2);
get_matched_colors(colors_for_all[i], colors_for_all[i + 1], matches_for_all[i], c1, c2);
//根据之前求得的R,T进行三维重建
vector<Point3f> next_structure;
reconstruct(K, rotations[i], motions[i], R, T, p1, p2, next_structure);
//将新的重建结果与之前的融合
fusion_structure(
matches_for_all[i],
correspond_struct_idx[i],
correspond_struct_idx[i + 1],
structure,
next_structure,
colors,
c1
);
}
测试
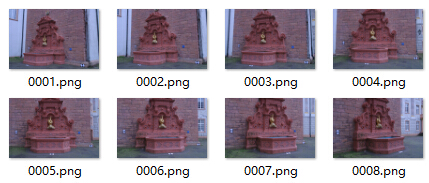
我用了八幅图像进行测试,正如问题简化中所要求的那样,图像是有序的。

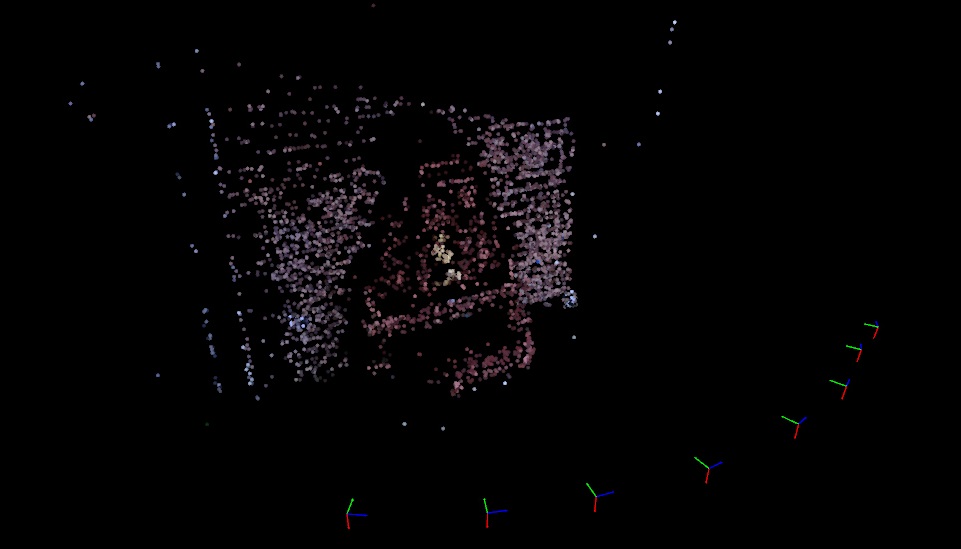
程序的大部分时间花在特征提取和匹配上,真正的重建过程耗时很少。最终结果如下。

图中每个彩色坐标系都代表一个相机。
思考
- 这个多目三维重建程序,要求图像必须是有序的,如果图像无序,比如只是对某个目标在不同角度的随意拍摄,程序应该如何修改?
- 增量式三维重建方法,有一个很大的缺点——随着图像的不断增加,误差会不断累积,最后误差过大以至于完全偏离重建的目标,怎么解决?
有兴趣的读者可以思考一下上面两个问题,第二个问题比较难,我会在下一篇文章中详细介绍。
下载
程序使用VS2015开发,OpenCV版本为3.1且包含扩展部分,如果不使用SIFT特征,可以修改源代码,然后使用官方未包含扩展部分的库。软件运行后会将三维重建的结果写入Viewer目录下的structure.yml文件中,在Viewer目录下有一个SfMViewer程序,直接运行即可读取yml文件并显示三维结构。

- 1
- 2
- 3
- 4
- 5
- 6
- 7
- 8
- 9
- 10
- 11
- 12
- 13
- 14
- 15
- 16
- 17
- 18
- 19
- 20
- 21
- 22
- 23
- 24
- 25
- 26
- 27
- 28
- 29
- 30
- 31
- 32
- 33
- 34
- 35
- 36
- 37
- 38
- 39
- 40
- 41
- 42
- 43
- 44
- 45
- 46
- 47
- 48
- 49
- 50
- 51
- 52
- 53
- 54
- 55
- 56
- 57
- 58
- 59

- 1
- 2
- 3
- 4
- 5
- 6
- 7
- 8
- 9
- 10
- 11
- 12
- 13
- 14
- 15
- 16
- 17
- 18
- 19
- 20
- 21
- 22
- 23
- 24
- 25
- 26
- 27
- 28

- 1
- 2
- 3
- 4
- 5
- 6
- 7
- 8
- 9
- 10
- 11
- 12
- 13
- 14
- 15
- 16
- 17
- 18
- 19
- 20
- 21
- 22
- 23
- 24
- 25
- 26
- 27
- 28
- 29
- 30

- 1
- 2
- 3
- 4
- 5
- 6
- 7
- 8
- 9
- 10
- 11
- 12
- 13
- 14
- 15
- 16
- 17
- 18
- 19
- 20
- 21
- 22
- 23

- 1
- 2
- 3
- 4
- 5
- 6
- 7
- 8
- 9
- 10
- 11
- 12
- 13
- 14
- 15
- 16
- 17
- 18
- 19
- 20
- 21
- 22
- 23
- 24
- 25
- 26
- 27
- 28
- 29
- 30
- 31
- 32
- 33
- 34
- 35
- 36
- 37
- 38
- 39
- 40
- 41
- 42
- 43
- 44
- 45
- 46
- 47
- 48
- 49
- 50
- 51
- 52
- 53
- 54


