
- 1vue知识点归纳与总结(笔记)_v-after-render.one
- 2使用R语言中的plot函数可视化生存曲线并添加图例信息_r语言生存分析绘图添加图例
- 3LLaMA2--WebUI模型下载以及环境搭建_ollama webui
- 4【HCIA-Datacom V1.0培训教材】WLAN_hcia教材电子版
- 5WPF MVVM Livecharts 柱状图_livecharts rowseries 的宽度设置
- 6mysql分组查询把字段用逗号隔开
- 7node npm install Error: CERT_UNTRUSTED完美解决_untrusted cert title
- 8移动端--app,小程序,h5_移动端开发是指什么?包括小程序和app吗
- 9Spring BeanUtils.copyProperties只拷贝不为null的属性_springboot 在 copy 属性的时候有些字段可以拷贝有些为null
- 10ClickHouse查询语句详解_clickhouse not in
【Opencv综合应用】自制训练集的人脸识别3——用csv文件生成xml文件_opencv人脸识别xml文件
赞
踩
在上一篇文章 【Opencv综合应用】自制训练集的人脸识别2——制作csv文件中我们已经生成了csv文件,现在将使用VS2017来把csv文件制作成xml的训练集文件了
说明
本文参考自https://www.cnblogs.com/fpzs/p/10550305.html
由于参考博客中的Opencv版本很老了,并且其中有漏写的地方,我的版本为Opencv4.1.0,导致运行代码后有多处报错,我对其中错误进行修改后汇总如下:
原代码中模型训练部分createEngenFaceRecognize(); createFisherFaceRecognizer(); createLBPHFaceRecognizer();
需要更改为EigenFaceRecognize::create(); FisherFaceRecognizer::create(); LBPHFaceRecognizer::create();
model2对应的训练缺少了,需要在模型训练部分增加
	Ptr<FaceRecognizer> model2 = LBPHFaceRecognizer::create();
	model2->train(images, labels);
	model2->save("MyFaceLBPHModel.xml");
- 1
- 2
- 3
包含头文件#include< face/face.hpp >
命名空间using namespace cv::face;
一,环境准备
我的环境为win10+opencv4.1.0+VS2017。因为人脸模型训练模块在opencv-contrib模块中,而官方的OpenCV安装包中是不带opencv-contrib的,所以需自行下载opencv-contrib-4.1.0模块,然后将opencv4.1.0和opencv-contrib-4.1.0一起进行重新编译。需要注意opencv-contrib的版本必须要和opencv的版本相一致,不然程序无法运行。
二,主要步骤
创建一个自己的新VS项目,由于上一篇中我们写进att.txt的地址是相对地址,故需要将上一篇中已经生成的att.txt文件放到新建项目文件夹中可执行文件目录下(就是与文件后缀带cpp的同一目录),然后把ORL人脸库的att文件夹也放到同一目录下(这里很重要,因为写入的是相对地址,不连着文件夹一起移动是读不到图片的,当然要是一开始写入att.txt中的是绝对地址那就不用移动ORL人脸库文件了)
1.创建了一个特征脸模型用于人脸识别
2.通过CSV文件att.txt读取的图像和标签训练它
3.创建一个PCA人脸分类器,T这里是一个完整的PCA变换
4.调用其中的成员函数train()来完成分类器的训练
通过CSV文件att.txt去读图像和标签,主要使用stringstream和getline方法
/***************** 函数:static void read_csv(const string& filename,vector<Mat>images, vector<int> labels,int CountMax,int CountMin, char separator=';') 功能:读取csv文件的图像路径和标签。主要使用stringstream和getline() 参数说明: filename--要读取的csv文件 images----读取的图片(向量) labels----读取的图片对应标签 (向量) CountMax,int CountMin--读取的每一类别的图片下标的最大值和最小值(默认每个类别共10张照片) separator-分隔符,起控制读取的作用。可自定义为逗号空格等,(此程序中)默认为分号 返回值:空 *****************/ static void read_csv(const string& filename, vector<Mat>& images, vector<int>& labels, char separator = ';') { std::ifstream file(filename.c_str(), ifstream::in);//c_str()函数可用可不用,无需返回一个标准C类型的字符串 if (!file) { string error_message = "No valid input file was given, please check the given filename."; //CV_Error(CV_StsBadArg, error_message);这里注释掉是由于会报错 } string line, path, classlabel; while (getline(file, line)) //从文本文件中读取一行字符,未指定限定符默认限定符为“/n” { stringstream liness(line); getline(liness, path, separator); //这里采用stringstream主要作用是做字符串的分割 getline(liness, classlabel); //读入图片文件路径以分好作为限定符 if (!path.empty() && !classlabel.empty()) { images.push_back(imread(path, 0)); labels.push_back(atoi(classlabel.c_str()));//如果读取成功,则将图片和对应标签压入对应容器中 } } }

- 1
- 2
- 3
- 4
- 5
- 6
- 7
- 8
- 9
- 10
- 11
- 12
- 13
- 14
- 15
- 16
- 17
- 18
- 19
- 20
- 21
- 22
- 23
- 24
- 25
- 26
- 27
- 28
- 29
- 30
- 31
- 32
- 33
- 34
我们在代码里面用到了Facerecognizer类,opencv中所有的人脸识别模型都是来源于这个类。以下是opencv-contrib库中带着的三个人脸识别算法:EigenFace,FisherFace ,LBPHFace,这里我们不深究它们的原理,直接调用就行了
	Ptr<FaceRecognizer> model0 = EigenFaceRecognizer::create();
	model0->train(images, labels);
	model0->save("MyEigenFaces.xml");//将训练模型保存到MyEigenFaces.xml

	Ptr<FaceRecognizer> model1 = FisherFaceRecognizer::create();
	model1->train(images, labels);
	model1->save("MyFaceModel.xml");//将训练模型保存到MyFacePcaModel.xml

	Ptr<FaceRecognizer> model2 = LBPHFaceRecognizer::create();
	model2->train(images, labels);
	model2->save("MyFaceLBPHModel.xml");//将训练模型保存到MyFaceLBPHModel.xml
- 1
- 2
- 3
- 4
- 5
- 6
- 7
- 8
- 9
- 10
- 11
下面这部分是从人脸数据集中取出最后一张图片,对模型的准确度进行测试
    //下面的几行代码仅仅是从你的数据集中移除最后一张图片,作为测试图片
	//自然这里需要根据自己的需要修改,这里简化了很多问题
	Mat testSample = images[images.size() - 1];
	int testLabel = labels[labels.size() - 1];
	images.pop_back();    //删除最后一张照片,此照片作为测试图片
	labels.pop_back();    //删除最有一张照片的labels
	...
	...中间省略一些代码
	...
	//对csv文件中的位于最后的一张图片进行预测,Predicted class是预测的图片组号,
	//Actual class是该图片真实的组号,两个值相同说明人脸模型预测成功
	int predictedLabel0 = model0->predict(testSample);
	int predictedLabel1 = model1->predict(testSample);
	int predictedLabel2 = model2->predict(testSample);

	string result_message0 = format("Predicted class = %d / Actual class = %d.",  predictedLabel0, testLabel);
	string result_message1 = format("Predicted class = %d / Actual class = %d.", predictedLabel1, testLabel);
	string result_message2 = format("Predicted class = %d / Actual class = %d.", predictedLabel2, testLabel);

	cout << result_message0 << endl;
	cout << result_message1 << endl;
	cout << result_message2 << endl;
- 1
- 2
- 3
- 4
- 5
- 6
- 7
- 8
- 9
- 10
- 11
- 12
- 13
- 14
- 15
- 16
- 17
- 18
- 19
- 20
- 21
- 22
三,全部代码
#include <opencv2/opencv.hpp> #include <opencv2/core/core.hpp> #include "opencv2/face/facerec.hpp" #include "opencv2/face.hpp" #include "opencv2/core.hpp" #include "opencv2/highgui.hpp" #include "opencv2/imgproc.hpp" #include <iostream> #include <fstream> #include <sstream> #include <math.h> using namespace cv; using namespace cv::face; using namespace std; static Mat norm_0_255(InputArray _src) { Mat src = _src.getMat(); // 创建和返回一个归一化后的图像矩阵: Mat dst; switch (src.channels()) { case 1: cv::normalize(_src, dst, 0, 255, NORM_MINMAX, CV_8UC1); break; case 3: cv::normalize(_src, dst, 0, 255, NORM_MINMAX, CV_8UC3); break; default: src.copyTo(dst); break; } return dst; } /******************************************* 使用CSV文件去读图像和标签,主要使用stringstream和getline方法 函数:static void read_csv(const string& filename,vector<Mat>images, vector<int> labels,int CountMax,int CountMin, char separator=';') 功能:读取csv文件的图像路径和标签。主要使用stringstream和getline() 参数说明: filename--要读取的csv文件 images----读取的图片(向量) labels----读取的图片对应标签 (向量) CountMax,int CountMin--读取的每一类别的图片下标的最大值和最小值(默认每个类别共10张照片) separator-分隔符,起控制读取的作用。可自定义为逗号空格等,(此程序中)默认为分号 返回值:空 *******************************************/ static void read_csv(const string& filename, vector<Mat>& images, vector<int>& labels, char separator = ';') { std::ifstream file(filename.c_str(), ifstream::in);//c_str()函数可用可不用,无需返回一个标准C类型的字符串 if (!file) { string error_message = "No valid input file was given, please check the given filename."; //CV_Error(CV_StsBadArg, error_message);注释掉是因为会报错 } string line, path, classlabel; while (getline(file, line)) //从文本文件中读取一行字符,未指定限定符默认限定符为“/n” { stringstream liness(line); getline(liness, path, separator); //这里采用stringstream主要作用是做字符串的分割 getline(liness, classlabel); //读入图片文件路径以分好作为限定符 if (!path.empty() && !classlabel.empty()) { images.push_back(imread(path, 0)); labels.push_back(atoi(classlabel.c_str()));//如果读取成功,则将图片和对应标签压入对应容器中 } } } int main() { //读取你的CSV文件路径. string fn_csv = "att.txt"; // 2个容器来存放图像数据和对应的标签 vector<Mat> images; vector<int> labels; // 读取数据. 如果文件不合法就会出错 try { read_csv(fn_csv, images, labels); } catch (cv::Exception& e) { cerr << "Error opening file \"" << fn_csv << "\".Reason: " << e.msg << endl; exit(1); } // 如果没有读取到足够图片,也退出. if (images.size() <= 1) { string error_message = " Please add more images to your data set!"; //CV_Error(CV_StsError, error_message);注释掉是因为会报错 } for (int i = 0; i < images.size(); i++) { if (images[i].size() != Size(92, 112)) { cout << i << endl; cout << images[i].size() << endl; } } //下面的几行代码仅仅是从你的数据集中移除最后一张图片,作为测试图片 //自然这里需要根据自己的需要修改,这里简化了很多问题 Mat testSample = images[images.size() - 1]; int testLabel = labels[labels.size() - 1]; images.pop_back(); //删除最后一张照片,此照片作为测试图片 labels.pop_back(); //删除最有一张照片的labels /*****模型训练******* 创建了一个特征脸模型用于人脸识别, 通过CSV文件读取的图像和标签训练它。 T这里是一个完整的PCA变换 创建一个PCA人脸分类器, 调用其中的成员函数train()来完成分类器的训练 *******************/ Ptr<FaceRecognizer> model0 = EigenFaceRecognizer::create(); model0->train(images, labels); model0->save("MyEigenFaces.xml");//将训练模型保存到MyEigenFaces.xml Ptr<FaceRecognizer> model1 = FisherFaceRecognizer::create(); model1->train(images, labels); model1->save("MyFaceModel.xml");//将训练模型保存到MyFacePcaModel.xml Ptr<FaceRecognizer> model2 = LBPHFaceRecognizer::create(); model2->train(images, labels); model2->save("MyFaceLBPHModel.xml");//将训练模型保存到MyFaceLBPHModel.xml // 还有一种调用方式,可以获取结果同时得到阈值: // int predictedLabel = -1; // double confidence = 0.0; // model->predict(testSample, predictedLabel, confidence); //对csv文件中的位于最后的一张图片进行预测,Predicted class是预测的图片组号, //Actual class是该图片真实的组号,两个值相同说明人脸模型预测成功 int predictedLabel0 = model0->predict(testSample); int predictedLabel1 = model1->predict(testSample); int predictedLabel2 = model2->predict(testSample); string result_message0 = format("Predicted class = %d / Actual class = %d.", predictedLabel0, testLabel); string result_message1 = format("Predicted class = %d / Actual class = %d.", predictedLabel1, testLabel); string result_message2 = format("Predicted class = %d / Actual class = %d.", predictedLabel2, testLabel); cout << result_message0 << endl; cout << result_message1 << endl; cout << result_message2 << endl; waitKey(0); return 0; }
- 1
- 2
- 3
- 4
- 5
- 6
- 7
- 8
- 9
- 10
- 11
- 12
- 13
- 14
- 15
- 16
- 17
- 18
- 19
- 20
- 21
- 22
- 23
- 24
- 25
- 26
- 27
- 28
- 29
- 30
- 31
- 32
- 33
- 34
- 35
- 36
- 37
- 38
- 39
- 40
- 41
- 42
- 43
- 44
- 45
- 46
- 47
- 48
- 49
- 50
- 51
- 52
- 53
- 54
- 55
- 56
- 57
- 58
- 59
- 60
- 61
- 62
- 63
- 64
- 65
- 66
- 67
- 68
- 69
- 70
- 71
- 72
- 73
- 74
- 75
- 76
- 77
- 78
- 79
- 80
- 81
- 82
- 83
- 84
- 85
- 86
- 87
- 88
- 89
- 90
- 91
- 92
- 93
- 94
- 95
- 96
- 97
- 98
- 99
- 100
- 101
- 102
- 103
- 104
- 105
- 106
- 107
- 108
- 109
- 110
- 111
- 112
- 113
- 114
- 115
- 116
- 117
- 118
- 119
- 120
- 121
- 122
- 123
- 124
- 125
- 126
- 127
- 128
- 129
- 130
- 131
- 132
- 133
- 134
- 135
- 136
- 137
- 138
- 139
- 140
- 141
- 142
- 143
- 144
- 145
- 146
- 147
- 148
- 149
- 150
- 151
- 152
- 153
- 154
- 155
- 156
- 157
- 158
四,结果
由于人脸数据比较多,计算量比较大,计算机需要跑一段时间才会出结果,千万不要以为是程序卡死了,我是跑了1分多钟才出结果的。

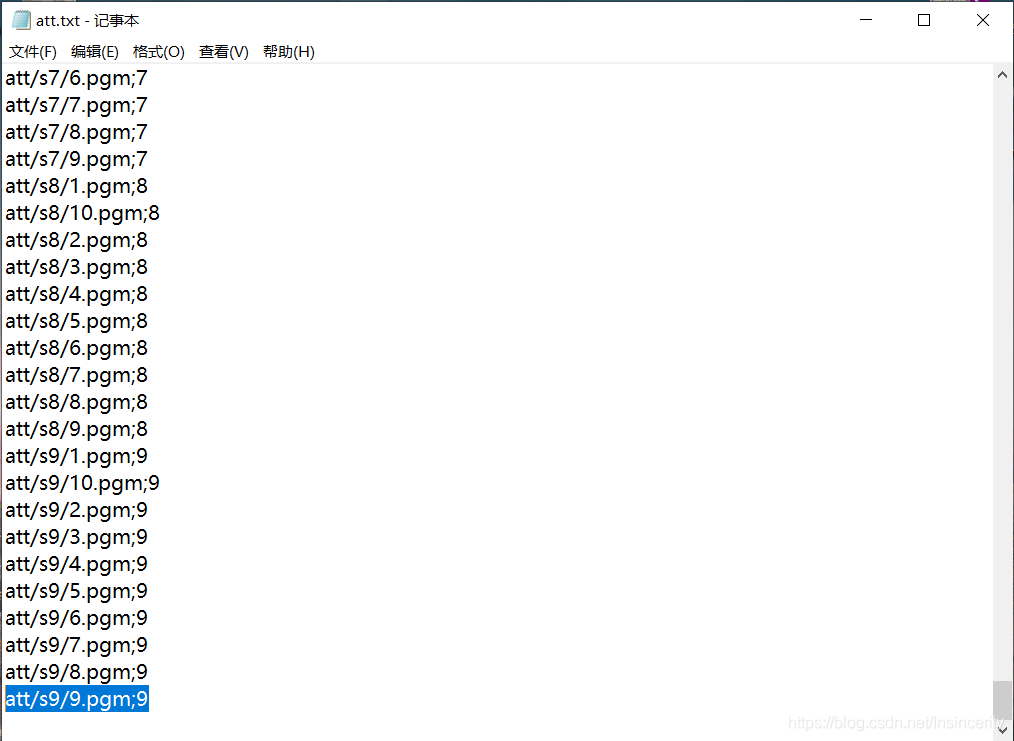
这里的Predicted class就是上面说的最后一个图片的预测组别,Actual class就是该图片的真实组别,当预测的组别等于真实组别就说明这个人脸预测模型正确了。至于为什么是9,我们把之前写入了csv形式的att.txt文件打开,看到文件最后的路径是att/s9/9.pgm;9,这说明了取的最后一张图片是第9组的图片,这就对了。
接下来看看我们的可执行文件目录下生成了什么吧
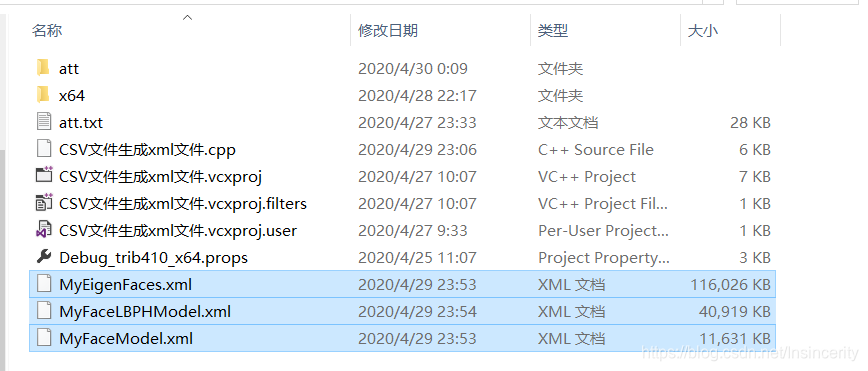
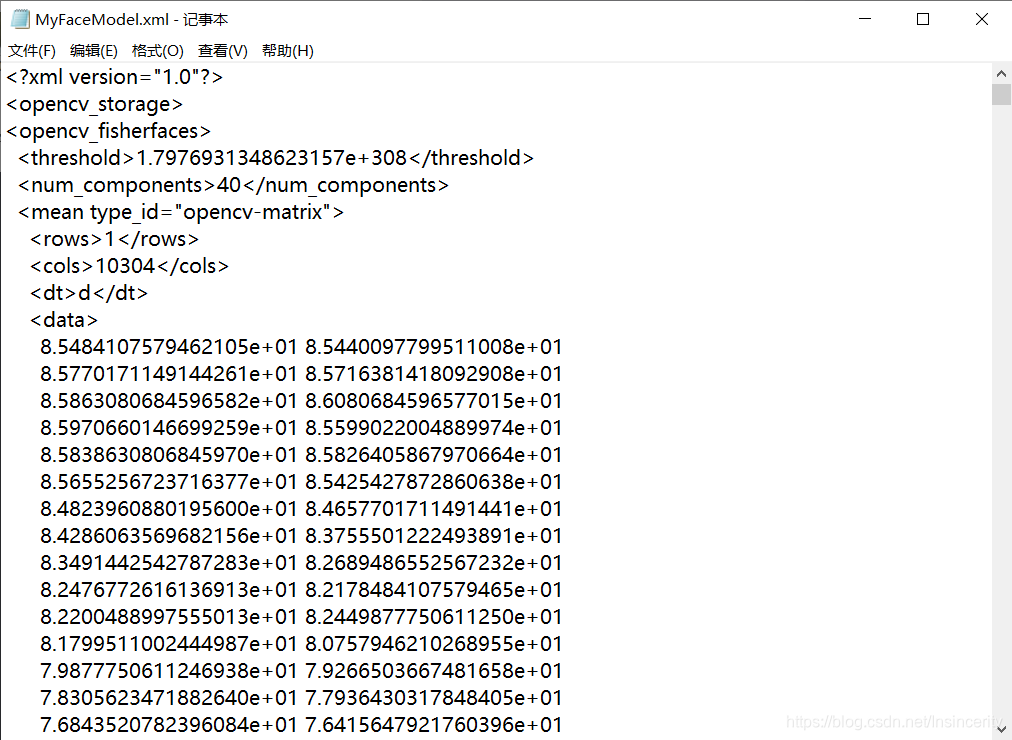
可以看到已经生成三个xml训练集文件了,分别就是模型训练部分的三段代码生成的。我们再用记事本打开其中一个看看生成好的数据长什么样
之后的人脸识别用其中任意一个训练集就都可以在众多的人中识别出自己了,只不过越大的训练集电脑运行起来速度就越慢,所以我下一篇就选最小的MyFaceModel.xml来识别了。

