当前位置:   article > 正文

Spring Boot + Angular 8 CRUD 示例_springboot angular

springboot angular

在这个页面上,我们将把Spring Boot RESTful 服务与 Angular 8 集成,逐步执行创建、读取、更新和删除(CRUD)操作。Angular 是最流行的开源 Web 应用程序框架之一,而 Spring Boot 使您可以轻松地创建可以“直接运行”的独立、生产就绪的应用程序。

您将构建什么

在这个演示中,您将从头开始创建 Spring Boot RESTful API(后端)和 Angular 8 用户界面(前端)来执行以下操作:

  1. 添加学生
  2. 查看学生名单
  3. 编辑学生
  4. 删除学生

为了更容易理解,我们将本教程分为两部分:

  • 后端→ 使用 Spring Boot 创建 REST 端点并使用 Spring Data JPA 访问数据库。
  • 前端→ 使用 Angular 8 创建用户界面服务(网页)。

先决条件

我们在创建这个 Spring Boot + Angular 8 CRUD 应用程序时使用了以下技术。

  1. 后端
    • Spring Boot 2.1.9.RELEASE
    • Java 8
    • Spring Data JPA
    • MySQL 数据库
  2. 前端
    • Nodejs v10.16.2
    • npm 6.9.0
    • Angular CLI 8.3.3

让我们开始真正的编码……

1.后端-API开发

我们将创建一个公开 GET、ADD、EDIT、DELETE API 的 Spring Boot 应用程序,以便客户端可以使用它。

1.1 需要依赖

将以下依赖项添加到您的pom.xml文件中。

pom.xml
  1. <?xml version="1.0" encoding="UTF-8"?>
  2. <project xmlns="http://maven.apache.org/POM/4.0.0"
  3. xmlns:xsi="http://www.w3.org/2001/XMLSchema-instance"
  4. xsi:schemaLocation="http://maven.apache.org/POM/4.0.0 https://maven.apache.org/xsd/maven-4.0.0.xsd">
  5. <modelVersion>4.0.0</modelVersion>
  6. <parent>
  7. <groupId>org.springframework.boot</groupId>
  8. <artifactId>spring-boot-starter-parent</artifactId>
  9. <version>2.1.9.RELEASE</version>
  10. <relativePath /> <!-- lookup parent from repository -->
  11. </parent>
  12. <groupId>com.websparrow</groupId>
  13. <artifactId>AgularDemo</artifactId>
  14. <version>0.0.1-SNAPSHOT</version>
  15. <name>Demo</name>
  16. <description>Demo project for Spring Boot+ Angular 8</description>
  17. <properties>
  18. <java.version>1.8</java.version>
  19. </properties>
  20. <dependencies>
  21. <dependency>
  22. <groupId>org.springframework.boot</groupId>
  23. <artifactId>spring-boot-starter-data-jpa</artifactId>
  24. </dependency>
  25. <dependency>
  26. <groupId>org.springframework.boot</groupId>
  27. <artifactId>spring-boot-starter-web</artifactId>
  28. </dependency>
  29. <dependency>
  30. <groupId>mysql</groupId>
  31. <artifactId>mysql-connector-java</artifactId>
  32. <scope>runtime</scope>
  33. </dependency>
  34. </dependencies>
  35. <build>
  36. <plugins>
  37. <plugin>
  38. <groupId>org.springframework.boot</groupId>
  39. <artifactId>spring-boot-maven-plugin</artifactId>
  40. </plugin>
  41. </plugins>
  42. </build>
  43. </project>
复制

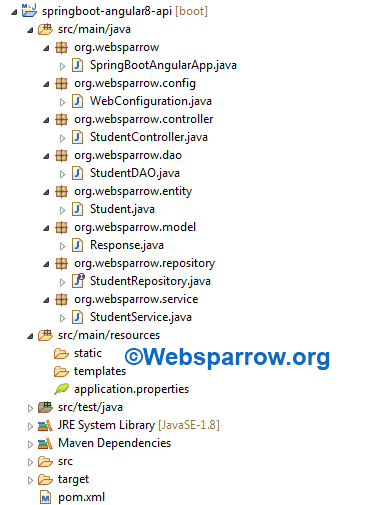
1.2 项目结构

我们在 STS 4 IDE 中的应用程序的最终项目结构将如下所示:
1.3 创建数据库

打开您的 MySQL 数据库并通过以下命令创建一个新数据库。

  1. #create database <database-name-of-your-choice>;
  2. CREATE DATABASE spring_angular;
复制

您还可以使用之前创建的数据库。

不用担心创建表,Spring Data JPA 会管理它。

1.4 应用程序.properties

在application.properties文件中设置您的数据库连接字符串、服务器端口、上下文路径等。

application.properties

  1. # Set application port and context path
  2. server.servlet.context-path=/api
  3. server.port=8080
  4. # MySQL database connection strings
  5. spring.datasource.username=root
  6. spring.datasource.password=root
  7. spring.datasource.url=jdbc:mysql://localhost:3306/spring_angular
  8. # JPA property settings
  9. spring.jpa.hibernate.ddl-auto=update
  10. spring.jpa.properties.hibernate.show_sql=true
复制

1.5 实体

创建一个Student包含学生所有属性​​的类。

Student.java

  1. package org.websparrow.entity;
  2. @Entity
  3. @Table(name = "student")
  4. public class Student implements Serializable {
  5. private static final long serialVersionUID = 1681261145191719508L;
  6. @Id
  7. @GeneratedValue(strategy = GenerationType.IDENTITY)
  8. private int id;
  9. private String firstName;
  10. private String lastName;
  11. private String email;
  12. // Generate Getters and Setters...
  13. }
复制

1.6 存储库

StudentRepository接口将扩展JpaRepository公开 CRUD 方法的接口。

StudentRepository.java
  1. package org.websparrow.repository;
  2. @Repository
  3. public interface StudentRepository extends JpaRepository<Student, Integer> {
  4. }
复制

1.7 数据访问层(DAO)

StudentDAO类将自动装配StudentRepository接口以在数据库级别执行操作。

StudentDAO.java
  1. package org.websparrow.dao;
  2. @Repository
  3. public class StudentDAO {
  4. @Autowired
  5. private StudentRepository studentRepository;
  6. public List<Student> get() {
  7. return studentRepository.findAll();
  8. }
  9. public Student save(Student student) {
  10. return studentRepository.save(student);
  11. }
  12. public void delete(int id) {
  13. studentRepository.deleteById(id);
  14. }
  15. }
复制

1.8 服务

服务层实现业务逻辑并从DAO对象调用方法。

StudentService.java

  1. package org.websparrow.service;
  2. @Service
  3. public class StudentService {
  4. @Autowired
  5. private StudentDAO studentDAO;
  6. public List<Student> get() {
  7. return studentDAO.get();
  8. }
  9. public Student save(Student student) {
  10. return studentDAO.save(student);
  11. }
  12. public void delete(int id) {
  13. studentDAO.delete(id);
  14. }
  15. }
复制

1.9 型号

Response模型类负责以有组织的格式显示 API 响应。

Response.java

  1. package org.websparrow.model;
  2. public class Response {
  3. // Generate Getters and Setters...
  4. private Object data;
  5. private Date date;
  6. public Response(Object data, Date date) {
  7. super();
  8. this.data = data;
  9. this.date = date;
  10. }
  11. }
复制

1.10 控制器

创建StudentController将公开以下端点的类:

1. /api/student :获取学生列表

2. /api/student : POST添加一个新学生

3. /api/student : PUT更新现有学生

4. /api/student : DELETE删除学生

StudentController.java
  1. package org.websparrow.controller;
  2. @RestController(value = "/student")
  3. public class StudentController {
  4. @Autowired
  5. private StudentService studentService;
  6. @GetMapping
  7. public ResponseEntity<Response> get() {
  8. return ResponseEntity.status(HttpStatus.OK)
  9. .body(new Response(studentService.get(), new Date()));
  10. }
  11. @PostMapping
  12. public ResponseEntity<Response> save(@RequestBody Student student) {
  13. return ResponseEntity.status(HttpStatus.OK)
  14. .body(new Response(studentService.save(student), new Date()));
  15. }
  16. @PutMapping
  17. public ResponseEntity<Response> update(@RequestBody Student student) {
  18. return ResponseEntity.status(HttpStatus.OK)
  19. .body(new Response(studentService.save(student), new Date()));
  20. }
  21. @DeleteMapping
  22. public ResponseEntity<Response> delete(@RequestParam("id") int id) {
  23. studentService.delete(id);
  24. return ResponseEntity.status(HttpStatus.OK)
  25. .body(new Response(true, new Date()));
  26. }
  27. }
复制

1.11 Web MVC 配置

当我们尝试在后端项目之外使用 JavaScript 使用 API 时,Web 浏览器会发出有关CORS的警告。因此,为了处理这个问题,我们允许所有来源与我们的 API 连接。

WebConfiguration.java
  1. package org.websparrow.config;
  2. @Configuration
  3. @EnableWebMvc
  4. public class WebConfiguration implements WebMvcConfigurer {
  5. @Override
  6. public void addCorsMappings(CorsRegistry registry) {
  7. registry.addMapping("/**").allowedOrigins("*").allowedMethods("GET",
  8. "HEAD", "POST", "PUT", "DELETE", "OPTIONS", "PATCH");
  9. WebMvcConfigurer.super.addCorsMappings(registry);
  10. }
  11. }
复制

最后,REST API 的开发完成并可以使用了。

2.前端-UI开发

用户界面是人类可以与计算机(应用程序)交互的地方。Angular 8 用于创建用户界面并将使用上述 API。

要进行前端开发,您必须按照以下步骤操作:

1.根据您的操作系统下载 Nodejs 表单,链接如下:

2.安装 Nodejs 后安装 Angular CLI:它是一个命令行工具,用于在您的机器上全局构建、搭建和安装 angular-cli:

npm install -g @angular/cli
复制

3.通过键入以下命令创建一个 Angular 项目。它将创建一个骨架项目结构,如下所示:

ng new springboot-angular8-ui
复制

4.让我们进入新创建的 Angular 项目:

cd springboot-angular8-ui
复制

2.1 项目结构

在 VS Code 中通过命令创建的 Angular 项目的基本骨架ng new springboot-angular8-ui如下所示:
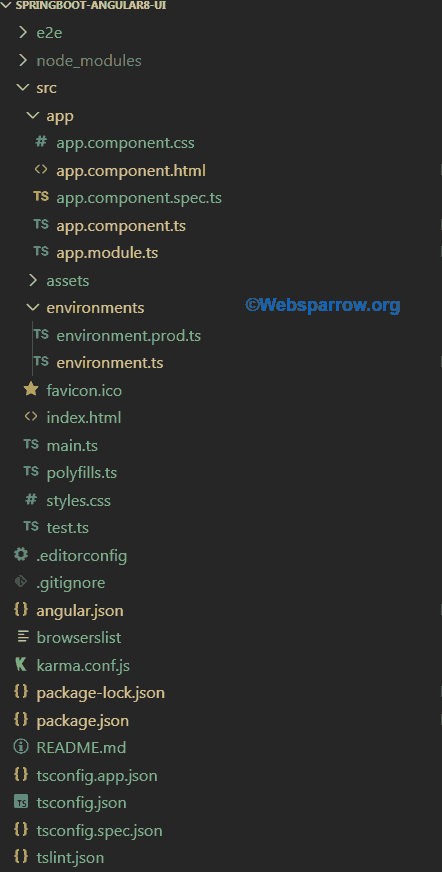
让我们讨论一下上述结构中的一些主要文件和目录:

2.1.1 package.json

package.json文件是 Angular/Node 系统的主要构建块。它是包含项目元数据和依赖项的清单文件。NPM使用package.json文件来管理应用程序、依赖项和打包。您可以使用命令创建上述文件npm init,这将是我们下一篇文章的一部分。

2.1.2 tsconfig.json

tsconfig.json文件指导编译器生成 JavaScript 文件。它指定编译项目所需的根文件和编译器选项。

2.1.3 angular.json

该文件提供有关 Angular 应用程序环境的信息,该环境告诉系统在构建项目时替换哪些文件。它还描述了将项目的构建放在哪里以及将使用什么样的编译过程ex: aotjit.

2.1.4 源

此文件夹包含根级应用程序项目。

2.1.5 节点模块

它为整个项目提供npm包。

2.1.6 package-lock.json

当npm修改node_modules树或package.json时,会自动创建此文件。它描述了依赖关系树,以便保证队友、部署和持续集成安装完全相同的依赖关系。因此,用户不需要将node_modules推送到存储库。

2.2 接口

创建Student与数据库具有相同字段的接口:

ng g i interface/student
复制

student.interface.ts

  1. export interface Student {
  2. id: number,
  3. firstName: string,
  4. lastName: string,
  5. email: string
  6. }
复制

2.3 服务

现在让我们创建一个将使用 REST API 的服务。HttpClient用于与后端服务通信。在项目结构中使用以下命令。

ng g s services/web
复制

此命令将创建一个可注入服务,您将从中使用 REST API。

HttpClientModuleapp.module.ts中导入。该HttpClient服务包含在其中,HttpClientModule因此我们需要先导入它以启动XSRFrequest.

import { HttpClientModule } from "@angular/common/http";
复制

添加HttpClientModule内部导入:

app.module.ts
  1. @NgModule({
  2. declarations: [
  3. AppComponent
  4. ],
  5. imports: [
  6. BrowserModule,
  7. FormsModule,
  8. HttpClientModule,
  9. AppRoutingModule
  10. ],
  11. providers: [],
  12. bootstrap: [AppComponent]
  13. })
  14. export class AppModule { }
复制

与后端服务实现基于 REST 的通信。为此,您需要使用为浏览器公开的Angular 应用程序提供HTTPHttpClient客户端 API的包。@angular/common/httpXMLHttpRequest

web.service.ts

  1. import { environment } from "../../environments/environment";
  2. import { Observable } from 'rxjs';
  3. import { Student } from '../interface/student.interface';
  4. import { HttpClient } from "@angular/common/http";
  5. import { Injectable } from "@angular/core";
  6. @Injectable()
  7. export class WebService {
  8. constructor(private httpClient: HttpClient) { }
  9. serverUrl: string = "http://localhost:8080/api/"
  10. get(url: string): Observable<any> {
  11. return this.httpClient.get(this.serverUrl + url);
  12. }
  13. post(url: string, data: Student): Observable<any> {
  14. return this.httpClient.post(this.serverUrl + url, data);
  15. }
  16. put(url: string, data: Student): Observable<any> {
  17. return this.httpClient.put(this.serverUrl + url, data);
  18. }
  19. delete(url: string, data: Student): Observable<any> {
  20. return this.httpClient.delete(this.serverUrl + url, { params: { id: data.id + "" } });
  21. }
  22. }
复制

在app.module.ts中向提供者添加服务。您必须需要使用提供程序配置注入器,否则它将不知道如何创建依赖项。

app.module.ts
  1. @NgModule({
  2. declarations: [
  3. AppComponent
  4. ],
  5. imports: [
  6. BrowserModule,
  7. HttpClientModule,
  8. AppRoutingModule
  9. ],
  10. providers: [WebService],
  11. bootstrap: [AppComponent]
  12. })
  13. export class AppModule { }
复制

2.4 组件

组件是 Angular 应用程序的基本 UI 构建块。它控制应用程序的视图。创建student-view将显示学生列表的组件:

ng g c student-view
复制

通过使用这个命令,你的大部分工作都是由 Angular CLI 完成的,你不需要在app.module.ts中声明你的组件


2.4.1 设计HTML页面

现在让我们设计 HTML 页面。Bootstrap CSS 用于在此应用程序中进行样式设置,因此您需要安装以下软件包:

npm install bootstrap –save
复制

如果您不想在应用程序中包含 Bootstrap CSS,则可以跳过此步骤。

在样式部分内的angular.json文件中添加bootstrap.min.css文件。

angular.json

  1. "styles": [
  2. "src/styles.css",
  3. "node_modules/bootstrap/dist/css/bootstrap.min.css"
  4. ]
复制

student-view.component.html

  1. <div class="container">
  2. <div class="row">
  3. <h1 style="text-align: center;">Spring Boot + Angular 8 CRUD Example</h1>
  4. </div>
  5. <div class="row">
  6. <form [formGroup]="myForm" (ngSubmit)="submitForm(myForm)">
  7. <div class="form-row align-items-center">
  8. <div class="col-auto">
  9. <label class="sr-only" for="inlineFormInput">First Name</label>
  10. <input type="text" class="form-control mb-2" id="inlineFormInput" placeholder="First name"
  11. formControlName="firstName">
  12. </div>
  13. <div class="col-auto">
  14. <label class="sr-only" for="inlineFormInputGroup">Last Name</label>
  15. <input type="text" class="form-control" id="inlineFormInput" placeholder="Last name"
  16. formControlName="lastName">
  17. </div>
  18. <div class="col-auto">
  19. <label class="sr-only" for="inlineFormInputGroup">Email</label>
  20. <input type="text" class="form-control" id="inlineFormInput" placeholder="Email"
  21. formControlName="email">
  22. </div>
  23. <div class="col-auto">
  24. <button type="submit" class="btn btn-primary mb-2" [disabled]="!myForm.valid">Save</button>
  25. </div>
  26. </div>
  27. </form>
  28. </div>
  29. <div class="row">
  30. <table class="table table-hover">
  31. <thead>
  32. <tr>
  33. <th scope="col">#</th>
  34. <th scope="col">First</th>
  35. <th scope="col">Last</th>
  36. <th scope="col">Email</th>
  37. <th scope="col">Action</th>
  38. </tr>
  39. </thead>
  40. <tbody>
  41. <tr *ngFor="let student of usersList; let i=index">
  42. <th scope="row">{{i+1}}</th>
  43. <td>{{student.firstName}}</td>
  44. <td>{{student.lastName}}</td>
  45. <td>{{student.email}}</td>
  46. <td>
  47. <span style="margin-right: 10px"><button (click)="edit(student)"
  48. class="btn btn-primary mb-2">Edit</button> </span>
  49. <span><button (click)="delete(student)" class="btn btn-primary mb-2">Delete</button></span>
  50. </td>
  51. </tr>
  52. </tbody>
  53. </table>
  54. </div>
  55. </div>
复制

编写组件以执行我们之前讨论的操作:

student-view.component.ts

  1. import { Component, OnInit } from '@angular/core';
  2. import { Student } from '../interface/student.interface';
  3. import { FormGroup, FormBuilder, FormControl, Validators, Form } from '@angular/forms';
  4. import { WebService } from '../sevices/web.service';
  5. @Component({
  6. selector: 'app-student-view',
  7. templateUrl: './student-view.component.html',
  8. styleUrls: ['./student-view.component.css']
  9. })
  10. export class StudentViewComponent implements OnInit {
  11. ngOnInit(): void {
  12. this.createForm();
  13. this.getData();
  14. }
  15. url: string = 'student';
  16. title = 'Spring Boot + Angular 8 CRUD Example';
  17. usersList: Array<Student>
  18. student: Student = undefined
  19. myForm: FormGroup;
  20. constructor(private webService: WebService, private formBuilder: FormBuilder) { }
  21. private createForm() {
  22. this.myForm = this.formBuilder.group({
  23. firstName: new FormControl(this.student ? this.student.firstName : '', Validators.required),
  24. lastName: new FormControl(this.student ? this.student.lastName : '', Validators.required),
  25. email: new FormControl(this.student ? this.student.email : '', Validators.required)
  26. });
  27. }
  28. private submitForm(data: FormGroup) {
  29. if (data.valid)
  30. this.addStudent(data.value)
  31. }
  32. getData(): void {
  33. this.webService.get(this.url).subscribe(res => {
  34. let response = JSON.parse(JSON.stringify(res))
  35. this.usersList = response.data
  36. })
  37. }
  38. addStudent(student: Student): void {
  39. if (this.student)
  40. student.id = this.student.id
  41. this.webService.post(this.url, student).subscribe(res => {
  42. let response = JSON.parse(JSON.stringify(res))
  43. this.getData()
  44. this.myForm.reset()
  45. this.student = undefined
  46. }, error => {
  47. })
  48. }
  49. edit(student: Student): void {
  50. this.student = student
  51. this.myForm.controls['firstName'].setValue(this.student.firstName)
  52. this.myForm.controls['lastName'].setValue(this.student.lastName)
  53. this.myForm.controls['email'].setValue(this.student.email)
  54. }
  55. delete(student: Student): void {
  56. this.webService.delete(this.url, student).subscribe(res => {
  57. let data = JSON.parse(JSON.stringify(res))
  58. this.getData()
  59. }, error => {
  60. })
  61. }
  62. }
复制

因为我们在我们的应用程序中使用表单。所以,我们需要用和更新我们的app.module.tsFormsModuleReactiveFormsModule

app.module.ts
  1. import { BrowserModule } from '@angular/platform-browser';
  2. import { NgModule } from '@angular/core';
  3. import { FormsModule, ReactiveFormsModule } from "@angular/forms";
  4. import { HttpClientModule } from "@angular/common/http";
  5. import { AppRoutingModule } from './app-routing.module';
  6. import { AppComponent } from './app.component';
  7. import { StudentViewComponent } from './student-view/student-view.component';
  8. import { WebService } from "./sevices/web.service";
  9. @NgModule({
  10. declarations: [
  11. AppComponent,
  12. StudentViewComponent
  13. ],
  14. imports: [
  15. BrowserModule,
  16. FormsModule,
  17. ReactiveFormsModule,
  18. HttpClientModule,
  19. AppRoutingModule
  20. ],
  21. providers: [WebService],
  22. bootstrap: [AppComponent]
  23. })
  24. export class AppModule { }
复制

现在最后一步是使用您的选择器更新app.component.html文件StutentViewComponent

app.component.html
<app-student-view></app-student-view>
复制

此标记将呈现您的学生视图组件。

3. 测试应用

最终完成后端(API)和前端(UI)的开发。要测试应用程序,您需要执行以下步骤:

1.启动您使用 Spring Boot 开发的后端 (API) 应用程序。

2.转到创建 Angular 项目的前端 (UI) 目录并点击以下命令:

npm install
复制

它将安装必要的依赖项/库/模块。

3.安装模块后,使用以下命令启动前端 (UI) 应用程序:

npm start
复制

4.现在,打开您喜欢的 Web 浏览器并点击 http://localhost:4200 URL 并执行 CRUD 操作。

声明:本文内容由网友自发贡献,转载请注明出处:【wpsshop】
推荐阅读
相关标签
  

闽ICP备14008679号