
- 1Fiddler抓包工具应用_安卓抓包工具fiddler
- 2软件外包公司到底干啥的?要不要去外包公司?_软件外包是干什么的
- 3解决Idea中文乱码_idea出现中文乱码
- 4【Flink SQL】Flink SQL 语法篇(二):WITH、SELECT & WHERE、SELECT DISTINCT_flinksql with
- 5JVM jmap -histo 简介_jmap histo 前几条
- 6VMwareWorkStation Pro 16 上 创建虚拟机安装 MacOS 10.14 系统_auto-unlocker
- 7如何制作一台ROS小车(一)
- 8unity urp 实现雨水在物体上流动的效果_unity 后处理 模拟下雨效果
- 9UMl期末复习知识点集合_uml期末复习懒羊羊h
- 10电脑技巧:Windows系统原版纯净软件必备的两个网站_msdn
23电赛e题复盘(舵机+opencv方案,附源码)
赞
踩
题目解读和大致思路
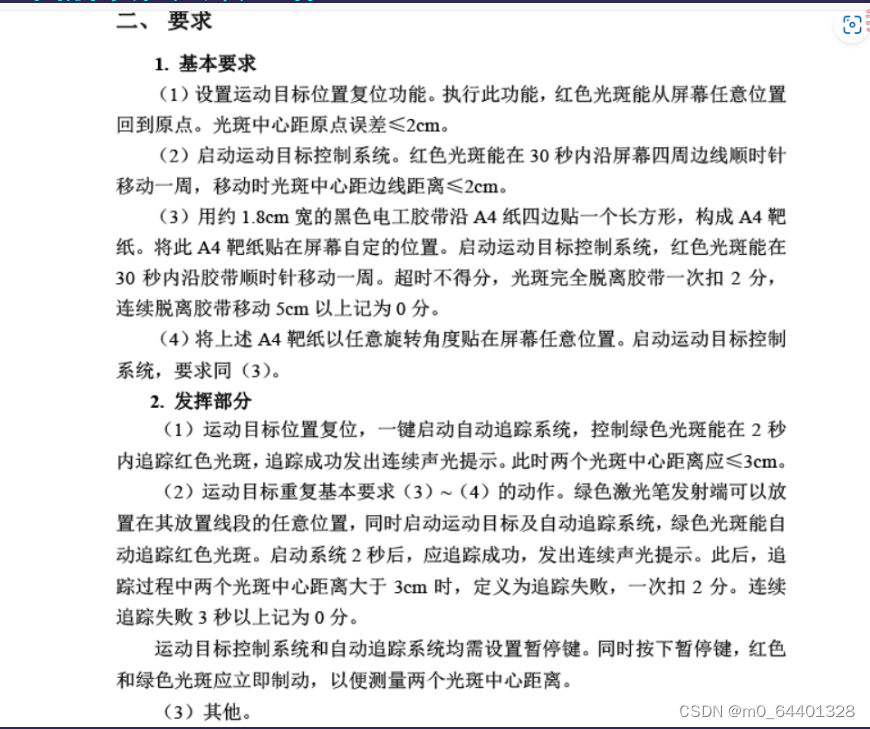
1.激光点需能从任意位置回到原点
任务需求:
- 需知道激光点当前位置,原点位置,
- 控制激光点在白板上运动
解决方法:
-
1.识别激光点:
根据激光点所在像素点的亮度远远高于其他像素点,所以将图像转为[[HSV空间]]
而V表示亮度,将V的阈值调至一定高度后,并调整S在白色范围,图像中仅仅剩下激光点,没有其他的干扰,可用轮廓检测找到轮廓,使用外接矩形求的激光xy坐标
[[激光点在白板上示意图]] -
2.得知原点位置:
白板四周有一段铅笔线,摄像头像素低,识别难度较大,故采用人工对准方法,提前测得原点坐标 -
3.控制激光移动到某点:
-
使用[[二维云台]]控制激光笔运动
-
方案一:
根据舵机转动的角度和激光点在图上移动距离的关系中心点为原点建立坐标系建立一个坐标系

x = tan ( θ ) m x = \tan(\theta)m x=tan(θ)m
y = tan ( θ ) m y = \tan(\theta)m y=tan(θ)m根据该式,我们可以通过控制两个舵机的角度来使光斑指向任意位置。
,然后将该坐标系与摄像头坐标系建立映射关系,即可实现摄像头的一个坐标对应一对角度。
缺点是,该方案在使用舵机时精度较差,舵机旋转一度,激光移动距离为tan1=1.74cm属于无法接受的误差,优点在于不需要调参,对执行机构精度和稳定性要求高,精度达到要求甚至不需要识别激光点,本次使用的电机两个要求都达不到 -
方案二:
在摄像头坐标系下,使用激光点的位置作为观测值和期望位置做比较,通过增量式pid的计算输出到舵机上,形成一个闭环,优点在于这是一个闭环系统,可以自行减小误差,缺点在于需要调参,需要识别激光实时位置,难度转移到视觉组上,
![[Pasted image 20240127000048.png]]
这里选择第二种方法
-
-
4.控制激光点运动按规定路径运动:
对于任意的路径,都可以一段段很短的直线去近似拟合,当这段直线长度为零时,就能够完全和原来的曲线(路径)重合,所以只要给的点数够多,就能够走出比较光滑的曲线
但是在代码里给太多点又比较麻烦,这时对于直线路径我们可以进行简化,只需给出起始点和终点,让程序自行计算中间点的坐标:
![![[Pasted image 20240127012129.png]]](https://img-blog.csdnimg.cn/direct/ba6400bbd97a48b9a22fdd64d511e444.png)
题目要求只要走一个矩形,所以四个点就够了!,因为是四条直线,所以能根据这四个点插值得到狠多点
2.激光点绕着铅笔线移动
任务需求:
- 知道铅笔线路径:
解决方法:
- 铅笔线识别难度较大,故该任务提前测量好铅笔线四个框的角点,依次控制激光点到达
3&4.激光点沿着矩形黑框运动
任务需求:
- 需知道黑色矩形框内外轨迹的中间轨迹,
解决方法:
- 矩形黑框与白板区别明显,故先将图像转换为灰度图像,然后进行二值化,由于反光原因,黑色内部会有一些空洞,使用闭运算填充空洞,利用轮廓检测寻找轮廓,然后用直线对轮廓进行近似,获得矩形框四个角点,利用四个角点对矩形框进行插值,使四个点变为12个点,最后由于得到点位于矩形框最边缘,将路径坐标相对于中心点进行向内收缩。
![![[Pasted image 20240127012355.png]]](https://img-blog.csdnimg.cn/direct/07b774091c6a4824bfc4e58141f06ae2.png)
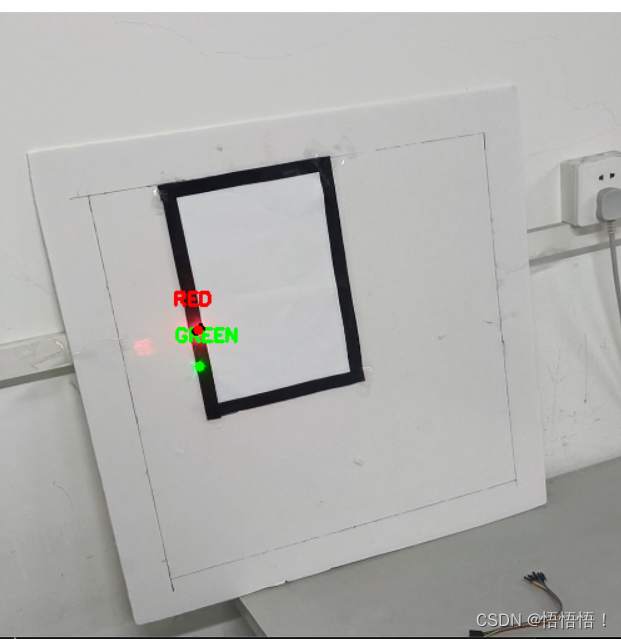
发挥1&2
任务需求:
- 识别红绿激光点
解决方法:
- 在HSV空间里,红绿激光点中心的阈值相差不大,无法区别,但是激光的光晕在RGB空间下颜色还是有区别,所以在HSV空间得到两个激光点中心坐标以后,可将这两个坐标值附近的像素点在RGB空间下的R/G值相加,若R值大的则为红点,反之亦然。
其他
控制器与树莓派的数据通信
- 使用串口通信来回传数据/切换模式
核心代码解读
矩形框识别
[[电赛识别矩形框]]
激光点识别
思路解读
1.找到激光点中心坐标
- 色彩空间选择:激光点中心因为亮度过高在图像里看起来已经是白色,与背景板颜色系统,主要区别在于该颜色的强度,在[[RGB空间]]里阈值较为难确定,并且受线影响,而在[[HSV空间]]里,色调通道H代表颜色本身,与光照无关,亮度通道V代表颜色的明暗程度,非常符合该项目。
- 提高激光点识别精度:根据阈值二值化后的图像激光点中间存在一些空洞,使用 [[闭运算]] 填和这些空洞。
- 寻找激光点轮廓:使用[[cv2.findContours()]]函数寻找激光点轮廓
- 根据轮廓确定中心 :轮廓为不规则图形,可以用外接矩形保住轮廓,来求得近似的中心点,使用[[cv2.minAreaRect()]]函数来寻找外接矩形
2.判断激光颜色
- 色彩空间选择 :两个激光点中心颜色都差不多,主要区别在于光晕,光晕的颜色区别较大,选取[[RGB空间]]
- 颜色区分:竟然中心点的值相差不大,那么就选取中心点附加的点,把这些点的R和G值分别加起来,总和R比较大的为红点,G比较大的为绿点。
核心代码
1.找到激光点中心坐标
	def detect_lasers(image):

    Green_laser_coords = None,None

    Red_laser_coords = None,None

    # 转换颜色空间为HSV

    hsv = cv2.cvtColor(image, cv2.COLOR_BGR2HSV)


    # 定义激光点颜色范围

    lower_laser = np.array([0, 0, 255])

    upper_laser = np.array([179, 60, 255])


    # 创建二值化图像

    mask_laser = cv2.inRange(hsv, lower_laser, upper_laser)

    cv2.imshow("mask_laser", mask_laser)

    # 闭运算

    kernel = np.ones((5, 5), np.uint8)

    mask_laser = cv2.morphologyEx(mask_laser, cv2.MORPH_CLOSE, kernel)

    cv2.imshow("mask_laser", mask_laser)

    # 寻找外轮廓,返回轮廓坐标

    contours_laser, _ = cv2.findContours(mask_laser, cv2.RETR_EXTERNAL, cv2.CHAIN_APPROX_SIMPLE)


    # 标记激光点

    for contour in contours_laser:

        # 找到最小矩形框

        rect = cv2.minAreaRect(contour)

        # 矩形框的中心坐标

        laser_coords = tuple(map(int, rect.center))

- 1
- 2
- 3
- 4
- 5
- 6
- 7
- 8
- 9
- 10
- 11
- 12
- 13
- 14
- 15
- 16
- 17
- 18
- 19
- 20
- 21
- 22
- 23
- 24
- 25
- 26
- 27
- 28
- 29
- 30
- 31
- 32
- 33
- 34
- 35
- 36
- 37
- 38
- 39
- 40
- 41
- 42
- 43
- 44
- 45
- 46
- 47
- 48
- 49
- 50
- 51
2.颜色区分
	def get_pixel_sum(image, coords):

    # 获取图像宽度和高度

    height, width = image.shape[:2]

    radius=3

    # 确定方圆的左上角和右下角坐标

    x, y = coords

    x_start = max(0, x - radius)

    y_start = max(0, y - radius)

    x_end = min(width - 1, x + radius)

    y_end = min(height - 1, y + radius)


    # 提取方圆区域

    roi = image[y_start:y_end, x_start:x_end]


    # 计算 R 和 G 通道总值

    #选取红色

    r_channel = roi[:, :, 2]

    #绿色

    g_channel = roi[:, :, 1]

    #求和

    r_sum = int(r_channel.sum())

    g_sum = int(g_channel.sum())


    return r_sum, g_sum
- 1
- 2
- 3
- 4
- 5
- 6
- 7
- 8
- 9
- 10
- 11
- 12
- 13
- 14
- 15
- 16
- 17
- 18
- 19
- 20
- 21
- 22
- 23
- 24
- 25
- 26
- 27
- 28
- 29
- 30
- 31
- 32
- 33
- 34
- 35
- 36
- 37
- 38
- 39
- 40
- 41
- 42
- 43
- 44
- 45
- 46
- 47
激光点运动控制
思路解读
1控制激光运动到坐标点:
设计一个闭环控制系统,使用增量式PID控制器来将激光点在图像上的实际位置移动到期望位置。在激光点在图像上的坐标作为测量值,而期望的目标坐标则是我们希望激光点最终到达的位置。输出为舵机偏转的角度,从而影响激光点位置,减小期望与测量值之间的偏差
2.控制激光按照期望轨迹运动
化曲为直,如果是曲线路径的话,先用许多直线去逼近它,当直线长度趋于零,数量趋于无穷时,这些直线的集合就是这条曲线,可以根据需求和性能选取直线数。
化线为点:对于一条直线,可以按一定的间距在这条直线上取许多点,当点数达到无穷时,这些点的集合就是这条直线,根据需求和性能选取取得点数,也就是插值数。
化为一系列点后,问题就退化到控制激光点运动到目标坐标。在本项目里没有曲线,故可以跳过第一步
核心代码
1控制激光运动到坐标点:
float laser_Pose_control(float Expet ,float Measure)

{


static float Kp = 0;

static float Ki = 0;

static float Kd = 0;

//误差,上一次误差,上上一次误差

static float ERR,Last_ERR,LastLast_ERR;

float Out_Inc;

//误差更新

ERR = Expet - Measure;

//计算

Out_Inc = Kp*(ERR - Last_ERR ) + Ki*Last_ERR + Kd*(ERR - 2*Last_ERR + LastLast_ERR);

//误差更新

Last_ERR = ERR;

LastLast_ERR = Last_ERR;

return Out_Inc;

}

  //按一定的时间循环运行
{

angle_Out_Inc_x = laser_Pose_control(Expet_x,Measure_x);

angle_Out_Inc_y = laser_Pose_control(Expet_y,Measure_y);

angle_x += angle_Out_Inc_x;

angle_y += angle_Out_Inc_y;

}
- 1
- 2
- 3
- 4
- 5
- 6
- 7
- 8
- 9
- 10
- 11
- 12
- 13
- 14
- 15
- 16
- 17
- 18
- 19
- 20
- 21
- 22
- 23
- 24
- 25
- 26
- 27
- 28
- 29
- 30
- 31
- 32
- 33
- 34
- 35
- 36
- 37
- 38
- 39
- 40
- 41
- 42
- 43
- 44
- 45
- 46
- 47
- 48
- 49
- 50
- 51
2.控制激光按照期望轨迹运动
同1
总结
- 效果不丝滑,感觉可能是舵机精度确实比较低,启动阈值太大,看起来激光点跳动严重,激光白板的距离也较远,可以考虑增加减速齿轮,或者使用精度更高的伺服电机,步进电机等,
- 视觉方面使用opencv识别较为稳定,摄像头像素还有提升空间,铅笔线识别还需继续学习
代码存档
树莓派端代码
import cv2

import numpy as np

import pigpio

import time


# 创建窗口

cv2.namedWindow('Frame')


mode = 'B'


# 循环读取视频帧

cap = cv2.VideoCapture(0)


#########################################串口部分##############################


BAUD = 38400

RX_PIN = 24

TX_PIN = 23

pi = pigpio.pi()


# 初始化GPIO引脚和串口

pi.set_mode(RX_PIN, pigpio.INPUT)

pi.set_mode(TX_PIN, pigpio.OUTPUT)

pigpio.exceptions = False

pi.bb_serial_read_close(RX_PIN)

pigpio.exceptions = True

pi.bb_serial_read_open(RX_PIN, BAUD, 8)


def send_data(data):

    pi.wave_clear()

    Tdata = data.encode()

    pi.wave_add_serial(TX_PIN, BAUD, Tdata)

    wave_id = pi.wave_create()

    pi.wave_send_once(wave_id)


def change_mode(newmode):

    mode = newmode


##########################################################################矩形框识别函数定义########################################

def extract_path(image):

    # 将图像转换为灰度图

    gray = cv2.cvtColor(image, cv2.COLOR_BGR2GRAY)


    # 对灰度图进行阈值处理,将黑色部分变为白色,其他部分变为黑色

    _, threshold = cv2.threshold(gray, 50, 255, cv2.THRESH_BINARY_INV)

    # 进行形态学闭操作,填充内部空洞

    kernel = np.ones((5,5),np.uint8)

    closing = cv2.morphologyEx(threshold, cv2.MORPH_CLOSE, kernel, iterations=3)

    # 进行形态学腐蚀操作,缩小黑色框的大小

    kernel = np.ones((3,3),np.uint8)

    erosion = cv2.erode(closing,kernel,iterations = 1)


    # 利用轮廓检测函数找到黑色框的轮廓

    contours, hierarchy = cv2.findContours(erosion, cv2.RETR_EXTERNAL, cv2.CHAIN_APPROX_SIMPLE)


    # 如果找到了轮廓

    if len(contours) > 0:

        # 提取最大的轮廓

        max_contour = max(contours, key=cv2.contourArea)


        # 近似曲线

        epsilon = 0.01 * cv2.arcLength(max_contour, True)

        approx_contour = cv2.approxPolyDP(max_contour, epsilon, True)


        # 获取路径坐标

        path = []

        for point in approx_contour:

            path.append(tuple(point[0]))


        return path

    return None


def interpolate_points(points):

    interpolated_points = []


    for i in range(len(points)):

        start_point = points[i]

        end_point = points[(i+1) % len(points)]


        # 计算两点之间的距离

        dx = end_point[0] - start_point[0]

        dy = end_point[1] - start_point[1]

        distance = 3


        # 根据距离进行插值

        for j in range(distance):

            x = start_point[0] + int(dx * j / distance)

            y = start_point[1] + int(dy * j / distance)

            interpolated_points.append((x, y))


    return interpolated_points


######################################################################激光识别函数定义#########################################

def detect_lasers(image):

    # 转换颜色空间为HSV

    hsv = cv2.cvtColor(image, cv2.COLOR_BGR2HSV)

    # 定义红色范围

    lower_red = np.array([0, 0, 255])

    upper_red = np.array([179, 255, 255])

    # 定义绿色范围

    lower_green = np.array([50, 100, 100])

    upper_green = np.array([70, 255, 255])

    # 创建红色和绿色掩膜

    mask_red = cv2.inRange(hsv, lower_red, upper_red)

    mask_green = cv2.inRange(hsv, lower_green, upper_green)

    # 使用形态学操作进行清理

    kernel = np.ones((5, 5), np.uint8)

    mask_red = cv2.morphologyEx(mask_red, cv2.MORPH_CLOSE, kernel)

    mask_green = cv2.morphologyEx(mask_green, cv2.MORPH_CLOSE, kernel)


    # 寻找红色和绿色激光点轮廓

    contours_red, _ = cv2.findContours(mask_red, cv2.RETR_EXTERNAL, cv2.CHAIN_APPROX_SIMPLE)

    contours_green, _ = cv2.findContours(mask_green, cv2.RETR_EXTERNAL, cv2.CHAIN_APPROX_SIMPLE)


    # 初始化激光点坐标

    red_laser_coords = None

    green_laser_coords = None


    # 标记红色激光点

    max_area_red = 0

    for contour in contours_red:

        area = cv2.contourArea(contour)

        if area > max_area_red:

            max_area_red = area

            M = cv2.moments(contour)

            if M["m00"] != 0:

                cX = int(M["m10"] / M["m00"])

                cY = int(M["m01"] / M["m00"])

                red_laser_coords = (cX, cY)


    # 标记绿色激光点

    max_area_green = 0

    for contour in contours_green:

        area = cv2.contourArea(contour)

        if area > max_area_green:

            max_area_green = area

            M = cv2.moments(contour)

            if M["m00"] != 0:

                cX = int(M["m10"] / M["m00"])

                cY = int(M["m01"] / M["m00"])

                green_laser_coords = (cX, cY)


    return red_laser_coords, green_laser_coords


long_path =[(0,0)]

# 检查摄像头是否成功打开

if not cap.isOpened():

    print("Error opening camera")

count = 0

G_y=str(0).zfill(3)

G_x=str(0).zfill(3)

# 循环读取视频帧

while cap.isOpened():

    # 逐帧读取视频

    ret, frame = cap.read()

    # 如果成功读取到帧

    if ret:

        # 调整帧大小

        frame = cv2.resize(frame, (600, 600))


        # 根据工作模式处理帧

        if mode == 'A':#矩形框

            print('a')

            # 提取黑色框的路径坐标

            path = extract_path(frame)


            # 如果成功提取到路径坐标,则进行绘制

            if path is not None:

                # 创建空白画布,与原图大小相同

                canvas = np.zeros_like(frame)


                # 绘制路径上的点

                for point in path:

                    cv2.circle(canvas, point, 2, (255, 0, 0), -1)


                # 找到左右轮廓的边界点

                leftmost = min(path, key=lambda x: x[0])

                rightmost = max(path, key=lambda x: x[0])


                # 计算左右轮廓的中间点

                middle_x = int((leftmost[0] + rightmost[0]) / 2)

                middle_y = int((leftmost[1] + rightmost[1]) / 2)

                middle_point = (middle_x, middle_y)


                # 在画布上绘制左右轮廓的中间点

                cv2.circle(canvas, middle_point, 5, (0, 255, 0), -1)


                # 计算轮廓的中心点

                center_x = int(sum([point[0] for point in path]) / len(path))

                center_y = int(sum([point[1] for point in path]) / len(path))

                center_point = (center_x, center_y)


                # 缩放比例

                scale_factor = 0.94


                # 对路径坐标进行缩放

                scaled_path = []

                for point in path:

                    # 将点相对于中心点缩放

                    scaled_x = int(center_x + scale_factor * (point[0] - center_x))

                    scaled_y = int(center_y + scale_factor * (point[1] - center_y))

                    scaled_path.append((scaled_x, scaled_y))


                # 将路径绘制结果与原图叠加

                result = cv2.addWeighted(frame, 0.7, canvas, 0.3, 0)


                # 在原图上绘制轮廓

                cv2.drawContours(result, [np.array(scaled_path)], -1, (0, 255, 0), 2)

                print(scaled_path)

                long_path = interpolate_points(scaled_path)

                for point in long_path:

                    cv2.circle(result, point, 5, (0, 0, 255), -1)

                print(long_path)

                ZB_num = 0

                for coordinate in long_path:

                    x = str(coordinate[0]).zfill(3)

                    y = str(coordinate[1]).zfill(3)

                    num = str(ZB_num).zfill(2)

                    ZB_num = ZB_num+1

                    data = f"$1{num}{x}{y}@"#矩形框第一个数为1

                    send_data(data)

                    time.sleep(0.005)  # 等待0.005秒钟

                    #print(data)

                print('   ')

                # 显示图像

                cv2.imshow('Result', result)

        elif mode == 'B':#激光点识别

            #print('b')

            red_coords, green_coords = detect_lasers(frame)

            # 处理红激光点

            if red_coords is not None:

                cX, cY = red_coords

                cv2.circle(frame, (cX, cY), 7, (0, 0, 255), -1)

                cv2.putText(frame, "Red Laser", (cX - 20, cY - 20), cv2.FONT_HERSHEY_SIMPLEX, 0.5, (0, 0, 255), 2)

            ####回传

                G_x = str(red_coords[0]).zfill(3)

                G_y = str(red_coords[1]).zfill(3)

            G_data = f"$0{G_x}{G_y}@"#激光点第一个数为0

            send_data(G_data)

            #time.sleep(0.005)  # 等待0.005秒钟

            #print(data)

            # 处理绿激光点

            if green_coords is not None:

                cX, cY = green_coords

                cv2.circle(frame, (cX, cY), 7, (0, 255, 0), -1)

                cv2.putText(frame, "Green Laser", (cX - 20, cY - 20), cv2.FONT_HERSHEY_SIMPLEX, 0.5, (0, 255, 0), 2)

            for point in long_path:

                    cv2.circle(frame, point, 5, (0, 0, 255), -1)

            # 显示图像

            cv2.imshow("Laser Detection", frame)


        PI_count, PI_data = pi.bb_serial_read(RX_PIN)

        if PI_count:

            print(chr(PI_data[0]))

            # 处理接收到的数据

            if chr(PI_data[0]) in ['A', 'B']:

                change_mode(chr(PI_data[0]))

                mode = chr(PI_data[0])#改变模式

                cv2.destroyAllWindows()#关闭窗口

        # 按下 'q' 键退出循环

        if cv2.waitKey(1) & 0xFF == ord('q'):

            break

    else:

        break


# 关闭窗口

cv2.destroyAllWindows()
- 1
- 2
- 3
- 4
- 5
- 6
- 7
- 8
- 9
- 10
- 11
- 12
- 13
- 14
- 15
- 16
- 17
- 18
- 19
- 20
- 21
- 22
- 23
- 24
- 25
- 26
- 27
- 28
- 29
- 30
- 31
- 32
- 33
- 34
- 35
- 36
- 37
- 38
- 39
- 40
- 41
- 42
- 43
- 44
- 45
- 46
- 47
- 48
- 49
- 50
- 51
- 52
- 53
- 54
- 55
- 56
- 57
- 58
- 59
- 60
- 61
- 62
- 63
- 64
- 65
- 66
- 67
- 68
- 69
- 70
- 71
- 72
- 73
- 74
- 75
- 76
- 77
- 78
- 79
- 80
- 81
- 82
- 83
- 84
- 85
- 86
- 87
- 88
- 89
- 90
- 91
- 92
- 93
- 94
- 95
- 96
- 97
- 98
- 99
- 100
- 101
- 102
- 103
- 104
- 105
- 106
- 107
- 108
- 109
- 110
- 111
- 112
- 113
- 114
- 115
- 116
- 117
- 118
- 119
- 120
- 121
- 122
- 123
- 124
- 125
- 126
- 127
- 128
- 129
- 130
- 131
- 132
- 133
- 134
- 135
- 136
- 137
- 138
- 139
- 140
- 141
- 142
- 143
- 144
- 145
- 146
- 147
- 148
- 149
- 150
- 151
- 152
- 153
- 154
- 155
- 156
- 157
- 158
- 159
- 160
- 161
- 162
- 163
- 164
- 165
- 166
- 167
- 168
- 169
- 170
- 171
- 172
- 173
- 174
- 175
- 176
- 177
- 178
- 179
- 180
- 181
- 182
- 183
- 184
- 185
- 186
- 187
- 188
- 189
- 190
- 191
- 192
- 193
- 194
- 195
- 196
- 197
- 198
- 199
- 200
- 201
- 202
- 203
- 204
- 205
- 206
- 207
- 208
- 209
- 210
- 211
- 212
- 213
- 214
- 215
- 216
- 217
- 218
- 219
- 220
- 221
- 222
- 223
- 224
- 225
- 226
- 227
- 228
- 229
- 230
- 231
- 232
- 233
- 234
- 235
- 236
- 237
- 238
- 239
- 240
- 241
- 242
- 243
- 244
- 245
- 246
- 247
- 248
- 249
- 250
- 251
- 252
- 253
- 254
- 255
- 256
- 257
- 258
- 259
- 260
- 261
- 262
- 263
- 264
- 265
- 266
- 267
- 268
- 269
- 270
- 271
- 272
- 273
- 274
- 275
- 276
- 277
- 278
- 279
- 280
- 281
- 282
- 283
- 284
- 285
- 286
- 287
- 288
- 289
- 290
- 291
- 292
- 293
- 294
- 295
- 296
- 297
- 298
- 299
- 300
- 301
- 302
- 303
- 304
- 305
- 306
- 307
- 308
- 309
- 310
- 311
- 312
- 313
- 314
- 315
- 316
- 317
- 318
- 319
- 320
- 321
- 322
- 323
- 324
- 325
- 326
- 327
- 328
- 329
- 330
- 331
- 332
- 333
- 334
- 335
- 336
- 337
- 338
- 339
- 340
- 341
- 342
- 343
- 344
- 345
- 346
- 347
- 348
- 349
- 350
- 351
- 352
- 353
- 354
- 355
- 356
- 357
- 358
- 359
- 360
- 361
- 362
- 363
- 364
- 365
- 366
- 367
- 368
- 369
- 370
- 371
- 372
- 373
- 374
- 375
- 376
- 377
- 378
- 379
- 380
- 381
- 382
- 383
- 384
- 385
- 386
- 387
- 388
- 389
- 390
- 391
- 392
- 393
- 394
- 395
- 396
- 397
- 398
- 399
- 400
- 401
- 402
- 403
- 404
- 405
- 406
- 407
- 408
- 409
- 410
- 411
- 412
- 413
- 414
- 415
- 416
- 417
- 418
- 419
- 420
- 421
- 422
- 423
- 424
- 425
- 426
- 427
- 428
- 429
- 430
- 431
- 432
- 433
- 434
- 435
- 436
- 437
- 438
- 439
- 440
- 441
- 442
- 443
- 444
- 445
- 446
- 447
- 448
- 449
- 450
- 451
- 452
- 453
- 454
- 455
- 456
- 457
- 458
- 459
- 460
- 461
- 462
- 463
- 464
- 465
- 466
- 467
- 468
- 469
- 470
- 471
- 472
- 473
- 474
- 475
- 476
- 477
- 478
- 479
- 480
- 481
- 482
- 483
- 484
- 485
- 486
- 487
- 488
- 489
- 490
- 491
- 492
- 493
- 494
- 495
- 496
- 497
- 498
- 499
- 500
- 501
- 502
- 503
- 504
- 505
- 506
- 507
- 508
- 509
- 510
- 511
- 512
- 513
- 514
- 515
- 516
- 517
- 518
- 519
- 520
- 521
- 522
- 523
- 524
- 525
- 526
- 527
- 528
- 529
- 530
- 531
- 532
- 533
- 534
- 535
- 536
- 537
  / \__              /\_/\
 (    @\___         ( o.o )
 /         O         > ^ <
/   (_____/     猫猫镇楼,bug退散
/_____/   U
- 1
- 2
- 3
- 4
- 5
激光点识别
import cv2

import numpy as np

def get_pixel_sum(image, coords):

    # 获取图像宽度和高度

    height, width = image.shape[:2]

    radius=3

    # 确定方圆的左上角和右下角坐标

    x, y = coords

    x_start = max(0, x - radius)

    y_start = max(0, y - radius)

    x_end = min(width - 1, x + radius)

    y_end = min(height - 1, y + radius)


    # 提取方圆区域

    roi = image[y_start:y_end, x_start:x_end]


    # 计算 R 和 G 通道总值

    r_channel = roi[:, :, 2]

    g_channel = roi[:, :, 1]

    r_sum = int(r_channel.sum())

    g_sum = int(g_channel.sum())


    return r_sum, g_sum


def detect_lasers(image):

    Green_laser_coords = None,None

    Red_laser_coords = None,None

    # 转换颜色空间为HSV

    hsv = cv2.cvtColor(image, cv2.COLOR_BGR2HSV)


    # 定义激光点颜色范围

    lower_laser = np.array([24, 0, 255])

    upper_laser = np.array([179, 45, 255])


    # 创建激光点掩膜

    mask_laser = cv2.inRange(hsv, lower_laser, upper_laser)


    # 使用形态学操作进行清理

    kernel = np.ones((5, 5), np.uint8)

    mask_laser = cv2.morphologyEx(mask_laser, cv2.MORPH_CLOSE, kernel)


    # 寻找激光点轮廓

    contours_laser, _ = cv2.findContours(mask_laser, cv2.RETR_EXTERNAL, cv2.CHAIN_APPROX_SIMPLE)


    # 标记激光点

    for contour in contours_laser:

        # 获取最小矩形框

        rect = cv2.minAreaRect(contour)

        # 矩形框的中心坐标

        laser_coords = tuple(map(int, rect[0]))

        # 矩形框的四个角点

        box = cv2.boxPoints(rect)

        box = np.int0(box)

        # 绘制矩形框

        cv2.drawContours(image, [box], 0, (0, 0, 0), 2)

        #[0]索引为红色,[1]索引为绿色

        color_vel = get_pixel_sum (image,laser_coords)

        if(color_vel[0]>color_vel[1]):

            Green_laser_coords = laser_coords

            cv2.circle(image, laser_coords, 4, (0, 0, 255), -1)

            cv2.putText(image, "RED ", (laser_coords[0] - 20, laser_coords[1] - 20), cv2.FONT_HERSHEY_SIMPLEX, 0.5, (0, 0, 255), 2)

        else:

            Red_laser_coords = laser_coords

            cv2.circle(image, laser_coords, 4, (0, 255, 0), -1)

            cv2.putText(image, "GREEN ", (laser_coords[0] - 20, laser_coords[1] - 20), cv2.FONT_HERSHEY_SIMPLEX, 0.5, (0, 255, 0), 2)

        print('R_Vel&G_Vel'+str(color_vel))

    cv2.imshow("Laser Detection", image)

    return Green_laser_coords,Red_laser_coords


# 读取图像

image = cv2.imread(r'C:/Users/shili/Pictures/Saved Pictures/333.jpg')

image = cv2.resize(image, (500, 500))


# 在图像中识别激光点并标记

Green_coords, Red_coords= detect_lasers(image)


print('GREEN:'+ str(Green_coords))

print('RED:'+ str(Red_coords))

# 显示图像


cv2.waitKey(0)

cv2.destroyAllWindows()
- 1
- 2
- 3
- 4
- 5
- 6
- 7
- 8
- 9
- 10
- 11
- 12
- 13
- 14
- 15
- 16
- 17
- 18
- 19
- 20
- 21
- 22
- 23
- 24
- 25
- 26
- 27
- 28
- 29
- 30
- 31
- 32
- 33
- 34
- 35
- 36
- 37
- 38
- 39
- 40
- 41
- 42
- 43
- 44
- 45
- 46
- 47
- 48
- 49
- 50
- 51
- 52
- 53
- 54
- 55
- 56
- 57
- 58
- 59
- 60
- 61
- 62
- 63
- 64
- 65
- 66
- 67
- 68
- 69
- 70
- 71
- 72
- 73
- 74
- 75
- 76
- 77
- 78
- 79
- 80
- 81
- 82
- 83
- 84
- 85
- 86
- 87
- 88
- 89
- 90
- 91
- 92
- 93
- 94
- 95
- 96
- 97
- 98
- 99
- 100
- 101
- 102
- 103
- 104
- 105
- 106
- 107
- 108
- 109
- 110
- 111
- 112
- 113
- 114
- 115
- 116
- 117
- 118
- 119
- 120
- 121
- 122
- 123
- 124
- 125
- 126
- 127
- 128
- 129
- 130
- 131
- 132
- 133
- 134
- 135
- 136
- 137
- 138
- 139
- 140
- 141
- 142
- 143
- 144
- 145
- 146
- 147
- 148
- 149
- 150
- 151
- 152
- 153
- 154
- 155
- 156
- 157
- 158
- 159
- 160
- 161
- 162
- 163
- 164
- 165
- 166
- 167

