热门标签
热门文章
- 13位2进制与4位2进制乘法器,Quartus 电路图_逻辑设计框图基于quartus的实验输入:两个4位二进制数,代表两个操作数a,b;一个3位
- 2git基础(一)-新建git仓库_创建git仓库是选择项目路径?
- 3Unity开发微信小游戏获取用户信息_unity获取微信用户数据
- 4热门组合:Kubernetes与GPU的前世今生_kubernetes gpu
- 5Dubbo 3.0 前瞻:重塑 Spring Cloud 服务治理_dubbocloudregistry
- 62024年9个程序员接私活的网站推荐,最后一个和想象差太远了吧!,2024年最新大厂面试必备_程序员私活网站
- 7数据库小技能:数据导入脚本_导入数据的脚本
- 8ARKit_arkit 模型 position
- 9git随笔_半包辣条博客
- 10Go语言proto使用入门_go proto
当前位置: article > 正文
YOLO语义分割标注文件txt还原到图像中_yolo分割txt
作者:花生_TL007 | 2024-06-03 04:57:43
赞
踩
yolo分割txt
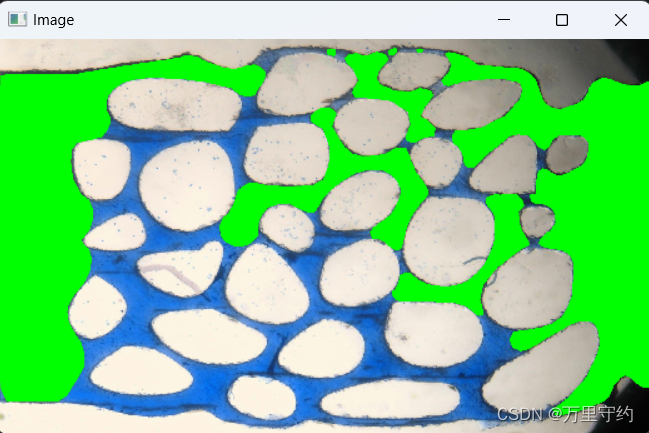
最近做图像分割任务过程中,使用labelme对图像进行标注,得到的数据文件是json,转换为YOLO训练所需的txt格式后,想对标注文件进行检验,即将txt标注文件还原到原图像中,下面是代码:
import cv2
import numpy as np
'''
读取txt标注文件及原图
'''
def read_txt_labels(txt_file):
  """
  从 txt 标注文件中读取标签
  :param txt_file: txt 标注文件路径
  :return: 标签列表
  """
  with open(txt_file, "r") as f:
    labels = []
    for line in f.readlines():
      label_data = line.strip().split(" ")
      class_id = int(label_data[0])
      # 解析边界框坐标
      coordinates = [float(x) for x in label_data[1:]]
      labels.append([class_id, coordinates])
  return labels

def draw_labels(image, labels):
  """
  在图像上绘制分割区域
  :param image: 图像
  :param labels: 标签列表
  """
  for label in labels:
    class_id, coordinates = label
    # 将坐标转换为整数并重新塑形为多边形
    points = [(int(x * image.shape[1]), int(y * image.shape[0])) for x, y in zip(coordinates[::2], coordinates[1::2])]
    # 使用多边形填充
    cv2.fillPoly(image, [np.array(points)], (0, 255, 0))  # 绿色表示分割区域

def main():
  """
  将 YOLO 语义分割的 txt 标注文件还原到原图中
  """
  # 读取图像
  image = cv2.imread("D:\Desktop\gasdata\images\\0002.jpg")
  # 读取 txt 标注文件
  txt_file = "D:\Desktop\gasdata\\txt\\0002.txt"
  labels = read_txt_labels(txt_file)
  # 绘制分割区域
  draw_labels(image, labels)
  # 获取窗口大小
  window_size = (1600, 800)  # 您可以根据需要调整窗口大小
  # 调整图像大小
  image = cv2.resize(image, window_size)
  # 创建一个与窗口大小相同的黑色图像
  background = np.zeros((window_size[1], window_size[0], 3), np.uint8)
  # 将图像放置在黑色背景的中心
  image_x = int((window_size[0] - image.shape[1]) / 2)
  image_y = int((window_size[1] - image.shape[0]) / 2)
  background[image_y:image_y + image.shape[0], image_x:image_x + image.shape[1]] = image
  cv2.namedWindow("Image", cv2.WINDOW_NORMAL)
  cv2.imshow("Image", image)
  cv2.waitKey(0)
if __name__ == "__main__":
  main()
- 1
- 2
- 3
- 4
- 5
- 6
- 7
- 8
- 9
- 10
- 11
- 12
- 13
- 14
- 15
- 16
- 17
- 18
- 19
- 20
- 21
- 22
- 23
- 24
- 25
- 26
- 27
- 28
- 29
- 30
- 31
- 32
- 33
- 34
- 35
- 36
- 37
- 38
- 39
- 40
- 41
- 42
- 43
- 44
- 45
- 46
- 47
- 48
- 49
- 50
- 51
- 52
- 53
- 54
- 55
- 56
- 57
- 58
- 59
- 60
效果图:

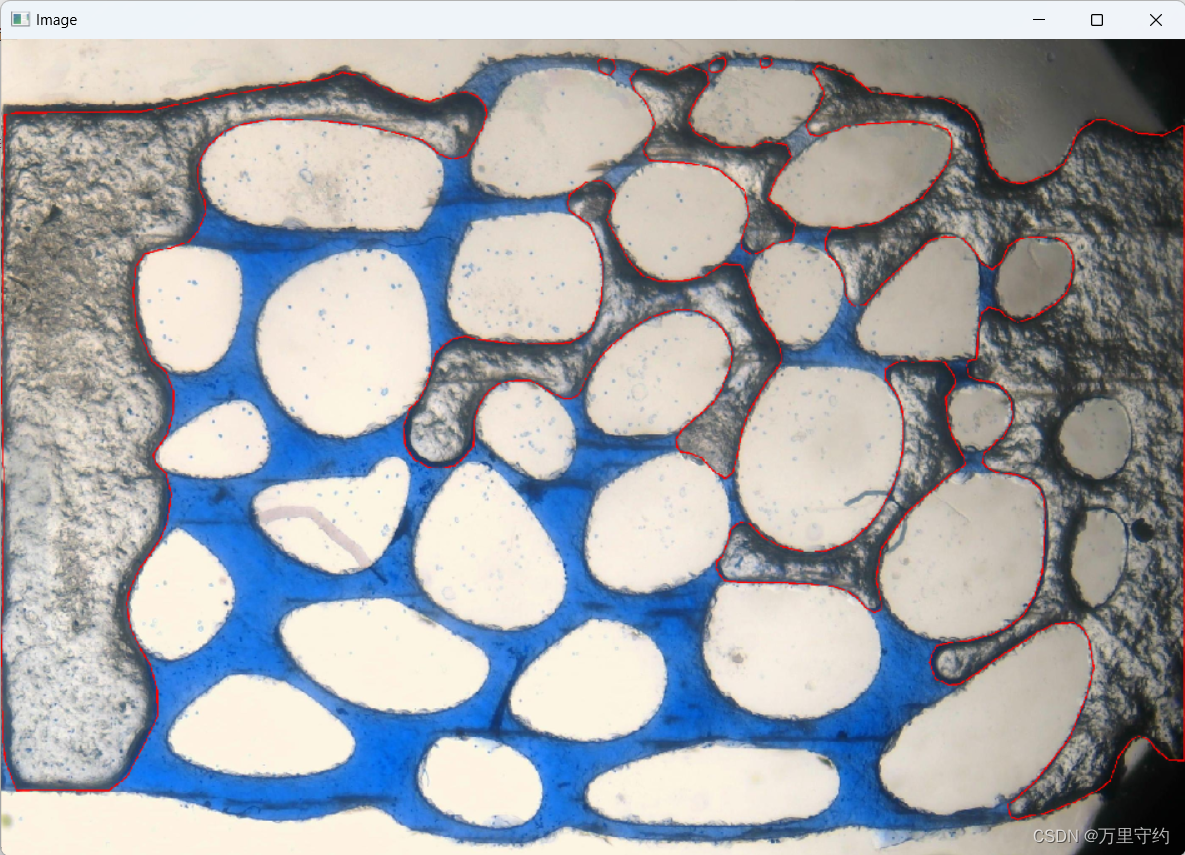
如果仅对轮廓进行标注,不填充整个区域,则只需修改draw_labels函数:
def draw_labels(image, labels):
  """
  在图像上绘制分割区域轮廓
  :param image: 图像
  :param labels: 标签列表
  """
  for label in labels:
    class_id, coordinates = label
    # 将坐标转换为整数并重新塑形为多边形
    points = [(int(x * image.shape[1]), int(y * image.shape[0])) for x, y in zip(coordinates[::2], coordinates[1::2])]
    # 使用多边形绘制轮廓
    cv2.polylines(image, [np.array(points)], True, (0, 255, 0), 2)  # 红色表示分割区域轮廓
- 1
- 2
- 3
- 4
- 5
- 6
- 7
- 8
- 9
- 10
- 11
- 12
效果图:

声明:本文内容由网友自发贡献,转载请注明出处:【wpsshop博客】
推荐阅读
相关标签


