热门标签
热门文章
- 1大学专科本科的javaweb毕业设计题目_基于javaweb的毕业设计选题
- 2TensorFlow + GPU配置_tensorflow gpu
- 3jQuery03_juq-033
- 4设某机为定长指令字结构,指令长度12位,每个地址码占3位,试提出一种分配方案……_5.某机指令字长12位,每个地址段3位,试提出一种指令条数最少的分配方案,使该机指令
- 5Java微信消息推送(二)_java 登录微信 发送消息
- 6MyBatis与MyBatisPlus的区别_mybatis和mybatisplus的区别
- 7泰迪智能科技企业数据挖掘平台使用场景
- 8虚拟机CentOS7下安装Java1.8与Tomcat9_centos7中安装java和tomcat9
- 9发布iis让外网也能看到自己的本地站点的方法_iis搭建网站别人可以搜到吗
- 10还用 if/else 走天下?不妨试试这几种改进方法_改造else if
当前位置: article > 正文
Angular 路由(routing)基本配置_routing.module.ts
作者:菜鸟追梦旅行 | 2024-02-23 04:21:37
赞
踩
routing.module.ts
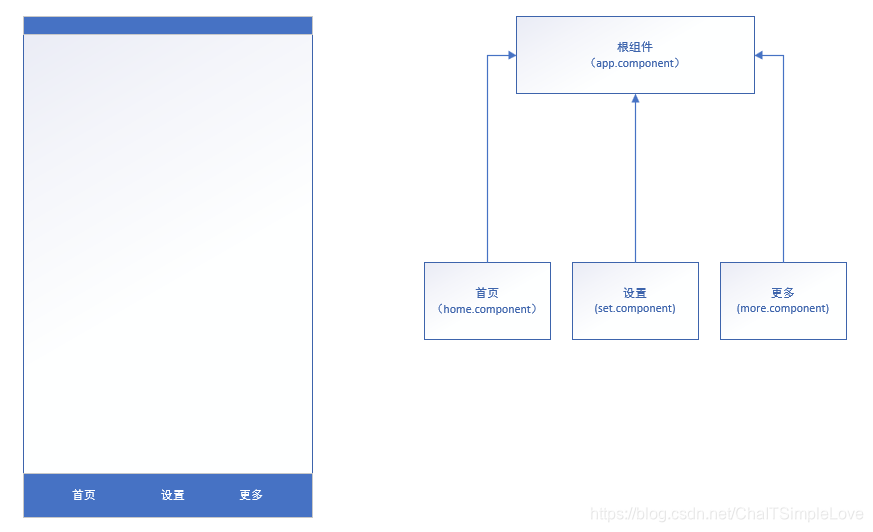
本节我们学习路由知识点,假如我们有三个自定义组件,分别是【首页|home】,【设置|set】和【更多|more】,需要动态挂载在根组件【app.component.html】中,当浏览器url地址输入对应组件名称,动态显示该组件对应的内容,这就是动态路由;

- 使用 CLI 创建一个项目并配置默认路由:
ng new demo01 --routing在新建的项目【demo01】的根组件上面就会多一个ts文件【app-routing.module.ts】

此时在【app.module.ts】文件中就会新增如下信息:
- import { AppRoutingModule } from './app-routing.module';
-
- //同时在imports中声明
- imports: [ //此处是模块声明
- BrowserModule,
- FormsModule,
- AppRoutingModule, /* Routing */
- HttpClientModule /* HttpClient */
- ],
同时在根组件的【app.component.html】文件中默认添加如下信息:
<router-outlet></router-outlet>- 创建组件【home,set,more】
- ng generate component components/home
- ng generate component components/set
- ng generate component components/more
路由基本配置
- 在【app-routing.module.ts】文件中配置组件路由信息:
- import { NgModule } from '@angular/core';
- import { Routes, RouterModule } from '@angular/router';
-
- //引入(需要的)自定义组件
- import { HomeComponent } from './components/home/home.component';
- import { SetComponent } from './components/set/set.component';
- import { MoreComponent } from './components/more/more.component';
-
- /* 【路由配置信息】 */
- /* 路由配置使用符号“**”匹配时,注意顺序,路由匹配到信息不会再往后匹配 */
- const routes: Routes = [
- // {path:'', pathMatch:'full', redirectTo:'home'}, /* 当为''的时候,从下面定义的路由中寻找,重定向到指定的组件home */
- // {path:'', component: HomeComponent}, /* 当为''的时候,重定向到指定的组件home */
- {path:'home',component: HomeComponent},
- {path:'set',component: SetComponent},
- {path:'more',component: MoreComponent},
- {path:'**', redirectTo:'home'} /* [**]任意路由,匹配不到路由的时候加载组件或者跳转(重定向)的路由 */
-
- ];
-
- @NgModule({
- imports: [RouterModule.forRoot(routes)],
- exports: [RouterModule]
- })
- export class AppRoutingModule { }

以上配置就实现路由链接的基本配置;
默认选中路由
- 在根组件【app.component.html】文件中编写基本标签:
- <p>我是根组件</p>
- <figure>
- <p>默认选中路由</p>
- <h3>
- <a title="原生默认" href="http://www.jd.com" target="_blank">我们去京东</a>
- <a title="blank打开" target="_blank" routerLink="/home" routerLinkActive="active">首页</a>
- <a title="self打开" target="_self" routerLink="/set" routerLinkActive="active">设置</a>
- <a title="top打开" target="_top" routerLink="/more" routerLinkActive="active">更多</a>
-
- <!-- 【等效代码】 -->
- <a [routerLink]="['/home']" routerLinkActive="active">首页</a>
- <a [routerLink]="['/set']" routerLinkActive="active">设置</a>
- <a [routerLink]="['/more']" routerLinkActive="active">更多</a>
- </h3>
- </figure>
- <hr/>
-
- <router-outlet></router-outlet>

为了区分在每个组件中都标记个信息,同时在根组件的html页面中添加个横线分隔区分,当选择首页的时候,下面就显示首页的信息,同时为路由激活状态(此处未编写对应的css样式),运行效果如下:

以上就是对ng 路由的基本配置介绍,下一篇我们继续介绍【路由传参】。
声明:本文内容由网友自发贡献,不代表【wpsshop博客】立场,版权归原作者所有,本站不承担相应法律责任。如您发现有侵权的内容,请联系我们。转载请注明出处:https://www.wpsshop.cn/w/菜鸟追梦旅行/article/detail/133605
推荐阅读
相关标签


