hi,我是熵减,见字如面。
昨天我们用ChatGPT来设计一个账号系统,并尝试输出:模型表,类关系图,序列图,状态图等常用的架构设计中常用的元素。
今天,我们继续向更高层级延伸一下,看ChatGPT能不能更进一步释放工程师的生产力,创造更多的可能性。
所以,这次我们就来尝试用ChatGPT,来构建账号系统的C4模型的架构图啦。
由于ChatGPT不能直接输出图像,所以我们转化为用Mermaid的脚本,通过markdown的方式输出,再用支持Mermaid渲染的工具,将图片显示出来。
生成数据库初始化SQL
我们首先来试试,生成数据库初始化SQL吧。
提示:将以上账号系统的数据模型,生成MySQL数据库的SQL
ChatGPT:
- -- 创建表:Account
- CREATE TABLE Account (
- id INT PRIMARY KEY,
- username VARCHAR(50) NOT NULL,
- password VARCHAR(50) NOT NULL,
- email VARCHAR(50),
- phone_number VARCHAR(20),
- state VARCHAR(20),
- email_ver BOOLEAN DEFAULT false,
- phone_ver BOOLEAN DEFAULT false,
- created_at DATETIME,
- updated_at DATETIME
- );
-
- -- 创建表:EmailVerification
- CREATE TABLE EmailVerification (
- id INT PRIMARY KEY,
- token VARCHAR(50) NOT NULL,
- expired_at DATETIME,
- account_id INT,
- FOREIGN KEY (account_id) REFERENCES Account(id)
- );
-
- -- 创建表:PhoneVerification
- CREATE TABLE PhoneVerification (
- id INT PRIMARY KEY,
- token VARCHAR(50) NOT NULL,
- expired_at DATETIME,
- phone_number VARCHAR(20),
- account_id INT,
- FOREIGN KEY (account_id) REFERENCES Account(id)
- );
-
- -- 创建表:ThirdPartySocialAccount
- CREATE TABLE ThirdPartySocialAccount (
- id INT PRIMARY KEY,
- provider VARCHAR(20) NOT NULL,
- provider_id VARCHAR(50) NOT NULL,
- account_id INT,
- FOREIGN KEY (account_id) REFERENCES Account(id)
- );
-
- -- 创建表:LoginRecord
- CREATE TABLE LoginRecord (
- id INT PRIMARY KEY,
- account_id INT,
- login_at DATETIME,
- FOREIGN KEY (account_id) REFERENCES Account(id)
- );
以上SQL语句可以在MySQL数据库中创建相应的表,包括Account、EmailVerification、PhoneVerification、ThirdPartySocialAccount和LoginRecord五个表,并设置它们之间的关联关系。
直接输出C4 Diagram
接下来我们直接尝试其是否可以输出系统的C4模型的代码吧。
提示:对于系统架构图,用Mermaid's c4 diagram是非常有效的,接下来,我们需要开始构建c4 模型的Mermaid脚本,并用markdown
ChatGPT:
好的,以下是用Mermaid's C4 Diagram构建系统架构图的Mermaid脚本,并用markdown格式输出:
- ## C4 Model for Account System
-
- ### Level 1: System Context Diagram
-
- title Account System - System Context Diagram
-
- actor User
-
- User -> AccountSystem: Use
-
- ### Level 2: Container Diagram
-
- title Account System - Container Diagram
-
- AccountSystem -> AccountService: Uses
- AccountSystem -> EmailService: Uses
- AccountSystem -> PhoneService: Uses
- AccountSystem -> ThirdPartyService: Uses
- AccountSystem -> Database: Uses
-
- AccountService -> Database: Reads/Writes
- EmailService -> Database: Reads/Writes
- PhoneService -> Database: Reads/Writes
- ThirdPartyService -> Database: Reads/Writes
-
- ### Level 3: Component Diagram
-
- title Account System - Component Diagram
-
- AccountSystem --> AccountService: Manages Accounts
- AccountSystem --> EmailService: Sends Email
- AccountSystem --> PhoneService: Sends SMS
- AccountSystem --> ThirdPartyService: Interacts with Social Platforms
-
- AccountService --> Account: Accesses Account Data
- EmailService --> EmailVerification: Validates Email
- PhoneService --> PhoneVerification: Validates Phone Number
-
- Account --> PasswordSecurity: Manages Passwords
- Account --> LoginRecord: Records Login Information
虽然给出了完整的代码,但在我的vscode的插件中,无法渲染出正确的结果图。
我推测由于ChatGPT训练的时间是21年的,所以其给出的代码版较低,而Mermaid近期升级了对C4模型的脚本规范,所以,我试图提升ChatGPT升级一下:
提示:这不是最新版的,请用Mermaid的最新版的C4 Diagrams脚本,再次输出
ChatGPT:
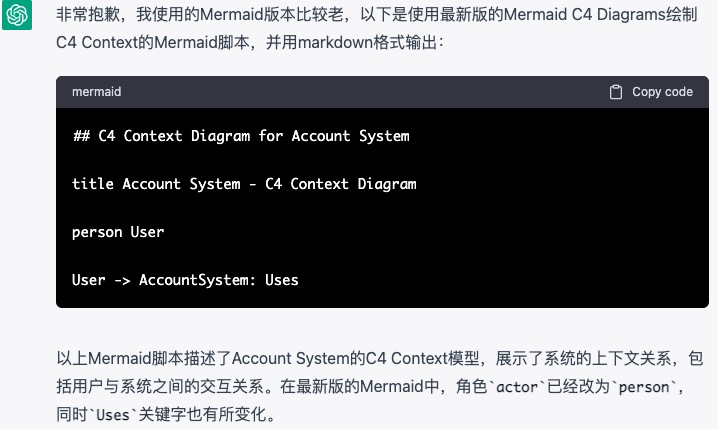
输出的结果,依然在我的渲染插件中无法展示。
所以,我尝试换了一种方法,来让其帮我继续做C4模型图,这也是我发现的一个大惊喜:
你给ChatGPT一个内容模版,它立马就会学会应用,而且效果惊人。
下面我们继续来看新方法的过程。
C4模型实验
C4Context视图
我输入的提示:下面,我要给你一个最新版本的Mermaid C4 Diagrams脚本案例,你要记住哦
ChatGPT:好的,尽管跟我分享吧。
我将从Mermaid官网上复制的C4Context代码输入给了ChatGPT:
- C4Context
- title System Context diagram for Internet Banking System
- Enterprise_Boundary(b0, "BankBoundary0") {
- Person(customerA, "Banking Customer A", "A customer of the bank, with personal bank accounts.")
- Person(customerB, "Banking Customer B")
- Person_Ext(customerC, "Banking Customer C", "desc")
-
- Person(customerD, "Banking Customer D", "A customer of the bank, <br/> with personal bank accounts.")
-
- System(SystemAA, "Internet Banking System", "Allows customers to view information about their bank accounts, and make payments.")
-
- Enterprise_Boundary(b1, "BankBoundary") {
-
- SystemDb_Ext(SystemE, "Mainframe Banking System", "Stores all of the core banking information about customers, accounts, transactions, etc.")
-
- System_Boundary(b2, "BankBoundary2") {
- System(SystemA, "Banking System A")
- System(SystemB, "Banking System B", "A system of the bank, with personal bank accounts. next line.")
- }
-
- System_Ext(SystemC, "E-mail system", "The internal Microsoft Exchange e-mail system.")
- SystemDb(SystemD, "Banking System D Database", "A system of the bank, with personal bank accounts.")
-
- Boundary(b3, "BankBoundary3", "boundary") {
- SystemQueue(SystemF, "Banking System F Queue", "A system of the bank.")
- SystemQueue_Ext(SystemG, "Banking System G Queue", "A system of the bank, with personal bank accounts.")
- }
- }
- }
-
- BiRel(customerA, SystemAA, "Uses")
- BiRel(SystemAA, SystemE, "Uses")
- Rel(SystemAA, SystemC, "Sends e-mails", "SMTP")
- Rel(SystemC, customerA, "Sends e-mails to")
-
- UpdateElementStyle(customerA, $fontColor="red", $bgColor="grey", $borderColor="red")
- UpdateRelStyle(customerA, SystemAA, $textColor="blue", $lineColor="blue", $offsetX="5")
- UpdateRelStyle(SystemAA, SystemE, $textColor="blue", $lineColor="blue", $offsetY="-10")
- UpdateRelStyle(SystemAA, SystemC, $textColor="blue", $lineColor="blue", $offsetY="-40", $offsetX="-50")
- UpdateRelStyle(SystemC, customerA, $textColor="red", $lineColor="red", $offsetX="-50", $offsetY="20")
-
- UpdateLayoutConfig($c4ShapeInRow="3", $c4BoundaryInRow="1")
ChatGPT:

提示:请按照上面给的案例,输出我们修改后的账号系统的C4Context的Mermaid脚本,用markdown输出
ChatGPT输出:
- C4Context
- title Account System Context Diagram
-
- Enterprise_Boundary(EB, "Account System Boundary") {
- System(AccountSystem, "Account System", "Allows users to manage their accounts, passwords, and login sessions.")
- User(User, "User", "A user of the account system.")
-
- System_Ext(MailSystem, "Email System", "The internal email system.")
- System_Ext(SMS, "SMS System", "The system that sends SMS messages for 2FA.")
-
- AccountSystem --> User
- AccountSystem --> MailSystem
- AccountSystem --> SMS
- }
-
- BiRel(User, AccountSystem, "Uses")
- Rel(AccountSystem, MailSystem, "Sends emails")
- Rel(AccountSystem, SMS, "Sends SMS messages for 2FA")
-
- UpdateElementStyle(User, $fontColor="red", $bgColor="grey", $borderColor="red")
- UpdateRelStyle(User, AccountSystem, $textColor="blue", $lineColor="blue", $offsetX="5")
- UpdateRelStyle(AccountSystem, MailSystem, $textColor="blue", $lineColor="blue", $offsetY="-10", $offsetX="-50")
- UpdateRelStyle(AccountSystem, SMS, $textColor="blue", $lineColor="blue", $offsetY="10", $offsetX="-50")
代码渲染后为:
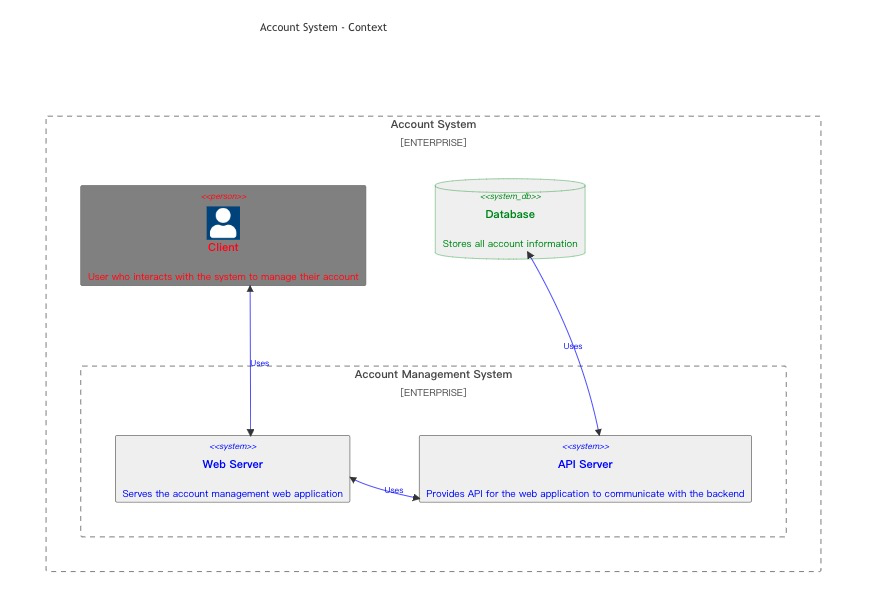
实验成功,那接下来的其他的C4模型,就可以如法炮制啦。
C4Container视图
提供Mermaid官网的demo后,就可以提示:
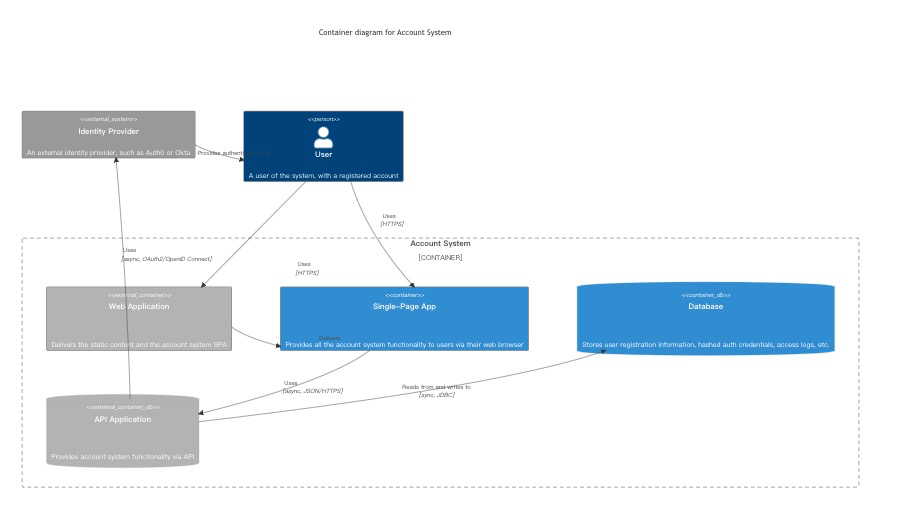
请按照上面给的案例,输出我们我们要处理账号系统C4Container的Mermaid脚本,用markdown输出
ChatGPT输出代码为:
- C4Container
- title Container diagram for Account System
-
- System_Ext(identity_provider, "Identity Provider", "An external identity provider, such as Auth0 or Okta", $tags="v1.0")
- Person(user, User, "A user of the system, with a registered account", $tags="v1.0")
-
- Container_Boundary(c1, "Account System") {
- Container_Ext(web_app, "Web Application", "Java, Spring MVC", "Delivers the static content and the account system SPA")
- Container(spa, "Single-Page App", "JavaScript, Angular", "Provides all the account system functionality to users via their web browser")
- ContainerDb(database, "Database", "SQL Database", "Stores user registration information, hashed auth credentials, access logs, etc.")
- ContainerDb_Ext(api, "API Application", "Java, Docker Container", "Provides account system functionality via API")
-
- }
-
- Rel(user, web_app, "Uses", "HTTPS")
- UpdateRelStyle(user, web_app, $offsetY="60", $offsetX="90")
- Rel(user, spa, "Uses", "HTTPS")
- UpdateRelStyle(user, spa, $offsetY="-40")
- Rel(web_app, spa, "Delivers")
- UpdateRelStyle(web_app, spa, $offsetX="130")
- Rel(spa, api, "Uses", "async, JSON/HTTPS")
- Rel_Back(database, api, "Reads from and writes to", "sync, JDBC")
-
- Rel(identity_provider, user, "Provides authentication for")
- UpdateRelStyle(identity_provider, user, $offsetX="-45")
- Rel(api, identity_provider, "Uses", "async, OAuth2/OpenID Connect")
- UpdateRelStyle(api, identity_provider, $offsetY="-60")
脚本渲染后图片为:
C4Component视图
提供Mermaid官网的demo后,就可以提示:
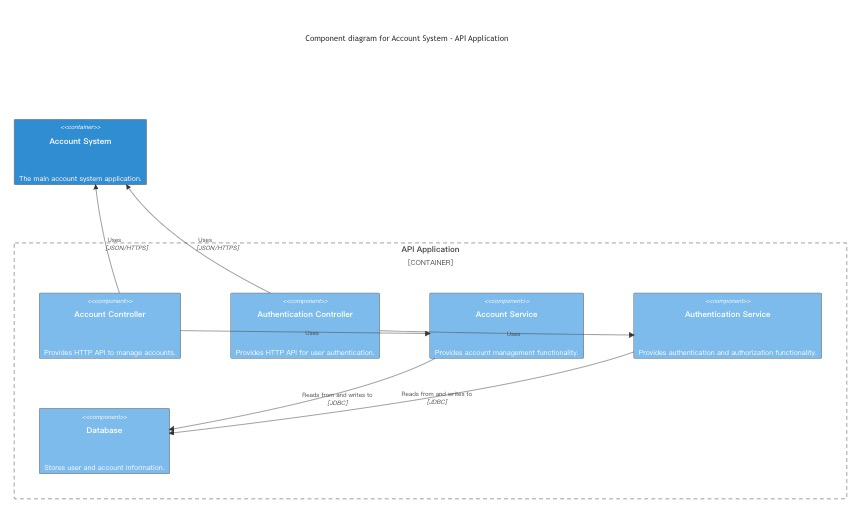
请按照上面给的案例,输出我们我们要处理账号系统C4Component的Mermaid脚本,用markdown输出
ChatGPT输出代码渲染后图片为:
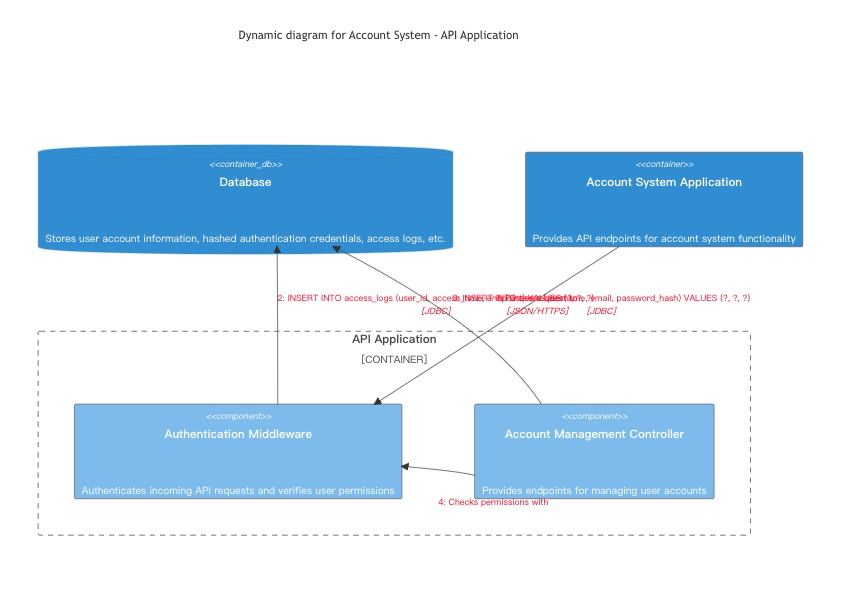
C4Dynamic 视图
提供Mermaid官网的demo后,就可以提示:
请按照上面给的案例,输出我们我们要处理账号系统C4Component的Mermaid脚本,用markdown输出
ChatGPT输出代码渲染后图片为:
C4Deployment视图
提供Mermaid官网的demo后,就可以提示:
请按照上面给的案例,输出我们我们要处理账号系统C4Deployment的Mermaid脚本,用markdown输出
ChatGPT输出代码渲染后图片为:
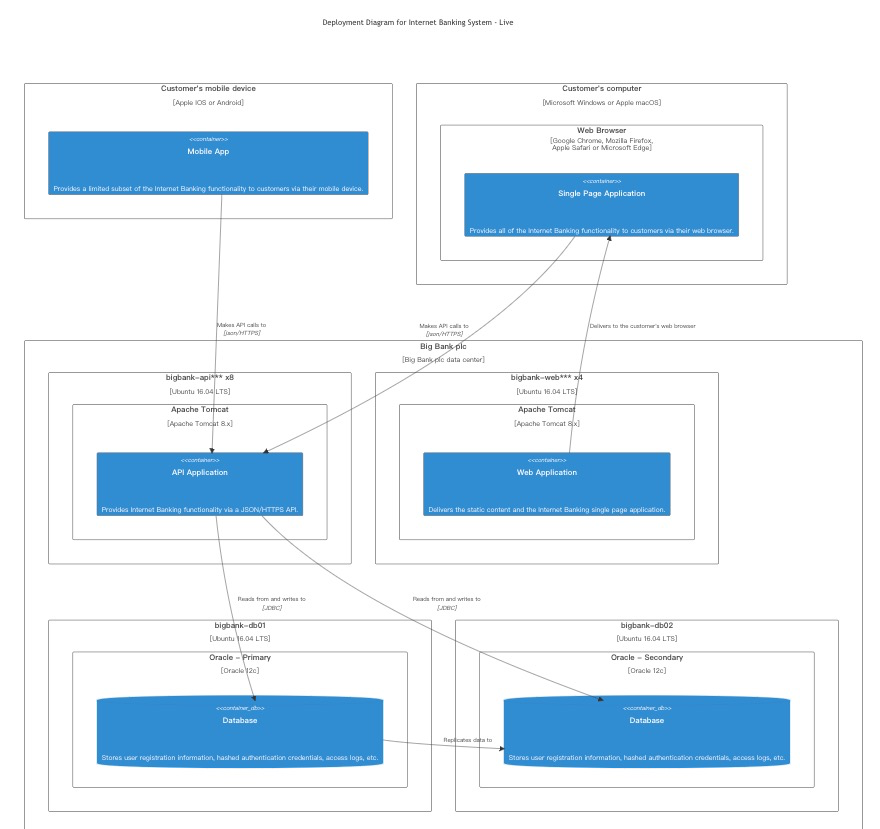
备注:在ChatGPT熟悉了2-3次过程后,只要输入模版,其就会自动给出结果啦,连提示都可以省略了,重复工作完全自动化啦。
复杂状态试图
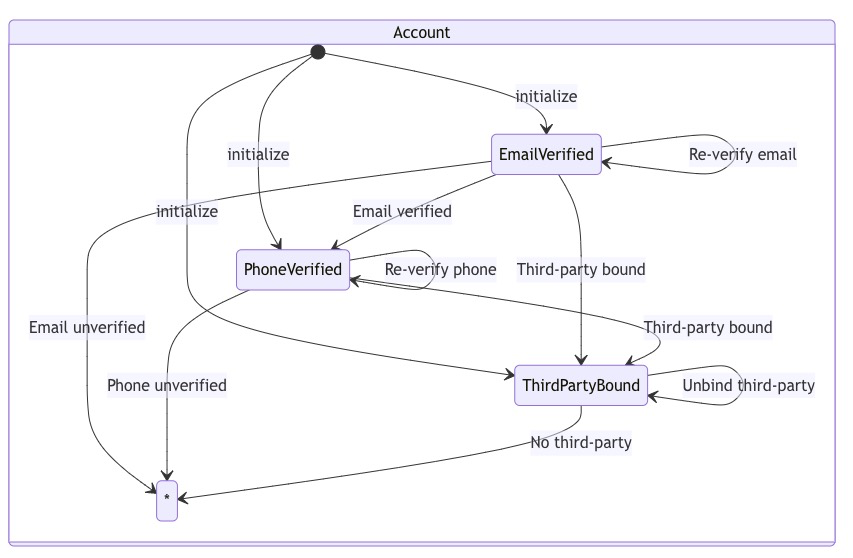
在今天的实验中,最后尝试做了一个负责的系统状态转化图,具体如下:
提示:在账号系统中的EmailVerification,PhoneVerification,ThirdPartyBinding的状态发生变化时,Account中对应信息变化的 Mermaid 脚本
ChatGPT:
以下是在账号系统中的EmailVerification,PhoneVerification,ThirdPartyBinding的状态发生变化时,Account中对应信息变化的Mermaid脚本:
给出的代码如下:
- stateDiagram-v2
- state "Account" as account {
- state "EmailVerified" as emailVerified
- state "PhoneVerified" as phoneVerified
- state "ThirdPartyBound" as thirdPartyBound
-
- [*] --> emailVerified : initialize
- [*] --> phoneVerified : initialize
- [*] --> thirdPartyBound : initialize
-
- emailVerified --> phoneVerified : Email verified
- emailVerified --> thirdPartyBound : Third-party bound
- phoneVerified --> thirdPartyBound : Third-party bound
-
- emailVerified --> emailVerified : Re-verify email
- phoneVerified --> phoneVerified : Re-verify phone
- thirdPartyBound --> thirdPartyBound : Unbind third-party
-
- emailVerified --> * : Email unverified
- phoneVerified --> * : Phone unverified
- thirdPartyBound --> * : No third-party
- }
这个脚本包含了四个节点,分别表示账户,电子邮件验证,电话验证和第三方绑定。每个节点有对应的状态,包括已验证,无效,已绑定和未绑定。节点之间的关系用箭头表示,例如账户有电子邮件验证,电话验证和第三方绑定。在状态发生变化时,节点的颜色也会相应地改变。
代码渲染图片:
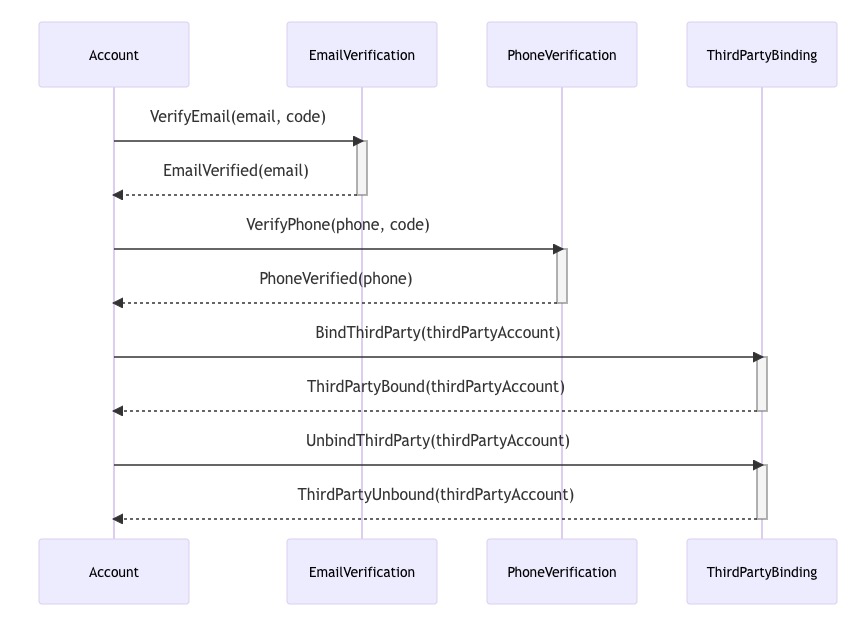
继续尝试,输出以上变化的序列图,提示:
ChatGPT:
以下是在账号系统中的EmailVerification,PhoneVerification,ThirdPartyBinding的状态发生变化时,Account中对应信息变化的序列图的Mermaid脚本:
- sequenceDiagram
- participant Account
- participant EmailVerification
- participant PhoneVerification
- participant ThirdPartyBinding
-
- Account ->> EmailVerification: VerifyEmail(email, code)
- activate EmailVerification
- EmailVerification -->> Account: EmailVerified(email)
- deactivate EmailVerification
-
- Account ->> PhoneVerification: VerifyPhone(phone, code)
- activate PhoneVerification
- PhoneVerification -->> Account: PhoneVerified(phone)
- deactivate PhoneVerification
-
- Account ->> ThirdPartyBinding: BindThirdParty(thirdPartyAccount)
- activate ThirdPartyBinding
- ThirdPartyBinding -->> Account: ThirdPartyBound(thirdPartyAccount)
- deactivate ThirdPartyBinding
-
- Account ->> ThirdPartyBinding: UnbindThirdParty(thirdPartyAccount)
- activate ThirdPartyBinding
- ThirdPartyBinding -->> Account: ThirdPartyUnbound(thirdPartyAccount)
- deactivate ThirdPartyBinding
上面的序列图描述了Account对象和三个相关对象(EmailVerification,PhoneVerification和ThirdPartyBinding)之间的交互,以处理EmailVerification,PhoneVerification和ThirdPartyBinding状态变化的情况。
在这个序列图中,Account对象向EmailVerification,PhoneVerification和ThirdPartyBinding发送请求,以更新与它们关联的信息。每个参与者在收到请求后执行其操作,并通过消息传递结果将结果返回给Account对象,以通知其信息已被更新。
渲染后的图片为:
写在最后
今天的实验,就这么多啦,希望对你有启发哦。
在日常的系统设计中,创造系统图表是一件不太容易,也非常繁琐的事情,而ChatGPT则可以很好的帮我们处理这些问题,让我们可以节省不少的时间和精力哦。
在实验的过程中,也可以发现ChatGPT存在这个各种可能性,只要我们能给出不错的提示,提供有效的上下文,他就可以快速的学习,并将此结果有效的利用在接下来的任务之中。
ChatGPT还有很多未知的能力,值得每一个人去探索,保持好奇心吧。


