热门标签
热门文章
- 1AI服务器市场火爆,价格飙升20倍的背后有何因素?_影响ai行情的因素
- 2STM32——SDIO的学习(驱动SD卡)(实战篇)_sdio cmd命令
- 3利用深度学习来预测股票价格变动_utility = utilityfunction(kind="ucb", kappa=2.5, x
- 4克服当众讲话紧张的12种方法_调节当众讲话紧张的十七种方法
- 5自然语言处理NLTK(一):NLTK和语料库_import nltk
- 6编译遇到 Could not determine the dependencies of task ‘:xxxxx:compileDebugAidl‘.
- 7extjs学习总结_textfield 设置 禁止缓存
- 8VASP6.1.0以上版本中VASPsol的修改及编译方法
- 9[实践]YOLOv5提升10倍推理速度:利用TensorRT 在Jetson NX上的模型部署
- 10错误C4996 'scanf': This function or variable may be unsafe. Consider using scanf_s instead. 最高效解决办法!!_c4996'scanf': this function or variable may be uns
当前位置: article > 正文
yolov8检测头
作者:菜鸟追梦旅行 | 2024-04-04 22:00:21
赞
踩
yolov8检测头
1.检测头原理检测
1.1检测头
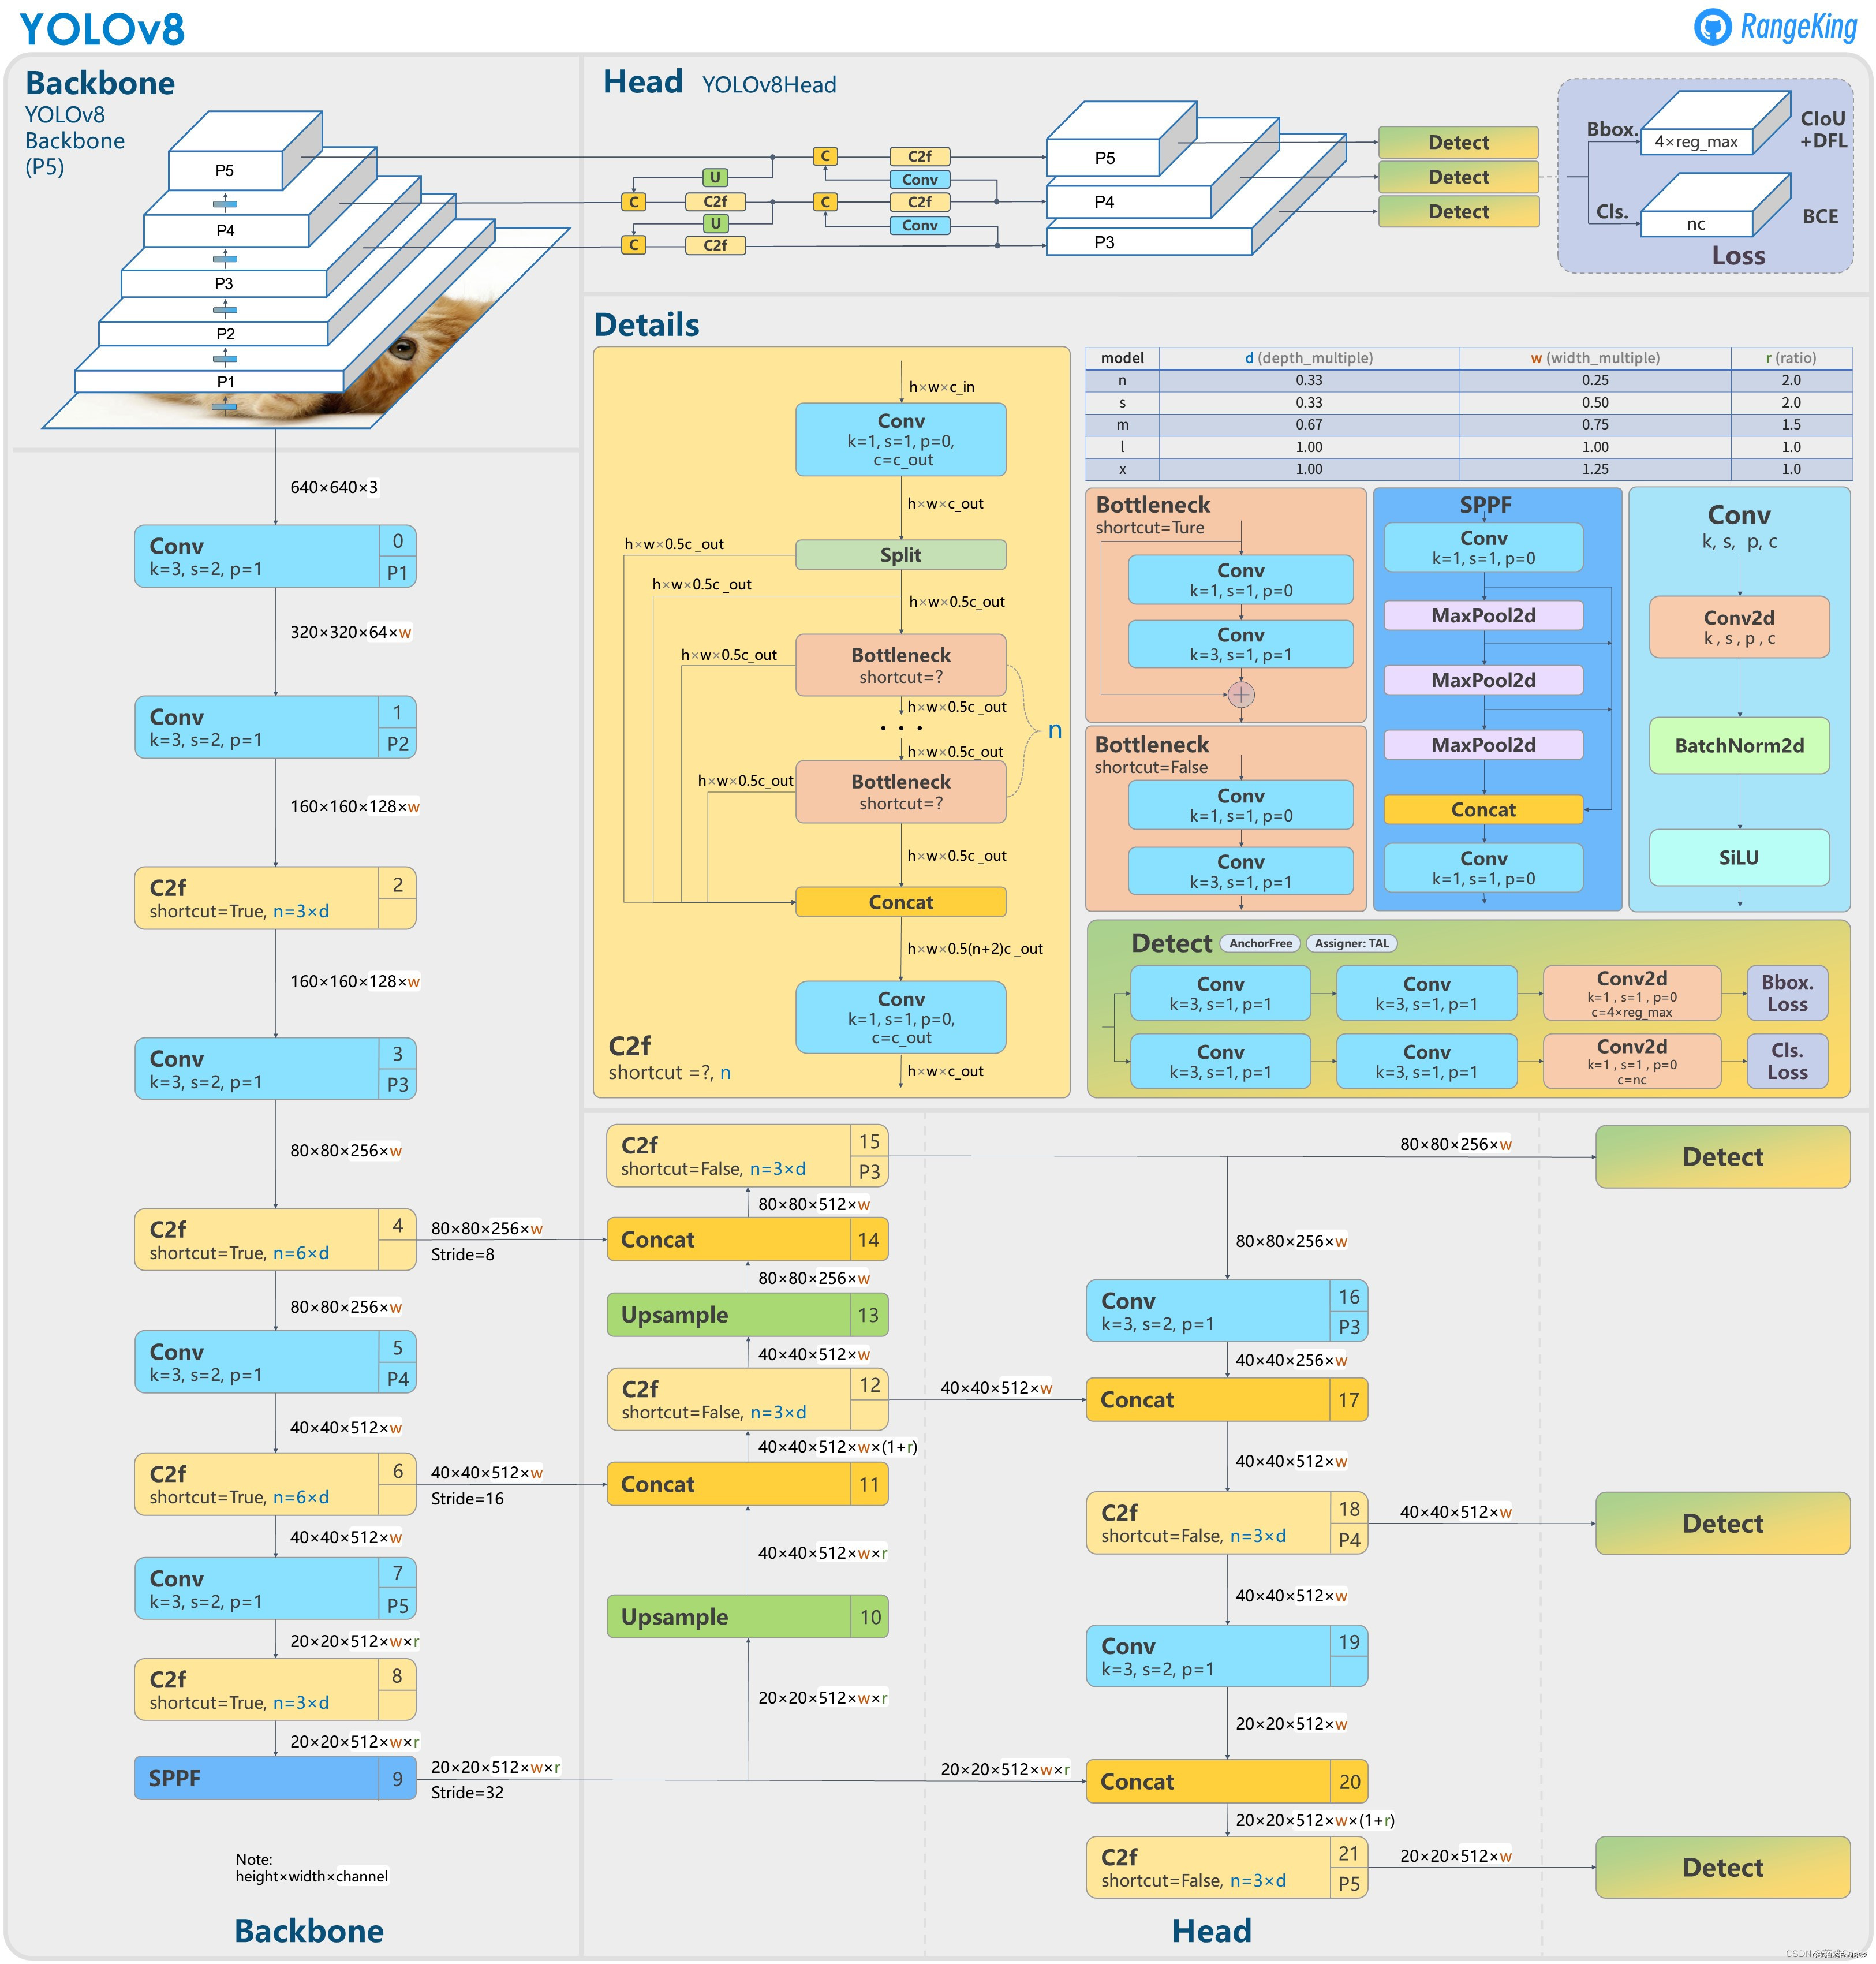
在图中的Detect就是yolov8的检测头部分.我们可以发现有两个分支
第一个是![]()
第二个是![]()
分别通过2个3x3的卷积和一个1x1的卷积来提取信息,最后分别结算Bbox.loss和CLs.loss
对应代码部分是cv2和cv3

可以发现,3层卷积之后有一个for循环,来遍历所有的通道数(3通道),这也是大大加大计算量的原因

1.2检测头的计算量
yolov8中的检测头是yolov8中检测目标的关键,它几乎占了计算量的1/5

从图中可以看到检测头部分的时间为125.37ms约为564.40ms的1/5
因此我们想要减少模型的计算量就可以对yolov8的检测头进行改进
1.3文件中的head.py
首先我们需要查看yolov8中的ultralytics/nn/modules/head.py
- class Detect(nn.Module):
- """YOLOv8 Detect head for detection models."""
- dynamic = False # force grid reconstruction
- export = False # export mode
- shape = None
- anchors = torch.empty(0) # init
- strides = torch.empty(0) # init
-
- def __init__(self, nc=80, ch=()): # detection layer
- super().__init__()
- self.nc = nc # number of classes
- self.nl = len(ch) # number of detection layers
- self.reg_max = 16 # DFL channels (ch[0] // 16 to scale 4/8/12/16/20 for n/s/m/l/x)
- self.no = nc + self.reg_max * 4 # number of outputs per anchor
- self.stride = torch.zeros(self.nl) # strides computed during build
- c2, c3 = max((16, ch[0] // 4, self.reg_max * 4)), max(ch[0], self.nc) # channels
- self.cv2 = nn.ModuleList(
- nn.Sequential(Conv(x, c2, 3), Conv(c2, c2, 3), nn.Conv2d(c2, 4 * self.reg_max, 1)) for x in ch)
- self.cv3 = nn.ModuleList(nn.Sequential(Conv(x, c3, 3), Conv(c3, c3, 3), nn.Conv2d(c3, self.nc, 1)) for x in ch)
- self.dfl = DFL(self.reg_max) if self.reg_max > 1 else nn.Identity()
-
- def forward(self, x):
- """Concatenates and returns predicted bounding boxes and class probabilities."""
- shape = x[0].shape # BCHW
- for i in range(self.nl):
- x[i] = torch.cat((self.cv2[i](x[i]), self.cv3[i](x[i])), 1)
- if self.training:
- return x
- elif self.dynamic or self.shape != shape:
- self.anchors, self.strides = (x.transpose(0, 1) for x in make_anchors(x, self.stride, 0.5))
- self.shape = shape
-
- x_cat = torch.cat([xi.view(shape[0], self.no, -1) for xi in x], 2)
- if self.export and self.format in ('saved_model', 'pb', 'tflite', 'edgetpu', 'tfjs'): # avoid TF FlexSplitV ops
- box = x_cat[:, :self.reg_max * 4]
- cls = x_cat[:, self.reg_max * 4:]
- else:
- box, cls = x_cat.split((self.reg_max * 4, self.nc), 1)
- dbox = dist2bbox(self.dfl(box), self.anchors.unsqueeze(0), xywh=True, dim=1) * self.strides
- y = torch.cat((dbox, cls.sigmoid()), 1)
- return y if self.export else (y, x)
-
- def bias_init(self):
- """Initialize Detect() biases, WARNING: requires stride availability."""
- m = self # self.model[-1] # Detect() module
- # cf = torch.bincount(torch.tensor(np.concatenate(dataset.labels, 0)[:, 0]).long(), minlength=nc) + 1
- # ncf = math.log(0.6 / (m.nc - 0.999999)) if cf is None else torch.log(cf / cf.sum()) # nominal class frequency
- for a, b, s in zip(m.cv2, m.cv3, m.stride): # from
- a[-1].bias.data[:] = 1.0 # box
- b[-1].bias.data[:m.nc] = math.log(5 / m.nc / (640 / s) ** 2) # cls (.01 objects, 80 classes, 640 img)

代码中的各个参数的含义为:
nc: 整数,表示图像分类问题中的类别数;
nl: 整数,表示检测模型中使用的检测层数;
reg_max: 整数,表示每个锚点输出的通道数;
no: 整数,表示每个锚点的输出数量,其中包括类别数和位置信息;
stride: 一个形状为(nl,)的张量,表示每个检测层的步长(stride);
cv2: 一个 nn.ModuleList 对象,包含多个卷积层,用于预测每个锚点的位置信息;
cv3: 一个 nn.ModuleList 对象,包含多个卷积层,用于预测每个锚点的类别信息;
dfl: DFL(Distribution Focal Loss)
具体的检测流程可以查看,以下的连接(作者以后理解了更新)
yolov8的Detect层详解(输出维度改动)_yolov8中detect.py在哪-CSDN博客
2.检测头的更改
检测头的更改方案可以分为两种
一种是轻量化
轻量化,主要是更改卷积层来实现
举例,我们可以把两个检测头前面的两次卷积合在一起
一种是增加检测的精度
检测精度可以在检测头中增加注意力机制来实现
随着学习,更新
声明:本文内容由网友自发贡献,不代表【wpsshop博客】立场,版权归原作者所有,本站不承担相应法律责任。如您发现有侵权的内容,请联系我们。转载请注明出处:https://www.wpsshop.cn/w/菜鸟追梦旅行/article/detail/361399
推荐阅读
相关标签


