- 1软件测试|解决 Git Push 出现 “error: failed to push some refs to“错误_git error: failed to push some refs to
- 2JAVA常量池和在基本数据类型包装器类及String的应用_java常量池只能引到基本类型和string
- 3离线程序激活功能实现思路第二版(ts实现)_离线激活原理
- 4常用的java反编译工具介绍
- 5Opencv cv2 Python 安装教程_cv2包怎么安装
- 6python collections 模块中 deque_from collections import deque
- 7git stash pop不删除stash内容_git stash pop了,stash还存在吗
- 8与 Apollo 共创生态:Apollo 7 周年大会的启示与心得
- 9编译chromium 87 时用到的命令_chromium87
- 10基于STM32设计的室内环境监测系统(华为云IOT)_2023_室内环境监测系统设计
基于ollama和CPU运行本地gguf量化模型_ollama 模型 格式 guff
赞
踩
前言
本文先以Windows电脑运行为例,Linux同理
本案运行配置:
Win11/CPU i5/RAM 32G (实际运行使用约占用10G)
假设你已经下载好了需要的xxx.gguf模型文件,本案:
wizardcoder-python-13b-v1.0.Q5_K_M.gguf
下载地址:https://huggingface.co/TheBloke/WizardCoder-Python-13B-V1.0-GGUF
一、安装ollama
- ollama官方GitHub下载安装包:
https://github.com/ollama/ollama/releases/tag/v0.1.31
下载 OllamaSetup.exe 和 ollama-windows-amd64.exe - 安装 OllamaSetup.exe,运行点击即可完成
二、创建ollama模型
在 wizardcoder-python-13b-v1.0.Q5_K_M.gguf 同目录下创建Modelfile.txt文件
本案模型地址:D:\develop\model\wizardcoder-python-13b\wizardcoder-python-13b-v1.0.Q5_K_M.gguf
创建文件:D:\develop\model\wizardcoder-python-13b\Modelfile.txt
Modelfile.txt 内容如下(仅一行)
FROM D:\develop\model\wizardcoder-python-13b\wizardcoder-python-13b-v1.0.Q5_K_M.gguf
进入ollama-windows-amd64.exe所在目录,命令行打开终端cmd
运行如下命令
ollama-windows-amd64.exe create wizardcoder-13b-Q5 -f D:\develop\model\wizardcoder-python-13b\Modelfile.txt
create 后面紧跟的一个参数是创建模型名称,可以自定义
三、运行模型
# 使用python3.10 清华源安装ollama
pip install ollama -i https://pypi.tuna.tsinghua.edu.cn/simple
- 1
- 2
python 代码如下
import ollama

stream = ollama.chat(
    model='wizardcoder-13b-Q5:latest',
    messages=[{'role': 'user', 'content': 'what is 1 plus 1. show me python code. \nresponse:'}],
    stream=True,
)

for chunk in stream:
  print(chunk['message']['content'], end='', flush=True)
- 1
- 2
- 3
- 4
- 5
- 6
- 7
- 8
- 9
- 10

流式输出结果如上图,运行时 RAM 大约增加 10G
下面也写一个非流式输出代码,供参考
import ollama

response = ollama.chat(model='wizardcoder-13b-Q5:latest', messages=[
  {
    'role': 'user',
    'content': 'what is 1 plus 1. show me python code. \nresponse:',
  },
])
print(response['message']['content'])
- 1
- 2
- 3
- 4
- 5
- 6
- 7
- 8
- 9
整体内容到这里就结束了,接下来就可以自己尝试各种量化模型,并再自己封装成API使用了
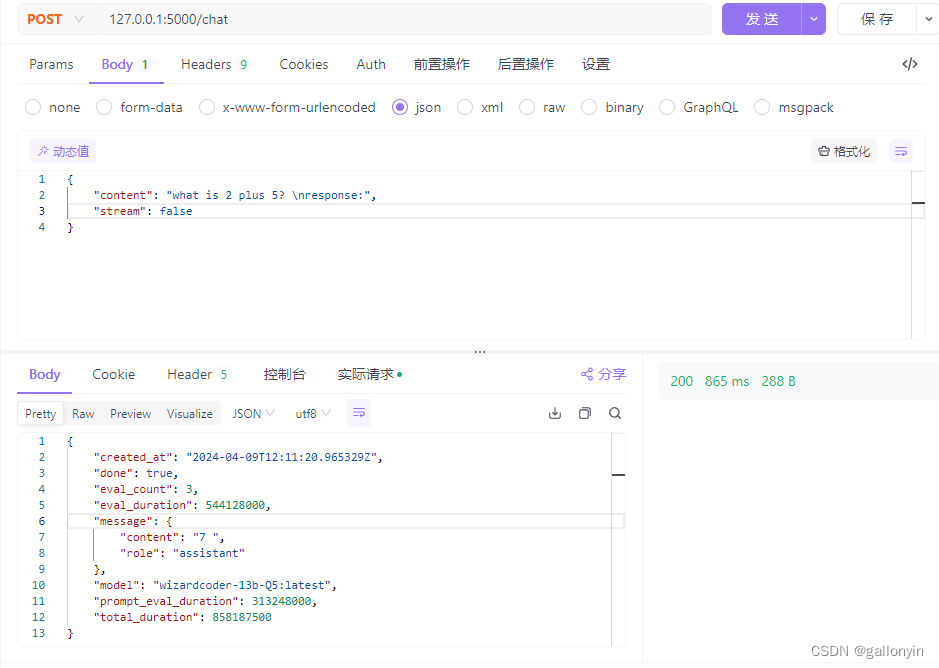
四、编写API
如果想做个API集成,接下来这里使用 flask 创建一个 API (假设你会安装和使用 flask),非最佳实践,仅供测试参考
pip install flask -i https://pypi.tuna.tsinghua.edu.cn/simple
- 1
import time

from flask import Flask, request, Response, stream_with_context, jsonify
import ollama

app = Flask(__name__)


def call_ollama(content):
    response = ollama.chat(
        model='wizardcoder-13b-Q5:latest',
        messages=[{'role': 'user', 'content': content}],
        stream=False,
    )
    return response


def generate(content):
    result = ollama.chat(
        model='wizardcoder-13b-Q5:latest',
        messages=[{'role': 'user', 'content': content}],
        stream=True,
    )
    for chunk in result:
        print(chunk['message']['content'], end='', flush=True)
        yield f"data: {chunk['message']['content']}\n\n"


@app.route('/chat', methods=['POST'])
def chat():
    data = request.get_json()
    if data is None or 'content' not in data:
        return jsonify({'error': 'Missing content field'}), 400
    content = data['content']
    stream = data.get('stream', False)
    if stream:
        # 创建流式响应对象
        return Response(generate(content=content), mimetype='text/event-stream')
    else:
        # 使用非流式输出
        response = call_ollama(content=content)
        return response


if __name__ == '__main__':
    app.run(debug=True)

- 1
- 2
- 3
- 4
- 5
- 6
- 7
- 8
- 9
- 10
- 11
- 12
- 13
- 14
- 15
- 16
- 17
- 18
- 19
- 20
- 21
- 22
- 23
- 24
- 25
- 26
- 27
- 28
- 29
- 30
- 31
- 32
- 33
- 34
- 35
- 36
- 37
- 38
- 39
- 40
- 41
- 42
- 43
- 44
- 45
- 46