
- 1CentOS 7.5下在线yum安装GCC与G++_yum install g++
- 2Java操作Hadoop进行基础操作_hadoop在java中的使用
- 3CTF-basecrack-Base编码分析工具安装及使用详解(MAC)
- 4简洁下载pytorch_geometric_pytorch geometric下载
- 5Java中浅拷贝与深拷贝_java int 深拷贝
- 6每个人的经济学-第一章“如何看待收入分配不均”
- 7YOLOv1/v2/v3简述 | 目标检测
- 8【DjangoDRF+缓存+JWT+RabbitMQ 七万字总结】_drf permission 缓存
- 9【oracle】oracle创建表、创建索引、创建自增id_oracle 建表 添加索引 自增
- 10微信小程序_backgroundfetch privacy fail错误
2.deeplabv3+的主干网络(mobilenet网络)
赞
踩
deeplabv3的论文中用了resnet网络,在这里用轻量级网络mobilenet替换resnet,下面分别是两个网络的代码。
1.mobilenet网络
代码如下:
- import math
- import os
- import cv2
- import numpy as np
- import torch
- import torch.nn as nn
- import torch.utils.model_zoo as model_zoo
-
-
- BatchNorm2d = nn.BatchNorm2d
-
- def conv_bn(inp, oup, stride):
- return nn.Sequential(
- nn.Conv2d(inp, oup, 3, stride, 1, bias=False),
- BatchNorm2d(oup),
- nn.ReLU6(inplace=True)
- )
-
- def conv_1x1_bn(inp, oup):
- return nn.Sequential(
- nn.Conv2d(inp, oup, 1, 1, 0, bias=False),
- BatchNorm2d(oup),
- nn.ReLU6(inplace=True)
- )
-
- class InvertedResidual(nn.Module):
- def __init__(self, inp, oup, stride, expand_ratio):
- super(InvertedResidual, self).__init__()
- self.stride = stride
- assert stride in [1, 2]
-
- hidden_dim = round(inp * expand_ratio)
- self.use_res_connect = self.stride == 1 and inp == oup
-
- if expand_ratio == 1:
- self.conv = nn.Sequential(
- #--------------------------------------------#
- # 进行3x3的逐层卷积,进行跨特征点的特征提取
- #--------------------------------------------#
- nn.Conv2d(hidden_dim, hidden_dim, 3, stride, 1, groups=hidden_dim, bias=False),
- BatchNorm2d(hidden_dim),
- nn.ReLU6(inplace=True),
- #-----------------------------------#
- # 利用1x1卷积进行通道数的调整
- #-----------------------------------#
- nn.Conv2d(hidden_dim, oup, 1, 1, 0, bias=False),
- BatchNorm2d(oup),
- )
- else:
- self.conv = nn.Sequential(
- #-----------------------------------#
- # 利用1x1卷积进行通道数的上升
- #-----------------------------------#
- nn.Conv2d(inp, hidden_dim, 1, 1, 0, bias=False),
- BatchNorm2d(hidden_dim),
- nn.ReLU6(inplace=True),
- #--------------------------------------------#
- # 进行3x3的逐层卷积,进行跨特征点的特征提取
- #--------------------------------------------#
- nn.Conv2d(hidden_dim, hidden_dim, 3, stride, 1, groups=hidden_dim, bias=False),
- BatchNorm2d(hidden_dim),
- nn.ReLU6(inplace=True),
- #-----------------------------------#
- # 利用1x1卷积进行通道数的下降
- #-----------------------------------#
- nn.Conv2d(hidden_dim, oup, 1, 1, 0, bias=False),
- BatchNorm2d(oup),
- )
-
- def forward(self, x):
- if self.use_res_connect:#使用残差边
- return x + self.conv(x)
- else:
- return self.conv(x)#不使用残差边
-
- class MobileNetV2(nn.Module):
- def __init__(self, n_class=1000, input_size=224, width_mult=1.):
- super(MobileNetV2, self).__init__()
- block = InvertedResidual
- input_channel = 32
- last_channel = 1280
- interverted_residual_setting = [
- # t, c, n, s
- [1, 16, 1, 1], # 256, 256, 32 -> 256, 256, 16
- [6, 24, 2, 2], # 256, 256, 16 -> 128, 128, 24 2
- [6, 32, 3, 2], # 128, 128, 24 -> 64, 64, 32 4
- [6, 64, 4, 2], # 64, 64, 32 -> 32, 32, 64 7
- [6, 96, 3, 1], # 32, 32, 64 -> 32, 32, 96
- [6, 160, 3, 2], # 32, 32, 96 -> 16, 16, 160 14
- [6, 320, 1, 1], # 16, 16, 160 -> 16, 16, 320
- ]
-
- assert input_size % 32 == 0
- input_channel = int(input_channel * width_mult)
- self.last_channel = int(last_channel * width_mult) if width_mult > 1.0 else last_channel
- # 512, 512, 3 -> 256, 256, 32
- self.features = [conv_bn(3, input_channel, 2)]
-
- for t, c, n, s in interverted_residual_setting:
- output_channel = int(c * width_mult)
- for i in range(n):
- if i == 0:
- self.features.append(block(input_channel, output_channel, s, expand_ratio=t))
- else:
- self.features.append(block(input_channel, output_channel, 1, expand_ratio=t))
- input_channel = output_channel
-
- self.features.append(conv_1x1_bn(input_channel, self.last_channel))
- self.features = nn.Sequential(*self.features)
-
- self.classifier = nn.Sequential(
- nn.Dropout(0.2),
- nn.Linear(self.last_channel, n_class),
- )
-
- self._initialize_weights()
-
- def forward(self, x):
- x = self.features(x)
- x = x.mean(3).mean(2)
- x = self.classifier(x)
- return x
-
- def _initialize_weights(self):
- for m in self.modules():
- if isinstance(m, nn.Conv2d):
- n = m.kernel_size[0] * m.kernel_size[1] * m.out_channels
- m.weight.data.normal_(0, math.sqrt(2. / n))
- if m.bias is not None:
- m.bias.data.zero_()
- elif isinstance(m, BatchNorm2d):
- m.weight.data.fill_(1)
- m.bias.data.zero_()
- elif isinstance(m, nn.Linear):
- n = m.weight.size(1)
- m.weight.data.normal_(0, 0.01)
- m.bias.data.zero_()
-
-
- def load_url(url, model_dir='./model_data', map_location=None):
- if not os.path.exists(model_dir):
- os.makedirs(model_dir)
- filename = url.split('/')[-1]
- cached_file = os.path.join(model_dir, filename)
- if os.path.exists(cached_file):
- return torch.load(cached_file, map_location=map_location)
- else:
- return model_zoo.load_url(url,model_dir=model_dir)
-
- def mobilenetv2(pretrained=False, **kwargs):
- model = MobileNetV2(n_class=1000, **kwargs)
- if pretrained:
- model.load_state_dict(load_url('https://github.com/bubbliiiing/deeplabv3-plus-pytorch/releases/download/v1.0/mobilenet_v2.pth.tar'), strict=False)
- return model
-
-
-
- if __name__ == '__main__':
-
- img_paths = r"img\000001.jpg"
- img = cv2.imread(img_paths)
- img = cv2.resize(img, (512, 512))
- images = img.reshape(1, 3, 512, 512)
- #images=img.reshape(1,3,1080,1920)
-
- data=torch.tensor(images,dtype=torch.float32)
- #print(data.sum())
- model=MobileNetV2()
- for i,layer in enumerate(model.features):
- print(i,layer)
-
- # output=model(data)
- # print(output)
-
-
-
-

代码运行结构如下:

结果从0到17共18层卷积网络。在该网络结构中,输入的数据大小是1X3X512X512,网络结构共有18层,在这里对下面的部分代码做一些解释:
解释1:

以上是网络结构,t表示是否需要升维,1表示不需要升维,6表示需要;c表示该网络结构输出的通道数;n表示该网络结构重复次数;s表示该网络结构的步长。如[6,24,2,2]表示不需要下采样,输出通道数为24,重复两次网络结构,步长是2,该层的网络输出结果如下:

我们对以上的n的所有值相加得1+2+3+4+3+3+1=17,再加上刚输入进来的一层网络结构刚好等于18层.
解释2:InvertedResidual类
如下图所示,mobilenetv2网络结构的最基本单元(InvertedResidual)就是下图结构:

上图中用了1X1卷积+3X3卷积+1X1卷积共3层网络构成,第一个1X1卷积起到升维的作用,可以使得获取的信息更丰富,第二个3X3卷积进行跨特征点信息提取,第3个1X1卷积进行降维,是为了减少计算量,也为了获取卷积的主要信息。从上面构建卷积网络的循环代码中可以看到,每个单元网络都是由InvertedResidual构成的,而不是简单的 卷积+BN+激活函数 的结构。
注意,这个类最后返回两种结果:一种是返回残差结果,一种是不使用残差边的结果。
解释3:代码中的self.features
如下图所示:self.features是一个列表变量,里面的conv_bn是代码中最上面的函数,其实就是定义的一个Conv2d+BN+ReLU6的一个卷积层。
![]()
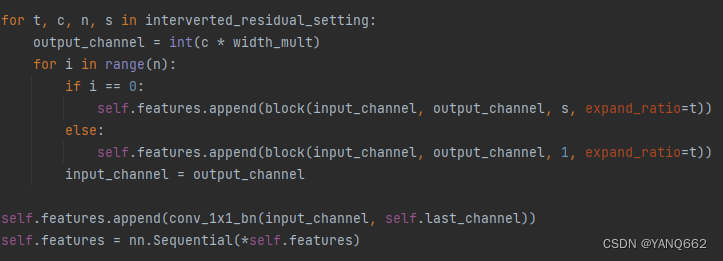
在这里定义了self.features后,它又在第二个图片的for循环里不断的添加(append)新的卷积层,这个for循环添加了17个卷积层,加上定义时的一个卷积层,总共刚好18个卷积层。
在这里,我们就对mobilenetv2的网络结构解释完了。
2.deeplabv3+对mobilenetv2的运用
在deeplabv3+里,我们首先写入上面的代码,文件名称为mobilenetv2.py,然后再写一个deeplabv3_plus.py文件对先前写的代码进行引用,代码如下:
- class MobileNetV2(nn.Module):
- def __init__(self, downsample_factor=8, pretrained=True):
- super(MobileNetV2, self).__init__()
- from functools import partial
-
- model = mobilenetv2(pretrained)
- self.features = model.features[:-1]
-
- self.total_idx = len(self.features)
- self.down_idx = [2, 4, 7, 14]
-
- if downsample_factor == 8:
- for i in range(self.down_idx[-2], self.down_idx[-1]):
- self.features[i].apply(
- partial(self._nostride_dilate, dilate=2)
- )
- for i in range(self.down_idx[-1], self.total_idx):
- self.features[i].apply(
- partial(self._nostride_dilate, dilate=4)
- )
- elif downsample_factor == 16:
- for i in range(self.down_idx[-1], self.total_idx):
- self.features[i].apply(
- partial(self._nostride_dilate, dilate=2)
- )
-
- def _nostride_dilate(self, m, dilate):
- classname = m.__class__.__name__
- if classname.find('Conv') != -1:
- if m.stride == (2, 2):
- m.stride = (1, 1)
- if m.kernel_size == (3, 3):
- m.dilation = (dilate//2, dilate//2)
- m.padding = (dilate//2, dilate//2)
- else:
- if m.kernel_size == (3, 3):
- m.dilation = (dilate, dilate)
- m.padding = (dilate, dilate)
-
- def forward(self, x):
- low_level_features = self.features[:4](x)
- x = self.features[4:](low_level_features)
- return low_level_features, x
对于以上代码的主要部分,在这里做部分解释如下:
解释一:self.features = model.features[:-1]
这个代码就是提取mobilenetv2代码的self.features,那这里为什么加了[:-1]呢?因为mobilenetv2最后加了一层卷积self.features.append(conv_1x1_bn(input_channel, self.last_channel)),这个卷积层其实就是mobilenetv2自身分类用的,而在deeplabv3+里不需要这一层卷积,所以下面的代码调用的是model.features[:-1]。
解释二:代码中的self.down_idx = [2, 4, 7, 14]
这行代码是与mobilenetv2代码的卷积层对应的,mobilenetv2代码有下图的几行代码:
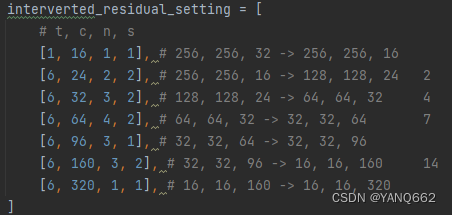
其实,[2, 4, 7, 14]中的几个数对应的是图片中s=2的卷积层的位置。
- 图片中的第二行的s=2对应卷积层的第3层(前两层是 1+1)位置(对应的坐标位置就是2),最前面有一层初始定义的卷积层(前面已经解释过);
- 图片中第3行的2对应第5层(前4层是1+1+2)位置(对应的坐标位置就是4);
- 图片中第4行的2对应第8层(前7层是1+1+2+3)位置(对应的坐标位置就是7);
- 图片中第6行的2对应第15层(前14层是1+1+2+3+4+3)位置(对应的坐标位置就是14);
解释3:downsample_factor == 8或者downsample_factor == 16
这两行代码表示如果downsample_factor == 8,表示我们只需要3次下采用,那么我们需要将[2, 4, 7, 14]的后两次采样的参数做一个修改(对第7和第14层的参数作一个修改),即将步长s修改为1.
前3次下采样的地方是:第0层到第1层之间做了一次下采样;第2层到第3层之间做了一次下采样;第4层到第5层之间做了一次下采样.
如果downsample_factor == 16,表示我们只需要4次下采用,那么我们需要将[2, 4, 7, 14]的后一次采样的参数做一个修改(第14层的参数作一个修改),即将步长s修改为1.
前4次下采样的地方是:第0层到第1层之间做了一次下采样;第2层到第3层之间做了一次下采样;第4层到第5层之间做了一次下采样;第7层到第8层之间做了一次下采样。
在这里,我们就对deeplabv3+中的mobilenet2模型的运用解释完了!!!

