
热门标签
热门文章
- 1Mysql数据分片技术(二)——轻量分库分表框架Sharding-jdbc实例_数据分片技术框架
- 2PostgreSql表字段变更常用sql_pgsql修改字段长度
- 3向量点积计算_c++向量点积计算答案
- 4[Unity] Canvas 设置为 Screen Space - Camera 时,UI 被场景物体遮挡的解决办法:设置 Canvas 的 Plane Distance 为一个较小的数_canvas render mode camera 会被物体挡住
- 5kafka3.4.0单机版安装配置教程(kraft模式舍弃ZK)_基于kraft方式部署单机版
- 6Ipython和Jupyter Notebook介绍_ipython notebook
- 7使用 OpenAI Whisper 模型实现语音转文本
- 8Numpy 和 Matplotlib 基础_numpy~=1.19.2 matplotlib 什么版本匹配
- 9cmd执行python脚本命令_Python脚本实现在cmd执行相关命令
- 10将colab上训练的模型下载到本地_colab文件能保存到本地吗
当前位置: article > 正文
Python实现视频自动打码功能,避免看到羞羞的画面_浏览视频时自动打马赛克
作者:运维做开发 | 2024-06-26 19:09:29
赞
踩
浏览视频时自动打马赛克
前言
嗨呀嗨呀,最近重温了一档综艺节目 至于叫什么 这里就不细说了
老是看着看着就会看到一堆马赛克,由于太好奇了就找了一下原因,结果是因为某艺人塌房了…虽然但是 看综艺的时候满影响美观的
咳咳,这里我可不是来教你们如何解码的,我是来教你们如何打码的,嘿嘿
那今天就在这分享一下 视频打码功能如何用python来实现

准备工作
环境咱们还是使用 Python3.8 和 pycharm2021 即可
实现原理
- 将视频分为音频和画面
- 画面中出现人脸和目标比对,相应人脸进行打码
- 处理后的视频添加声音
模块
手动安装一下 cv2 模块 ,pip install opencv-python 安装
安装遇到报错,可以私信我
素材工具
我们需要安装一下 ffmpeg 音视频转码工具

代码解析
导入模块
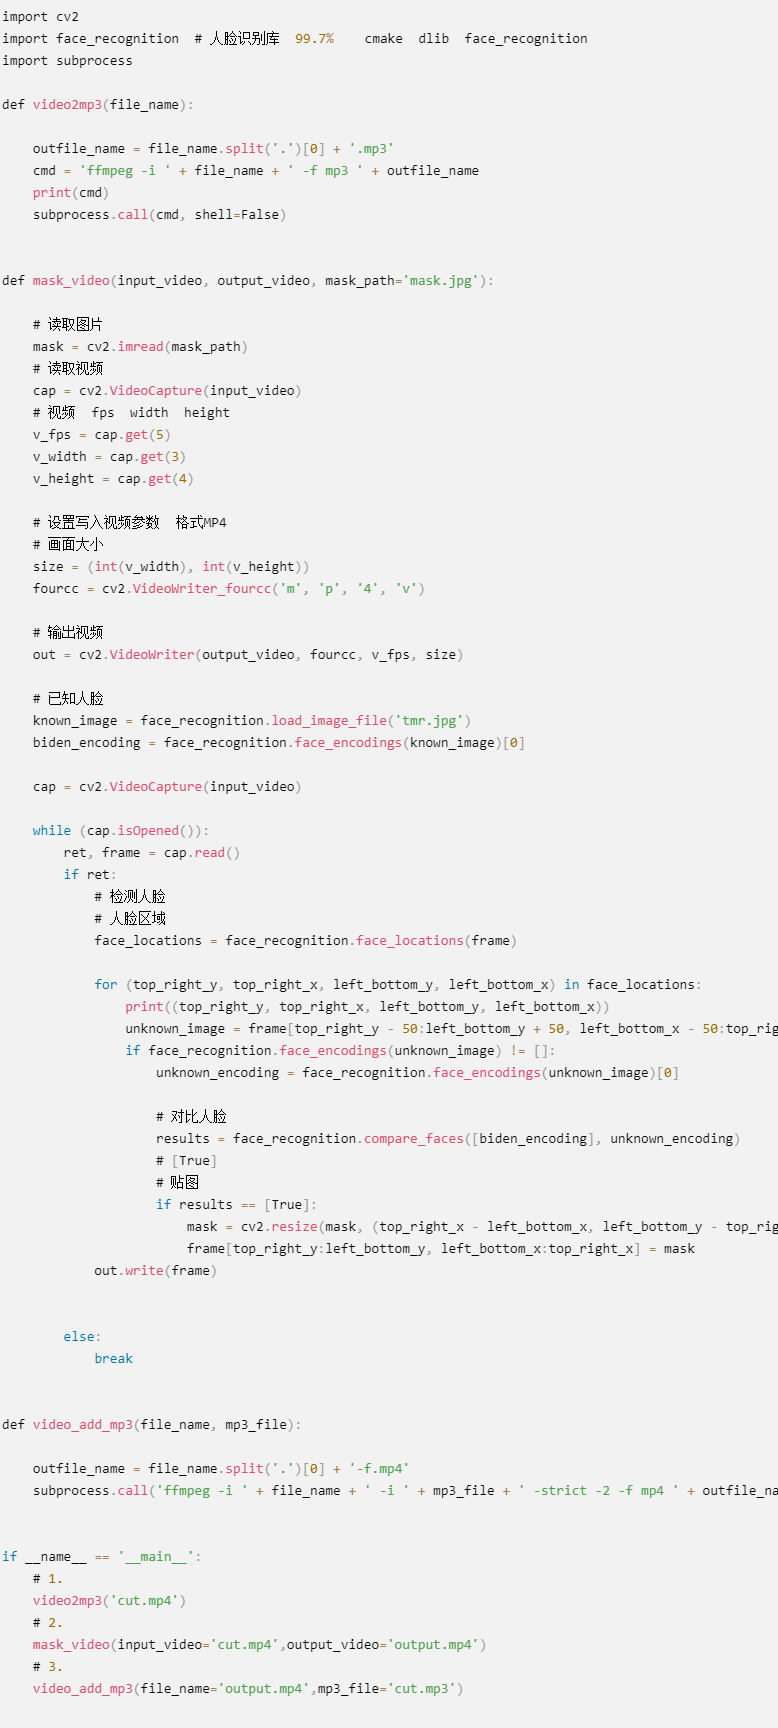
import cv2
import face_recognition  # 人脸识别库  99.7%    cmake  dlib  face_recognition
import subprocess
- 1
- 2
- 3
视频转为音频
def video2mp3(file_name):
    """
    :param file_name: 视频文件路径
    :return:
    """
    outfile_name = file_name.split('.')[0] + '.mp3'
    cmd = 'ffmpeg -i ' + file_name + ' -f mp3 ' + outfile_name
    print(cmd)
    subprocess.call(cmd, shell=False)
- 1
- 2
- 3
- 4
- 5
- 6
- 7
- 8
- 9
进行打码
# 源码领取:309488165 ###
def mask_video(input_video, output_video, mask_path='mask.jpg'):
    """
    :param input_video: 需打码的视频
    :param output_video: 打码后的视频
    :param mask_path: 打码图片
    :return:
    """
    # 读取图片
    mask = cv2.imread(mask_path)
    # 读取视频
    cap = cv2.VideoCapture(input_video)
    # 视频  fps  width  height
    v_fps = cap.get(5)
    v_width = cap.get(3)
    v_height = cap.get(4)

- 1
- 2
- 3
- 4
- 5
- 6
- 7
- 8
- 9
- 10
- 11
- 12
- 13
- 14
- 15
- 16
设置写入视频参数 格式MP4
画面大小
size = (int(v_width), int(v_height))
fourcc = cv2.VideoWriter_fourcc('m', 'p', '4', 'v')
- 1
- 2
输出视频
out = cv2.VideoWriter(output_video, fourcc, v_fps, size)
- 1
已知人脸
    known_image = face_recognition.load_image_file('tmr.jpg')
    biden_encoding = face_recognition.face_encodings(known_image)[0]

    cap = cv2.VideoCapture(input_video)

    while (cap.isOpened()):
        ret, frame = cap.read()
        if ret:
            # 检测人脸
            # 人脸区域
            face_locations = face_recognition.face_locations(frame)

            for (top_right_y, top_right_x, left_bottom_y, left_bottom_x) in face_locations:
                print((top_right_y, top_right_x, left_bottom_y, left_bottom_x))
                unknown_image = frame[top_right_y - 50:left_bottom_y + 50, left_bottom_x - 50:top_right_x + 50]
                if face_recognition.face_encodings(unknown_image) != []:
                    unknown_encoding = face_recognition.face_encodings(unknown_image)[0]

                    # 对比人脸
                    results = face_recognition.compare_faces([biden_encoding], unknown_encoding)
                    # [True]
                    # 贴图
                    if results == [True]:
                        mask = cv2.resize(mask, (top_right_x - left_bottom_x, left_bottom_y - top_right_y))
                        frame[top_right_y:left_bottom_y, left_bottom_x:top_right_x] = mask
            out.write(frame)


        else:
            break
- 1
- 2
- 3
- 4
- 5
- 6
- 7
- 8
- 9
- 10
- 11
- 12
- 13
- 14
- 15
- 16
- 17
- 18
- 19
- 20
- 21
- 22
- 23
- 24
- 25
- 26
- 27
- 28
- 29
- 30
音频添加到画面
def video_add_mp3(file_name, mp3_file):
    """
    :param file_name: 视频画面文件
    :param mp3_file:  视频音频文件
    :return:
    """
    outfile_name = file_name.split('.')[0] + '-f.mp4'
    subprocess.call('ffmpeg -i ' + file_name + ' -i ' + mp3_file + ' -strict -2 -f mp4 ' + outfile_name, shell=False)
- 1
- 2
- 3
- 4
- 5
- 6
- 7
- 8
完整代码
点击文末名片领取即可
声明:本文内容由网友自发贡献,不代表【wpsshop博客】立场,版权归原作者所有,本站不承担相应法律责任。如您发现有侵权的内容,请联系我们。转载请注明出处:https://www.wpsshop.cn/w/运维做开发/article/detail/760235
推荐阅读

相关标签

