
热门标签
热门文章
- 1UE5增强输入系统 Enhanced Input_ue5 快速按ad有延迟
- 2NAN报错_nan 报错
- 3记:lora及lorawan的一些概念话_lora调制解调器
- 4Homebrew 安装指定版本软件_brew 更新指定版本cmake
- 5Hortonworks HDP3.1.0 / HDF 3.4.0 官方资源下载地址._hortonworks3.0下载
- 6AIGC专题:Sora实现文生视频跨越式突破,AIGC持续正反馈
- 7Redis入门详解(一)—Redis数据类型及命令、SpringBoot整合Redis_redis关系型数据库
- 8计算机专业:未来的“万金油”还是过时的选择
- 9spring Ai框架整合Ollama,调用本地大模型_ollamachatclient
- 10STM32循迹小车系列教程(三)—— 使用灰度传感器循迹_stm32灰度传感器循迹的程序
当前位置: article > 正文
SpringBoot 整合WebService_springboot webservice
作者:黑客灵魂 | 2024-07-04 10:38:28
赞
踩
springboot webservice
WebService
Web服务(Web Services)是一种基于网络的标准化的软件系统,允许不同的应用程序通过网络相互通信和交互。它们使用标准化的网络协议和数据格式,使得不同平台、不同语言编写的应用程序能够互相通信和交换数据。
在现代软件开发中,构建可靠的Web服务是至关重要的。Apache CXF是一个功能强大的Java框架,用于构建Web服务和Web应用程序。结合Spring Boot,我们可以快速搭建一个简单的WebService。本文将介绍如何使用Apache CXF和Spring Boot创建一个简单的WebService,并进行基本的测试。
1.简单介绍WebService
1.1. 类型
Web服务通常分为两种主要类型:
- SOAP Web服务:基于SOAP(Simple Object Access Protocol)协议的Web服务。SOAP是一种用于交换结构化信息的协议,它使用XML作为消息格式,并通常通过HTTP协议进行传输。
- RESTful Web服务:基于REST(Representational State Transfer)原则的Web服务。RESTful服务使用标准的HTTP方法(如GET、POST、PUT、DELETE)来执行操作,并通常返回JSON或XML格式的数据。
1.2. 架构
Web服务的架构通常包括以下关键组件:
- 服务提供者(Service Provider):提供Web服务的实体。它们发布服务并处理来自客户端的请求。
- 服务请求者(Service Requestor):使用Web服务的客户端应用程序。它们向服务提供者发送请求并处理响应。
- 服务描述(Service Description):Web服务的描述文件,通常使用WSDL(Web Services Description Language)或OpenAPI等格式来描述服务的接口和操作。
- 消息格式(Message Format):Web服务使用的数据交换格式,通常是XML或JSON。
- 通信协议(Communication Protocol):Web服务之间通信的协议,常见的包括HTTP、HTTPS、SMTP等。
1.3. 主要特点
Web服务具有以下主要特点:
- 跨平台性(Platform Independence):由于Web服务使用标准化的协议和数据格式,因此它们可以在不同的平台和操作系统上运行。
- 松耦合(Loose Coupling):Web服务通过标准化接口进行通信,服务提供者和请求者之间的耦合度较低,可以独立开发和部署。
- 可组合性(Composability):可以通过组合多个Web服务来创建复杂的应用程序。
- 可重用性(Reusability):Web服务可以被多个应用程序重复使用,从而提高了软件开发效率。
- 易于维护(Maintainability):由于Web服务使用标准化的接口和协议,因此易于维护和更新。
1.4. 使用场景
Web服务在许多场景下都得到了广泛应用,包括但不限于:
- 企业应用集成(Enterprise Application Integration,EAI):将不同的企业应用程序和系统集成在一起,实现数据和业务流程的无缝交互。
- 分布式系统:构建分布式系统和服务导向架构(Service-Oriented Architecture,SOA),提供跨网络的服务和资源共享。
- 移动应用程序开发:通过Web服务为移动应用程序提供数据和功能支持,与后端服务器进行通信和交互。
- 云计算:在云平台上部署和管理Web服务,提供云端服务和资源。
1.5. Web服务标准和技术
一些常见的Web服务标准和技术包括:
- SOAP(Simple Object Access Protocol):用于构建基于XML的Web服务的协议。
- WSDL(Web Services Description Language):用于描述Web服务的接口和操作的XML格式的语言。
- UDDI(Universal Description, Discovery, and Integration):用于注册和发现Web服务的协议和规范。
- REST(Representational State Transfer):一种基于HTTP协议的软件架构风格,用于构建RESTful Web服务。
- JSON(JavaScript Object Notation):一种轻量级的数据交换格式,通常用于RESTful Web服务的数据格式。
2.案例-WebServiceDemo
2.1.引入配置文件
首先,我们需要在项目中添加必要的依赖项。这些依赖项将帮助我们集成Apache CXF到Spring Boot应用程序中。我的使用的是gradle构建的项目
    // 引入WebService
    implementation 'org.apache.cxf:cxf-rt-frontend-jaxws:3.2.0'
    implementation 'org.apache.cxf:cxf-rt-transports-http:3.2.0'
- 1
- 2
- 3
<dependency>
    <groupId>org.apache.cxf</groupId>
    <artifactId>cxf-rt-frontend-jaxws</artifactId>
    <version>3.2.0</version>
</dependency>
<dependency>
    <groupId>org.apache.cxf</groupId>
    <artifactId>cxf-rt-transports-http</artifactId>
    <version>3.2.0</version>
</dependency>
- 1
- 2
- 3
- 4
- 5
- 6
- 7
- 8
- 9
- 10
- 11
2.2.创建接口
import com.fhr.student.entity.Student;
import javax.jws.WebParam;
import javax.jws.WebService;

@WebService
public interface StudentService {
    /**
     * 根据姓名获取学生信息
     * @param userName 学生姓名
     * @return 学生信息
     */
    Student getStudentInfoByName(@WebParam(name = "userName")String userName);
}
- 1
- 2
- 3
- 4
- 5
- 6
- 7
- 8
- 9
- 10
- 11
- 12
- 13
- 14
2.3.创建接口实现类
import com.fhr.service.StudentService;
import com.fhr.student.entity.Student;
import org.springframework.stereotype.Component;

import javax.jws.WebService;

/**
 * targetNamespace:目标命名控件,一般由接口所在包路径命名,不过是由里往外写:比如:我接口所在路径为:com.fhr.service 写为:http://service.fhr.com/
 */
@Component
@WebService(targetNamespace = "http://service.fhr.com/",endpointInterface = "com.fhr.service.StudentService")
public class StudentImpl implements StudentService {
    /**
     * 根据学生姓名获取学生信息
     * @param userName 学生姓名
     * @return 学生信息
     */
    @Override
    public Student getStudentInfoByName(String userName) {
        // TODO这里应该查询数据库
        System.out.println("传入的参数为:"+userName);
        Student student = new Student();
        student.setUserName(userName);
        student.setClassName("高三一班");
        student.setAge(14);
        return student;
    }
}

- 1
- 2
- 3
- 4
- 5
- 6
- 7
- 8
- 9
- 10
- 11
- 12
- 13
- 14
- 15
- 16
- 17
- 18
- 19
- 20
- 21
- 22
- 23
- 24
- 25
- 26
- 27
- 28
- 29
2.4.创建WebService配置类
我们需要配置CXF和发布WebService的端点。我们使用Spring Boot的配置类来完成这个任务。
import com.fhr.service.StudentService;
import org.apache.cxf.Bus;
import org.apache.cxf.bus.spring.SpringBus;
import org.apache.cxf.jaxws.EndpointImpl;
import org.apache.cxf.transport.servlet.CXFServlet;
import org.springframework.boot.web.servlet.ServletRegistrationBean;
import org.springframework.context.annotation.Bean;
import org.springframework.context.annotation.Configuration;
import javax.xml.ws.Endpoint;

@Configuration
public class WebServiceConfig {

    // 创建一个SpringBus Bean,作为Apache CXF的默认总线
    @Bean(name = Bus.DEFAULT_BUS_ID)
    public SpringBus springBus() {
        return new SpringBus();
    }

    // 注册CXF Servlet,用于处理WebService请求
    @Bean(name = "wbsBean")
    public ServletRegistrationBean dispatcherServlet() {
        // 创建一个ServletRegistrationBean,将CXFServlet映射到指定路径
        ServletRegistrationBean wbsServlet = new ServletRegistrationBean(new CXFServlet(), "/wbs/*");
        return wbsServlet;
    }

    // 定义WebService端点
    @Bean
    public Endpoint endpointPurchase(SpringBus springBus, StudentService studentService) {
        // 创建EndpointImpl对象,并将SpringBus和WebService实现类传入
        EndpointImpl endpoint = new EndpointImpl(springBus, studentService);
        // 将端点发布到指定路径
        endpoint.publish("/user-server");
        // 打印发布成功消息,显示服务的访问地址
        System.out.println("服务发布成功!地址为:http://localhost:8081/wbs/user-server");
        // 返回端点对象
        return endpoint;
    }
}
- 1
- 2
- 3
- 4
- 5
- 6
- 7
- 8
- 9
- 10
- 11
- 12
- 13
- 14
- 15
- 16
- 17
- 18
- 19
- 20
- 21
- 22
- 23
- 24
- 25
- 26
- 27
- 28
- 29
- 30
- 31
- 32
- 33
- 34
- 35
- 36
- 37
- 38
- 39
- 40
- 41
2.5.测试
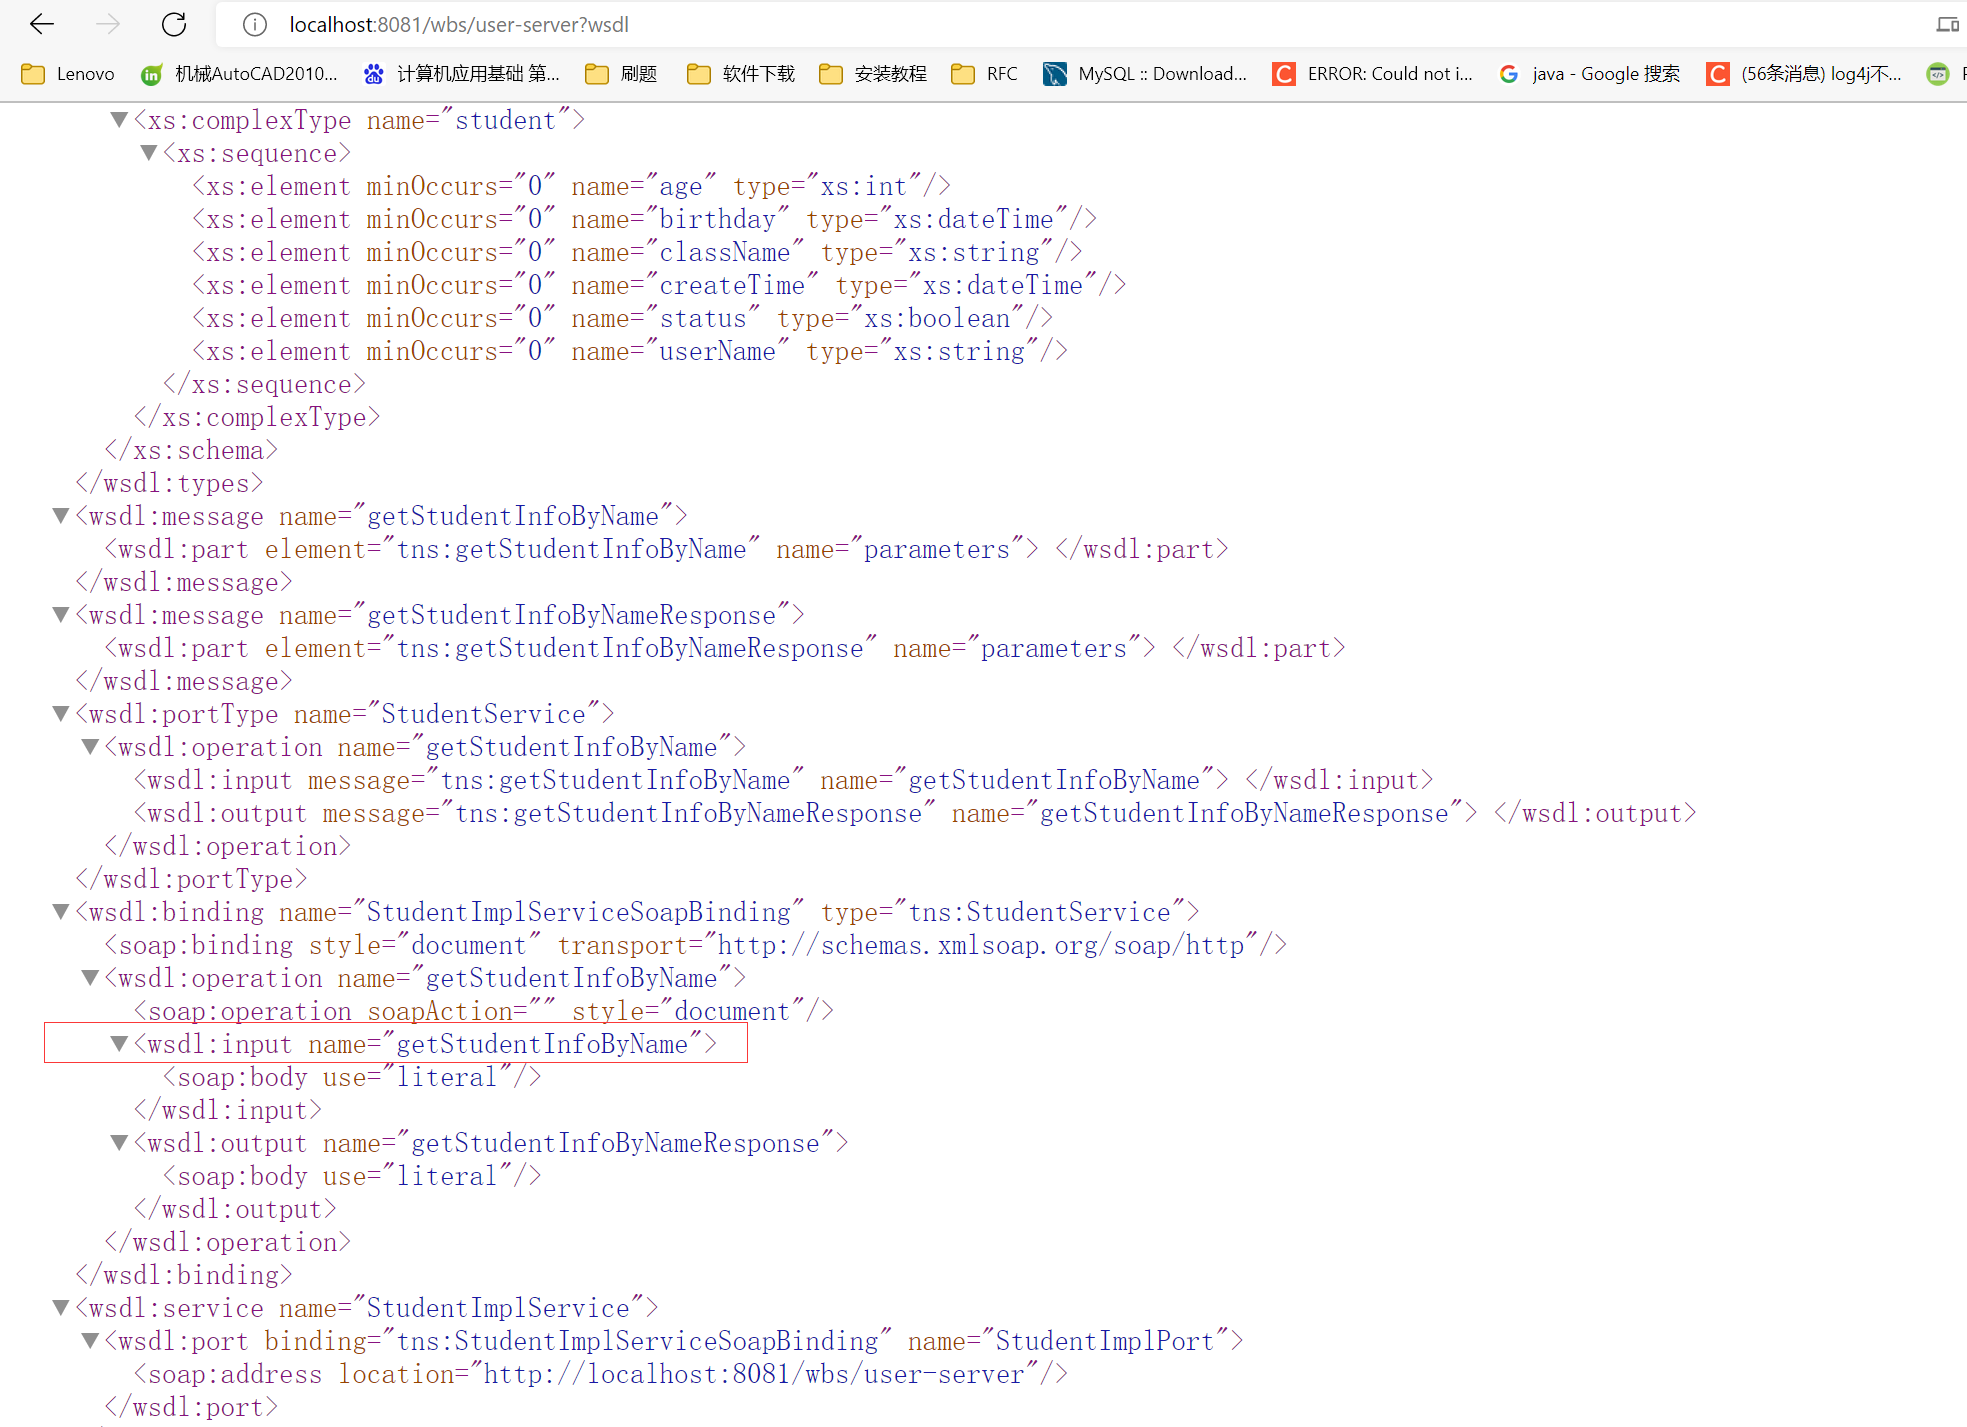
启动项目后,您可以在浏览器中输入
http://localhost:8081/wbs/user-server?wsdl来查看WebService的WSDL文档。
# 启动项目
	在浏览器的地址中输入 http://localhost:8081/wbs/user-server?wsdl
- 1
- 2
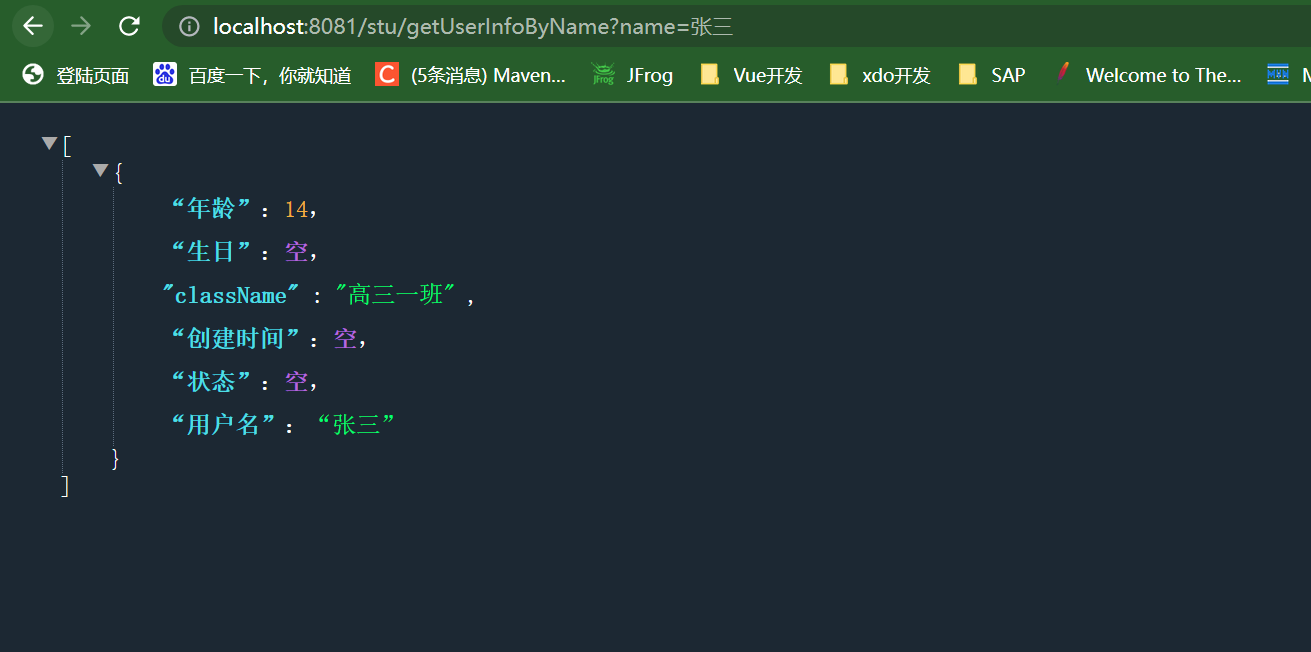
# 测试客户端
	为了方便直接在本地项目测试
	在浏览器中输入 测试
- 1
- 2
- 3
import org.apache.cxf.endpoint.Client;
import org.apache.cxf.jaxws.endpoint.dynamic.JaxWsDynamicClientFactory;
import org.springframework.web.bind.annotation.GetMapping;
import org.springframework.web.bind.annotation.RequestMapping;
import org.springframework.web.bind.annotation.RequestParam;
import org.springframework.web.bind.annotation.RestController;

@RestController
@RequestMapping("/stu")
public class StudentController {

    // 定义了一个映射到路径"/stu/getUserInfoByName"的GET请求处理方法
    @GetMapping("/getUserInfoByName")
    public Object[] getUserInfoByName(@RequestParam("name")String name){
        // 创建JaxWsDynamicClientFactory实例,用于动态创建客户端
        JaxWsDynamicClientFactory proxyFactoryBean =  JaxWsDynamicClientFactory.newInstance();
        // 使用动态客户端工厂创建客户端对象,并指定WebService的WSDL地址
        Client client = proxyFactoryBean.createClient("http://localhost:8081/wbs/user-server?wsdl");
        // 定义一个Object数组用于存储调用WebService方法后的返回结果
        Object[] objects = new Object[0];

        // 调用远程WebService方法
        try {
            // 调用客户端的invoke方法,传入方法名和参数,获取WebService方法的返回结果
            objects = client.invoke("getStudentInfoByName", name);
        } catch (Exception e) {
            // 捕获异常,打印异常信息
            e.printStackTrace();
        }
        // 返回WebService方法的返回结果
        return objects;
    }
}
- 1
- 2
- 3
- 4
- 5
- 6
- 7
- 8
- 9
- 10
- 11
- 12
- 13
- 14
- 15
- 16
- 17
- 18
- 19
- 20
- 21
- 22
- 23
- 24
- 25
- 26
- 27
- 28
- 29
- 30
- 31
- 32
- 33
- 34
- 35
声明:本文内容由网友自发贡献,不代表【wpsshop博客】立场,版权归原作者所有,本站不承担相应法律责任。如您发现有侵权的内容,请联系我们。转载请注明出处:https://www.wpsshop.cn/w/黑客灵魂/article/detail/786496
推荐阅读
相关标签

