- 1k8s技术预研5--Kubernetes集群的安全设置
- 2SparkSQL数据源代码分析_在右侧编辑器补充代码,加载people.json文件,以覆盖的方式保存到people路径里,继续
- 3nacos添加权限控制的鉴权功能_nacos开启鉴权
- 4nmap基础命令使用_nmap 发送指令
- 5Delphi Architect强大视觉设计功能_delphi 机器视觉
- 6词性标注规范表_词类标记规范
- 7视口变换ViewPort transformation 和空间拾取
- 8数学建模 (线性规划 python代码 两种)_线性规划怎么编程
- 9IntelliJ IDEA创建一个spark的项目_idea创建spark项目
- 10windows下docker环境搭建与运行实战_windows docker
HNU-操作系统OS-2023期中考试_湖南大学操作系统期中
赞
踩
前言
【2023.4.17】
今天考了OS期中考试,特别傻地最后改错了一道10分的题目,很难受。应该是考差了。
回忆一下今天考试的题目,为可能需要的后继者提供帮助(往年期中考题极难获得)
我这里先给出题目,有时间我再补充答案,太忙了,实验和小班,喘不过气来。
欢迎物理催更
【2023.5.20补充】
今天验收的时候恰好助教找我们做验证第四题,就顺便做了新的一些更新,更新算完全了)
【2024.5.10补充】
关于第4题进程号的补充
【2024.5.11更正】
1.4更正答案,给出了具体计算方法。给出了两种计算方法,以及比较。推荐使用第一种。
试卷总共6道题目
第一题:基础题(20分)
1.1(4分)
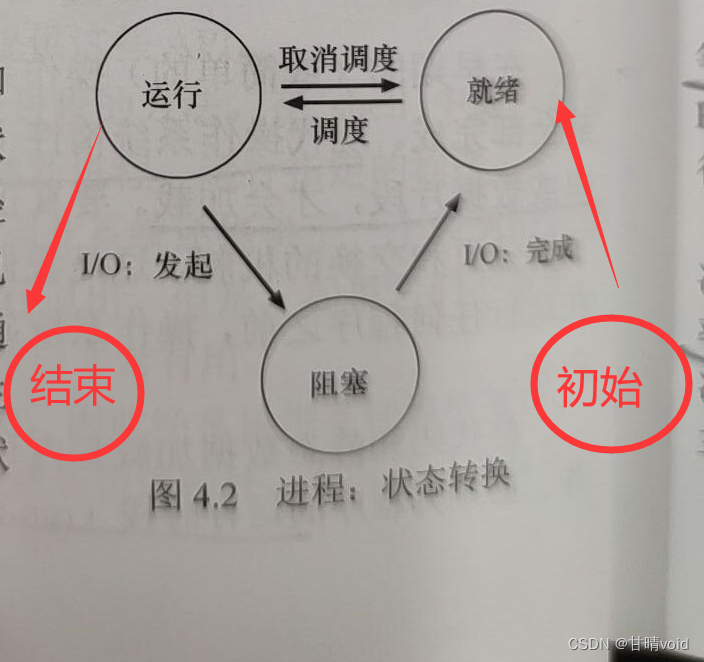
进程状态一共有多少个,是哪些?哪些状态只出现一次,哪些出现多次?
答:
- 初始,运行,就绪,阻塞,结束
- 只出现一次:初始,结束
- 出现多次:运行,就绪,阻塞
1.2(4分)
请结合进程状态转移图来说明,哪些是抢占式的,哪些是非抢占式的。
这道题不太确定。放张状态图在这里,等确定了再更新,或者就一直不知道了
【2024.5.10补充】
应该问的是下图中哪几条线是抢占式的,哪几条线是非抢占式的(我不是很明白在问什么,有点迷)

1.3(4分)
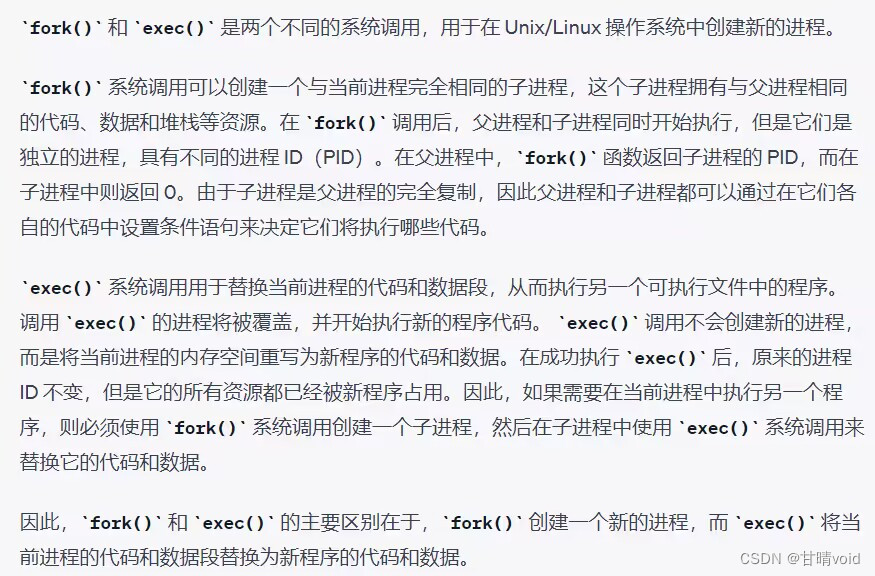
fork()与exec()调用的区别

答到:一个创建新的进程,一个不创建新的进程,即可,我觉的啊。
1.4(8分)
基于抢占式的调度,优先权值越小表示越优先,运行调度程序和进程切换用时1μs。
| 到达时间 | CPU耗时 | 优先权值 | |
| P1 | 2μs | 12μs | 10 |
| P2 | 1μs | 24μs | 30 |
| P3 | 0μs | 36μs | 20 |
从0开始调度程序,问平均周转时间为多少。
这个要自己计算,我算出来46.3【似乎正确】,注意在第一个个调度程序运行之前也要考虑切换的1μs
【2024.5.11补充】这道题跟去我之前放的一张卷子有一道题很像,就是这里注意优先权值越小表示越优先,正好相反。
周转时间:从到达开始,到完毕结束,这一整个过程的时间
【计算过程1】【推荐,这种是我考试时的做法】
这里理解为,现在是0时刻,此时P3已经到达了,1μs后,P2到达,再1μs后,P1到达:
- 0时刻,P3到达后,一开始没有与P3竞争的,准备调度P3,需要1μs切换。
- 1时刻,P2到达后,由于P2优先级比P3小,故仍然是P3运行。这段时间P3在运行.
- 2时刻,P1到达后,由于P1优先级比P3大,且是抢占式的,P1将取代P3先运行。准备调度P1,需要1μs切换。
- 3时刻,切换至P1,运行12μs。
- 15时刻,P1运行完成,调度发现P3优先级较大,准备调度P3,需要1μs切换。
- 16时刻,切换至P3,运行35μs。
- 51时刻,P3运行完成,只剩P2,准备调度P3,需要1μs切换。
- 52时刻,切换至P2,运行24μs。
- 76时刻,P2运行完成。
表格如下:
| 时刻 | 0-1 | 1-2 | 2-3 | 3-15 | 15-16 | 16-51 | 51-52 | 52-76 |
| 进程 | 切换 | P3 | 切换 | P1 | 切换 | P3 | 切换 | P2 |
P1周转 = 15 - 2 = 13
P2周转 = 76 - 1 = 75
P3周转 = 51 - 0 = 51
Pavg = (13 + 76 + 52) / 3 = 139 / 3 = 46.3
【计算过程2】【不推荐,这种似乎有硬往去年那张卷子上靠的嫌疑,有点生硬】
这里的到达时间理解为:在现在这个时刻(也就是要开始调度的时候),该进程已经到达了多久。
【这个应该是参考了去年的那张卷子,有了思维的惯性,但跟这道题其实不太契合】
调度顺序是 P1 P3 P2
运行时间轴
P1 P3 P2
1 12 1 36 1 24
计算公式:P周转 = 开始之前的等待时间 + 运行时间
P1周转 = 2 + 1 + 12 = 15
P3周转 = 0 + 14 + 36 = 50
P2周转 = 1 + 51 + 24 = 76
Pavg = (15 + 50 + 76) / 3 = 47 s
第二题:MLFQ多级反馈队列(10分)
问五条规则及其相应作用
五条规则:
- 如果A的优先级 > B的优先级,运行A(不运行B)
- 如果A的优先级 = B的优先级,轮转运行A和B
- 工作进入系统时,放在最高优先级(最上层队列)
- 一旦工作用完了其在某一层中的时间配额(无论中间主动放弃了多少次CPU),就降低其优先级(移入低一级队列)
- 经过一段时间S,就将系统中所有工作重新加入最高优先级队列
具体作用(书上有,自己稍作摘录即可)
【2024.5.10补充】这道题要拿分,是送分题
第三题:彩票调度与步长调度(20分)
(1)写出彩票的意义,问彩票数与步长的关系
(2)若ABC彩票数分别是200,300,500。给定整数60000,求出各自的票数。
(3)模拟一遍,直至各自里程再次相同。
(4)求出各自的CPU占比。
这一部分自己计算,不难
第四题:僵尸进程(20分)
(1)运行以下代码,写出输出结果(pid整数可以自定,但前后要自洽)
【更新】:拿到了考题的原版代码
- #include <stdio.h>
- #include <stdlib.h>
- #include <sys/types.h>
- #include <sys/wait.h>
- #include <unistd.h>
-
- int main()
- {
- printf("hello world (pid:%d)\n", (int)getpid());
- pid_t pid;
- int count = 0;
- pid = fork();
- if (pid < 0)
- {
- printf("error occurred!\n");
- }
- else if (pid == 0)
- {
- printf("%d son %4d\n", getppid(), getpid());
- count++;
- exit(0);
- }
- else
- {
- sleep(5);
- wait(NULL);
- printf("%d father %4d\n", getppid(), getpid());
- count++;
- }
- printf("count = %d\n",count);
- return 0;
- }

虚拟机上跑了一遍,考试的时候又写错了,都怪y神,当时复习的时候参考他的(doge)
结果如下(进程号对应好就可以)
【2024.5.10补充】这里1593只要比1599小即可。

(2)结合僵尸进程与孤儿进程的概念。这段代码会产生僵尸进程还是孤儿进程?
如果是孤儿进程,请修改代码使其产生僵尸进程;
如果是僵尸进程,请修改代码使其产生孤儿进程。
题目给的是僵尸进程,若要改成孤儿进程,做如下改动。
将sleep(5)改为放在子进程那边,exit也要换位置。
完整版如下
- #include <stdio.h>
- #include <stdlib.h>
- #include <sys/types.h>
- #include <sys/wait.h>
- #include <unistd.h>
-
- int main()
- {
- printf("hello world (pid:%d)\n", (int)getpid());
- pid_t pid;
- int count = 0;
- pid = fork();
- if (pid < 0)
- {
- printf("error occurred!\n");
- }
- else if (pid == 0)
- {
- sleep(5);
- printf("%d son %4d\n", getppid(), getpid());
- count++;
- }
- else
- {
- printf("%d father %4d\n", getppid(), getpid());
- count++;
- exit(0);
- }
- printf("count = %d\n",count);
- return 0;
- }

第五题:作业题(10分)
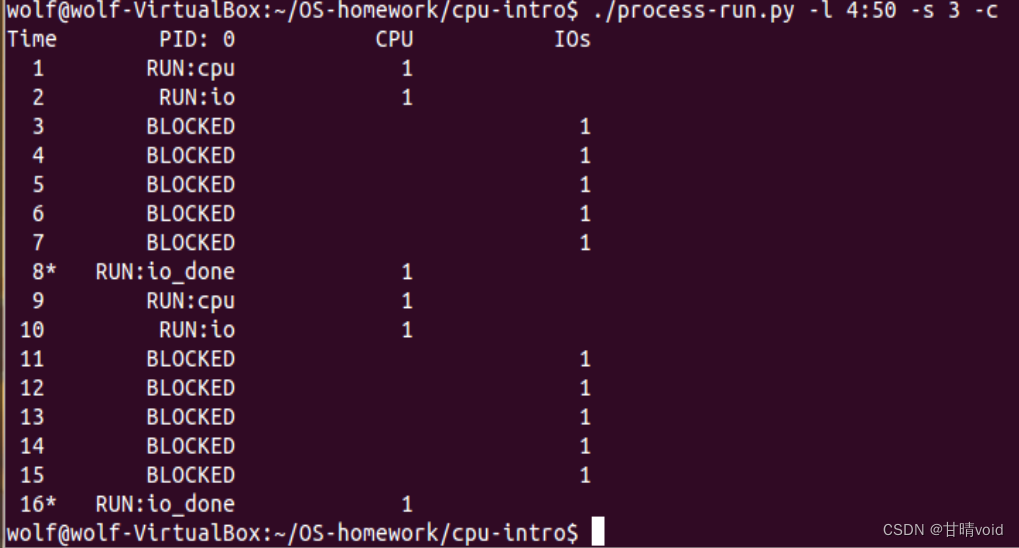
题目提供了./process-run -l 4:100 -s 3 -c和./process-run -l 4:0 -s 3 -c的运行截图
要求我们写出./process-run -l 4:50 -s 3 -c的运行截图
这道题我做错了,亏。实际上就是最简单就可以了,我想复杂了。
下面是一个参考的范例。

第六题:实验题【与Lab1实验紧密相关】(20分)
给了bootmain.S的一段代码,围绕这个展开问题。
- .globl start
- start:
- .code16 # Assemble for 16-bit mode
- cli # Disable interrupts
- cld # String operations increment
-
- # Set up the important data segment registers (DS, ES, SS).
- xorw %ax, %ax # Segment number zero
- movw %ax, %ds # -> Data Segment
- movw %ax, %es # -> Extra Segment
- movw %ax, %ss # -> Stack Segment
-
- # Enable A20:
- # For backwards compatibility with the earliest PCs, physical
- # address line 20 is tied low, so that addresses higher than
- # 1MB wrap around to zero by default. This code undoes this.
- seta20.1:
- inb $0x64, %al # Wait for not busy(8042 input buffer empty).
- testb $0x2, %al
- jnz seta20.1
-
- movb $0xd1, %al # 0xd1 -> port 0x64
- outb %al, $0x64 # 0xd1 means: write data to 8042's P2 port
-
- seta20.2:
- inb $0x64, %al # Wait for not busy(8042 input buffer empty).
- testb $0x2, %al
- jnz seta20.2
-
- movb $0xdf, %al # 0xdf -> port 0x60
- outb %al, $0x60 # 0xdf = 11011111, means set P2's A20 bit(the 1 bit) to 1
-
- # Switch from real to protected mode, using a bootstrap GDT
- # and segment translation that makes virtual addresses
- # identical to physical addresses, so that the
- # effective memory map does not change during the switch.
- lgdt gdtdesc
- movl %cr0, %eax
- orl $CR0_PE_ON, %eax
- movl %eax, %cr0
-
- # Jump to next instruction, but in 32-bit code segment.
- # Switches processor into 32-bit mode.
- ljmp $PROT_MODE_CSEG, $protcseg
-
- .code32 # Assemble for 32-bit mode
- protcseg:
- # Set up the protected-mode data segment registers
- movw $PROT_MODE_DSEG, %ax # Our data segment selector
- movw %ax, %ds # -> DS: Data Segment
- movw %ax, %es # -> ES: Extra Segment
- movw %ax, %fs # -> FS
- movw %ax, %gs # -> GS
- movw %ax, %ss # -> SS: Stack Segment

(1)为什么要打开A20,哪一段代码是打开A20的操作(8分)
具体的原因很复杂,点到即可,如下。
Intel早期的8086 CPU提供了20根地址线,可寻址空间范围即0~2^20(00000H~FFFFFH)的 1MB内存空间。但8086的数据处理位宽位16位,无法直接寻址1MB内存空间,所以8086提供了段地址加偏移地址的地址转换机制。
PC机的寻址结构超过了20位地址线的物理寻址能力。所以当寻址到超过1MB的内存时,会发生“回卷”(不会发生异常)。但下一代的基于Intel 80286 CPU的PC AT计算机系统提供了24根地址线,这样CPU的寻址范围变为 2^24=16M,同时也提供了保护模式,可以访问到1MB以上的内存了,此时如果遇到“寻址超过1MB”的情况,系统不会再“回卷”了,这就造成了向下不兼容。
为了保持完全的向下兼容性,IBM决定在PC AT计算机系统上加个硬件逻辑,来模仿以上的回绕特征,于是出现了A20 Gate。他们的方法就是把A20地址线控制和键盘控制器的一个输出进行AND操作,这样来控制A20地址线的打开(使能)和关闭(屏蔽/禁止)。
一开始时A20地址线控制是被屏蔽的(总为0),直到系统软件通过一定的IO操作去打开它(参看bootasm.S)。
很显然,在实模式下要访问高端内存区,这个开关必须打开,在保护模式下,由于使用32位地址线,如果A20恒等于0,那么系统只能访问奇数兆的内存,即只能访问0--1M、2-3M、4-5M......,这样无法有效访问所有可用内存。所以在保护模式下,这个开关也必须打开。
为了与最早的PC机向后兼容,物理地址行20被限制在低位,因此高于1MB的地址默认为零。此代码将撤消此操作,通过打开A20,将键盘控制器上的A20线置于高电位,就能使全部32条地址线可用,可以访问4G的内存空间。
总结来说,如果不打开A20,就会保留回卷机制,禁止访问大于1MB的空间,从而实现向下兼容,保留在实模式;而打开A20,就会撤销回卷机制,允许访问大于1MB的空间。
为了能访问更多的空间,打开A20是一个必须的操作。
代是这一段
- seta20.1:
- inb $0x64, %al # Wait for not busy(8042 input buffer empty).
- testb $0x2, %al
- jnz seta20.1
-
- movb $0xd1, %al # 0xd1 -> port 0x64
- outb %al, $0x64 # 0xd1 means: write data to 8042's P2 port
-
- seta20.2:
- inb $0x64, %al # Wait for not busy(8042 input buffer empty).
- testb $0x2, %al
- jnz seta20.2
-
- movb $0xdf, %al # 0xdf -> port 0x60
- outb %al, $0x60 # 0xdf = 11011111, means set P2's A20 bit(the 1 bit) to 1
(2)运行至33行后【也就是图中movw %ax, %ss 这一行】,ax,ds,es,ss寄存器的值(4分)
都是0
(3)如何使能和进入保护模式,这一段代码在哪里,请解释代码(6分)
使能
- movl %cr0, %eax
- orl $CR0_PE_ON, %eax
- movl %eax, %cr0
进入保护模式
- ljmp $PROT_MODE_CSEG, $protcseg
-
- .code32 # Assemble for 32-bit mode
- protcseg:
(4)【movl %eax, %cr0】这一段代码结束之后,cr0寄存器的值是多少(2分)
0x0

