- 12023-04-13_面试题复盘笔记(81)_开望科技有限公司java
- 2无监督学习,生成模型:自编码器(AE,VAE),GAN_ae神经网络
- 3用Python写个简单的推荐系统(一)_sim_pearson(prefs,person1,person2)
- 4resttemplate发送post请求
- 5阿里巴巴——三面,面试经历记录_阿里三面
- 6CSS入门学习笔记+案例_css2.3
- 7数据分析之理解数据_提取sepal-width
- 8在arrch64的ubutu上进行深度学习环境搭建_ubuntu 在/usr/lib下 存在arrch64-linux-gpu
- 9Halcon深度学习常用算子及参数解释,完整流程(一)
- 10基于Spring Boot的汽车租赁系统设计与实现
GitCode使用教程,创建项目仓库并上传代码(git)
赞
踩
零、说在最前面
可能有些同学还没有接触过代码托管,甚至可能也没使用过SVN。
没关系,我举个例子,假设现在你创建了一个Android工程,你的工程代码都在你自己的电脑上,你的所有的保存的修改都是存储在你本地电脑的磁盘里,并且没办法追溯到昨天修改的记录,除非你用小本本自己记录,然后,有一天你想查看某行代码是什么时候修改的,为什么这么修改,发现无从对证,也不能很方便地回滚代码到某一个时刻的版本,这对于项目工程的管理非常糟糕,如果是多人协作,那就更糟糕了,如果你的笔记本磁盘坏了,那就GameOver了。
这个时候,你需要一个代码版本控制系统,你的工程文件将保存在一台或多台服务器上,你的本地代码的提交记录都可以通过这个系统追溯到,可以查看提交的作者、时间、文件变化等等信息,更重要的是,你不用担心因为自己的笔记本磁盘坏了而GameOver,只要你的代码版本控制系统所在的服务器没事即可,谁来提供这个代码版本控制系统呢,如果你的项目不是那种机密项目,可以考虑使用GitHub、gitee以及本文要讲的GitCode,企业的话,一般在内网环境工作,用的比较多的是SVN,自己在内网搭建SVN服务器,不管是GitHub、gitee、GitCode还是SVN,它们都可以用来作为我们的代码版本控制系统。
一、关于GitCode(以前叫CODE.CHINA)
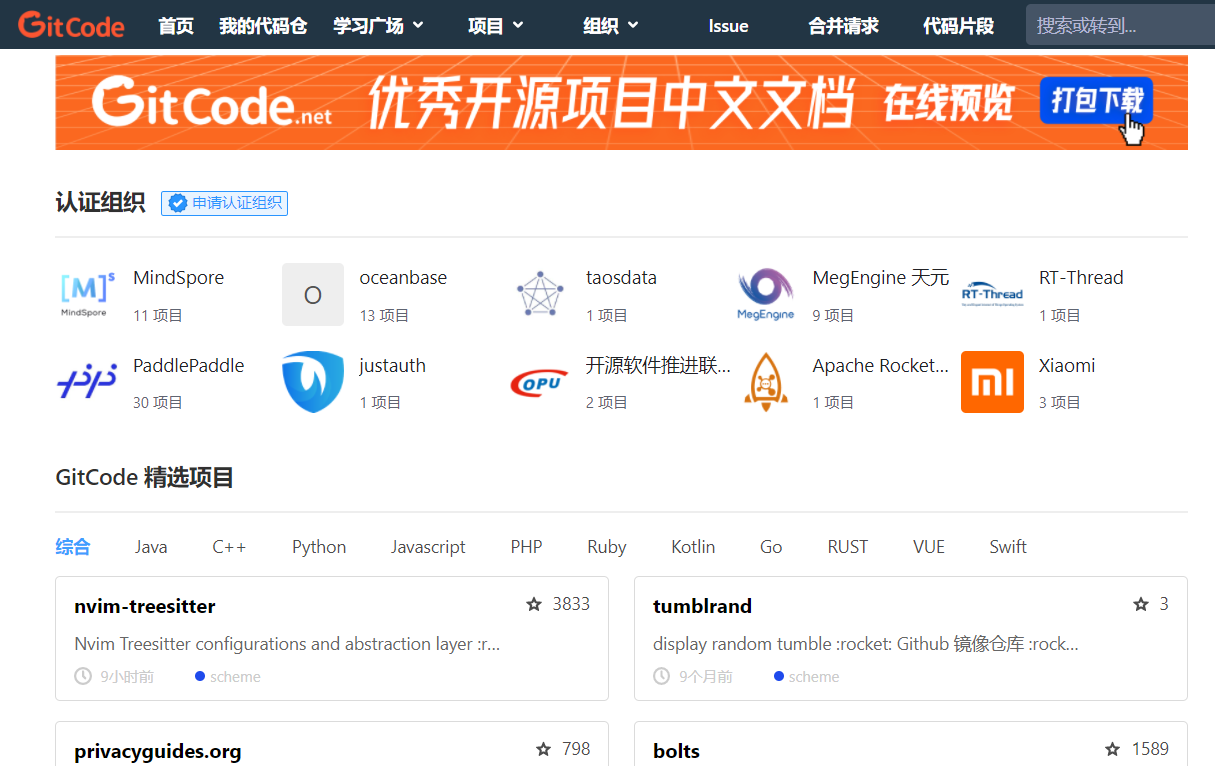
2020年9月10日,中国专业IT开发者社区 CSDN 正式推出全新升级的开源平台 GitCode(https://gitcode.net/)。面向国际化市场,具备使用GitLab 最新高可靠部署方案、独立第三方平台等特点,拥有海量用户基础和品牌加持。
GitCode地址:https://gitcode.net/
二、安装git
要使用GitCode,需要先安装git工具。
git工具下载:https://git-scm.com/downloads

安装完成后,在命令行输入git --version可以查看到git的版本。

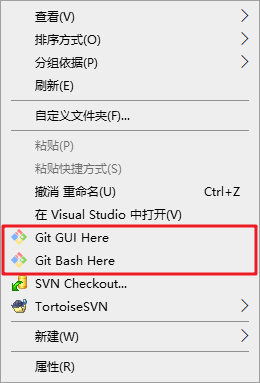
右键菜单也会出现相应的菜单。
三、登录GitCode
我们先在 GitCode上注册账号并登录。
如果你有CSDN账号,直接用CSDN账号登录即可。
GitCode地址:https://gitcode.net/
四、生成SSH密钥
由于我们的本地git仓库和 GitCode仓库之间的传输是通过SSH加密的,所以我们需要配置SSH密钥。
注:安装了
git工具,就可以使用ssh命令
打开cmd命令行,输入命令
ssh-keygen -t rsa -C "xxxxx@xxxxx.com"
- 1
注意:这里的
xxxxx@xxxxx.com只是生成的 sshkey 的名称,并不约束或要求具体命名为某个邮箱。
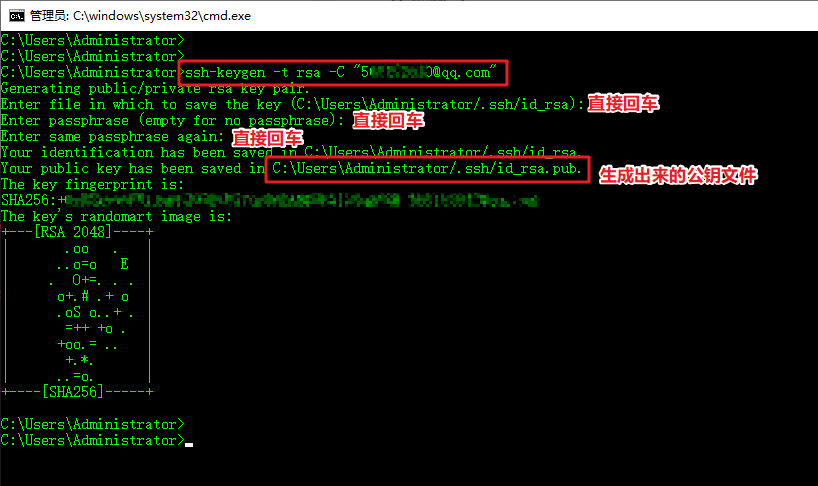
按照提示完成三次回车,即可生成ssh key。
可以看到,我们生成的公钥文件id_rsa.pub路径:C:\User\Adminstrator/.ssh/id_rsa.pub
进入该目录用文本编辑器打开

即可看到SSH公钥,下文中将会用到这个SSH公钥。

五、配置SSH密钥
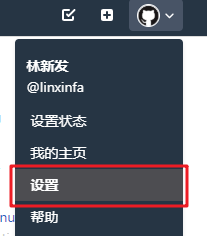
在GitCode网站点击设置
点击SSH密钥

拷贝刚刚的SSH密钥到框中,输入公钥标题,点击添加密钥

配置成功

六、新建一个项目
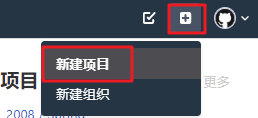
点击右上角的 +号,新建项目
如下,填写项目信息,最后点击创建即可。

新建项目成功

七、克隆项目到本地
点击克隆,然后点击SSH Clone项目的复制链接按钮,复制git链接

接着,在本地目录空白处右键菜单,点击Git Bash Here。

输入git clone 刚刚的git链接,如下
git clone git@codechina.csdn.net:linxinfa/mytest.git
- 1

成功后,本地目录即可看到克隆下来的文件。

八、关联本地工程到远程仓库
有时候,我们可能是先在本地有了工程文件,然后再在gitee上创建仓库的。
此时,可在本地库上使用命令 git remote add把它和 gitee 的远程库关联,如下
git remote add origin git@gitee.com:linxinfa/mytest.git
- 1
如果在使用命令 git remote add时报错:
git remote add origin git@gitee.com:linxinfa/mytest.git
fatal: remote origin already exists.
- 1
- 2
说明本地库已经关联了一个名叫 origin的远程库,此时,可以先用git remote -v查看远程库信息:
git remote -v
origin git@gitee.com:linxinfa/mytest.git (fetch)
origin git@gitee.com:linxinfa/mytest.git (push)
- 1
- 2
- 3
我们可以删除已有的远程库
git remote rm origin
- 1
再关联远程库
git remote add origin git@gitee.com:linxinfa/mytest.git
- 1
九、添加文件
在本地添加文件,如下,添加一个HelloWorld.txt文件。

十、执行git命令,提交文件
打开git,执行git的add、commit、push命令,即可将本地文件上传到远程仓库。
注:常用的git命令见文章最后面。

刷新GitCode页面,即可看到本地文件已经上传到GitCode上了

十一、小技巧
1、如何在README.md中显示图片
格式

先把图片上传到GitCode工程中,然后点击下载,即可得到图片的https链接


接着编辑README.md文件

以![()(https://xxxxxxxxxxxxxxxxxxx)]的格式,将https://xxxxxxxxxxxxxxxxxxx替换为刚刚复制的图片链接

提交即可显示图片

2、README.md如何换行
行末尾敲两个空格再回车
十二、删除项目
点击项目设置

点开高级的展开按钮

拉到最下面,即可看到删除项目按钮

十三、常用的git命令
常用的git命令
git init 					#把当前目录变成git可以管理的仓库
git clone git地址 			#克隆项目
git add readme.txt 			#添加一个文件,也可以添加文件夹
git add -A 					#添加全部文件
git rm test.txt 			#删除一个文件,也可以删除文件夹
git commit -a -m “some commit” #提交修改
git status 					#查看是否还有未提交
git log 					#查看最近日志
git reset --hard HEAD^ 		#版本回退一个版本
git reset --hard HEAD^^ 	#版本回退两个版本
git reset --hard HEAD~100 	#版本回退多个版本
git remote add origin +地址 #远程仓库的提交(第一次链接)
git push -u origin master	#仓库关联
git push 					#远程仓库的提交(第二次及之后)
git fetch 					#从远程获取代码库
git tag xxx 				#打tag
git tag 					#显示所有tag
git push --tag 				#提交tag
git branch -a 				#显示所有分支
git checkout 分支名 		#切换分支
git merge git分支 			#合并分支
- 1
- 2
- 3
- 4
- 5
- 6
- 7
- 8
- 9
- 10
- 11
- 12
- 13
- 14
- 15
- 16
- 17
- 18
- 19
- 20
- 21
更多的git命令,可以输入git --help查看,或者访问git命令手册:https://git-scm.com/docs
git --help
usage: git [--version] [--help] [-C <path>] [-c <name>=<value>]
           [--exec-path[=<path>]] [--html-path] [--man-path] [--info-path]
           [-p | --paginate | -P | --no-pager] [--no-replace-objects] [--bare]
           [--git-dir=<path>] [--work-tree=<path>] [--namespace=<name>]
           <command> [<args>]

These are common Git commands used in various situations:

start a working area (see also: git help tutorial)
   clone             Clone a repository into a new directory
   init              Create an empty Git repository or reinitialize an existing one

work on the current change (see also: git help everyday)
   add               Add file contents to the index
   mv                Move or rename a file, a directory, or a symlink
   restore           Restore working tree files
   rm                Remove files from the working tree and from the index
   sparse-checkout   Initialize and modify the sparse-checkout

examine the history and state (see also: git help revisions)
   bisect            Use binary search to find the commit that introduced a bug
   diff              Show changes between commits, commit and working tree, etc
   grep              Print lines matching a pattern
   log               Show commit logs
   show              Show various types of objects
   status            Show the working tree status

grow, mark and tweak your common history
   branch            List, create, or delete branches
   commit            Record changes to the repository
   merge             Join two or more development histories together
   rebase            Reapply commits on top of another base tip
   reset             Reset current HEAD to the specified state
   switch            Switch branches
   tag               Create, list, delete or verify a tag object signed with GPG

collaborate (see also: git help workflows)
   fetch             Download objects and refs from another repository
   pull              Fetch from and integrate with another repository or a local branch
   push              Update remote refs along with associated objects

'git help -a' and 'git help -g' list available subcommands and some
concept guides. See 'git help <command>' or 'git help <concept>'
to read about a specific subcommand or concept.
See 'git help git' for an overview of the system.
- 1
- 2
- 3
- 4
- 5
- 6
- 7
- 8
- 9
- 10
- 11
- 12
- 13
- 14
- 15
- 16
- 17
- 18
- 19
- 20
- 21
- 22
- 23
- 24
- 25
- 26
- 27
- 28
- 29
- 30
- 31
- 32
- 33
- 34
- 35
- 36
- 37
- 38
- 39
- 40
- 41
- 42
- 43
- 44
- 45
- 46
- 47


