- 1运用docker安装word press个人博客系统_ubuntu docker安装wordpross
- 2python写xml文件_pythonxml读取和写入
- 3LigaAI:从效率、度量和价值维度,成为研发团队的智能医生_liga ai
- 4美团“杀熟”,最终收割谁?_美团大数据杀熟案例分析
- 5linux 汇编 读取软盘,学习x86汇编语言7 使用INT13读取软盘数据
- 6(vue)前端获取ip方法_前端获取ip地址
- 7TP6+php8安装swoole扩展(宝塔)_thinkphp8 swoole
- 8室外低速自动导航车的设计(8)——A*算法在ROS上的移植_ros中a*1算法的总体思路
- 9马斯克突发Grok 1.5!上下文长度至128k、HumanEval得分超GPT-4
- 10C#微信公众号自动回复源码_c# 微信实现自动回复
微信小程序云开发操作全解_微信云开发不为空条件
赞
踩
云开发三大基础能力
- 云函数:运行在微信服务器上的函数,处理微信相关操作有天然优势,如获得用户信息异常方便(以前服务端解析很麻烦)
- 数据库:一个小程序可以直接操作的JSON数据库,可以直接操作数据库,不在需要服务端了。
- 存储:用来存储文件和图片
阅读本文之前最好对微信小程序有基本的了解,这个能够更加方便理解,如果能有一点点数据库知识那就更好了
云函数(配置)
第一步: project.config.json 中进行添加字段 "cloudfunctionRoot": "cloudfunctions/" 这个字段主要是为了指定存放云函数的文件夹 "cloudfunctions/"

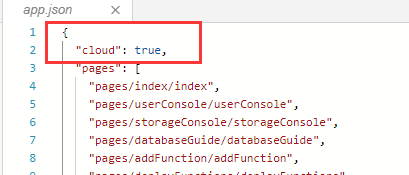
第二步: app.json 中添加 "cloud": true 指定是云开发模式

第三步: 添加云函数

第四步:添加对应的函数后,会下载依赖,这一步玩过node及npm的都知道,就是下载依赖,现在下载的是微信小程序官方的sdk。。。

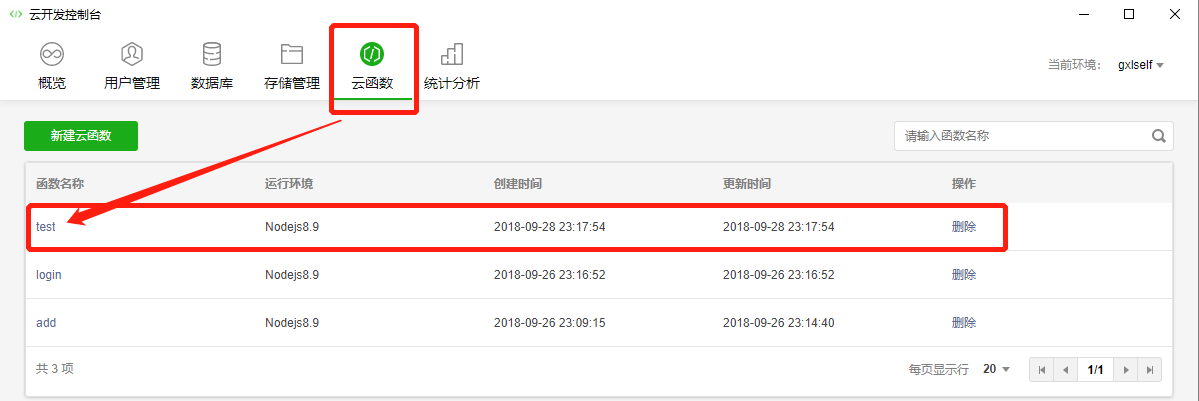
等下载完成后,点开云开发控制台的云函数一栏就会发现函数名称已经有了test这个云函数了。。。具体看下图所示:

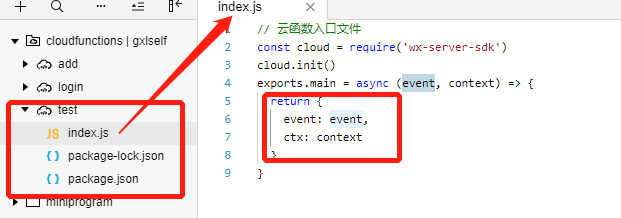
这个test云函数就是我们刚刚添加的云函数,此时在开发者工具中打开test目录下的index.js文件,就可以进行返回我们需要返回的内容。。。如下:测试

这里如果是利用了获取授权的按钮之后就会在return中返回用户登录后的openId和appId,所以我们就return默认的event对象以及context(上下文)对象。主要是为了看看小程序默认提供的对象包含了什么,我们可以用什么???
保存完了,还不够因为这个云函数我们都说了是小程序提供的服务平台来运行我们做的类似于接口的函数,所以我们必须得上传(每一次的更改操作都要上传☞),具体看下图:

等待上传完毕,在pages下index.wxml中需要做的是
<button open-type="getUserInfo" bindgetuserinfo="getUserInfgo">授权登录</button>由于获取授权需要配合点击后js的操作,所以在index.js中添加对应的getUserInfo的方法,并且注意这里的wx.cloud.callFunction方法,因为这是调用云函数的方法。
- getUserInfo: function(e){
- wx.cloud.callFunction({
- name: "test",//这里填写云函数的名字
- data: {
- userInfo: e // 这里是把参数e直接传给test函数处理
- },
- success: res => {
- console.log(res) // 返回的文本如下图所示:
- },
- fail: err => {
- console.log(err)
- }
- })
- }

可以看到输出的信息中会返回用户的openId以及appId还有对应云函数认证的信息。。。具体的实际可以自行测试查看
数据库
1.插入数据
- //首先 要实例一个数据库对象
-
- let db = wx.cloud.database();
- db.collection('test').add({
- data: {
- count: 1
- },
- success: res => {
- // 在返回结果中会包含新创建的记录的 _id
- this.setData({
- counterId: res._id,
- count: 1
- })
- wx.showToast({
- title: '新增记录成功',
- })
- console.log('[数据库] [新增记录] 成功,记录 _id: ', res._id)
- },
- fail: err => {
- wx.showToast({
- icon: 'none',
- title: '新增记录失败'
- })
- console.error('[数据库] [新增记录] 失败:', err)
- }
- })


这是利用添加数据的方法进行添加的数据,此时可以在云开发控制台看到对应得数据:下图

2.删除数据
- //删除数据:
- const db = wx.cloud.database()
- removeData:function(){
- db.collection('test').doc(this.data._id).remove({
- success: res => {
- wx.showToast({
- title: '删除成功',
- })
- this.setData({
- counterId: '',
- count: null,
- })
- },
- fail: err => {
- wx.showToast({
- icon: 'none',
- title: '删除失败',
- })
- console.error('[数据库] [删除记录] 失败:', err)
- }
- })
-
- },

3.修改数据
- //修改数据
- const db = wx.cloud.database()
- updateData:function(){
- const newCount = 1000
- db.collection('test').doc(this.data._id).update({
- data: {
- count: newCount
- },
- success: res => {
- console.log(res)
- this.setData({
- count: newCount
- })
- wx.showToast({
- title: '修改记录成功',
- })
- },
- fail: err => {
- icon: 'none',
- console.error('[数据库] [更新记录] 失败:', err)
- }
- })
- },

4.查询数据
- //查询数据
- const db = wx.cloud.database()
- getData:function(){
- db.collection('test').where({
- _openid: this.data.openid
- }).get({
- success: res => {
- this.setData({
- queryResult: JSON.stringify(res.data, null, 2)
- })
- console.log('[数据库] [查询记录] 成功: ', res)
- },
- fail: err => {
- wx.showToast({
- icon: 'none',
- title: '查询记录失败'
- })
- console.error('[数据库] [查询记录] 失败:', err)
- }
- })
-
-
- }

在数据库操作之前需要利用云函数login获取对应的openId, 获取方法请细看上方云函数test部分。。。
存储
上传图片
- // 上传图片
- doUpload: function () {
- // 选择图片
- wx.chooseImage({
- count: 1,
- sizeType: ['compressed'],
- sourceType: ['album', 'camera'],
- success: function (res) {
-
- wx.showLoading({
- title: '上传中',
- })
-
- const filePath = res.tempFilePaths[0]
-
- // 上传图片
- const cloudPath = 'my-image' + filePath.match(/\.[^.]+?$/)[0]
- wx.cloud.uploadFile({
- cloudPath,
- filePath,
- success: res => {
- console.log('[上传文件] 成功:', res)
-
- app.globalData.fileID = res.fileID
- app.globalData.cloudPath = cloudPath
- app.globalData.imagePath = filePath
-
- wx.navigateTo({
- url: '../storageConsole/storageConsole'
- })
- },
- fail: e => {
- console.error('[上传文件] 失败:', e)
- wx.showToast({
- icon: 'none',
- title: '上传失败',
- })
- },
- complete: () => {
- wx.hideLoading()
-
- }
- })
-
- },
- fail: e => {
- console.error(e)
- }
- })
- },

上传成功后在控制台查看下图

云开发已经基本上完成,当然云存储也可以存储json文件,然后请求静态数据~~~看自己的需要了。


