- 1Xcode Command Line tools安装失败.md_error: xcode command line tools are not found (it'
- 2python实战项目_driver.find_element_by_css_selector('button.questi
- 3c语言编程输入n个数输出素数,从键盘任意输入一个整数n,编程计算并输出1~n之间的所有素数之和 我编的这个程序怎么错了(C语言)...
- 45个经典激活函数_五种常见的激活函数
- 5论文阅读--Offline RL Without Off-Policy Evaluation
- 6Elasticsearch 7.X 聚合查询 及 ElasticsearchRestTemplate 操作
- 7SpringBoot Security的介绍_springbootsecurity
- 8荣耀手机出了鸿蒙系统了吗,荣耀手机能升级鸿蒙系统吗
- 9vue3中如何关闭eslint_vue3关闭eslint
- 10Java中使用yaml格式配置文件_dumperoptions.flowstyle.single_line
飞桨深度学习学院-Python小白逆袭大神Day(5)笔记_飞浆绘下载simhei
赞
踩
Day5-综合大作业
作业:
1.完成爱奇艺《青春有你2》评论数据爬取爬取任意一期正片视频下评论,评论条数不少于1000条 2、词频统计并可视化展示 3、绘制词云 4、结合PaddleHub,对评论进行内容审核
作业结果展示:


步骤一
安装必要的模块,字体等并导入
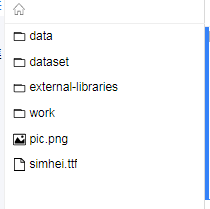
下边的代码主要是图片中所需要的字体设置(字体可在day3作业中下载simhei.ttf,并在day5中上传即可)
!mkdir .fonts
# 复制字体文件到该路径
!cp simhei.ttf .fonts/
#复制字体到当前使用的conda环境中的matplotlib下的指定路径
!cp simhei.ttf /opt/conda/envs/python35-paddle120-env/lib/python3.7/site-packages/matplotlib/mpl-data/fonts/ttf/
# Linux系统默认字体文件路径
# ls /usr/share/fonts/
# 查看系统可用的ttf格式中文字体
!fc-list :lang=zh | grep ".ttf"
- 1
- 2
- 3
- 4
- 5
- 6
- 7
- 8
- 9

from __future__ import print_function
import requests
import json
import re #正则匹配
import time #时间处理模块
import jieba #中文分词
import numpy as np
import matplotlib
import matplotlib.pyplot as plt
import matplotlib.font_manager as font_manager
from PIL import Image
from wordcloud import WordCloud  #绘制词云模块
import paddlehub as hub
import collections
- 1
- 2
- 3
- 4
- 5
- 6
- 7
- 8
- 9
- 10
- 11
- 12
- 13
- 14
注意其中多导入了collections,这个后边统计词频会用到,主要是由于python自带的字典是无序的,这个是有序的,所以比较方便。
步骤二
爱奇艺信息爬取,与解析
#请求爱奇艺评论接口,返回response信息
def getMovieinfo(url):
    '''
    请求爱奇艺评论接口,返回response信息
    参数  url: 评论的url
    :return: response信息
    '''
    # url = r"https://sns-comment.iqiyi.com/v3/comment/get_comments.action?agent_type=118&agent_version=9.11.5&authcookie=null&business_type=17&content_id=15068699100&hot_size=0&last_id=241062754621&page=&page_size=40"
    headers = {
        'User-Agent': 'Mozilla/5.0 (Windows NT 10.0; WOW64) AppleWebKit/537.36 (KHTML, like Gecko) Chrome/67.0.3396.99 Safari/537.36'
    }
    try:
        response = requests.get(url,headers=headers)
        # print(response.status_code)
        if response.status_code == 200:
        # 状态码为200时表示成功, 服务器已成功处理了请求
            json_text = json.loads(response.text)
            return json_text
        # print(json_text)
    except Exception as e:
        print(e)
    return None

#解析json数据,获取评论
def saveMovieInfoToFile(json_text):
    '''
    解析json数据,获取评论
    参数  lastId:最后一条评论ID  arr:存放文本的list
    :return: 新的lastId
    '''
    arr = []
    for i in range(40):
    # json_text.get('data').get('comments')得到的结果是列表
    # 由于page_size的值为40,因此需要循环40次
        comment = json_text.get('data').get('comments')[i].get('content')
        arr.append(comment)
    # lastId 的获取
    lastId = json_text.get('data').get('comments')[39].get('id')
    # print('comment获取成功,lastId:%s' % lastId)
    return arr,lastId
- 1
- 2
- 3
- 4
- 5
- 6
- 7
- 8
- 9
- 10
- 11
- 12
- 13
- 14
- 15
- 16
- 17
- 18
- 19
- 20
- 21
- 22
- 23
- 24
- 25
- 26
- 27
- 28
- 29
- 30
- 31
- 32
- 33
- 34
- 35
- 36
- 37
- 38
- 39
- 40
这段主要是评论抓取以及解析获取的json格式的评论(json对应的是python中的字典格式,可使用value = dict.get(key)。
首先是对URL的解析:
url = r"https://sns-comment.iqiyi.com/v3/comment/get_comments.action?agent_type=118&agent_version=9.11.5&authcookie=null&business_type=17&content_id=15068699100&hot_size=0&last_id=241062754621&page=&page_size=40"
- 1
可以看到其中主要修改的部分为last_id与page_size,page_size经过测试后发现最大值为40,因此设置为40;last_id每次都在改变,根据网页的源码可以发现,只要获取每次最后一个评论的id即可。
步骤三
定义clear_special_char(),去除文本中的特殊字符
#去除文本中特殊字符
def clear_special_char(content):
    '''
    正则处理特殊字符
    参数 content:原文本
    return: 清除后的文本
    '''
    s = r'[^\u4e00-\u9fa5a-zA-Z0-9]'
    # 用空格替换文本中特殊字符
    content= re.sub(s,'',content)
    return content
- 1
- 2
- 3
- 4
- 5
- 6
- 7
- 8
- 9
- 10
- 11
这步主要是对正则表达式的使用,以及re模块的使用。
步骤四
利用jieba进行分词
def fenci(text):
    '''
    利用jieba进行分词
    参数 text:需要分词的句子或文本
    return:分词结果
    '''
    words = [i for i in jieba.lcut(text)]
    return words
- 1
- 2
- 3
- 4
- 5
- 6
- 7
- 8
这步主要是对jieba的使用
步骤五
创建停用词list,主要数对文档的读操作
def stopwordslist(file_path):
    '''
    创建停用词表
    参数 file_path:停用词文本路径
    return:停用词list
    '''
    with open(file_path, encoding='UTF-8') as words:
        stopwords = [i.strip() for i in words.readlines()]
    return stopwords
- 1
- 2
- 3
- 4
- 5
- 6
- 7
- 8
- 9
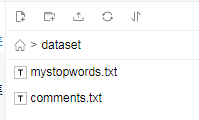
这里停用词的txt文档可以在网上随便下载一个上传即可。之后需要对停用词进行扩充,因为对评论的分词结果可能不正确,所以需要将这些不正确的词放入停用词中。(言喻、欣书等)

步骤六
去除停用词,统计词频
def movestopwords(file_path):
    '''
    去除停用词,统计词频
    参数 file_path:停用词文本路径 stopwords:停用词list counts: 词频统计结果
    return:None
    '''
    clean_word_list = []
    # 使用set集合可以更快的查找某元素是否在这个集合中
    stopwords = set(stopwordslist(file_path))
    # 遍历获取到的分词结果,去除停用词
    for word in all_words:
        if word not in stopwords and len(word) > 1:
            clean_word_list.append(word)
    # 由于没有返回值的限制,所以此处现在main()中定义counts变量,再使用全局变量counts,此句是对counts为全局变量的声明
    global counts
    # collections.Counter(clean_word_list)就是前边多导入的一个package,返回的值是一个有序字典,并且带有词频
    counts = collections.Counter(clean_word_list)
    return None
- 1
- 2
- 3
- 4
- 5
- 6
- 7
- 8
- 9
- 10
- 11
- 12
- 13
- 14
- 15
- 16
- 17
- 18
这步主要是对collections.Counter()的使用,collections.Counter(clean_word_list)就是前边多导入的一个package,返回的值是一个有序字典,并且带有词频
步骤七
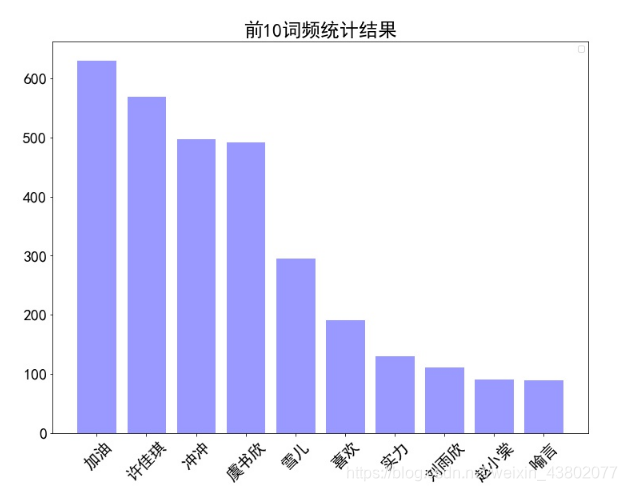
绘制词频统计表
def drawcounts(counts,topN):
    '''
    绘制词频统计表
    参数 counts: 词频统计结果 num:绘制topN
    return:none
    '''
    # counts.most_common(topN)返回的是一个列表,并且每个元素是一个元组,元组中的第一个元素是词,第二个元素是词频
    word_counts_topN = counts.most_common(topN) # 获取前topN最高频的词
    word_counts = []
    labels = []
    # 对列表进行遍历,获取词频word_counts 和该词的labels
    for ele in word_counts_topN:
        labels.append(ele[0])
        word_counts.append(ele[1])
    plt.rcParams['font.sans-serif'] = ['SimHei'] # 指定默认字体

    plt.figure(figsize=(12,9))
    plt.bar(range(topN), word_counts,color='r',tick_label=labels,facecolor='#9999ff',edgecolor='white')

    # 这里是调节横坐标的倾斜度,rotation是度数,以及设置刻度字体大小
    plt.xticks(rotation=45,fontsize=20)
    plt.yticks(fontsize=20)

    plt.legend()
    plt.title('''前%d词频统计结果''' % topN,fontsize = 24)
    plt.savefig('/home/aistudio/work/result/bar_result.jpg')
    plt.show()
    return
- 1
- 2
- 3
- 4
- 5
- 6
- 7
- 8
- 9
- 10
- 11
- 12
- 13
- 14
- 15
- 16
- 17
- 18
- 19
- 20
- 21
- 22
- 23
- 24
- 25
- 26
- 27
- 28
这步主要是对counts.most_common(topN)以及之前学过的matplotlib的使用,counts.most_common(topN)返回的是前topN词频的列表,并且每个元素是一个元组,元组中的第一个元素是词,第二个元素是词频
步骤八
根据词频绘制词云图,需要注意的是背景图的尺寸大小,如果太大会导致词云图片生成的非常慢;词云的词数和字体大小的设置需要根据背景图的大小来进行调整;scale值也不易过大,会使得生成的图片达到10M以上
def drawcloud(word_f):
    '''
    根据词频绘制词云图
    参数 word_f:统计出的词频结果
    return:none
    '''
    mask = np.array(Image.open('/home/aistudio/work/result/background.jpg')) # 定义词频背景
    wc = WordCloud(
        background_color='white', # 设置背景颜色
        font_path='/home/aistudio/simhei.ttf', # 设置字体格式
        mask=mask, # 设置背景图
        max_words=150, # 最多显示词数
        max_font_size=100 , # 字体最大值
        min_font_size  = 10,
        width = 400,
        scale=2  # 调整图片清晰度,值越大越清楚
    )
    wc.generate_from_frequencies(word_f) # 从字典生成词云
    wc.to_file('/home/aistudio/pic.png') # 将图片输出为文件
- 1
- 2
- 3
- 4
- 5
- 6
- 7
- 8
- 9
- 10
- 11
- 12
- 13
- 14
- 15
- 16
- 17
- 18
- 19
这步主要是对WordCloud的使用,主要的参数如下所示:
font_path : string #字体路径,需要展现什么字体就把该字体路径+后缀名写上,如:font_path = ‘黑体.ttf’
width : int (default=400) #输出的画布宽度,默认为400像素
height : int (default=200) #输出的画布高度,默认为200像素
mask : nd-array or None (default=None) #如果参数为空,则使用二维遮罩绘制词云。如果 mask 非空,设置的宽高值将被忽略,遮罩形状被 mask 取代。除全白(#FFFFFF)的部分将不会绘制,其余部分会用于绘制词云。如:bg_pic = imread(‘读取一张图片.png’),背景图片的画布一定要设置为白色(#FFFFFF),然后显示的形状为不是白色的其他颜色。可以用ps工具将自己要显示的形状复制到一个纯白色的画布上再保存,就ok了。
scale : float (default=1) #按照比例进行放大画布,如设置为1.5,则长和宽都是原来画布的1.5倍
min_font_size : int (default=4) #显示的最小的字体大小
max_words : number (default=200) #要显示的词的最大个数
stopwords : set of strings or None #设置需要屏蔽的词,如果为空,则使用内置的STOPWORDS
background_color : color value (default=”black”) #背景颜色,如background_color=‘white’,背景颜色为白色
max_font_size : int or None (default=None) #显示的最大的字体大小
步骤九
使用hub对评论进行内容分析
def text_detection():
    '''
    使用hub对评论进行内容分析
    return:分析结果

    '''
    test_text = []
    # 配置hub模型
    porn_detection_lstm = hub.Module(name='porn_detection_lstm')
    # 读取评论,并存入test_text 下
    with open("./dataset/comments.txt", "r") as f:
        for line in f:
            if len(line) <= 1:
                continue
            else:
                test_text.append(line)

    input_dict = {'text':test_text}
    results = porn_detection_lstm.detection(data=input_dict,use_gpu=True,batch_size=1)
    for index,item in enumerate(results):
        if item['porn_detection_key'] == 'porn':
            print(item['text'], ':', item['porn_probs'])
- 1
- 2
- 3
- 4
- 5
- 6
- 7
- 8
- 9
- 10
- 11
- 12
- 13
- 14
- 15
- 16
- 17
- 18
- 19
- 20
- 21
- 22
这步主要是对hub的使用,也就是调用hub.Module(name=‘porn_detection_lstm’)进行评论的色情检测。具体参数可以自行查阅
步骤10
输出结果
#评论是多分页的,得多次请求爱奇艺的评论接口才能获取多页评论,有些评论含有表情、特殊字符之类的
#num 是页数,一页10条评论,假如爬取1000条评论,设置num=100
if __name__ == "__main__":
    text_list = []
    # 起始url
    url = r"https://sns-comment.iqiyi.com/v3/comment/get_comments.action?agent_type=118&agent_version=9.11.5&authcookie=null&business_type=17&content_id=15068699100&hot_size=0&last_id=241062754621&page=&page_size=40"
    # 停用词路径
    file_path = r'./dataset/mystopwords.txt'
    # 停用词list
    topN = 10
    counts = None
    stopwords = stopwordslist(file_path)
    # 评论获取
    for i in range(30):
        json_text = getMovieinfo(url)
        arr,lastId = saveMovieInfoToFile(json_text)
        text_list.extend(arr)
        time.sleep(0.5)
        # print('lastId:%s,评论抓取成功' %lastId)
        # 去除特殊字符
        for text in arr:
            # 去除文本中特殊字符
            if text and len(text) > 2:
                content = clear_special_char(text)
                text_list.append(content)
        # print('数据获取成功')
        url = r"https://sns-comment.iqiyi.com/v3/comment/get_comments.action?agent_type=118&agent_version=9.11.5&authcookie=null&business_type=17&content_id=15068699100&hot_size=0&last_id=" +lastId+ "&page=&page_size=40"
    with open("./dataset/comments.txt", "w") as f:
    # 评论写入txt文档
        for line in text_list:
            if line != None:
                f.writelines(line)
                # print(line)
                f.writelines("\n")
        print('*' * 50)
        print('写入完成')
    print('共爬取评论:%d' %len(text_list))
    # 评论分词
    all_words = []
    for text in text_list:
        if text:
            all_words.extend(fenci(text))
    # 分词结果 去除停用词
    movestopwords(file_path)
    # 绘制词频展示图
    drawcounts(counts,topN)
    # 绘制词云
    drawcloud(counts)
    display(Image.open('pic.png')) #显示生成的词云图像
    text_detection()#显示色情评论及其概率
- 1
- 2
- 3
- 4
- 5
- 6
- 7
- 8
- 9
- 10
- 11
- 12
- 13
- 14
- 15
- 16
- 17
- 18
- 19
- 20
- 21
- 22
- 23
- 24
- 25
- 26
- 27
- 28
- 29
- 30
- 31
- 32
- 33
- 34
- 35
- 36
- 37
- 38
- 39
- 40
- 41
- 42
- 43
- 44
- 45
- 46
- 47
- 48
- 49
- 50
- 51
这步主要是对之前定义函数的调用,需要了解每个子函数的入参已经输出。
总结
经过深度学习7日打卡营Python小白逆袭大神的这个活动,系统的了解了机器学习的主要步骤,初步会使用paddle,学习到了网页爬取、数据可视化展示、图片分类、文本分类等。虽然时间很短,但是收获颇丰。希望以后还能参加类似活动,最后感谢飞桨深度学习学院举办这次活动。


