- 1AI-Xmind来袭:掌握恐怖生产力的神器!_xmind ai
- 2英特尔集成显卡+ChatGLM3大语言模型的企业本地AI知识库部署
- 3NotionAI - 文档领域的ChatGPT,一款 AI 加持的在线文档编辑和管理工具_notion ai在线
- 4MAE技术总结_mae csdn
- 5mysql中关于字符集的系统变量
- 62023年02月28日_OpenAI的团队成员分析_openai 设计团队 多少人
- 7用于视觉识别的深度卷积网络空间金字塔池化方法_需要1.2毫秒才能生成227×227图像的分类分数
- 8高性能网络数据捕获:netsniff-ng源码分析
- 9免费AI开源引擎:在电力电网工单系统中智能解析的应用场景
- 10EasyNLP 带你实现中英文机器阅读理解
直线检测——对比M-LSD直线检测(基于深度学习)与霍夫曼直线检测
赞
踩
前言
1.直线检测在好多实现应用中能用到到,比如文档扫描,辅助驾驶中的车道线检测,传统的算法用的最多应该属于霍夫曼直线检测,但传统算法都有一个痛苦的调参过程和只能对优化过的使用场景有较好的结果,换个场景可能就要重新调参。
2.MLSD是一种面向实时和轻量级的线段检测深度学习算法,论文地址:https://arxiv.org/abs/2106.00186,相对于传统算法,MLSD只是在训练模型的层面上会比较麻烦,在实现检测并不用去关心各种参数就能达到很好的效果。
3.这里的对比环境是Win 10, vs2019,OpenCV4.5, MLSD会用到NCNN加速库,使用的语言是C++。
一、霍夫曼变换直线检测
1.霍夫曼直线检测的原理
(1)对于直角坐标系中的任意一点A(x0,y0),经过点A的直线满足Y0=kX0+b.(k是斜率,b是截距)。
(2)那么在X-Y平面过点A(x0,y0)的直线簇可以用Y0=kX0+b表示,但对于垂直于X轴的直线斜率是无穷大的则无法表示。因此将直角坐标系转换到极坐标系就能解决该特殊情况。
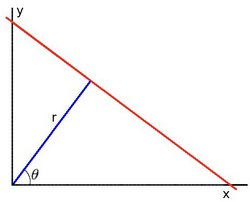
(3)在极坐标系中表示直线的方程为ρ=xCosθ+ySinθ(ρ为原点到直线的距离)。


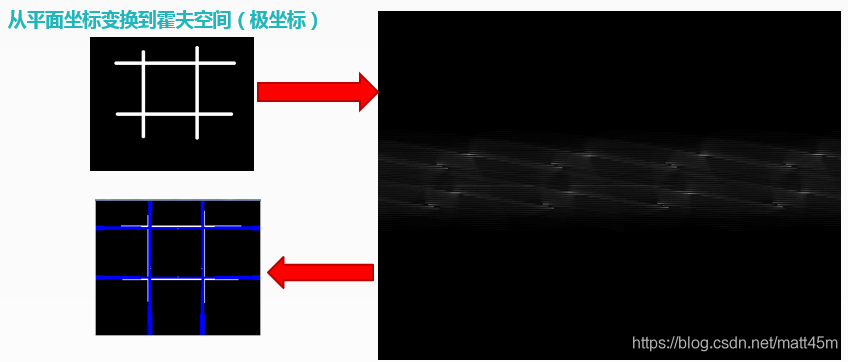
(4)对于任意一条直线上的所有点来说,变换到极坐标中,从[0~360]空间,可以得到r的大小,属于同一条直线上点在极坐标空(r, theta)必然在一个点上有最强的信号出现,根据此反算到平面坐标中就可以得到直线上各点的像素坐标。从而得到直线。

2.OpenCV封装有直线检测的函数,HoughLines()和HoughLinesP(),它们都能实现直线检测,差别是:HoughLines()函数使用标准的Hough变换HoughLinesP()函数使用概率Hough变换,即只通过分析点的子集并估计这些点都属于一条直线的概率,这在计算速度上更快。
3.基于OpenCV的霍夫曼直线检测代码,这个代码我之前用于拍照文档扫描时调过参数,觉得相对于拍照的文档扫描,已是不错的一个效果。
void getCanny(cv::Mat &gray, cv::Mat& canny)
{
	cv::Mat thres;
	double high_thres = threshold(gray, thres, 0, 255, cv::THRESH_BINARY | cv::THRESH_OTSU), low_thres = high_thres * 0.5;
	cv::Canny(gray, canny, low_thres, high_thres);
}

void lineDetection(cv::Mat &cv_src, cv::Mat &cv_dst)
{
	float w = cv_src.cols >= cv_src.rows ? 960.00 : 640.00;
	float h = cv_src.rows > cv_src.cols ? 960.00 : 640.00;

	float x_s = cv_src.cols / w;
	float y_s = cv_src.rows / h;
	cv::Mat cv_resize;
	cv::resize(cv_src, cv_resize, cv::Size(w, h));


	cv::Mat cv_gray, cv_canny;
	cv::cvtColor(cv_resize, cv_gray, cv::COLOR_BGR2GRAY);
	getCanny(cv_gray, cv_canny);

	// extract lines from the edge image
	std::vector<cv::Vec4i> lines;
	std::vector<Line> horizontals, verticals;
	HoughLinesP(cv_canny, lines, 1, CV_PI / 180,80, 60, 8);
	for (size_t i = 0; i < lines.size(); i++)
	{
		cv::Vec4i v = lines[i];
		double delta_x = v[0] - v[2], delta_y = v[1] - v[3];
		line(cv_resize, cv::Point(v[0], v[1]), cv::Point(v[2], v[3]), cv::Scalar(0, 0, 255), 1, cv::LINE_AA);
	}
	cv::resize(cv_resize, cv_dst, cv_src.size());
}
- 1
- 2
- 3
- 4
- 5
- 6
- 7
- 8
- 9
- 10
- 11
- 12
- 13
- 14
- 15
- 16
- 17
- 18
- 19
- 20
- 21
- 22
- 23
- 24
- 25
- 26
- 27
- 28
- 29
- 30
- 31
- 32
- 33
- 34
4.检测效果:

二、MLSD直线检测
1.LSD (M-LSD)一种用于资源受限环境的实时轻量线段检测器。它利用了极其高效的 LSD 架构和新颖的训练方案,包括 SoL 增强和几何学习方案。模型可以在GPU、CPU甚至移动设备上实时运行。算法已开源:https://github.com/navervision/mlsd。如果想更详细的理解算法原理,可以直接看论文。
2.为了更好转到ncnn模型,可以使用Pytorch版本进行训练,是于如果转ncnn模型,参考之前的博客或者ncnn官方文档,有很详细的步骤。
3.M-LSD ncnn C++ 模型推理代码:
#ifndef MLSD_H
#define MLSD_H

#include <opencv2/opencv.hpp>
#include <ncnn/net.h>

struct Line
{
    cv::Point _p1;
    cv::Point _p2;
    cv::Point _center;

    Line(cv::Point p1, cv::Point p2)
    {
        _p1 = p1;
        _p2 = p2;
        _center = cv::Point((p1.x + p2.x) / 2, (p1.y + p2.y) / 2);
    }
};

class MLSD
{
public:
    MLSD();

    int loadModel(std::string models_path, int _target_size, bool use_gpu = false);

    int detect(const cv::Mat& rgb, std::vector<Line>& line, int topk = 200, float score_threshold = 0.1f, float dist_threshold = 20.0f);

    int draw(cv::Mat& rgb, const std::vector<Line>& line);

private:

    ncnn::Net lsdnet;
    int target_size;
    const float mean_mlsd[3] = { 127.5f, 127.5f, 127.5f };
    const float norm_mlsd[3] = { 1 / 127.5f, 1 / 127.5f, 1 / 127.5f };


    ncnn::UnlockedPoolAllocator blob_pool_allocator;
    ncnn::PoolAllocator workspace_pool_allocator;
};

#endif // NANODET_H
- 1
- 2
- 3
- 4
- 5
- 6
- 7
- 8
- 9
- 10
- 11
- 12
- 13
- 14
- 15
- 16
- 17
- 18
- 19
- 20
- 21
- 22
- 23
- 24
- 25
- 26
- 27
- 28
- 29
- 30
- 31
- 32
- 33
- 34
- 35
- 36
- 37
- 38
- 39
- 40
- 41
- 42
- 43
- 44
- 45
#include "MLSD.h"
#include <ncnn/cpu.h>

MLSD::MLSD()
{
    blob_pool_allocator.set_size_compare_ratio(0.f);
    workspace_pool_allocator.set_size_compare_ratio(0.f);
}

int MLSD::loadModel(std::string models_path, int _target_size,  bool use_gpu)
{
    lsdnet.clear();
    blob_pool_allocator.clear();
    workspace_pool_allocator.clear();

    ncnn::set_cpu_powersave(2);
    ncnn::set_omp_num_threads(ncnn::get_big_cpu_count());

    lsdnet.opt = ncnn::Option();

#if NCNN_VULKAN
    lsdnet.opt.use_vulkan_compute = use_gpu;
#endif

    lsdnet.opt.num_threads = ncnn::get_big_cpu_count();
    lsdnet.opt.blob_allocator = &blob_pool_allocator;
    lsdnet.opt.workspace_allocator = &workspace_pool_allocator;

    lsdnet.load_param((models_path + "large.param").c_str());
    lsdnet.load_model((models_path + "large.bin").c_str());

    target_size = _target_size;


    return 0;
}

int MLSD::detect(const cv::Mat& rgb,std::vector<Line> &lines, int topk, float score_threshold, float dist_threshold)
{
    int out_size = target_size / 2;
    ncnn::Extractor ex = lsdnet.create_extractor();
    ncnn::Mat ncnn_in = ncnn::Mat::from_pixels_resize(rgb.data,ncnn::Mat::PIXEL_RGB2BGRA, rgb.cols, rgb.rows, target_size, target_size);
    ncnn_in.substract_mean_normalize(0, norm_mlsd);

    ex.input("input", ncnn_in);

    ncnn::Mat org_disp_map, max_map, center_map;

    ex.extract("out1", org_disp_map);
    ex.extract("Decoder/Sigmoid_4:0", center_map);
    ex.extract("out2", max_map);

    float* max_map_data = (float*)max_map.data;
    float* center_map_data = (float*)center_map.data;
    std::vector<std::pair<float, int>> sort_result(max_map.total());
    for (int i = 0; i < max_map.total(); i++)
    {
        if (max_map_data[i] == center_map_data[i])
        {
            sort_result[i] = std::pair<float, int>(max_map_data[i],i);
        }
    }
    std::partial_sort(sort_result.begin(), sort_result.begin() + topk, sort_result.end(), std::greater<std::pair<float, int> >());

    std::vector<std::pair<int, int>>topk_pts;

    for (int i = 0; i < topk; i++)
    {
        int x = sort_result[i].second % out_size;
        int y = sort_result[i].second / out_size;
        topk_pts.push_back(std::pair<int, int>(x, y));
    }

    ncnn::Mat start_map = org_disp_map.channel_range(0, 2).clone();
    ncnn::Mat end_map = org_disp_map.channel_range(2, 2).clone();
    ncnn::Mat dist_map = ncnn::Mat(out_size, out_size, 1);
    float* start_map_data = (float*)start_map.data;
    float* end_map_data = (float*)end_map.data;
    for (int i = 0; i < start_map.total(); i++)
    {
        start_map_data[i] = (start_map_data[i] - end_map_data[i]) * (start_map_data[i] - end_map_data[i]);
    }
    float* dist_map_data = (float*)dist_map.data;
    for (int i = 0; i < start_map.total()/2; i++)
    {
        dist_map_data[i] = std::sqrt(start_map_data[i] + start_map_data[i + start_map.channel(0).total()]);

    }

    float h_ratio = (float)rgb.rows / target_size;
    float w_ratio = (float)rgb.cols / target_size;

    for (int i = 0; i < topk_pts.size(); i++)
    {
        int x = topk_pts[i].first;
        int y = topk_pts[i].second;

        float distance = dist_map_data[y * out_size + x];

        if (sort_result[i].first > score_threshold && distance > dist_threshold)
        {

            int disp_x_start = org_disp_map.channel(0)[y * out_size + x];
            int disp_y_start = org_disp_map.channel(1)[y * out_size + x];
            int disp_x_end = org_disp_map.channel(2)[y * out_size + x];
            int disp_y_end = org_disp_map.channel(3)[y * out_size + x];

            int x_start = std::max(std::min((int)((x + disp_x_start) * 2), target_size), 0);
            int y_start = std::max(std::min((int)((y + disp_y_start) * 2), target_size), 0);
            int x_end = std::max(std::min((int)((x + disp_x_end ) * 2), target_size), 0);
            int y_end = std::max(std::min((int)((y + disp_y_end ) * 2), target_size), 0);

            lines.push_back(Line{ cv::Point(x_start*w_ratio, y_start*h_ratio), cv::Point(x_end*w_ratio, y_end*h_ratio)});
        }
    }
    return 0;
}

int MLSD::draw(cv::Mat& rgb, const std::vector<Line>& line)
{
   for (auto l : line)
    {
       cv::line(rgb, l._p1, l._p2, cv::Scalar(255, 0, 255), 4, 8);
    }
    return 0;
}
- 1
- 2
- 3
- 4
- 5
- 6
- 7
- 8
- 9
- 10
- 11
- 12
- 13
- 14
- 15
- 16
- 17
- 18
- 19
- 20
- 21
- 22
- 23
- 24
- 25
- 26
- 27
- 28
- 29
- 30
- 31
- 32
- 33
- 34
- 35
- 36
- 37
- 38
- 39
- 40
- 41
- 42
- 43
- 44
- 45
- 46
- 47
- 48
- 49
- 50
- 51
- 52
- 53
- 54
- 55
- 56
- 57
- 58
- 59
- 60
- 61
- 62
- 63
- 64
- 65
- 66
- 67
- 68
- 69
- 70
- 71
- 72
- 73
- 74
- 75
- 76
- 77
- 78
- 79
- 80
- 81
- 82
- 83
- 84
- 85
- 86
- 87
- 88
- 89
- 90
- 91
- 92
- 93
- 94
- 95
- 96
- 97
- 98
- 99
- 100
- 101
- 102
- 103
- 104
- 105
- 106
- 107
- 108
- 109
- 110
- 111
- 112
- 113
- 114
- 115
- 116
- 117
- 118
- 119
- 120
- 121
- 122
- 123
- 124
- 125
- 126
- 127
- 128
4.检测结果:


三、检测结果对比
1.调用和对比代码:
#include "MLSD.h"
#include <string>
#include <opencv2/opencv.hpp>

void lineDetection(cv::Mat& cv_src, cv::Mat& cv_dst);

void  mergeImage(std::vector<cv::Mat>& src_vor, cv::Mat& cv_dst, int channel)
{
	cv::Mat img_merge;
	cv::Size size(src_vor.at(0).cols * src_vor.size(), src_vor.at(0).rows);
	if (channel == 1)
	{
		img_merge.create(size, CV_8UC1);
	}
	else if (channel == 3)
	{
		img_merge.create(size, CV_8UC3);
	}
	for (int i = 0; i < src_vor.size(); i++)
	{
		cv::Mat cv_temp = img_merge(cv::Rect(src_vor.at(i).cols * i, 0, src_vor.at(i).cols, src_vor.at(i).rows));
		src_vor.at(i).copyTo(cv_temp);
	}

	cv_dst = img_merge.clone();
}

int main(void)
{
	MLSD lsd;
	lsd.loadModel("models/", 320, true);

	std::string path = "images";
	std::vector<std::string> filenames;
	cv::glob(path, filenames, false);

	int i = 0;

	for (auto name : filenames)
	{
		cv::Mat cv_src = cv::imread(name);
		std::vector<Line> lines;
		double s_start = static_cast<double>(cv::getTickCount());
		lsd.detect(cv_src, lines);
		double s_time = ((double)cv::getTickCount() - s_start) / cv::getTickFrequency();
		cv::Mat cv_mlsd = cv_src.clone();
		lsd.draw(cv_mlsd, lines);
		cv::putText(cv_mlsd, "time:" + std::to_string(s_time), cv::Point(10, 60), 2, 1, cv::Scalar(0, 0, 255));

		cv::Mat cv_lines;
		lineDetection(cv_src, cv_lines);

		std::vector<cv::Mat> cv_dsts{ cv_src,cv_mlsd,cv_lines};
		cv::Mat cv_dst;
		mergeImage(cv_dsts, cv_dst, 3);


		//cv::namedWindow("LinesDetector",0);

		cv::imwrite(std::to_string(i)+".jpg", cv_dst);

		i++;

		//cv::waitKey();
	}
	return 0;
}

void getCanny(cv::Mat &gray, cv::Mat& canny)
{
	cv::Mat thres;
	double high_thres = threshold(gray, thres, 0, 255, cv::THRESH_BINARY | cv::THRESH_OTSU), low_thres = high_thres * 0.5;
	cv::Canny(gray, canny, low_thres, high_thres);
}

void lineDetection(cv::Mat &cv_src, cv::Mat &cv_dst)
{
	float w = cv_src.cols >= cv_src.rows ? 960.00 : 640.00;
	float h = cv_src.rows > cv_src.cols ? 960.00 : 640.00;

	float x_s = cv_src.cols / w;
	float y_s = cv_src.rows / h;
	cv::Mat cv_resize;
	cv::resize(cv_src, cv_resize, cv::Size(w, h));


	cv::Mat cv_gray, cv_canny;
	cv::cvtColor(cv_resize, cv_gray, cv::COLOR_BGR2GRAY);
	getCanny(cv_gray, cv_canny);

	// extract lines from the edge image
	std::vector<cv::Vec4i> lines;
	std::vector<Line> horizontals, verticals;

	double s_start = static_cast<double>(cv::getTickCount());
	HoughLinesP(cv_canny, lines, 1, CV_PI / 180,80, 60, 8);
	double s_time = ((double)cv::getTickCount() - s_start) / cv::getTickFrequency();
	for (size_t i = 0; i < lines.size(); i++)
	{
		cv::Vec4i v = lines[i];
		double delta_x = v[0] - v[2], delta_y = v[1] - v[3];
		line(cv_resize, cv::Point(v[0], v[1]), cv::Point(v[2], v[3]), cv::Scalar(0, 0, 255), 1, cv::LINE_AA);
	}
	cv::resize(cv_resize, cv_dst, cv_src.size());
	cv::putText(cv_dst, "time:" + std::to_string(s_time), cv::Point(10, 60), 2, 1, cv::Scalar(0, 0, 255));
}
- 1
- 2
- 3
- 4
- 5
- 6
- 7
- 8
- 9
- 10
- 11
- 12
- 13
- 14
- 15
- 16
- 17
- 18
- 19
- 20
- 21
- 22
- 23
- 24
- 25
- 26
- 27
- 28
- 29
- 30
- 31
- 32
- 33
- 34
- 35
- 36
- 37
- 38
- 39
- 40
- 41
- 42
- 43
- 44
- 45
- 46
- 47
- 48
- 49
- 50
- 51
- 52
- 53
- 54
- 55
- 56
- 57
- 58
- 59
- 60
- 61
- 62
- 63
- 64
- 65
- 66
- 67
- 68
- 69
- 70
- 71
- 72
- 73
- 74
- 75
- 76
- 77
- 78
- 79
- 80
- 81
- 82
- 83
- 84
- 85
- 86
- 87
- 88
- 89
- 90
- 91
- 92
- 93
- 94
- 95
- 96
- 97
- 98
- 99
- 100
- 101
- 102
- 103
- 104
- 105
- 106
- 107
2.检测结果对比,红色线条为传统霍夫曼直线检测的结果,在CPU上的检测时间,M-LSD也比传统的检测方法快。


四、工程源码
1.源码工程地址:https://download.csdn.net/download/matt45m/85212591。
2.下载工程后,用vs2019打开,设置include和lib路径,然后添加依赖的lib库名就可以运行了。
2.1把源码目录下的include和lib加到vs的属性配置里面。


2.2 把lib目录下的.lib文件加到附加依赖项里面。


