- 1渗透测试之内网渗透(四):端口转发_socat 端口转发
- 2如何在VSCode上新建Flutter项目【两步搞定】_vscode fulltter项目
- 3内卷了!阿里 Java 八股文面试题“惨遭”泄露,导致 132 人面进大厂_阿里java八股文
- 4苹果手机支持鸿蒙,全球第三大手机系统「鸿蒙」上线,这19款能抢先用…
- 5Win10系统更新后【开机黑屏/白屏,不显示桌面,但是鼠标和任务管理器都好使】问题的解决_csdn win10更新黑屏
- 6java 子线程定时去更改主线程的变量
- 7大数据在金融行业的应用_大数据技术在商务银行的应用图表
- 8python坐标字符串_字符串坐标的numpy mgrid shapely
- 9linux kernel 5.1编译8723ds报错_vfs_internal_i_am_really_a_filesystem_and_am_not_a
- 10IOS MJRefresh:下拉刷新与上拉加载_ios开发 mjrefresh上拉加载
【OpenCV DNN】Flask 视频监控目标检测教程 02_flask部署目标检测模型
赞
踩
欢迎关注『OpenCV DNN @ Youcans』系列,持续更新中
【OpenCV DNN】Flask 视频监控目标检测教程 01
【OpenCV DNN】Flask 视频监控目标检测教程 02
【OpenCV DNN】Flask 视频监控目标检测教程 02
本系列从零开始,详细讲解使用 Flask 框架构建 OpenCV DNN 模型的 Web 应用程序。
本节介绍使用OpenCV+Flask将计算机视觉应用程序部署到Web端。
3.1 从URL地址读取图片进行处理
我们编写的第一个例程,从指定的URL地址读取图片,对图片进行处理,返回处理后的图片并在网页上显示。本例程在浏览器直接显示响应图片,没有使用HTML文档。
3.1.1 从指定的 url 地址读取图像
(1)首先从指定的 url 地址读取图像。
Flask中使用route()装饰器将应用程序的URL绑定到函数,可以接受URL参数实现路由访问。
@app.route('/enhance', methods=['GET'])
def detail_enhance():
    # 从指定的 url 地址读取图像
    with urllib.request.urlopen(request.args.get('url')) as url:
        image_array = np.asarray(bytearray(url.read()), np.uint8)
    # 从指定的内存缓存中读取数据,并把数据转换成图像格式
    imgCV = cv2.imdecode(image_array, -1)  # 转换为 OpenCV 图像
- 1
- 2
- 3
- 4
- 5
- 6
- 7
使用函数request.args.get(‘url’)来获取URL参数,构建一个变量URL。当我们访问/user/时,就可以接收到URL地址,然后从URL地址读取图片。
注意不能使用函数cv.imread()读取图像,而要使用函数cv.imdecode()从指定的内存缓存中读取数据,并将传输数据转换为OpenCV图像。
(2)图像处理。
简单地,例程使用边缘保护图像滤波和铅笔素描两种方法进行图像处理。
(3)将图像编码到内存缓冲区。
使用函数cv.imencode()将图像编码为流数据,存储到内存缓存中,方便网络传输。
(4)生成返回页面响应。
使用函数make_response()将缓存中的图像编码封装为响应对象,将页面响应返回到客户端。
3.1.2 例程:从指定的 url 读取图像
完整的例程如下。
# opencvFlask01.py

import cv2
import numpy as np
from flask import Flask, request, make_response
import urllib.request


app = Flask(__name__)  # 用当前脚本名称实例化Flask对象

@app.route('/enhance', methods=['GET'])
def detail_enhance():
    # 从指定的 url 地址读取图像
    with urllib.request.urlopen(request.args.get('url')) as url:
        image_array = np.asarray(bytearray(url.read()), np.uint8)
    # 从指定的内存缓存中读取数据,并把数据转换成图像格式
    imgCV = cv2.imdecode(image_array, -1)  # 转换为 OpenCV 图像

    # # 双边滤波增强图像
    # dst = cv2.detailEnhance(imgCV, sigma_s=10, sigma_r=0.2)
    # 边缘保护滤波图像
    dst = cv2.edgePreservingFilter(imgCV, sigma_s=50, sigma_r=0.4)
    # 将图像编码到内存缓冲区
    ret, out_buf = cv2.imencode('.jpg', dst)

    # 生成返回页面响应
    resp = make_response(out_buf.tobytes())  # 封装为响应对象
    resp.headers['Content-Type'] = 'image/jpeg'  # 设置响应头
    return resp

@app.route('/pencil', methods=['GET'])
def pencil_sketch():
    # 从指定的 url 地址读取图像
    with urllib.request.urlopen(request.args.get('url')) as url:
        image_array = np.asarray(bytearray(url.read()), np.uint8)
    # 从指定的内存缓存中读取数据,并把数据转换成图像格式
    imgCV = cv2.imdecode(image_array, -1)  # 转换为 OpenCV 图像

    # 铅笔画滤波图像
    dst1, dst2 = cv2.pencilSketch(imgCV, sigma_s=100, sigma_r=0.15, shade_factor=0.02)
    # 将图像编码到内存缓冲区
    ret, out_buf = cv2.imencode('.jpg', dst1)

    # 生成返回页面响应
    resp = make_response(out_buf.tobytes())  # 封装为响应对象
    resp.headers['Content-Type'] = 'image/jpeg'  # 设置响应头
    return resp

if __name__ == '__main__':
    # 启动一个本地开发服务器,激活该网页
    app.run(host='0.0.0.0', debug=True)  # 绑定 IP 和端口
- 1
- 2
- 3
- 4
- 5
- 6
- 7
- 8
- 9
- 10
- 11
- 12
- 13
- 14
- 15
- 16
- 17
- 18
- 19
- 20
- 21
- 22
- 23
- 24
- 25
- 26
- 27
- 28
- 29
- 30
- 31
- 32
- 33
- 34
- 35
- 36
- 37
- 38
- 39
- 40
- 41
- 42
- 43
- 44
- 45
- 46
- 47
- 48
- 49
- 50
- 51
运行程序cvFlask01.py,启动Web服务器,控制台将显示如下消息。
 * Serving Flask app 'cvFlask01'
 * Debug mode: off

 * Running on all addresses (0.0.0.0)
 * Running on http://127.0.0.1:5000
 * Running on http://192.168.3.249:5000
- 1
- 2
- 3
- 4
- 5
- 6
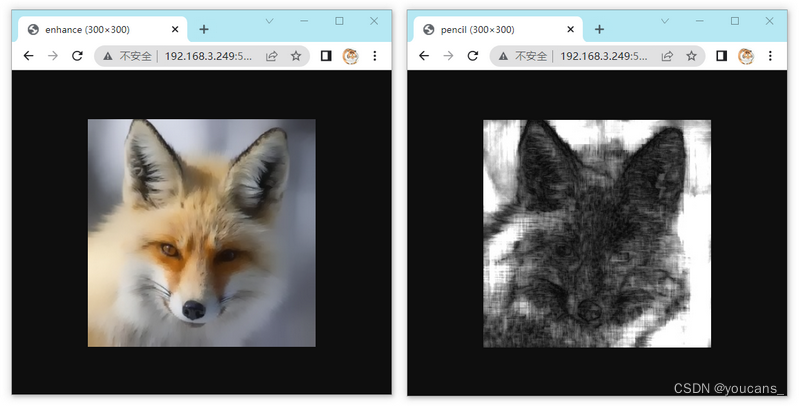
在浏览器输入以下URL,调用GET请求。
http://192.168.3.249:5000/enhance?url=http://www.news.cn/photo/2023-03/29/1129476453_16800903517201n.jpg

http://192.168.3.249:5000/pencil?url=http://www.news.cn/photo/2023-03/29/1129476453_16800903517201n.jpg
- 1
- 2
- 3
不同网络设备运行时的IP地址不同,具体可以参考控制台显示输出的内容。其中参数url的值http://www.news.cn/photo/***.jpg是待处理图像的URL地址。通过route()装饰器的路由规则,将enhance绑定到函数detail_enhance(),将pencil绑定到函数pencil_sketch(),执行不同的图像处理任务。
Flask获取GET请求后,进行图像处理,并在浏览器显示响应图片如下。
3.2 上传本地图片进行卡通处理
我们的第二个例程,上传本地图片,对图片进行处理,返回处理图片并在网页上进行格式化显示。
3.2.1 建立 Flask 项目
为了处理本地图片上传和格式化显示处理的图片,我们需要建立一个Flask项目,并编写简单的HTML文档。具体步骤如下。
(1)新建一个Flask项目。
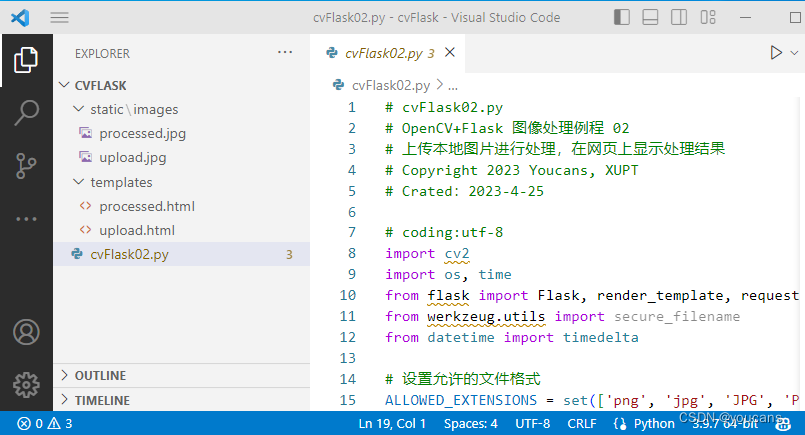
项目默认配置建立static和templates目录,static目录用来存放静态资源,例如图片、js、css文件等,templates目录存放模板文件。网站逻辑由Python程序文件cvFlask02.py实现,保存在项目的根目录。项目cvFlask02的文件树如下。
---项目文件名\
    |---static\
|---templates\
    |    |---processed.html
    |    |---upload.html
|--- cvFlask02.py
- 1
- 2
- 3
- 4
- 5
- 6
3.2.2 编写 HTML 文档
(2)编写upload.html文档,用于上传本地图片,保存在templates目录。
<!DOCTYPE html>
<html lang="en">
<head>
    <meta charset="UTF-8">
    <title>OpenCV+Flask 上传图片</title>
</head>
<body>
    <h1 align="center">OpenCV+Flask 例程:上传本地图片处理</h1>
    <p align="center">Developed by youcans@xupt,2023</p>
    <form action="" enctype='multipart/form-data' method='POST'>
        <label>选择按钮:</label>
        <input type="file" name="file" style="margin-top:25px;"/>
        <br>
        <label>选中文件:</label>
        <input type="text" class="txt_input" name="name"  value="png/jpg/jpeg/bmp" style="margin-top:20px;"/>
        <br>
        <label>上传按钮:</label>
        <input type="submit" value="上传图片" class="button-new" style="margin-top:20px;"/>
        <br>
    </form>
</body>
</html>
- 1
- 2
- 3
- 4
- 5
- 6
- 7
- 8
- 9
- 10
- 11
- 12
- 13
- 14
- 15
- 16
- 17
- 18
- 19
- 20
- 21
- 22
(3)编写processed.html文档,用于显示上传图片和处理图片,保存在templates目录。
<!DOCTYPE html>
<html lang="en">
<head>
    <meta charset="UTF-8">
    <title>OpenCV+Flask 上传图片</title>
</head>
<body>
    <h1 align="center">OpenCV+Flask 例程:上传本地图片进行处理</h1>
    <p align="center">Developed by youcans@xupt, 2023</p>
    <form action="" enctype='multipart/form-data' method='POST'>
        <label>选中文件:</label>
        <input type="text" class="txt_input" name="name" value={{userinput}} style="margin-top:10px;"/>
        <br>
    </form>
    <h2 align="center">图片处理结果</h2>
    <table width="700" height="350" border="5" align="center" frame=void>
		<tr>
			<td align="center" valign="middle">原始图片</td>
			<td align="center" valign="middle">处理结果</td>
		</tr>
		<tr>
			<td align="center" valign="middle">
                <img src="{{ url_for('static', filename= './images/upload.jpg',_t=val1) }}" width="300" height="300" alt="上传的原始图片"/>
            </td>
			<td align="center" valign="middle">
                <img src="{{ url_for('static', filename= './images/processed.jpg',_t=val1) }}" width="300" height="300" alt="处理完成的图片"/>
            </td>
		</tr>
    </table>

</body>
</html>
- 1
- 2
- 3
- 4
- 5
- 6
- 7
- 8
- 9
- 10
- 11
- 12
- 13
- 14
- 15
- 16
- 17
- 18
- 19
- 20
- 21
- 22
- 23
- 24
- 25
- 26
- 27
- 28
- 29
- 30
- 31
- 32
(4)编写Python程序文件cvFlask02.py,保存在项目根目录下。
3.2.3 Python程序实现业务逻辑
Python程序实现如下的业务逻辑:
1)启动一个本地开发服务器,激活upload.html网页。
2)接收upload.html页面上传的图像文件,并进行检查。
3)将上传的图片保存到 upload_path 路径。
4)调用图像处理子程序,对上传的图像进行处理。
5)激活processed.html网页,显示原始图像和处理后的图像。
本例程的图像处理子程序,使用cv. Stylization()函数对上传的图片进行卡通化处理,也可以根据需要实现其它图片处理方法。
cvFlask02.py完整的程序代码如下。
# cvFlask02.py
# OpenCV+Flask 图像处理例程 02
# 上传本地图片进行处理,在网页上显示处理结果
# Copyright 2023 Youcans, XUPT
# Crated:2023-4-25

# coding:utf-8
import cv2
import os, time
from flask import Flask, render_template, request, make_response, jsonify
from werkzeug.utils import secure_filename
from datetime import timedelta

# 设置允许的文件格式
ALLOWED_EXTENSIONS = set(['png', 'jpg', 'JPG', 'PNG', 'bmp'])

app = Flask(__name__)  # 用当前脚本名称实例化Flask对象
app.send_file_max_age_default = timedelta(seconds=1)  # 设置静态文件缓存过期时间

@app.route('/upload', methods=['POST', 'GET'])  # 添加路由
def upload():
    if request.method == 'POST':
        f = request.files['file']  # 从表单的 file 字段获取文件,file为该表单的name值
        print("user_input:", f.filename)  # tiger02.png
        if not (f and allowed_file(f.filename)):  # 检查图片类型
            return jsonify({"error": 1001, "msg": "上传图片必须是 png/jpg/jpeg/bmp 类型"})

        user_input = request.form.get("name")  # 获取表单输入的 name 值, png/jpg/jpeg/bmp
        basepath = os.path.dirname(__file__)  # 当前文件所在路径 C:\Users\David\cvFlask\
        # upload_filepath = os.path.join(basepath, 'static\images', secure_filename(f.filename))
        upload_filepath = os.path.join(basepath, 'static\images', 'upload.jpg')  # 合成上传图片的保存路径
        print("upload_filepath", upload_filepath)  # upload_path, C:\Users\David\cvFlask\static\images\upload.jpg
        f.save(upload_filepath)  # 将上传的图片保存到 upload_path 路径

        # OpenCV 图像处理
        dst = imageProcessing(upload_filepath)  # 调用图片处理子程序
        cv2.imwrite(os.path.join(basepath, 'static/images', 'processed.jpg'), dst)  # 保存处理后的图片
        user_input = f.filename  # 上传图片的文件名
        return render_template('processed.html', userinput=user_input, val1=time.time())

    return render_template('upload.html')

def imageProcessing(filepath):  # 图片处理子程序
    imgCV = cv2.imread(filepath)  # 从 filepath 路径读取图片
    dst = cv2.stylization(imgCV, sigma_s=60, sigma_r=0.07)  # 图片卡通化处理
    return dst

def allowed_file(filename):
    return '.' in filename and filename.rsplit('.', 1)[1] in ALLOWED_EXTENSIONS

if __name__ == '__main__':
    # 启动一个本地开发服务器,激活该网页
    app.run(host='0.0.0.0', port=5000, debug=True)  # 绑定 IP 和端口
- 1
- 2
- 3
- 4
- 5
- 6
- 7
- 8
- 9
- 10
- 11
- 12
- 13
- 14
- 15
- 16
- 17
- 18
- 19
- 20
- 21
- 22
- 23
- 24
- 25
- 26
- 27
- 28
- 29
- 30
- 31
- 32
- 33
- 34
- 35
- 36
- 37
- 38
- 39
- 40
- 41
- 42
- 43
- 44
- 45
- 46
- 47
- 48
- 49
- 50
- 51
- 52
- 53
3.2.4 运行脚本
(5)接下来运行此脚本。
进入cvFlask02项目的根目录,运行程序cvFlask02.py,启动流媒体服务器。控制台将显示如下消息。
 * Serving Flask app 'cvFlask02'
 * Debug mode: on

 * Running on all addresses (0.0.0.0)
 * Running on http://127.0.0.1:5000
 * Running on http://192.168.3.249:5000
- 1
- 2
- 3
- 4
- 5
- 6
在浏览器输入URL(http://192.168.3.249:5000/upload),打开upload.html网页,显示如下。
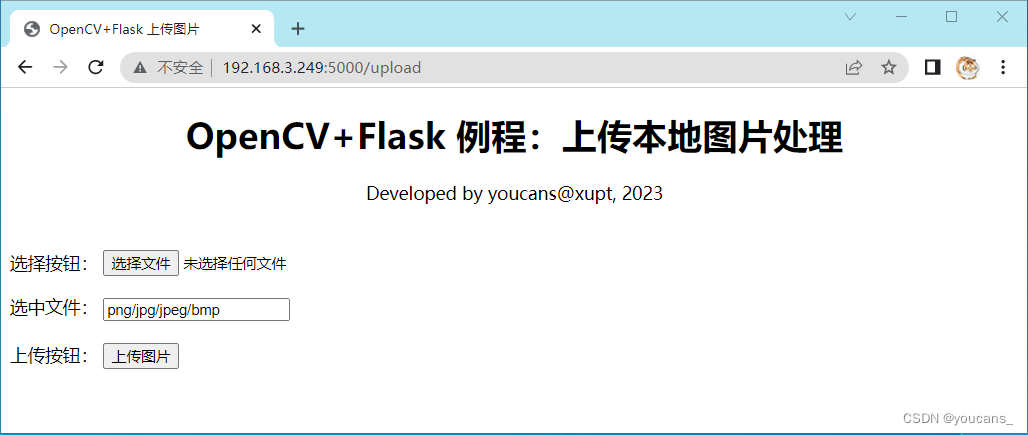
在浏览器点击页面上的选择按钮,选择本地的图片上传,上传的图片保存到static\images目录。
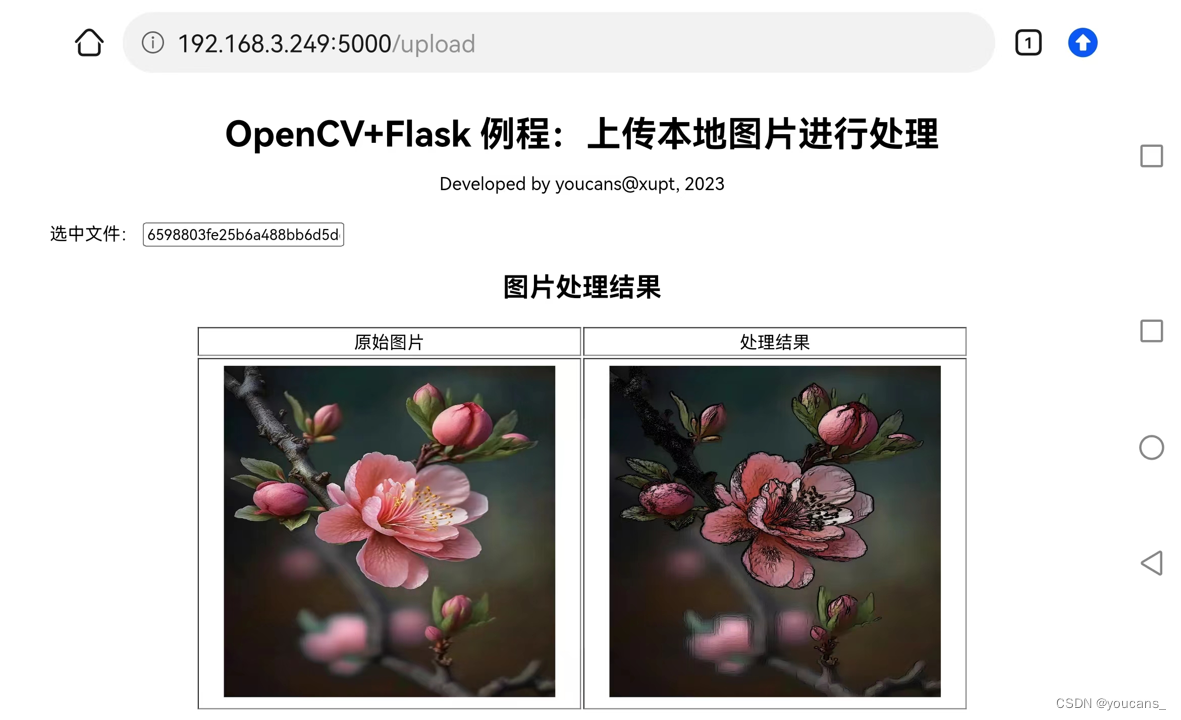
程序cvFlask02.py对上传的图片进行卡通化处理,然后激活processed.html网页,显示原始图像和处理后的图像。
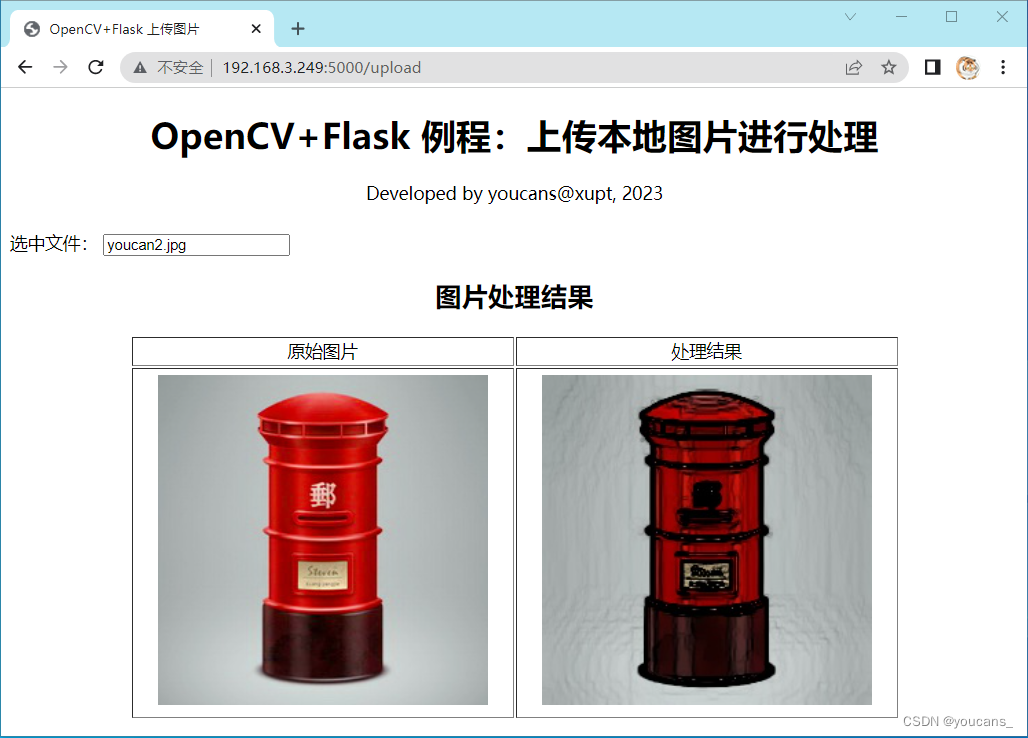
在移动手机打开浏览器,输入URL(http://192.168.3.249:5000/upload),也可以上传手机中的图片进行处理,结果如下图所示。不同网络设备运行时的IP地址不同,具体可以参考控制台显示输出的内容。
【本节完】
下节我们将讨论:在浏览器运行 OpenCV DNN 人脸检测。
欢迎关注『OpenCV DNN @ Youcans』系列,持续更新中
版权声明:
youcans@xupt 原创作品,转载必须标注原文链接:
【OpenCV DNN】Flask 视频监控目标检测教程 02(https://blog.csdn.net/youcans/article/details/130809121)
Copyright 2023 youcans, XUPT
Crated:2023-05-22


