热门标签
热门文章
- 1Verilog实验报告
- 2【DOA三维路径规划】野狗算法无人机避障三维航迹规划【含Matlab源码 3618期】_机器狗避障算法
- 3docker一站式安装Java开发环境_docker 安装java
- 4docker安装redis启动踩坑_docker redis fatal: can't initialize background jo
- 5苹果开发者后台添加udid后,xcode中 Devices 数量没有更新问题
- 6yolov8添加注意力机制_yolo v8 注意力机制插入不了
- 7排序算法之冒泡排序
- 8【Web】html+css+js实现post简易聊天室_html聊天室
- 9GIT分支tags管理_分支 tags
- 10Linux下解决访问github慢的问题_linux访问github
当前位置: article > 正文
QT DAY1作业
作者:知新_RL | 2024-04-11 16:43:39
赞
踩
QT DAY1作业
1.QQ登录界面

头文件代码
- #ifndef MYWIDGET_H
- #define MYWIDGET_H
-
- #include <QWidget>
- #include <QIcon>
- #include <QLabel>
- #include <QPushButton>
- #include <QMovie>
- #include <QLineEdit>
-
- class MyWidget : public QWidget
- {
- Q_OBJECT
-
- public:
- MyWidget(QWidget *parent = 0);
- ~MyWidget();
- };
-
- #endif // MYWIDGET_H

main代码
- #include "mywidget.h"
- #include <QApplication>
-
- int main(int argc, char *argv[])
- {
- QApplication a(argc, argv);
- MyWidget w;
- w.show();
-
- return a.exec();
- }
源代码
- #include "mywidget.h"
-
- MyWidget::MyWidget(QWidget *parent)
- : QWidget(parent)
- {
- //=====================窗口类=======================
- //设置窗口标题
- this->setWindowTitle("QQ");
- //设置窗口图标
- this->setWindowIcon(QIcon("D:\\QT\\23101\\QT\\picture\\qq2_logo.png"));
- //设置窗口大小
- this->resize(430,330);
- //固定窗口大小
- this->setFixedSize(430,330);
- //设置颜色
- this->setStyleSheet("background-color:rgb(255,255,255)");
- //设置纯净窗口
- this->setWindowFlag(Qt::FramelessWindowHint);
-
- //==================标签类=========================
- //设置标签1
- QLabel *background = new QLabel(this);
- //设置标签大小
- background->resize(430,127);
- //设置动图类
- QMovie *mv = new QMovie("D:\\QT\\23101\\QT\\picture\\qq2.gif");
- //将动图插入到标签中
- background->setMovie(mv);
- //启动动图
- mv->start();
- //设置动图自动适应大小
- background->setScaledContents(true);
-
- //设置标签2
- QLabel *lab1 = new QLabel(this);
- //设置标签位置
- lab1->move(15,12);
- //设置大小
- lab1->resize(65,32);
- //设置透明度
- lab1->setStyleSheet("background-color:transparent");
-
- //插入图片
- lab1->setPixmap(QPixmap("D:\\QT\\23101\\QT\\picture\\qq_logo.png"));
- //设置图片自动适应大小
- lab1->setScaledContents(true);
-
- //设置标签3
- QLabel *lab2 = new QLabel(this);
- //设置标签位置
- lab2->move(99,175);
- //设置标签大小
- lab2->resize(22,26);
- //插入图片
- lab2->setPixmap(QPixmap("D:\\QT\\23101\\QT\\picture\\qq3.png"));
- //设置自动适应大小
- lab2->setScaledContents(true);
-
- //设置标签4
- QLabel *lab3 = new QLabel(this);
- //设置标签位置
- lab3->move(97,203);
- //设置标签大小
- lab3->resize(23,27);
- //插入图片
- lab3->setPixmap(QPixmap("D:\\QT\\23101\\QT\\picture\\passwd.png"));
- //设置自动适应大小
- lab3->setScaledContents(true);
-
- //=======================行编辑器类============================
- //设置行编辑器1账号
- QLineEdit *edit1 = new QLineEdit(this);
- //设置行编辑器大小
- edit1->resize(200,27);
- //设置行编辑器位置
- edit1->move(122,175);
- //设置占位
- edit1->setPlaceholderText("QQ号码/手机/邮箱");
-
- //设置行编辑器2密码
- QLineEdit *edit2 = new QLineEdit(this);
- //设置行编辑器大小
- edit2->resize(200,27);
- //设置行编辑器位置
- edit2->move(122,203);
- //设置占位
- edit2->setPlaceholderText("密码");
- //设置密码输入模式
- edit1->setEchoMode(QLineEdit::Password);
-
- //============================按钮类=============================
- //设置按钮1
- QPushButton *btn1 = new QPushButton("登录",this);
- //设置按钮背景颜色
- btn1->setStyleSheet("background-color:rgb(31,199,253);color:white;border-radius:5px");
- //设置大小
- btn1->resize(235,35);
- //移动位置
- btn1->move(97,275);

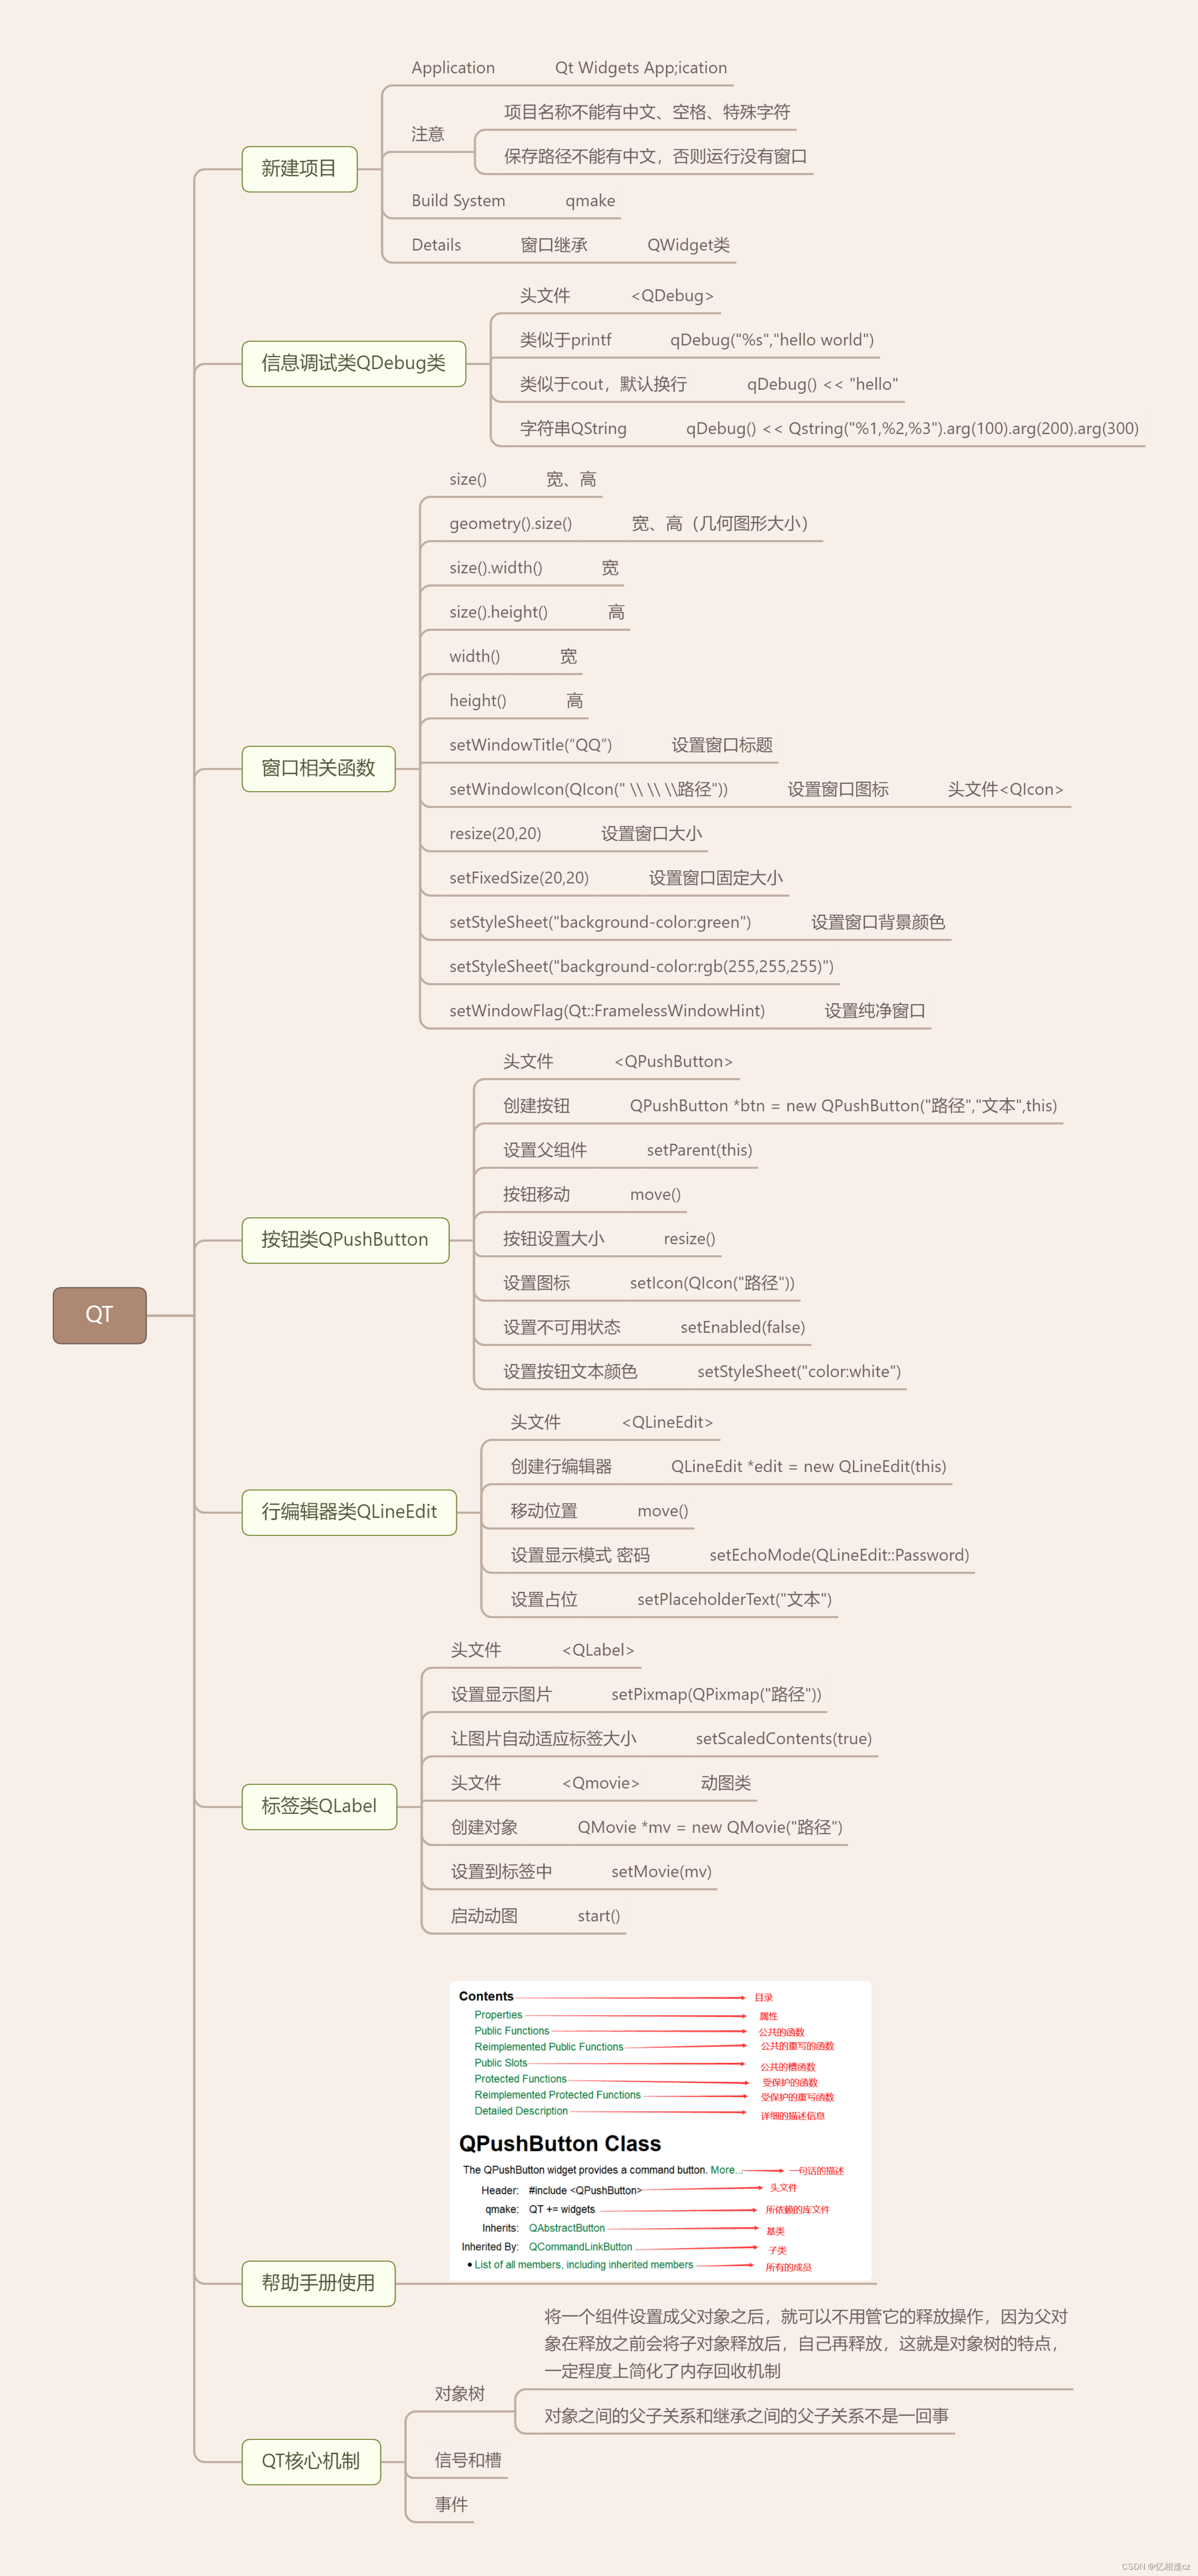
2.思维导图

声明:本文内容由网友自发贡献,不代表【wpsshop博客】立场,版权归原作者所有,本站不承担相应法律责任。如您发现有侵权的内容,请联系我们。转载请注明出处:https://www.wpsshop.cn/w/知新_RL/article/detail/406155
推荐阅读
相关标签


