- 1Subscriber class xxx.xxx.xxx and its super classes have no public methods with the@Subscribe annotat_subscriber class com.topdon.tool.mainactivity and
- 2PyQt5快速开发与实战 4.13 菜单栏、工具栏与状态栏 and 4.14 QPrinter_qprinter qml
- 3tensorflow中prefetch最合适的用法_dataset prefetch
- 4MNE-Python | 开源生理信号分析神器(一)_python mne
- 5INT4和INT8_int4和int8区别
- 6Kubernetes 健康检查之 livenessProbe/readinessProbe_kubernetes livenessprobe
- 7HTTP常见状态码_.getrequest( code:1000
- 8搭建私有Nuget服务器(.Net Core框架)_nuget.server core
- 9各种假设检验用法汇总_假设检验的八种情况的公式
- 10再生资源回收系统 毕业设计 JAVA+Vue+SpringBoot+MySQL
谷歌移动UI框架Flutter教程之Widget_flutter widget return title: home
赞
踩
引言
在之间我已经介绍了关于Flutter的下载安装以及配置,还有开发工具Android Studio的配置,还不知道的同学可以看看我这篇博客——谷歌移动UI框架Flutter入门。这里为什么非要用Android Studio,我可以解释一下。Android Studio是Google的亲儿子,由谷歌一手开发,而Flutter也是谷歌推出的技术,所以在支持和兼容问题上,Android Studio是非常有优势的。老话说得好,肥水不流外人田,谷歌内部肯定是将Android Studio对Flutter的优化做到最佳的。
Widget基本组件
那么话不多说,我们先来熟悉一下关于Flutter的Widget组件,在Flutter中,一切皆组件,TextView、Image、Row、Column等等,都统称组件。
1.文本组件(Text)
首先,我们就来了解一下文本组件(Text)。学过前端的同学对UI部分应该都很了解,那Flutter当然也没有什么特别的,无非也就是文本内容、大小、字体样式、颜色等等的设置,那么首先我们就先来编写一个案例。找到lib目录下的main.dart,我们将在这个文件中编写代码。
import 'package:flutter/material.dart';

void main() {
  runApp(MyTextApp());
}

/**
 * 文本组件(Text)的使用
 */
class MyTextApp extends StatelessWidget {

  @override
  Widget build(BuildContext context) {
    return MaterialApp(
      title: 'Text Demo',
      home: Scaffold(
        appBar: AppBar(title: Text('文本控件的使用'),),
        body: Center(
          child: Text(
            '这是一个文本控件', //文本内容
            textAlign: TextAlign.center, //居中
            maxLines: 1, //最大显示行数
            style: TextStyle(
              fontSize: 25.0, //字体大小
              color: Colors.lightBlue, //字体颜色
            ), //样式
          ),
        ),
      ),
    );
  }
}
- 1
- 2
- 3
- 4
- 5
- 6
- 7
- 8
- 9
- 10
- 11
- 12
- 13
- 14
- 15
- 16
- 17
- 18
- 19
- 20
- 21
- 22
- 23
- 24
- 25
- 26
- 27
- 28
- 29
- 30
- 31
- 32
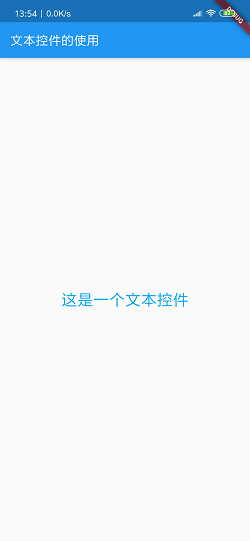
有语言基础的同学相信可以很好理解这些代码,第一行导入了Material相关的类库。程序会先执行main()方法,该方法又执行了runApp()方法,并将MyTextApp类作为参数传递。而MyTextApp类就是我们自定义的一个类,该类需要去继承StatelessWidget,并重写build()方法,该方法需要返回一个组件。具体的代码我就不一一介绍了,可以先不用理解每一行代码的意思。其中的Text便是文本组件,只需将值写入括号,便可以在文本框中显示,然后是文本框的一些属性。接下来我们运行起来看一下。
2.图片组件(Image)
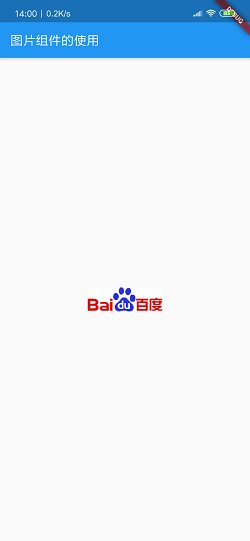
接下来是图片组件,图片组件的作用无非就是显示图片,在Flutter中,Image有四种方式显示图片,我只介绍一种,就是显示网络图片,其它三种方式没有太大差别。
import 'package:flutter/material.dart';

void main() {
  runApp(MyImageApp());
}

/**
 * 图片组件(Image)的使用
 */
class MyImageApp extends StatelessWidget {

  @override
  Widget build(BuildContext context) {
    return MaterialApp(
      title: 'Text Demo',
      home: Scaffold(
        appBar: AppBar(title: Text('图片组件的使用')),
        body: Center(
          child: Image.network(
            'https://www.baidu.com/img/baidu_jgylogo3.gif', //图片地址
            scale: 1.0, //缩放比
          ),
        ),
      ),
    );
  }
}
- 1
- 2
- 3
- 4
- 5
- 6
- 7
- 8
- 9
- 10
- 11
- 12
- 13
- 14
- 15
- 16
- 17
- 18
- 19
- 20
- 21
- 22
- 23
- 24
- 25
- 26
- 27
运行效果如下:
3.列表组件(ListView)
列表组件在移动端的开发中使用非常频繁,那么在Flutter中,该如何使用ListView呢?
import 'package:flutter/material.dart';

void main() {
  runApp(MyListViewApp());
}

/**
 * 列表组件(List)的使用
 */
class MyListViewApp extends StatelessWidget {

  @override
  Widget build(BuildContext context) {
    return MaterialApp(
      title: 'Text Demo',
      home: Scaffold(
        appBar: AppBar(title: Text('图片组件的使用')),
        body: Center(
          child: Container(
          	height: 200.0,
            child: ListView(
              scrollDirection: Axis.horizontal,,//列表方向(纵向)
              children: <Widget>[
                Container(
                  width: 180.0,
                  color: Colors.lightBlue,
                ), Container(
                  width: 180.0,
                  color: Colors.amber,
                ), Container(
                  width: 180.0,
                  color: Colors.deepOrange,
                ), Container(
                  width: 180.0,
                  color: Colors.deepPurple,
                ), //Container
              ], //Widget[]
            ),
          ),
        ),
      ),
    );
  }
}
- 1
- 2
- 3
- 4
- 5
- 6
- 7
- 8
- 9
- 10
- 11
- 12
- 13
- 14
- 15
- 16
- 17
- 18
- 19
- 20
- 21
- 22
- 23
- 24
- 25
- 26
- 27
- 28
- 29
- 30
- 31
- 32
- 33
- 34
- 35
- 36
- 37
- 38
- 39
- 40
- 41
- 42
- 43
- 44
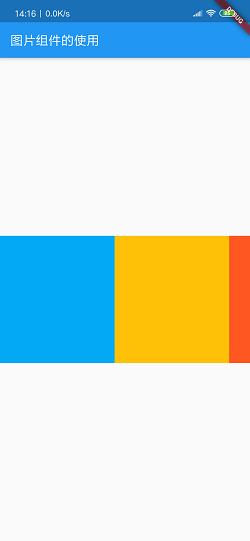
有些同学看到这样的代码可能惊呆了,这么多层的嵌套维护起来岂不是很麻烦,其实这也是Dart语法的特点,避免不了,但是还是有办法的,我们可以把ListView单独抽出来,这样主体的代码将会简洁很多。
import 'package:flutter/material.dart';

void main() {
  runApp(MyApp());
}

class MyApp extends StatelessWidget {

  @override
  Widget build(BuildContext context) {
    return MaterialApp(
      title: 'FlutterApp',
      home: Scaffold( //主页
        appBar: AppBar(title: Text('FlutterDemo')), //标题
        body: Center(
          child: Container(
            height: 200.0,
            child: MyList(), //ListView
          ), //Container
        ), //主体
      ), //Scaffold
    ); //MaterialApp
  }
}

class MyList extends StatelessWidget {

  @override
  Widget build(BuildContext context) {
    return ListView(
      scrollDirection: Axis.horizontal,
      children: <Widget>[
        Container(
          width: 180.0,
          color: Colors.lightBlue,
        ), Container(
          width: 180.0,
          color: Colors.amber,
        ), Container(
          width: 180.0,
          color: Colors.deepOrange,
        ), Container(
          width: 180.0,
          color: Colors.deepPurple,
        ), //Container
      ], //Widget[]
    );
  }
}
- 1
- 2
- 3
- 4
- 5
- 6
- 7
- 8
- 9
- 10
- 11
- 12
- 13
- 14
- 15
- 16
- 17
- 18
- 19
- 20
- 21
- 22
- 23
- 24
- 25
- 26
- 27
- 28
- 29
- 30
- 31
- 32
- 33
- 34
- 35
- 36
- 37
- 38
- 39
- 40
- 41
- 42
- 43
- 44
- 45
- 46
- 47
- 48
- 49
现在运行看一下效果。
当然,这样编写列表在实际开发中是不现实的,我们应该让列表活起来,所以,下面介绍如何实现动态列表。
import 'package:flutter/material.dart';

void main() {
  runApp(MyApp(
      items: List < String>.generate(1000, (i) => "Item $i")
  )
  );
}

class MyApp extends StatelessWidget {

  final List<String> items;

  MyApp({Key key, @required this.items}) :super(key: key);

  @override
  Widget build(BuildContext context) {
    return MaterialApp(
      title: 'FlutterApp',
      home: Scaffold( //主页
        appBar: AppBar(title: Text('FlutterDemo')), //标题
        body: ListView.builder(
          itemCount: items.length,
          itemBuilder: (context, index) {
            return ListTile(
              title: Text('${items[index]}'),
            );
          },
        ),
      ), //Scaffold
    ); //MaterialApp
  }
}
- 1
- 2
- 3
- 4
- 5
- 6
- 7
- 8
- 9
- 10
- 11
- 12
- 13
- 14
- 15
- 16
- 17
- 18
- 19
- 20
- 21
- 22
- 23
- 24
- 25
- 26
- 27
- 28
- 29
- 30
- 31
- 32
- 33
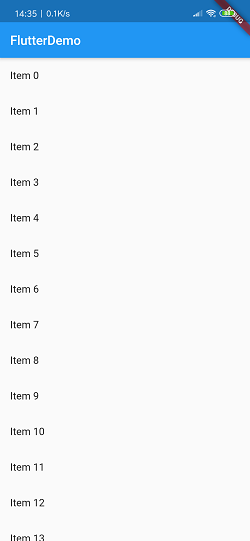
这样就实现了动态列表,只不过这个数据还是自己提供的,只需要后期通过网络获取数据再封装成集合然后传递即可。不懂Dart语法的同学对于里面的某些代码可能会觉得难以理解,但是不用担心。即使没有一点Dart语言基础的同学也是可以很容易地学会Flutter的,只不过在某些Dart语法上就只能死记了,记住它,不用管为什么。那么现在来运行看下效果。
4.列表组件(GridView)
第二个列表组件,网格组件,该组件在如今的移动应用中也非常常见,最典型的便是系统相册。那么我们关心的是在Flutter中该如何去使用GridView呢?通过一个例子来了解一下。
import 'package:flutter/material.dart';

void main() {
  runApp(MyApp());
}

class MyApp extends StatelessWidget {

  @override
  Widget build(BuildContext context) {
    return MaterialApp(
      title: 'FlutterApp',
      home: Scaffold( //主页
          appBar: AppBar(title: Text('FlutterDemo')), //标题
          body: GridView(
            gridDelegate: SliverGridDelegateWithFixedCrossAxisCount(
                crossAxisCount: 3,
                mainAxisSpacing: 2.0, //纵轴边距
                crossAxisSpacing: 2.0, //横轴边距
                childAspectRatio: 0.7 //缩放比例(宽高比)
            ),
            children: <Widget>[
              Image.network(
                  'http://img5.mtime.cn/mg/2019/05/31/163641.36482297_270X405X4.jpg',
                  fit: BoxFit.cover),
              Image.network(
                  'http://img5.mtime.cn/mg/2019/07/01/091243.35485139_270X405X4.jpg',
                  fit: BoxFit.cover),
              Image.network(
                  'http://img5.mtime.cn/mg/2019/06/28/141449.40971533_270X405X4.jpg',
                  fit: BoxFit.cover),
              Image.network(
                  'http://img5.mtime.cn/mg/2019/05/31/163641.36482297_270X405X4.jpg',
                  fit: BoxFit.cover),
              Image.network(
                  'http://img5.mtime.cn/mg/2019/07/01/091243.35485139_270X405X4.jpg',
                  fit: BoxFit.cover),
              Image.network(
                  'http://img5.mtime.cn/mg/2019/06/28/141449.40971533_270X405X4.jpg',
                  fit: BoxFit.cover),
            ], //Widget[]
          ) //GridView
      ), //Scaffold
    ); //MaterialApp
  }
}
- 1
- 2
- 3
- 4
- 5
- 6
- 7
- 8
- 9
- 10
- 11
- 12
- 13
- 14
- 15
- 16
- 17
- 18
- 19
- 20
- 21
- 22
- 23
- 24
- 25
- 26
- 27
- 28
- 29
- 30
- 31
- 32
- 33
- 34
- 35
- 36
- 37
- 38
- 39
- 40
- 41
- 42
- 43
- 44
- 45
- 46
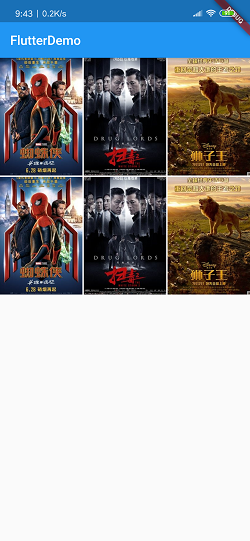
网格组件其实也非常的简单,和ListView其实没有什么差别,最主要的就是它独特的属性,这些属性在官网文档中都有解释和示例。那么这段代码运行的效果如何呢?我们看一下:
布局
Flutter中基本的一些组件就介绍完了,但是光知道如何编写组件可远远不够,UI设计中的布局管理也尤为重要,那么,我们继续深入,了解一下Flutter中的布局。
1.水平布局(Row)
经过前面基本组件的学习,会发现Flutter无非就是一些组件的嵌套,但注意嵌套级别,不要被自己的代码搞晕了,那么布局其实是一样的。我们看一个例子。
import 'package:flutter/material.dart';

void main() {
  runApp(MyApp());
}

class MyApp extends StatelessWidget {

  @override
  Widget build(BuildContext context) {
    return MaterialApp(
      title: 'Row Widget Demo',
      home: Scaffold(
        appBar: AppBar(
          title: Text('水平方向布局'),
        ), //AppBar
        body: Row(
          children: <Widget>[
            RaisedButton(
              onPressed: () {},
              color: Colors.redAccent,
              child: Text('Red Button'),
            ),RaisedButton(
              onPressed: () {},
              color: Colors.orangeAccent,
              child: Text('Orange Button'),
            ),RaisedButton(
              onPressed: () {},
              color: Colors.lightBlue,
              child: Text('Blue Button'),
            ),
          ], //Widget[]
        ), //Row
      ), //Scaffold
    ); //MaterialApp
  }
}
- 1
- 2
- 3
- 4
- 5
- 6
- 7
- 8
- 9
- 10
- 11
- 12
- 13
- 14
- 15
- 16
- 17
- 18
- 19
- 20
- 21
- 22
- 23
- 24
- 25
- 26
- 27
- 28
- 29
- 30
- 31
- 32
- 33
- 34
- 35
- 36
- 37
Row即是水平布局,那么水平布局中我们放置了三个按钮,现在,运行看效果。
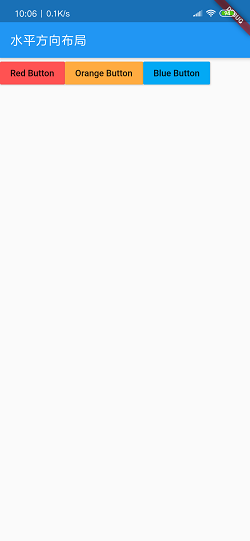
会发现 ,这个按钮的右边空出了一块,这是为什么呢?其实是因为我们使用的是一个不灵活的水平布局,那么既然有不灵活的水平布局,那就肯定会有灵活的水平布局。
import 'package:flutter/material.dart';

void main() {
  runApp(MyApp());
}

class MyApp extends StatelessWidget {

  @override
  Widget build(BuildContext context) {
    return MaterialApp(
      title: 'Row Widget Demo',
      home: Scaffold(
        appBar: AppBar(
          title: Text('水平方向布局'),
        ), //AppBar
        body: Row(
          children: <Widget>[
            Expanded(child: RaisedButton(
              onPressed: () {},
              color: Colors.redAccent,
              child: Text('Red Button'),
            )), Expanded(child: RaisedButton(
              onPressed: () {},
              color: Colors.orangeAccent,
              child: Text('Orange Button'),
            )), Expanded(child: RaisedButton(
              onPressed: () {},
              color: Colors.lightBlue,
              child: Text('Blue Button'),
            )),
          ], //Widget[]
        ), //Row
      ), //Scaffold
    ); //MaterialApp
  }
}
- 1
- 2
- 3
- 4
- 5
- 6
- 7
- 8
- 9
- 10
- 11
- 12
- 13
- 14
- 15
- 16
- 17
- 18
- 19
- 20
- 21
- 22
- 23
- 24
- 25
- 26
- 27
- 28
- 29
- 30
- 31
- 32
- 33
- 34
- 35
- 36
- 37
我们并没有对代码进行过多的修改,只是在每个按钮外部包了一个Expanded组件,那么现在我们来看一下运行效果:
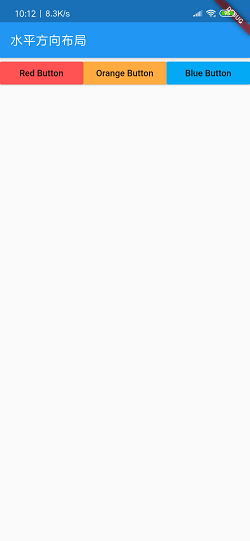
会发现,按钮成功自适应屏幕了,这才是我们想要的效果。
2.垂直布局(Column)
既然有水平布局,当然就有垂直布局。现在通过一个例子来理解一下垂直布局。
import 'package:flutter/material.dart';

void main() {
  runApp(MyApp());
}

class MyApp extends StatelessWidget {

  @override
  Widget build(BuildContext context) {
    return MaterialApp(
      title: 'Row Widget Demo',
      home: Scaffold(
          appBar: AppBar(
            title: Text('水平方向布局'),
          ), //AppBar
          body: Column(
            children: <Widget>[
              Text('Column 1'),
              Text('This is Column 2'),
              Text('Column 3'),
            ], //Widget
          ) //Column
      ), //Scaffold
    ); //MaterialApp
  }
}
- 1
- 2
- 3
- 4
- 5
- 6
- 7
- 8
- 9
- 10
- 11
- 12
- 13
- 14
- 15
- 16
- 17
- 18
- 19
- 20
- 21
- 22
- 23
- 24
- 25
- 26
- 27
应该不难理解,道理是一样的,现在看一下效果:
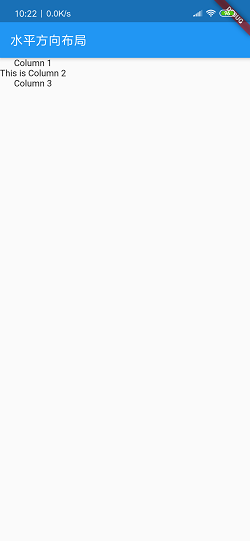
细心的同学会发现,它默认会有一个居中的对齐方式。但有同学提出疑问了,这也没居中啊,这不还是在屏幕的左侧吗?其实这个对齐是相对Column来说的,这个Column的大小是由最长的Text组件决定的。通过crossAxisAlignment属性可以设置Column的对齐方式。
3.层叠布局(Stack)
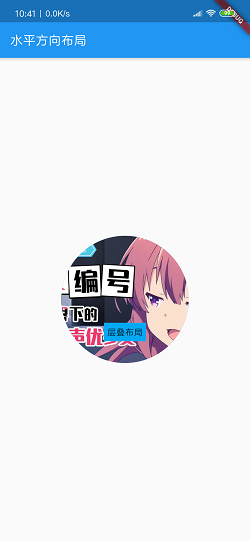
使用水平布局和垂直布局虽然可以实现大部分的布局效果,但是如果要在一张图片上显示一段文字,这两种布局将无法实现。所以,这里我们学习一种层叠布局,它能够很轻松地实现这个效果。
import 'package:flutter/material.dart';

void main() {
  runApp(MyApp());
}

class MyApp extends StatelessWidget {

  @override
  Widget build(BuildContext context) {
    var stack = Stack(
      alignment: const FractionalOffset(0.5, 0.8),
      children: <Widget>[
        CircleAvatar(
          backgroundImage: NetworkImage(
              'https://i0.hdslb.com/bfs/archive/79c30cf5850cb9ec9d6129b200145e1644f696f8.jpg@880w_440h.jpg'),
          radius: 100.0,
        ), //CircleAvatar
        Container(
          decoration: BoxDecoration(
              color: Colors.lightBlue
          ),
          padding: EdgeInsets.all(5.0),
          child: Text('层叠布局'),
        )
      ], //Widget[]
    ); //Stack
    return MaterialApp(
      title: 'Row Widget Demo',
      home: Scaffold(
          appBar: AppBar(
            title: Text('水平方向布局'),
          ), //AppBar
          body: Center(
            child: stack,
          )
      ), //Scaffold
    ); //MaterialApp
  }
}
- 1
- 2
- 3
- 4
- 5
- 6
- 7
- 8
- 9
- 10
- 11
- 12
- 13
- 14
- 15
- 16
- 17
- 18
- 19
- 20
- 21
- 22
- 23
- 24
- 25
- 26
- 27
- 28
- 29
- 30
- 31
- 32
- 33
- 34
- 35
- 36
- 37
- 38
- 39
- 40
我们首先创建一个组件变量,将我们的图片和文字都定义在里面,然后通过alignment属性可以决定文本组件的相对位置,看一下效果:
4.卡片布局(Card)
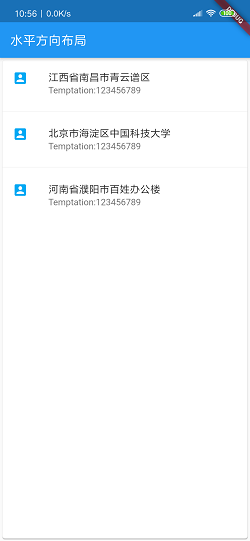
最后一个布局,卡片布局。来看例子。
import 'package:flutter/material.dart';

void main() {
  runApp(MyApp());
}

class MyApp extends StatelessWidget {

  @override
  Widget build(BuildContext context) {
    var card = Card(
      child: Column(
        children: <Widget>[
          ListTile(
            title: Text(
              '江西省南昌市青云谱区', style: TextStyle(fontWeight: FontWeight.w500),),
            subtitle: Text('Temptation:123456789'),
            leading: Icon(Icons.account_box, color: Colors.lightBlue,),
          ),
          new Divider(),
          ListTile(
            title: Text(
              '北京市海淀区中国科技大学', style: TextStyle(fontWeight: FontWeight.w500),),
            subtitle: Text('Temptation:123456789'),
            leading: Icon(Icons.account_box, color: Colors.lightBlue,),
          ),
          new Divider(),
          ListTile(
            title: Text(
              '河南省濮阳市百姓办公楼', style: TextStyle(fontWeight: FontWeight.w500),),
            subtitle: Text('Temptation:123456789'),
            leading: Icon(Icons.account_box, color: Colors.lightBlue,),
          ) //ListTile
        ], //Widget[]
      ), //Column
    ); //Card

    return MaterialApp(
      title: 'Row Widget Demo',
      home: Scaffold(
          appBar: AppBar(
            title: Text('水平方向布局'),
          ), //AppBar
          body: Center(
              child: card
          )
      ), //Scaffold
    ); //MaterialApp
  }
}
- 1
- 2
- 3
- 4
- 5
- 6
- 7
- 8
- 9
- 10
- 11
- 12
- 13
- 14
- 15
- 16
- 17
- 18
- 19
- 20
- 21
- 22
- 23
- 24
- 25
- 26
- 27
- 28
- 29
- 30
- 31
- 32
- 33
- 34
- 35
- 36
- 37
- 38
- 39
- 40
- 41
- 42
- 43
- 44
- 45
- 46
- 47
- 48
- 49
- 50
运行看效果:
篇幅有限,关于Flutter的组件和布局就介绍到这里,接下来还会有一篇关于Flutter的进阶博客,感兴趣的同学可以看一看。


