
- 1人工智能技术_人工智能ai技术csdn
- 2解决 Redis7.0远程连接及客户端连接报错:WRONGPASS invalid username-password pair or user is disabled.
- 3知识图谱:知识融合(将来自不同知识库的同一实体融合在一起)【知识融合有不同的叫法,如:知识对齐、本体对齐、本体匹配、Record Linkage、Entity Resolution、实体对齐】_知识融合处理
- 4Java基础知识及IDEA的使用
- 5【自然语言处理】【大模型】LaMDA:用于对话应用程序的语言模型_lamda模型 开源
- 6电商数据采集的网页抓取数据、淘宝、天猫、京东等平台的电商数据抓取|电商数据API接口网页爬虫、采集网站数据
- 7【人工智能】架构师的大语言模型技术指南:核心点是寻找一种合理的 DSL(领域特定语言)以将现有的流程结合到 LLM_dsl 大模型
- 8C++STL之优先级队列详解_c++priority_queue时间复杂度
- 9关于Stata工具变量固定效应回归ivreghdfe包报错last estimates not found一步解决问题的方法
- 10自制聊天机器人实现与chatgpt或微信好友对话【附代码】_微信用chatgtp和其他人聊天
IntelliJ IDEA创建一个spark的项目_idea创建javaspark项目
赞
踩
在开始之前,需要说明的是 要跑通基本的wordcount程序,是不需要在windows上安装 hadoop 和spark的,因为idea在跑程序的时候,会按照 pom.xml配置文件,从指定的 repository源,按照properties指定的版本,下载dependency中指定的依赖包 。
如果需要在本地通过 spark-shell,或者 运行开发完的包,那么就需要完整的hadoop 和spark环境,就需要把这两个都安装好。
我是新入门,之前idea建立spark项目是同事指导着创建的,但是过了一段时间,具体步骤都不记得了,所以试着自己重新建立一个新的spark项目,算是熟悉一下IDEA这个工具吧。
参考文档:写的很详细
1. 需要安装的软件及版本
jdk1.8-1.8.0_25
Scala:Scala code runner version 2.11.12
Intellij idea 2019.2.3(community edition)
Maven:apache-maven-3.6.3
2.配置环境变量 及 验证
配置环境变量过程中 前面的是 变量名(如 JAVA_HOME),后面是变量的值(C:\Program Files\Java)。
1. java
新增系统环境变量:JAVA_HOME C:\Program Files\Java
PATH 中增加:C:\Program Files\Java\jdk1.8.0_91\bin 和 C:\Program Files\Java\jre1.8.0_91\bin
CLASSPATH 中要增加:.;%JAVA_HOME%\lib;%JAVA_HOME%\lib\tools.jar;
验证是否安装成功(文字是粘的别人的,代码是我本机运行的):
- C:\Users\brayden.liu>java -version
- java version "1.4.2_03"
- Java(TM) 2 Runtime Environment, Standard Edition (build 1.4.2_03-b02)
- Java HotSpot(TM) Client VM (build 1.4.2_03-b02, mixed mode)
-
2.Scala
新增系统环境变量:SCALA_HOME C:\Program Files (x86)\scala
PATH 中增加:%SCALA_HOME%\bin
验证
- C:\Users\brayden.liu>scala -version
- Picked up JAVA_TOOL_OPTIONS: -Djava.vendor="Sun Microsystems Inc."
- Scala code runner version 2.11.12 -- Copyright 2002-2017, LAMP/EPFL
3.Maven
原文是:
Maven下载后,解压到了D:\spark_study ,删除了 apache-maven-3.6.3-bin目录,路径为D:\spark_study\apache-maven-3.6.3
我记得我安装时候,就是直接解压缩放到D:\dev_home\apache-maven-3.6.3,好像也能用
注意一下操作
新增系统环境变量:MAVEN_HOME D:\spark_study\apache-maven-3.6.3
新增系统环境变量:MAVEN_OPTS -Xms128m -Xmx512m
CLASSPATH 中要增加:%MAVEN_HOME%\bin
设置 本地maven 仓库 的路径为:D:\spark_study\localWarehouse,这个路径就是用来存放下载各种依赖包的。如果采用idea默认的Maven,那么仓库地址一般是 C:\Users\用户名\.m2 ,建议自己设置路径而非采用默认的路径。
重点
打开 D:\dev_home\apache-maven-3.6.3\conf\settings.xml,在文件中添加:
<localRepository>D:\spark_study\localWarehouse</localRepository>
后面加载maven的时候,可以联动带出本地仓库
接下来设置 国内maven仓库 如阿里仓库,后面就会从这个镜像地址下载依赖包,速度会更快。
在 <mirrors>标签中添加:
<mirror>
<id>nexus-aliyun</id>
<mirrorOf>central</mirrorOf>
<name>Nexus aliyun</name>
<url>http://maven.aliyun.com/nexus/content/groups/public</url>
</mirror>
验证(靠,后面有异常,但是好像不影响使用)
- C:\Users\brayden.liu>mvn -V
- Picked up JAVA_TOOL_OPTIONS: -Djava.vendor="Sun Microsystems Inc."
- Apache Maven 3.6.3 (cecedd343002696d0abb50b32b541b8a6ba2883f)
- Maven home: D:\dev_home\apache-maven-3.6.3\bin\..
- Java version: 1.8.0_251, vendor: Sun Microsystems Inc., runtime: C:\Program Files\Java\jdk1.8.0_251\jre
- Default locale: zh_CN, platform encoding: GBK
- OS name: "windows 10", version: "10.0", arch: "amd64", family: "windows"
- [INFO] Scanning for projects...
- [INFO] ------------------------------------------------------------------------
- [INFO] BUILD FAILURE
- [INFO] ------------------------------------------------------------------------
- [INFO] Total time: 0.161 s
- [INFO] Finished at: 2023-12-08T15:10:31+08:00
- [INFO] ------------------------------------------------------------------------
- [ERROR] No goals have been specified for this build. You must specify a valid lifecycle phase or a goal in the format <plugin-prefix>:<goal> or <plugin-group-id>:<plugin-artifact-id>[:<plugin-version>]:<goal>. Available lifecycle phases are: validate, initialize, generate-sources, process-sources, generate-resources, process-resources, compile, process-classes, generate-test-sources, process-test-sources, generate-test-resources, process-test-resources, test-compile, process-test-classes, test, prepare-package, package, pre-integration-test, integration-test, post-integration-test, verify, install, deploy, pre-clean, clean, post-clean, pre-site, site, post-site, site-deploy. -> [Help 1]
- [ERROR]
- [ERROR] To see the full stack trace of the errors, re-run Maven with the -e switch.
- [ERROR] Re-run Maven using the -X switch to enable full debug logging.
- [ERROR]
- [ERROR] For more information about the errors and possible solutions, please read the following articles:
- [ERROR] [Help 1] http://cwiki.apache.org/confluence/display/MAVEN/NoGoalSpecifiedException

3.配置intellij idea
1.安装软件
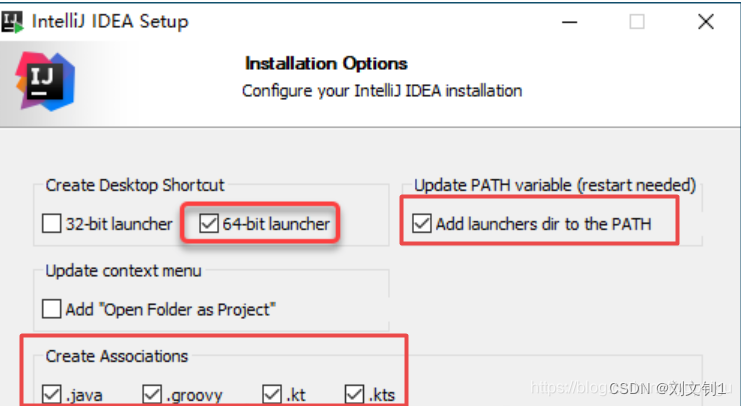
特别需要注意的是 这里只是安装社区版,没有安装专业版,因为社区版也够用了。
另外,如果用专业版,特别是来回安装了多次,会出现 安装完后,双击打开没有反应的问题,需要把 C:\Users\用户名\.IntelliJIdea版本号 这个目录底下的文件全部删除。
注意勾选红色框部分,然后一步一步安装就行。
图片是我粘的和我本机大差不差吧
2、安装scala插件
通过菜单 File -》Settings 进入如下页面,然后输入 scala 找到要安装的插件,点击 安装。按照提示,需要重启 IDE。
如果你已经下载了,好像可以本地安装,我是早就安装好了的,所以不太记得了。

如果 显示找不到插件,可以通过 点击 Auto-detect proxy settings 来设置代理(注意 这里并不需要输入具体的url),点击保存。
3、配置java、scala、maven
重点,这里是重点
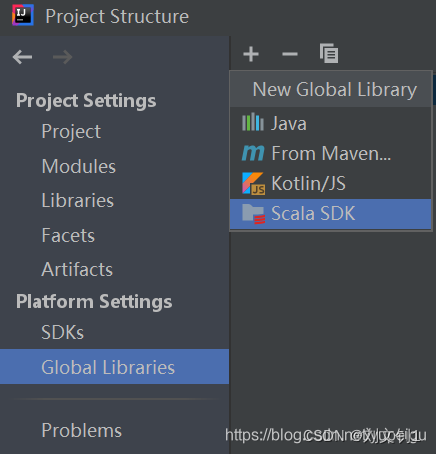
通过菜单 File -》Project Structure 进入页面进行设置:
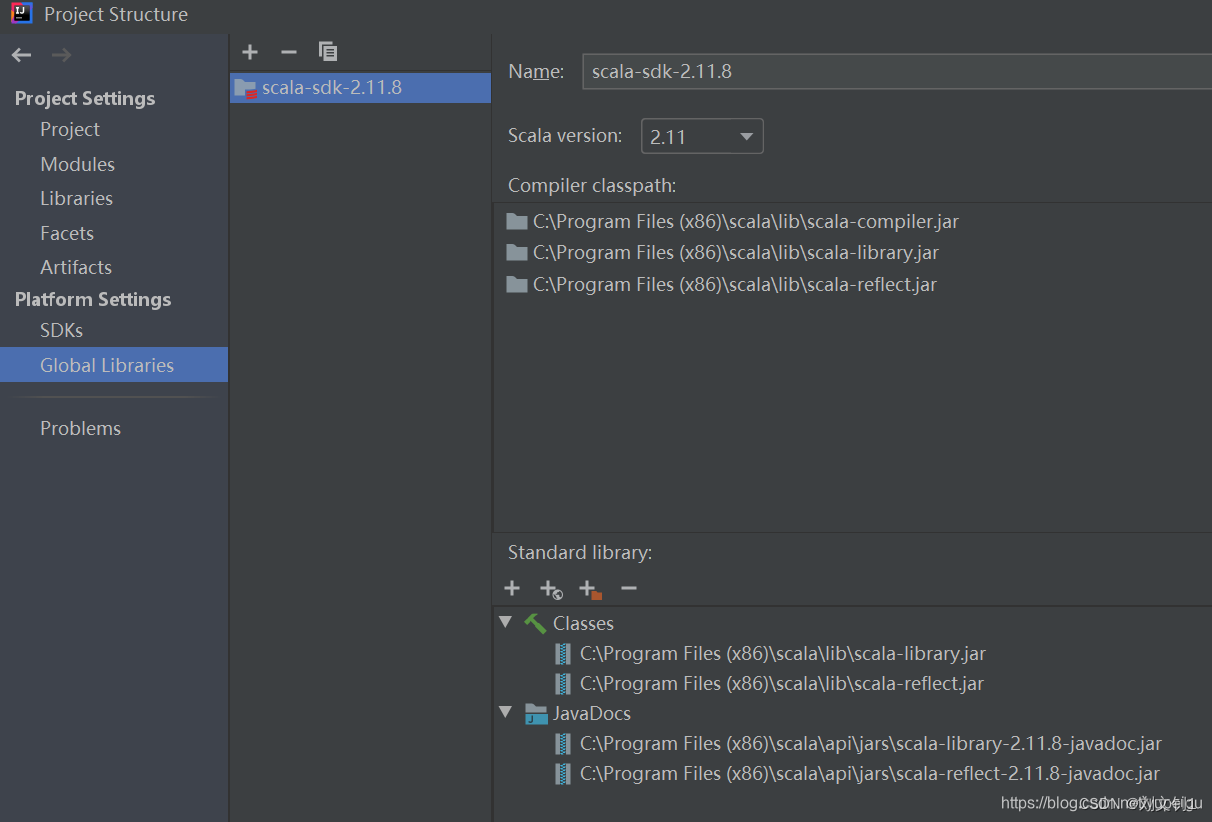
Global Libraries 点击 + 号,选择 Scala SDK
通过菜单 File-》Settings -》 Build,Exection,Deployment -》 Build Tools -》 Maven进入页面,要修改 Maven home directory,User settings file,Local repository,最后点击 OK 保存。
这里采用 手动安装的Maven 3.6.3版本,而非idea自带的Maven,同时指定相应的 settings.xml文件、Maven仓库的路径。
图片是我粘的别人的文档,我的也差不多,另外别忘了左边的勾选框
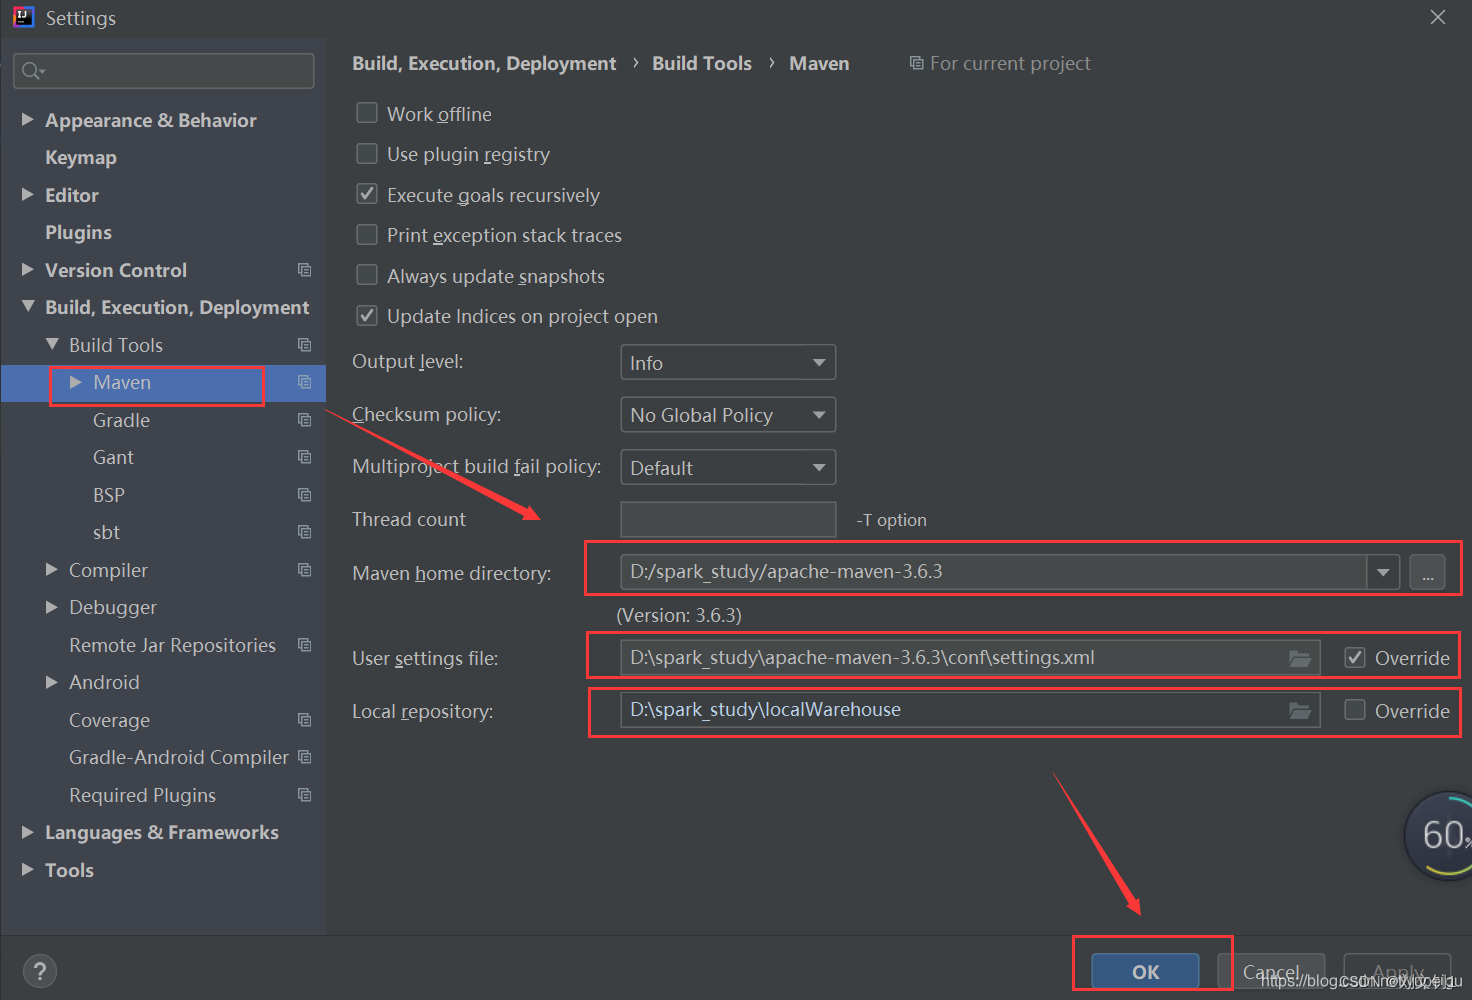
在IEDA中设置apache
file->settings->Build,Execution,Deployment->build Tools->maven
maven home directory:本机的maven的位置
我的是在D:/dev_home/apache-maven-3.6.3
User settings file:maven的设置文件位置,是在maven home directory路进下
我的是在D:\dev_home\apache-maven-3.6.3\conf\settings.xml
记得后边的Override勾选框勾上
Loca repository:本地jar仓库位置
我的是在E:\repository--这个由于前面在maven中设置了,所以这里自动带出来了,很好。
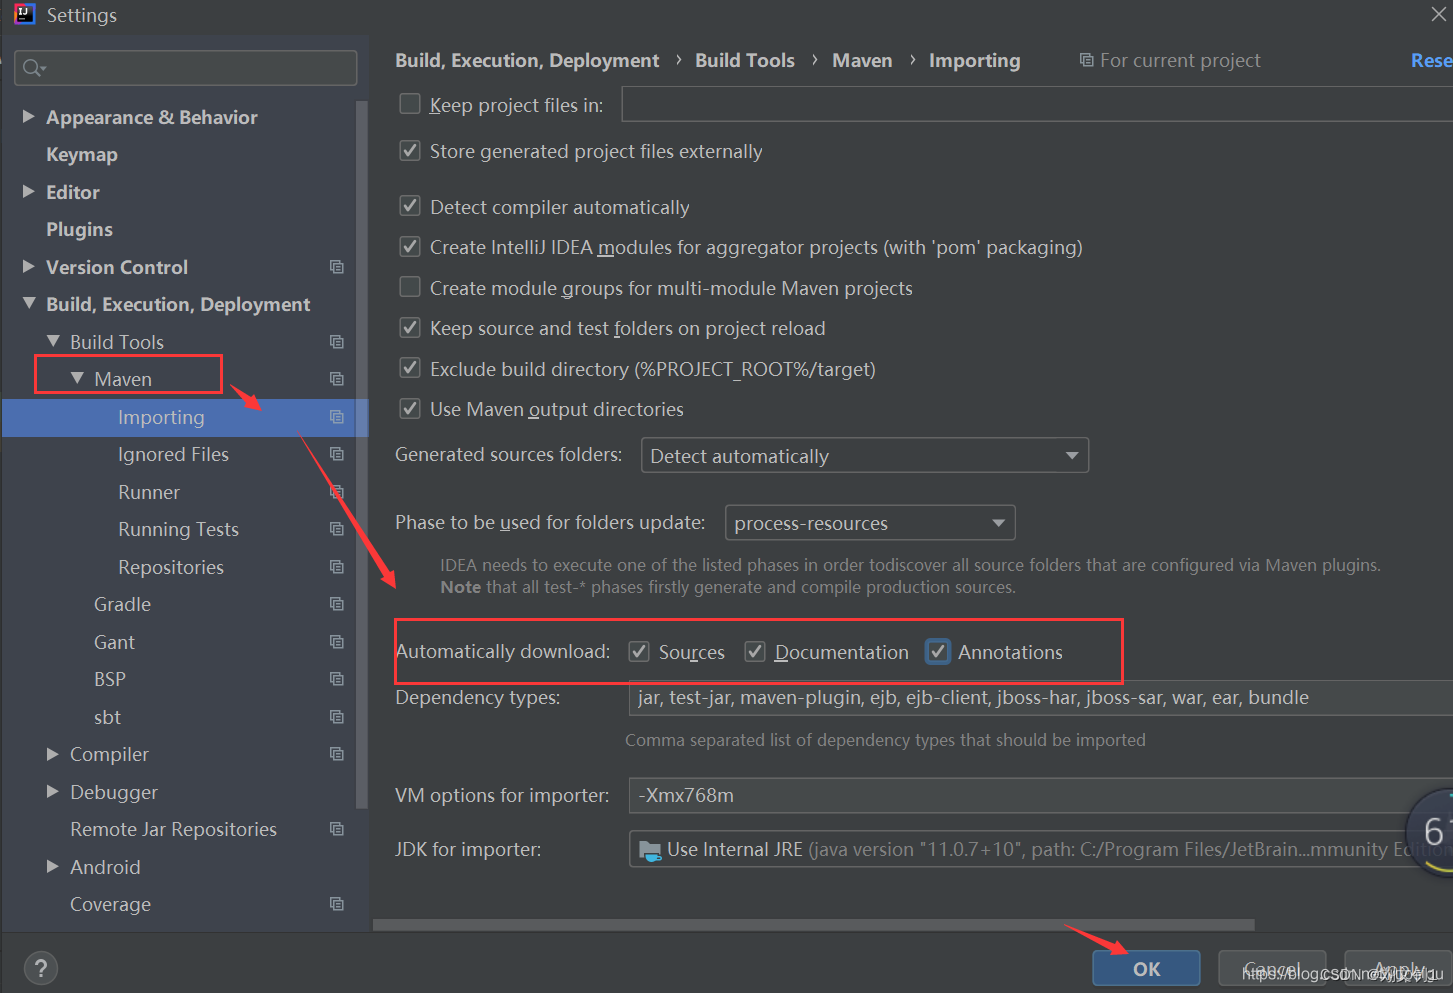
然后 继续点击 Maven 左侧的向右的三角形,展开子菜单,点击 Importing ,再勾选 红色框的3个 复选框,点击 OK 保存。
这里不知道具体是干啥的,我的软件只有前两项,感觉勾不勾差不多
4.intellij idea中新建项目
File -》New -》Project,注意 不要勾选 “Create from archetype”(这里是重点,用了后运行程序会报一些莫名其妙的错误),因为 scala-archetype-simple:1.2 版本太低,会有很多问题,也就是上面下载的 插件并没有排上用场,这也是试了很多次才发现的。。。
图片依然是粘的别人的,我都和这个有些不同,但是大差不差
 修改pom.xml文件,在 </project> 前面增加 依赖项:
这个pom是我本机的,不太明白都是干啥的,所以查了文档,加了一些备注,后面再逐步明细吧
- <?xml version="1.0" encoding="UTF-8"?>
-
- <project xmlns="http://maven.apache.org/POM/4.0.0"
- xmlns:xsi="http://www.w3.org/2001/XMLSchema-instance"
- xsi:schemaLocation="http://maven.apache.org/POM/4.0.0 http://maven.apache.org/xsd/maven-4.0.0.xsd">
- <modelVersion>4.0.0</modelVersion>
-
- <!--
- groupId(组织的ID):表示当前模块所属于的项目
- artifactId:模块的ID,如果是项目级的那就是项目名
- version:当前的版本
- -->
- <groupId>testNewProject1</groupId>
- <artifactId>testNewProject1</artifactId>
- <packaging>pom</packaging>
- <version>1.0-SNAPSHOT</version>
-
- <!--modules
- 这里需要在file->project structure里面建立一个新的modules
- 并且在他下面建立一个pom
- 这里指定后,本pom的参数可以被scala继承
- -->
- <modules>
- <module>scala</module>
- </modules>
-
- <!--properties
- 全局属性,一般情况下同于定义全局的jar包的版本
- 作用:比如在properties中定义版本<ljy.version>4.3.12</ljy.version>
- 那么在对于的依赖下添加${ljy.version}
- 在properties中改了 后面对应的依赖版本也跟着改了(方便)
- 在依赖的version中alt+ctrl+v(快速提取)
- -->
- <properties>
- <project.build.sourceEncoding>UTF-8</project.build.sourceEncoding>
- <encoding>UTF-8</encoding>
- <java.version>1.8</java.version>
- <scala.version>2.11.12</scala.version>
- <maven.compiler.source>1.8</maven.compiler.source>
- <maven.compiler.target>1.8</maven.compiler.target>
- <cdh.version>3.3.0-cdh6.3.1</cdh.version>
- <hadoop.version>3.3.0</hadoop.version>
- <hbase.version>2.1.0</hbase.version>
- <hive-jdbc.version>2.1.1</hive-jdbc.version>
- <spark2.version>2.4.0</spark2.version>
- <spark.version>2.4.0</spark.version>
- <maven.version>3.3</maven.version>
- <parquet.version>1.0.0-cdh6.3.1</parquet.version>
- <hbase-spark.version>2.1.0-cdh6.3.1</hbase-spark.version>
- <kafka.version>0.11.0.1</kafka.version>
- <hive.version>2.1.1</hive.version>
- <kudu-client.version>1.10.0-cdh6.3.1</kudu-client.version>
- <config.version>1.2.1</config.version>
- <zkclient.version>0.10</zkclient.version>
- <guava.version>18.0</guava.version>
- <redis.version>2.8.2</redis.version>
- <mysql.version>5.1.34</mysql.version>
- <ojdbc.version>11.1.0.7.0</ojdbc.version>
- <junit.version>3.8.1</junit.version>
- <fast.version>1.2.62</fast.version>
- <jcommander.version>1.71</jcommander.version>
- </properties>
-
-
- <build>
- <pluginManagement>
- <!--plugins
- 配置插件,是一种工具
- -->
- <plugins>
- <plugin>
- <groupId>net.alchim31.maven</groupId>
- <artifactId>scala-maven-plugin</artifactId>
- <version>3.2.1</version>
- </plugin>
- <plugin>
- <groupId>org.apache.maven.plugins</groupId>
- <artifactId>maven-compiler-plugin</artifactId>
- <version>2.3.1</version>
- </plugin>
- </plugins>
- </pluginManagement>
-
- </build>
-
- <!--repositories
- 用来配置当前工程使用的远程仓库
- 依赖查找的顺序:本地仓库——>当前工程pom.xml中配置的远程仓库——>setting.xml中配置的远程仓库
- spring为例:url 是spring官方地址
- -->
- <repositories>
- <repository>
- <id>apache.snapshots</id>
- <name>Apache Snapshot Repository</name>
- <url>https://repository.apache.org/content/repositories/snapshots/</url>
- </repository>
- <repository>
- <id>cdh.repo</id>
- <name>Cloudera Repositories</name>
- <url>https://repository.cloudera.com/artifactory/cloudera-repos</url>
- <snapshots>
- <enabled>false</enabled>
- </snapshots>
- </repository>
- <repository>
- <id>scala-tools.org</id>
- <name>Scala-tools Maven2 Repository</name>
- <url>http://scala-tools.org/repo-releases</url>
- </repository>
- </repositories>
-
- <pluginRepositories>
- <pluginRepository>
- <id>scala-tools.org</id>
- <name>Scala-tools Maven2 Repository</name>
- <url>http://scala-tools.org/repo-releases</url>
- </pluginRepository>
- <pluginRepository>
- <id>cloudera-repos</id>
- <name>Cloudera Repos</name>
- <url>https://repository.cloudera.com/artifactory/cloudera-repos/</url>
- </pluginRepository>
- </pluginRepositories>
-
- <!--dependencies
- 模块的依赖信息
- scope:作用域,具体指含义如下
- compile:该依赖可以在整个项目中使用,参与打包部署,默认值,如:commons-fileupload
- test:该依赖只能在测试代码中使用,并且不参与打包部署的,如:junit
- provided:该依赖编写源代码时需要,不参与打包部署,如:servlet-api、jsp-api
- runtime:该依赖编写代码时不需要,运行时需要,参与打包部署,如:mysql-connector
- system:表示使用本地系统路径下的jar包,需要和一个systemPath一起使用,如:ojdbc.jar
- -->
- <dependencies>
- <dependency>
- <groupId>junit</groupId>
- <artifactId>junit</artifactId>
- <version>3.8.1</version>
- <scope>test</scope>
- </dependency>
- <!--<dependency>
- <groupId>com.alibaba.otter</groupId>
- <artifactId>canal.client</artifactId>
- <version>1.0.25</version>
- </dependency>
- <dependency>
- <groupId>org.springframework</groupId>
- <artifactId>spring-core</artifactId>
- <version>2.5.6</version>
- </dependency>-->
- <!--<dependency>
- <groupId>org.apache.kudu</groupId>
- <artifactId>kudu-client</artifactId>
- <version>1.10.0-cdh6.3.1</version>
- </dependency>-->
- <dependency>
- <groupId>org.apache.spark</groupId>
- <artifactId>spark-core_2.11</artifactId>
- <version>${spark2.version}</version>
- <!-- <scope>runtime</scope> -->
- </dependency>
- <dependency>
- <groupId>org.apache.spark</groupId>
- <artifactId>spark-sql_2.11</artifactId>
- <version>${spark2.version}</version>
- <!-- <version>2.2.0</version> -->
- </dependency>
-
- <dependency>
- <groupId>com.alibaba</groupId>
- <artifactId>fastjson</artifactId>
- <version>${fast.version}</version>
- </dependency>
- <!-- hive impala -->
- <dependency>
- <groupId>org.apache.hive</groupId>
- <artifactId>hive-jdbc</artifactId>
- <version>1.2.1</version>
- <exclusions>
- <exclusion>
- <groupId>org.eclipse.jetty.aggregate</groupId>
- <artifactId>jetty-all</artifactId>
- </exclusion>
- <exclusion>
- <groupId>org.apache.hive</groupId>
- <artifactId>hive-shims</artifactId>
- </exclusion>
- </exclusions>
- </dependency>
- <dependency>
- <groupId>org.mongodb.spark</groupId>
- <artifactId>mongo-spark-connector_2.11</artifactId>
- <version>2.3.0</version>
- </dependency>
- <dependency>
- <groupId>org.mongodb</groupId>
- <artifactId>mongo-java-driver</artifactId>
- <version>3.8.0</version>
- </dependency>
- <dependency>
- <groupId>org.mongodb</groupId>
- <artifactId>casbah_2.10</artifactId>
- <version>3.1.1</version>
- <type>pom</type>
- </dependency>
- <dependency>
- <groupId>org.apache.spark</groupId>
- <artifactId>spark-hive_2.11</artifactId>
- <version>2.4.0</version>
- </dependency>
- <dependency>
- <groupId>org.apache.hive</groupId>
- <artifactId>hive-exec</artifactId>
- <version>2.1.1</version>
- </dependency>
- <dependency>
- <groupId>mysql</groupId>
- <artifactId>mysql-connector-java</artifactId>
- <version>5.1.46</version>
- </dependency>
- <dependency>
- <groupId>commons-io</groupId>
- <artifactId>commons-io</artifactId>
- <version>2.6</version>
- </dependency>
- <dependency>
- <groupId>com.crealytics</groupId>
- <artifactId>spark-excel_2.11</artifactId>
- <version>0.12.2</version>
- </dependency>
- </dependencies>
-
- </project>
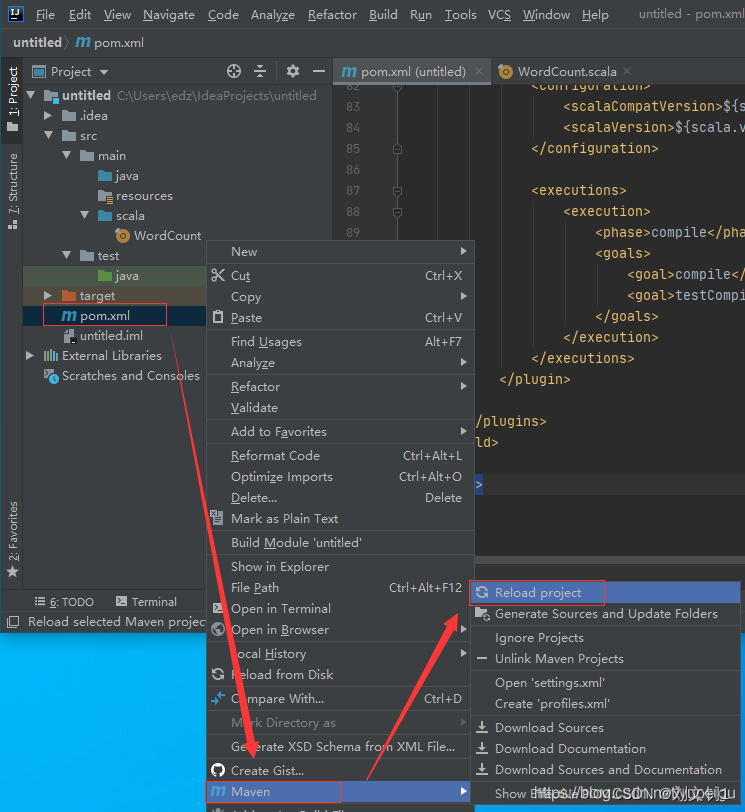
然后 右键项目中的 pom.xml 文件 -》Maven -》reload project 下载依赖包:
5.编写WordCount代码
右键 Main 目录 -》 New -》 Directory ,目录名称为: scala
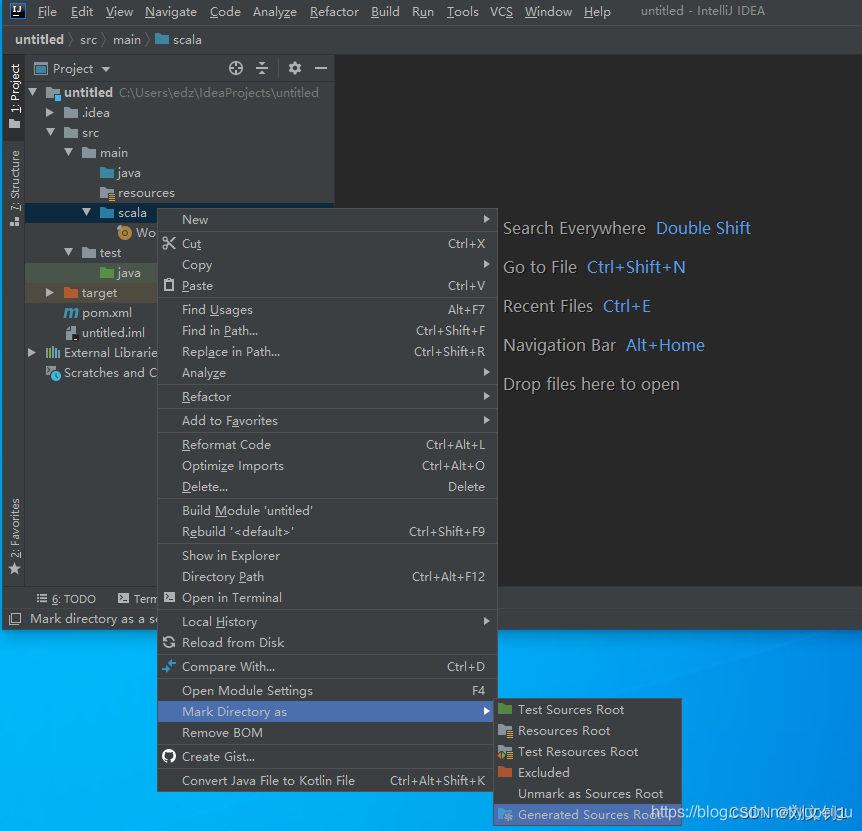
右键 scala 目录 -》Make Directory as -》Generate Sources Root
右键 scala 目录-》New -》scala class -》 object ,名称为:WordCoun
这里有个诡异的事情,我右键后,找不到scala的创建,然后使用file创建了个文件,文件名后缀.scala,执行后删除该文件,再右键新建的时候,可以创建scala的object了,很神奇!!!
6.出现的异常
1. 报错Exception in thread "main" java.lang.ClassNotFoundException: oracle.jdbc.driver.OracleDriver
写了一个scala来测试项目是否正常,主体逻辑是连接oracle,查询一个表,展示到工作台
但是报错:
Exception in thread "main" java.lang.ClassNotFoundException: oracle.jdbc.driver.OracleDriver
很奇怪,之前项目里面是可以正常使用的,但是新的不行,对比了以下,发现新项目的External Libraies中没有Oracle
试了手动在Project structure中导入,刷新Libraries等,依然报错。
并且发现本地仓库中有这个Oracle驱动类的。
最后,想到是不是pom中没加,手动加上,idea自动导入到了Libraries,程序可以正常运行了。
所以可见,External Libraries中的类是根据pom来导入的。
- <dependency>
- <groupId>com.oracle</groupId>
- <artifactId>ojdbc6</artifactId>
- <version>11.1.0.7.0</version>
- </dependency>
说一下猜测:
com.oracle:是该类的路径
ojdbc6:类名,但是时间上也是路径下的文件夹
11.1.0.7.0:版本,感觉也是类名下的文件夹
因为,这个驱动jar就是放在这个路径下的
E:\repository\com\oracle\ojdbc6\11.1.0.7.0
而 E:\repository 这个路径是我在file->setting->Build,Execution,Deployment->Build Tool->Maven的Local repository中设置的

