- 1Python JWT 介绍
- 2小程序引入字体注意点_微信小程序端字体链接必须是同源下的,或开启了cors支持,微信小程序的域名是servic
- 3用Three.js打造酷炫3D个人网站(含源码)_three.js案例网站
- 4Verilog--除法器的简单实现_verilog除法
- 5MathType2024最新7.6汉化破解版下载_mathtype 7.6
- 6windows远程访问树莓派ubuntu22.04 桌面 - NoMachine
- 7PyTorch2.0 环境搭建详细步骤(Nvidia显卡)_nvida pytorch
- 8webUI自动化之基本框架搭建(python + selenium + unittest)_python ui自动框架
- 9Android 使用retrofit+kotlin协程,搭建MVVM框架_android retrofit kotlin
- 10MySQL中的全表扫描和索引树扫描_mysql 全表扫描
如何使用 Github Action 管理 Issue
赞
踩
本文作者为 360 奇舞团前端开发工程师 Daryl
前言
 很多小伙伴打开 github 上的仓库都只使用
Code查看代码,或者只是把 github 当成一个代码仓库,但是 github 还提供了很多好用的功能。
其中,GitHub Action就是一个很好用的功能,本文将通过几个管理Issue的示例带大家了解GitHub Action:
什么是 Github Action
github 给所有用户都提供了临时可用的虚拟机, 我们通过创建 github action 工作流来使用这个虚拟机. 我们可以使用它来实现自动化部署、自动化测试、代码检查、管理 Issues...
使用步骤
在学习之前还需要准备一些资料:
Github Action文档
官方仓库中有很多可以复用的 Action, 通过
uses字段引用就可以直接使用了。阮一峰的YAML 教程;
也推荐大家使用Vscode GitHub Action插件,这个插件在登录后可以用来做语法校验,还能查看运行过的记录。
除了这些资料之外还有些基础概念需要了解:
事件: 在工作流中可以监听 github 的一些事件, 在事件触发后执行我们定义的工作流;
上下文: github 上下文包含有关工作流运行和触发运行的事件的信息,可以读取环境变量中的大多数 github 上下文数据,并允许我们通过变量访问这些数据。
变量: 变量提供了一种存储和重用非敏感配置信息的方法。 可以将任何配置数据(如编译器标志、用户名或服务器名称)存储为变量。 变量在运行工作流的运行器计算机上插值。 在操作或工作流步骤中运行的命令可以创建、读取和修改变量。
表达式: 可以使用表达式来运算工作流程文件中的变量。
秘钥: 普通变量中存储的信息并不安全,很容易泄露,一些需要保密的信息就可以存储到秘钥中。
如果不想去从头学习yml语法, 可以先了解一些yml的基础用法:
大小写敏感
使用缩进表示层级关系
缩进时不允许使用 Tab 键,只允许使用空格。
缩进的空格数目不重要,只要相同层级的元素左侧对齐即可
下面开始介绍 GitHub Action 的用法
使用 github Action ,第一步需要在项目根目录下创建.github/workflows文件夹, 所有的工作流文件都要放到这个文件夹,当事件触发时会自动执行;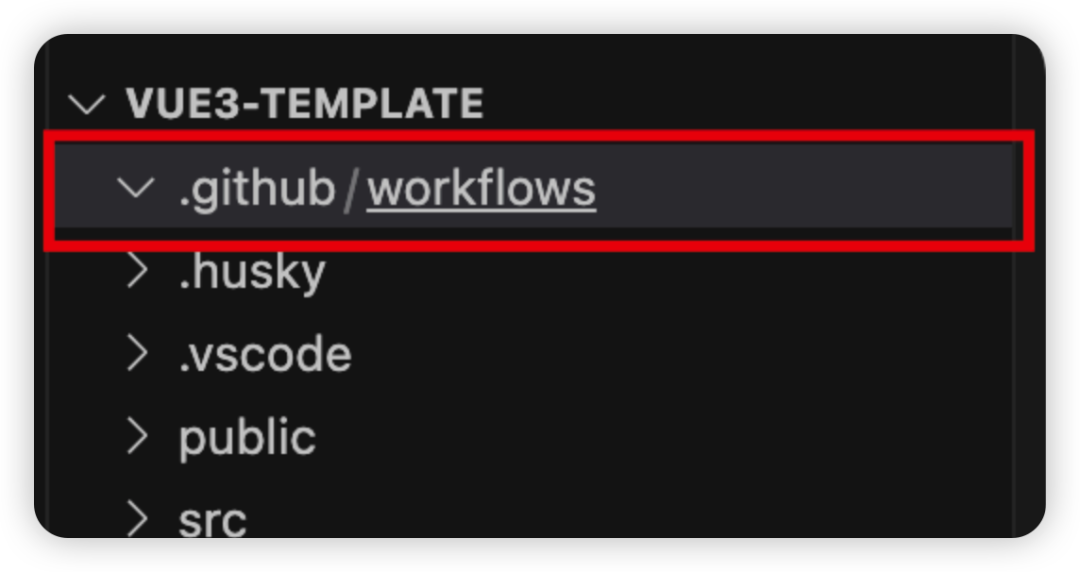
大家可以通过这个 workflow 文件示例来简单了解下各个字段的用处:
- name: build # workflow的名称,缺省时会使用文件名
- on: # workflow监听事件
- push # 具体的事件
- branches: # 在这些分支上才会触发
- - main
- - 'mona/octocat'
- - 'releases/**'
- jobs: # 执行的工作的集合
- build: # ‘build’是一个自定义的工作的id<job_id>
- name: rele # 当前工作的名称
- runs-on: ubuntu-latest # 因为工作实际是运行在虚拟机上的,runs-on就是指定虚拟机的版本
- steps: # steps是步骤的集合
- - name: checkout # name是指定当前工作的名称 在workflow(工作流)文件的steps中,每个用‘-’代替缩进视为一个步骤的开始
- uses: actions/checkout@v2 # uses字段是选择一个可以直接复用的action,并且在github action store中的action可以直接使用,不需要下载
- - name: setting env
- id: setting # id 是步骤的唯一标识符,可以使用 id 在上下文中引用该步骤
- env: # 设置环境变量
- NODEV: 18
- run: echo "nodev=$NODEV" >> $GITHUB_OUTPUT # run字段会在命令行执行一条命令,这个命令是将"nodev=18"写入到$GITHUB_OUTPUT,这样可以为'output'添加test属性值为test1,详情参考
- - name: addnode
- uses: actions/setup-node@v3 # 使用node环境
- with: # 为‘uses’使用的action传递参数
- node-version: ${{steps.setting.output.nodev}} # 使用上面设置的变量

在编写工作流文件之前有两件事要做:
一. 可以在 github 或者 github action 的仓库里查找公用 action.这样可以减少很多工作量:
常用的 action 有:
checkout: 帮我们自动把项目克隆到虚拟机上
Setup Node: 自动安装 node
issues-helper: 辅助处理 issues
二. 如果没有设置 action 的读写权限,第一次运行会报错: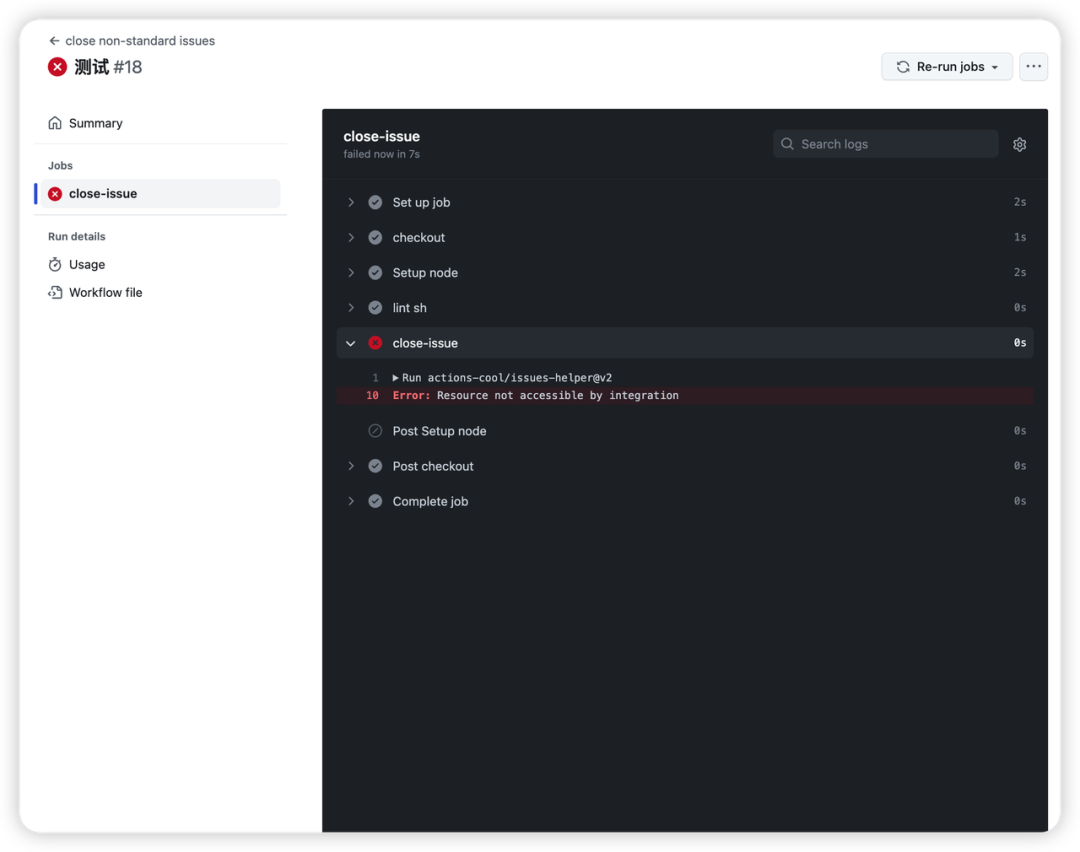 设置权限:
设置权限: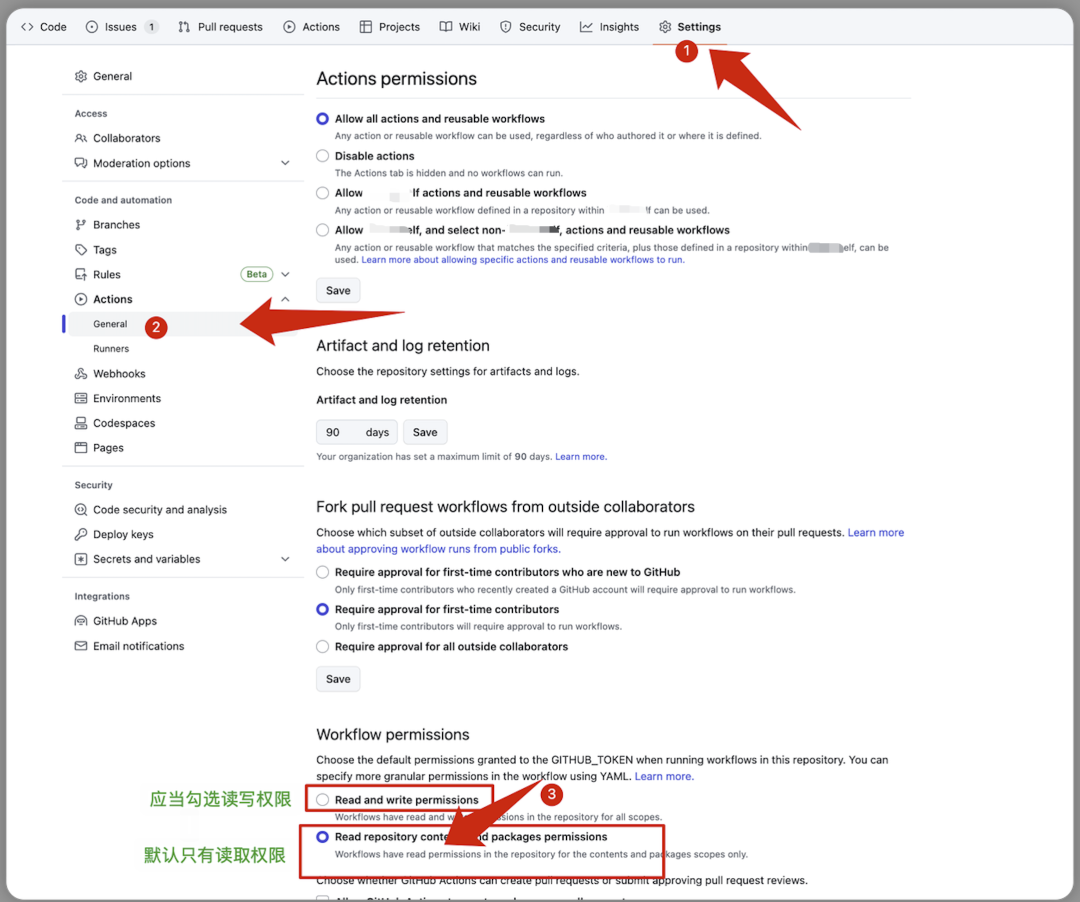
再次运行:
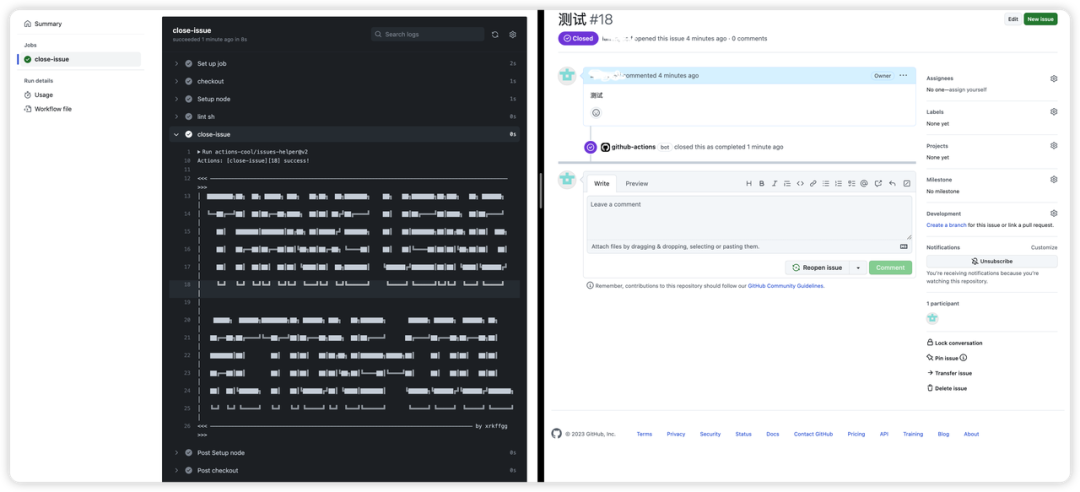
下面通过一些具体示例给大家介绍一些Github Action的用法:
检查 issues 格式是否规范, 并关闭不规范 issue
在开源项目中,很多人都会提一些 issue。为了方便开发者查看,可以上传 issue 模版,并且根据模版校验 issue 格式,然后关闭不符合模板格式的 issue。
在这个示例主要介绍脚本执行怎么向
github上下文注入变量,我们可以参考github 设置环境变量的教程.这个脚本可以配合
.github/ISSUE_TEMPLATE文件夹中的 issue 模板使用的,将.md文件放入这个文件夹中就可以作为 Issue 的默认模板;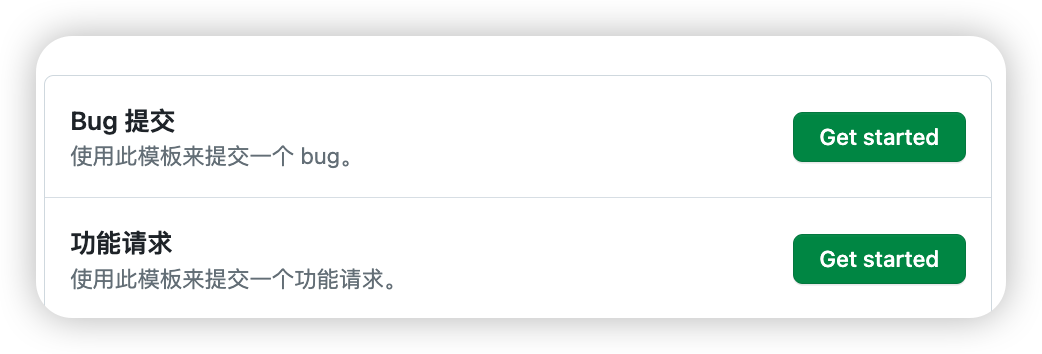
Alt text 选择 Bug 提交将使用这个模板:
- ---
- name: Bug 提交
- about: 使用此模板来提交一个 bug。
- ---
- # BUG 提交
- ## 描述该错误
- 简明扼要地描述一下这个错误是什么。
- 可以添加屏幕截图以帮助解释你的问题。
- ## 复现
- 这个 BUG 的复现步骤:
- 1. ...
- 2. ...
- 3. ...
- ...
- 或者添加录屏链接
- ## 运行结果
- 预期的结果:
- ... ...
- 实际的结果:
- ... ...
- ## 运行环境信息
- - Device: [e.g. 设备名称]
- - OS: [e.g. 操作系统]
- - Browser [e.g. 浏览器]
- - Version [e.g. 浏览器版本]
- ## 其它
- 在此添加关于问题的任何其它信息。

选择功能请求将使用这个模板:
- ---
- name: 功能请求
- about: 使用此模板来提交一个功能请求。
- ---
- # 功能请求
- ## 你期望添加什么样的功能?
- 你期望新增功能的描述,或者示例链接。
检查 issue 格式的脚本:
- // action_script/lintIssue.js
- const issueText = process.env.ISSUE
- const textSplit = issueText
- .split(
- `
- `
- )
- .map((str) => str.replace('\r', ''))
- const bugHandle = () => {
- // 缺少错误描述
- const desIndex = textSplit.indexOf('## 描述该错误')
- if (desIndex === -1) {
- console.log('ISSUE_CHECK_RESULT=unqualified')
- console.log('ISSUE_CHECK_REPLY=缺少错误描述')
- return
- }
- const repeatIndex = textSplit.indexOf('## 复现')
- if (repeatIndex === -1) {
- console.log('ISSUE_CHECK_RESULT=unqualified')
- console.log('ISSUE_CHECK_REPLY=缺少复现步骤')
- return
- }
- const desContent = textSplit
- .slice(desIndex + 1, repeatIndex)
- .join('')
- .replaceAll(' ', '')
- if (!desContent) {
- console.log('ISSUE_CHECK_RESULT=unqualified')
- console.log('ISSUE_CHECK_REPLY=缺少错误描述')
- return
- }
- // 缺少复现步骤
- const runResultIndex = textSplit.indexOf('## 运行结果')
- if (runResultIndex === -1) {
- console.log('ISSUE_CHECK_RESULT=unqualified')
- console.log('ISSUE_CHECK_REPLY=缺少运行结果')
- return
- }
- const repeatContent = textSplit
- .slice(repeatIndex + 1, runResultIndex)
- .join('')
- .replaceAll(' ', '')
- if (!repeatContent) {
- console.log('ISSUE_CHECK_RESULT=unqualified')
- console.log('ISSUE_CHECK_REPLY=缺少复现步骤')
- return
- }
- // 运行结果
- const envIndex = textSplit.indexOf('## 运行环境信息')
- if (envIndex === -1) {
- console.log('ISSUE_CHECK_RESULT=unqualified')
- console.log('ISSUE_CHECK_REPLY=缺少运行环境信息')
- return
- }
- const resContent = textSplit
- .slice(runResultIndex + 1, envIndex)
- .join('')
- .replaceAll(' ', '')
- if (!resContent) {
- console.log('ISSUE_CHECK_RESULT=unqualified')
- console.log('ISSUE_CHECK_REPLY=缺少运行结果')
- return
- }
- // 运行环境信息
- const otherIndex = textSplit.indexOf('## 其他') || textSplit.length + 1
- const envContent = textSplit.slice(envIndex + 1, otherIndex)
- const envReg = /\[e\.g\..{5,}\]/
- let hasDevice = false
- let hasOS = false
- let hasBrowser = false
- let hasVersion = false
- let errMsg = ''
- envContent.forEach((str) => {
- if (str.match(envReg)) {
- if (str.includes('Device')) {
- hasDevice = true
- } else if (str.includes('OS')) {
- hasOS = true
- } else if (str.includes('Browser')) {
- hasBrowser = true
- } else if (str.includes('Version')) {
- hasVersion = true
- }
- }
- })
- if (!hasDevice) {
- errMsg += '缺少设备名称;'
- } else if (!hasOS) {
- errMsg += '缺少操作系统名称;'
- } else if (!hasBrowser) {
- errMsg += '缺少浏览器名称;'
- } else if (!hasVersion) {
- errMsg += '缺少浏览器版本;'
- }
- if (errMsg) {
- console.log('ISSUE_CHECK_RESULT=unqualified')
- console.log('ISSUE_CHECK_REPLY=' + errMsg)
- } else {
- console.log('ISSUE_CHECK_RESULT=pass')
- }
- }
- const featureHandle = () => {
- // 缺少错误描述
- const desIndex = textSplit.indexOf('## 你期望添加什么样的功能?')
- const desContent = textSplit
- .slice(desIndex + 1, textSplit.length)
- .join('')
- .replaceAll(' ', '')
- .replaceAll('\n', '')
- if (desIndex === -1 || desIndex === textSplit.length - 1 || !desContent) {
- console.log('ISSUE_CHECK_RESULT=unqualified')
- console.log('ISSUE_CHECK_REPLY=缺少功能描述')
- return
- } else {
- console.log('ISSUE_CHECK_RESULT=pass')
- }
- }
- if (textSplit[0] === '# BUG 提交') {
- console.log('ISSUE_CHECK_TYPE=bug')
- bugHandle()
- } else if (textSplit[0] === '# 功能请求') {
- console.log('ISSUE_CHECK_TYPE=feature')
- featureHandle()
- } else {
- console.log('ISSUE_CHECK_TYPE=invalid')
- console.log('ISSUE_CHECK_RESULT=unqualified')
- console.log('ISSUE_CHECK_REPLY=这不是一个BUG或者功能请求')
- }

工作流示例文件:
- # .github/workflows/close-non_standard-issue.yml
- name: close non-standard issues
- on:
- issues:
- types: [opened, edited] # issue 打开或者编辑后
- jobs:
- close-issue:
- runs-on: ubuntu-latest
- env:
- ISSUE: ${{ github.event.issue.body }}
- steps:
- - name: 'checkout'
- uses: actions/checkout@v3
- - name: Setup node
- uses: actions/setup-node@v3
- with:
- node-version: 18
- registry-url: https://registry.npmjs.com/
- - name: lint sh
- run: node ./action_script/lintIssue.js >> "$GITHUB_ENV" # 设置自定义github变量
- - name: add-label
- uses: actions-cool/issues-helper@v3
- with:
- actions: 'add-labels'
- token: ${{ secrets.GITHUB_TOKEN }}
- issue-number: ${{ github.event.issue.number }}
- labels: ${{env.ISSUE_CHECK_TYPE}}
- - name: 'close-issue'
- if: ${{env.ISSUE_CHECK_RESULT == 'unqualified'}}
- uses: actions-cool/issues-helper@v3
- with:
- actions: 'close-issue'
- token: ${{ secrets.GITHUB_TOKEN }}
- body: |
- Hello @${{ github.event.issue.user.login }}.你的Issue因为下面的原因被关闭了:
- ${{env.ISSUE_CHECK_REPLY}}

如果是做一些简单的校验可以使用 actions-cool/issues-helper@v3 中的 check-issue:
这个示例主要是演示运算符的使用:
- name: add label of non_standard Issue
- on:
- issues:
- types: [opened, edited]
- jobs:
- check-issue:
- runs-on: ubuntu-latest
- steps:
- - id: check-issue # 必须使用id,不然不能访问到运行结果
- uses: actions-cool/issues-helper@v3
- with:
- actions: "check-issue"
- token: ${{ secrets.GITHUB_TOKEN }}
- issue-number: ${{ github.event.issue.number }}
- title-includes: "【,BUG,】" # 标题包含['【','BUG','】']
- body-includes: "问题描述,问题复现步骤" # 内容包含 ['问题描述','问题复现步骤']
- - name: add-label
- uses: actions-cool/issues-helper@v3
- if: ${{steps.check-issue.outputs.check-result == 'true'}} # 如果判断条件是 'true', 继续运行
- with:
- actions: "add-labels"
- token: ${{ secrets.GITHUB_TOKEN }}
- issue-number: ${{ github.event.issue.number }} # 当前Issue的编号
- labels: "bug" # 添加标签: 'bug'

关闭缺少复现步骤的 Issue
有些 Issue 虽然通过了格式检查,但是还会缺少一些步骤,或者不能复现。我们可以手动添加 label,并且在三天不活跃的情况下自动关闭。
这个示例主要是介绍怎么执行定时任务:
- # .github/workflows/close-inactive-issue.yml
- name: close inactive issue
- on:
- schedule:
- - cron: "00 12,00,18 * * *" # 在每天标准时间的12:00/00:00/18:00 执行
- jobs:
- check-inactive-info:
- runs-on: ubuntu-latest
- steps:
- - name: need reproduction
- uses: actions-cool/issues-helper@v3
- with: # 关闭有label是'need reproduction',并且三天不活跃的Issue
- actions: "close-issues"
- token: ${{ secrets.GITHUB_TOKEN }}
- labels: "need reproduction"
- inactive-day: 3

添加标签时自动评论、关闭 BUG
有些常用的评论内容,或者用的比较多的操作,每次使用都比较繁琐。我们可以在添加标签的时候自动评论,或者执行对应的操作。比如:自动评论欢迎词,关闭手动筛选出来不符合 issue 模版的 issue 并告诉用户原因。
这个示例是介绍在
.yml文件中长文本的写法- name: Issue Labeled
- # .github/workflows/issue-labeled.yml
- # 在issue添加标签后回复对应的评论
- on:
- issues:
- types: [labeled]
- jobs:
- reply-labeled:
- runs-on: ubuntu-latest
- steps:
- # 需要帮助
- - name: contribution welcome
- if: github.event.label.name == 'help wanted'
- uses: actions-cool/issues-helper@v3
- with:
- actions: "create-comment"
- issue-number: ${{ github.event.issue.number }}
- body: |
- 你好 @${{ github.event.issue.user.login }},我们完全同意你的提议/反馈,欢迎直接在此仓库 [创建一个 Pull Request](https://github.com/NI-Web-Infra-Team/vue3-template/pulls) 来解决这个问题。请将 Pull Request 发到 `dev` 分支,提供改动所需相应的 changelog、TypeScript 定义、测试用例、文档等,并确保 CI 通过,我们会尽快进行 Review,提前感谢和期待您的贡献。
- # 补充复现流程
- - name: need reproduction
- if: github.event.label.name == 'need reproduction'
- uses: actions-cool/issues-helper@v3
- with:
- actions: "create-comment"
- issue-number: ${{ github.event.issue.number }}
- body: |
- 你好 @${{ github.event.issue.user.login }}, 我们需要你提供一个在线的重现实例以便于我们帮你排查问题。可以通过点击 [此处](https://codepen.io/pen/) 创建或者提供一个最小化的 GitHub 仓库。3 天内未跟进此 issue 将会被自动关闭。
- - name: invalid
- if: github.event.label.name == 'invalid'
- uses: actions-cool/issues-helper@v3
- with:
- actions: "create-comment, close-issue"
- issue-number: ${{ github.event.issue.number }}
- body: |
- 你好 @${{ github.event.issue.user.login }},为了能够进行高效沟通,我们对 issue 有一定的格式要求,你的 issue 因为不符合要求而被自动关闭。你可以通过模板来创建 issue 以方便我们定位错误。谢谢配合!

使用 ftp 自动部署
如果有在公网的服务器,可以在编译完成后打包发送到自己的服务器实现自动部署。 在 github 中搜索 ftp action, 第一个 SamKirkland/FTP-Deploy-Action 就是将 github 项目部署到 ftp 服务器的:
最后这个示例介绍的是怎么设置秘钥:
- name: ftp send file
- on: workflow_dispatch # 手动部署
- jobs:
- web-deploy:
- name: Deploy
- runs-on: ubuntu-latest
- steps:
- - name: Get latest code
- uses: actions/checkout@v3 # 拉取项目代码
- - name: Setup node
- uses: actions/setup-node@v3 # 安装node
- with:
- node-version: 18
- registry-url: https://registry.npmjs.com/
- - name: install package
- run: npm i # 安装项目依赖
- - name: build
- run: npm run build # 编译
- - name: pack
- run: zip -q -r dist.zip ./dist # 打包成zip
- - name: Sync files
- uses: SamKirkland/FTP-Deploy-Action@v4.3.4 # 上传到ftp服务器
- with:
- server: 10.52.0.x # 服务器地址
- username: testusername # 服务器用户名
- password: ${{ secrets.ftp_password }} # 服务器密码

设置在 action 中可以访问的秘钥
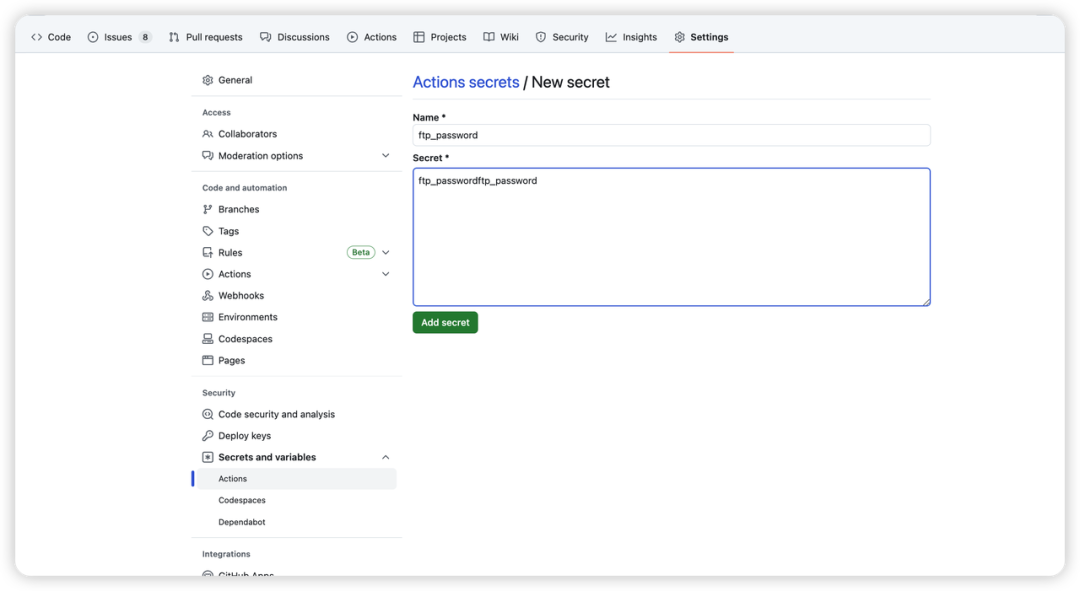
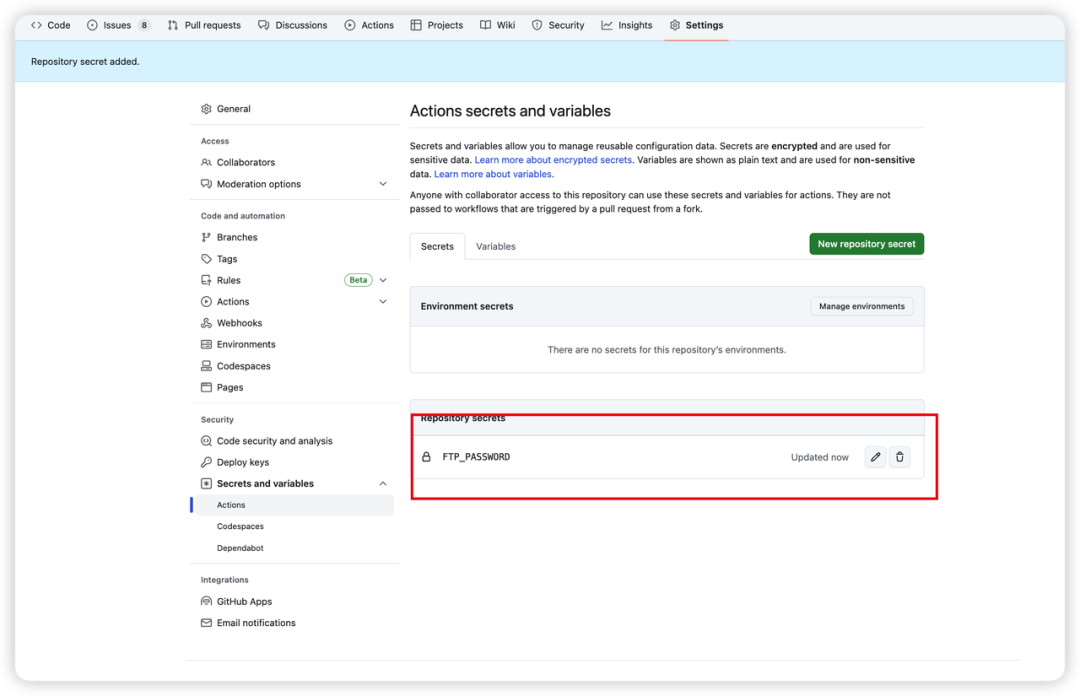
服务器密码
secrets.ftp_password,就是在 github 中设置的秘钥: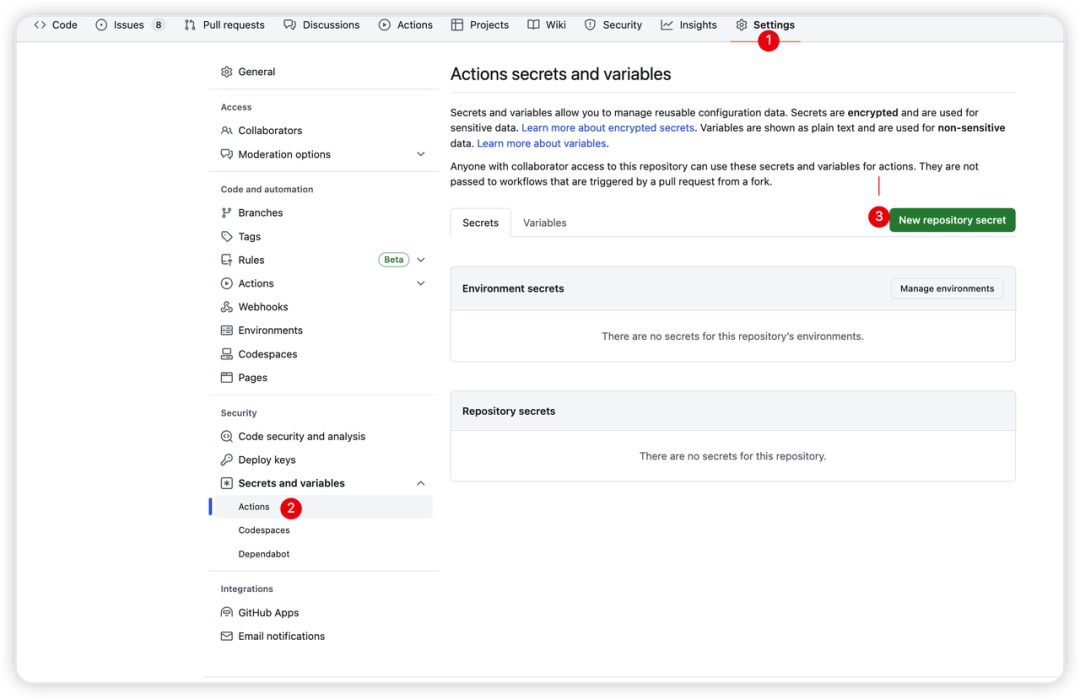
结语
通过使用 Github Action 来管理 Issue,可以有效的提高生产力和效率,在自动化、协作、代码质量管理等方面都有提升,并帮助我们更好地组织和管理问题。文章篇幅有限,我们暂且介绍到这里,感兴趣的小伙伴们可以再自行探索。
- END -
关于奇舞团
奇舞团是 360 集团最大的大前端团队,代表集团参与 W3C 和 ECMA 会员(TC39)工作。奇舞团非常重视人才培养,有工程师、讲师、翻译官、业务接口人、团队 Leader 等多种发展方向供员工选择,并辅以提供相应的技术力、专业力、通用力、领导力等培训课程。奇舞团以开放和求贤的心态欢迎各种优秀人才关注和加入奇舞团。


