
ChatGLM3-6B 多GPU、Linux环境部署遇到的问题以及解决方法_chatglm3微调的依赖安装报错
赞
踩
0、成果截图
笔者使用的是Ubuntu 22.04操作系统,显卡是两块P104(穷学生没钱),通过cpolar软件进行公网映射(后面有讲如何设置脚本),远程登陆寝室服务器。


ps: 安装Ubuntu的时候计算机名字少了一个o,esheeper敲成了ehseeper(T_T)
1、NVIDIA显卡驱动、CUDA安装
不像Windows,Linux上的CUDA安装时自带NVIDIA驱动,倘若之前安装过NVIDIA驱动,记得取消安装driver,防止安装报错 nvidia模块由于正在使用无法卸载。
建议使用multi-user模式使用Linux,这样显卡就不会背X server图形模块占用显存,后续使用远程连接连接计算机,具体解决方案如步骤5。
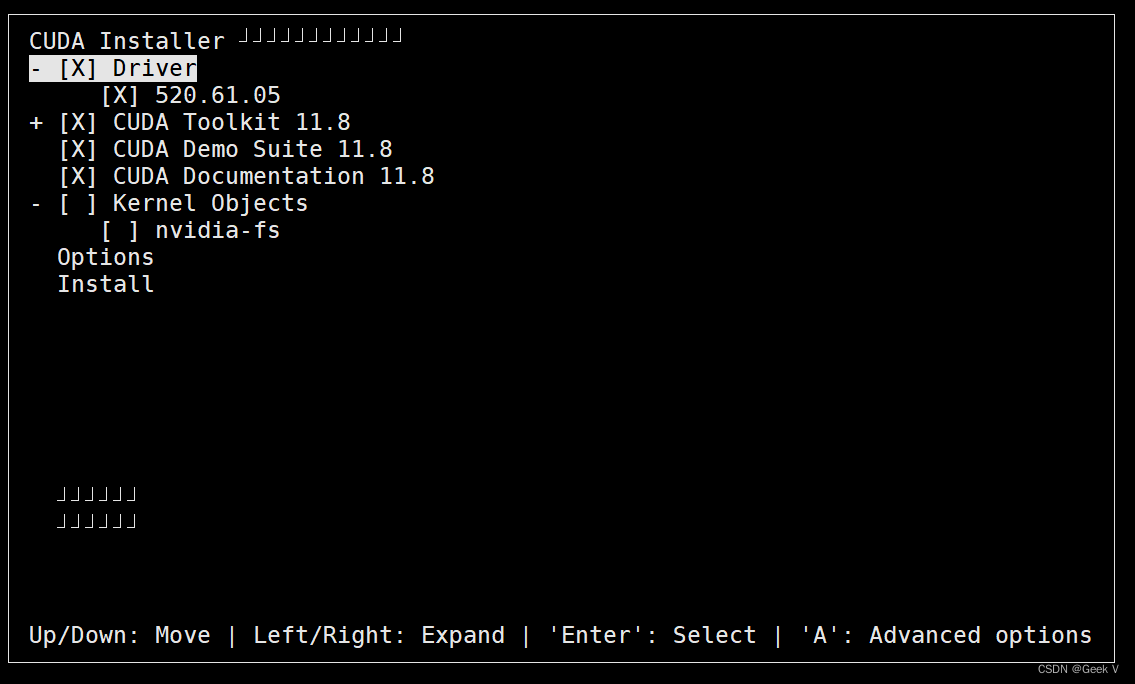
如图所示,根据需要使用Enter键取消和设置,Kernel Objects选项可以不选。
采用runfile安装,两条命令可以将nvidia驱动以及cuda全部安装好。
2、Conda安装
这个网上教程很多,记得用源与conda换源、还有pip也要设置一下源。
我使用的是python 3.11.3
conda create -n chatglm python=3.11.3
conda init
# 需要重新进入终端
conda activate chatglm
- 1
- 2
- 3
- 4
3、 ChatGLM3-6B模型下载
不要从Hugeface下载了,国内有魔塔,使用脚本从魔塔社区下载就行了,脚本如下:
记得安装魔塔库:pip install modelscope
from modelscope import snapshot_download
cache_dir = "/opt/model/cache" #模型下载路径

snapshot_download("ZhipuAI/chatglm3-6b", revision = "v1.0.0", cache_dir=cache_dir)
snapshot_download("AI-ModelScope/bge-large-zh-v1.5", cache_dir=cache_dir)
- 1
- 2
- 3
- 4
- 5
这里需要下载两个模型,前者是ChatGLM的模型,后者是语义向量模型。
mkdir -p /opt/project
cd /opt/project
git clone https://github.com/THUDM/ChatGLM3.git
cd ChatGLM3
ln -s /opt/model/cache/ZhipuAI /opt/project/ChatGLM3/THUDM #添加软链接访问
ln -s /opt/model/cache/AI-ModelScope /opt/project/ChatGLM3/BAAI #添加软链接访问
# 由于bge-large-zh-v1.5中存在符号.,下载后文件名中的.会被两个下划线替代,需要修改成正确的模型名
cd /opt/model/cache/ZhipuAI
mv bge-large-zh-v1__5 bge-large-zh-v1.5
- 1
- 2
- 3
- 4
- 5
- 6
- 7
- 8
- 9
记得进入项目根目录安装requirements.txt
pip install -r requirements.txt
4、多GPU部署
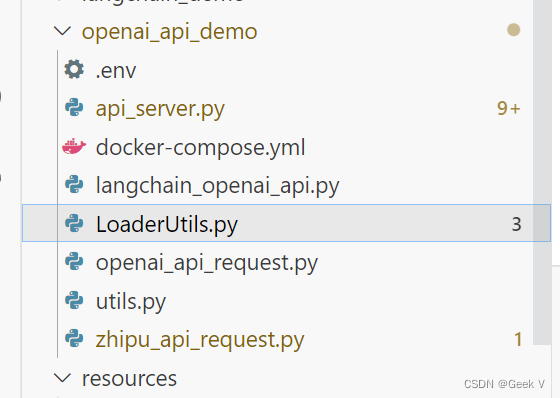
创建脚本LoaderUtil.py
大部分内容来源于ChatGLM2-6B这个库的utils.py文件,但是ChatGLM3升级了transformers,transformers的每一层的命名变更了,所以需要自己修改device_map
import os
from typing import Dict, Tuple, Union, Optional

from torch.nn import Module
from transformers import AutoModel


def auto_configure_device_map(num_gpus: int) -> Dict[str, int]:
    # transformer.word_embeddings 占用1层
    # transformer.final_layernorm 和 lm_head 占用1层
    # transformer.layers 占用 28 层
    # 总共30层分配到num_gpus张卡上
    num_trans_layers = 28
    per_gpu_layers = 30 / num_gpus

    # bugfix: 在linux中调用torch.embedding传入的weight,input不在同一device上,导致RuntimeError
    # windows下 model.device 会被设置成 transformer.word_embeddings.device
    # linux下 model.device 会被设置成 lm_head.device
    # 在调用chat或者stream_chat时,input_ids会被放到model.device上
    # 如果transformer.word_embeddings.device和model.device不同,则会导致RuntimeError
    # 因此这里将transformer.word_embeddings,transformer.final_layernorm,lm_head都放到第一张卡上

    ## 旧版
    ## device_map = {'transformer.word_embeddings': 0,
    ##             'transformer.final_layernorm': 0, 'lm_head': 0, }
    ## 新版
    device_map={"transformer.embedding.word_embeddings" :0,
                "transformer.rotary_pos_emb": 0,
                "transformer.output_layer": 0,
                "transformer.encoder.final_layernorm": 0}

    used = 2
    gpu_target = 0
    for i in range(num_trans_layers):
        if used >= per_gpu_layers:
            gpu_target += 1
            used = 0
        assert gpu_target < num_gpus
        ## 旧版
        device_map[f'transformer.layers.{i}'] = gpu_target
        ## 新版
        device_map[f'transformer.encoder.layers.{i}'] = gpu_target
        used += 1

    return device_map


def load_model_on_gpus(checkpoint_path: Union[str, os.PathLike], num_gpus: int = 2,
                       device_map: Optional[Dict[str, int]] = None, **kwargs) -> Module:
    if num_gpus < 2 and device_map is None:
        model = AutoModel.from_pretrained(checkpoint_path, trust_remote_code=True, **kwargs).half().cuda()
    else:
        from accelerate import dispatch_model

        model = AutoModel.from_pretrained(checkpoint_path, trust_remote_code=True, **kwargs).half()

        if device_map is None:
            device_map = auto_configure_device_map(num_gpus)

        model = dispatch_model(model, device_map=device_map)

    return model
- 1
- 2
- 3
- 4
- 5
- 6
- 7
- 8
- 9
- 10
- 11
- 12
- 13
- 14
- 15
- 16
- 17
- 18
- 19
- 20
- 21
- 22
- 23
- 24
- 25
- 26
- 27
- 28
- 29
- 30
- 31
- 32
- 33
- 34
- 35
- 36
- 37
- 38
- 39
- 40
- 41
- 42
- 43
- 44
- 45
- 46
- 47
- 48
- 49
- 50
- 51
- 52
- 53
- 54
- 55
- 56
- 57
- 58
- 59
- 60
- 61
- 62
我是将这个LoaderUtil.py放在openai_api_demo中的,然后在api_server.py中直接import
api_server.py中修改如下:
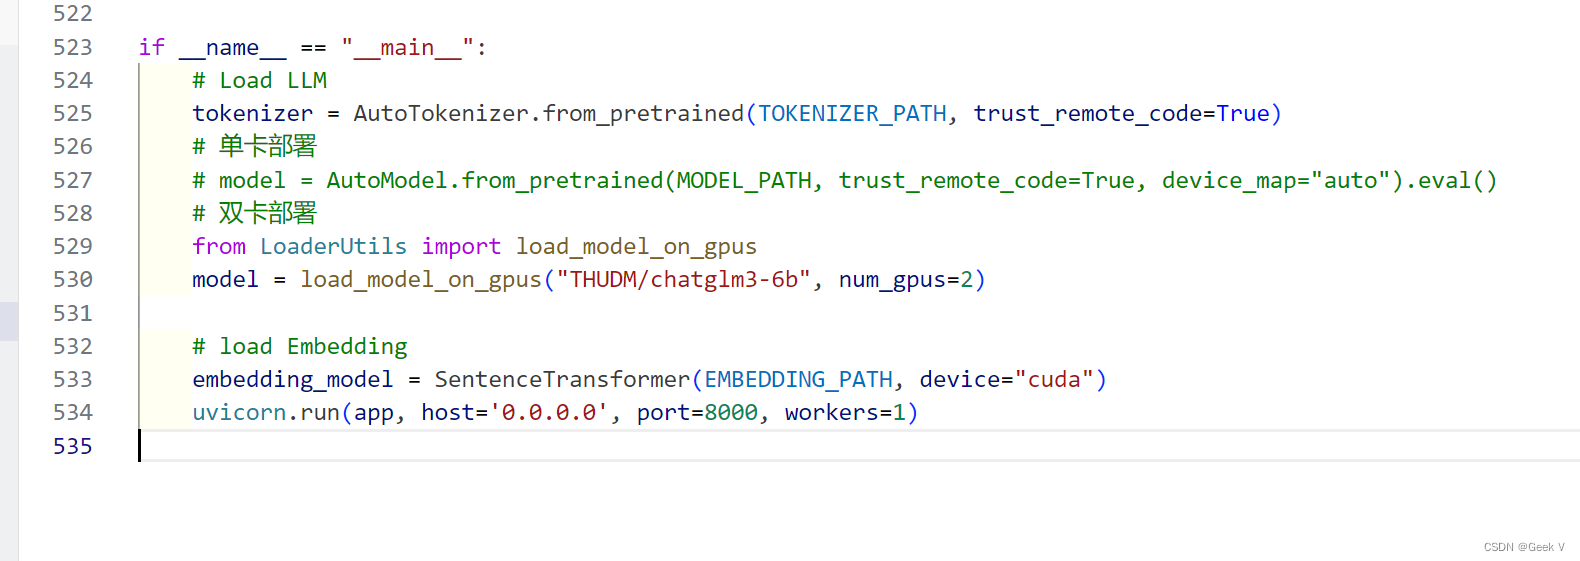
if __name__ == "__main__":
    # Load LLM
    tokenizer = AutoTokenizer.from_pretrained(TOKENIZER_PATH, trust_remote_code=True)
    # 单卡部署
    # model = AutoModel.from_pretrained(MODEL_PATH, trust_remote_code=True, device_map="auto").eval()
    # 双卡部署
    from LoaderUtils import load_model_on_gpus
    model = load_model_on_gpus("THUDM/chatglm3-6b", num_gpus=2)

    # load Embedding
    embedding_model = SentenceTransformer(EMBEDDING_PATH, device="cuda")
    uvicorn.run(app, host='0.0.0.0', port=8000, workers=1)
- 1
- 2
- 3
- 4
- 5
- 6
- 7
- 8
- 9
- 10
- 11
- 12
5、公网映射
https://dashboard.cpolar.com
这个是cpolar官网
https://dashboard.cpolar.com/status
这个是仪表盘,用来查看链接情况的,需要登陆,登陆后直接跳转到https://dashboard.cpolar.com/get-start,感觉是个小BUG。
比如我的:

SSH的安装:
sudo apt install ssh
- 1
我的进程检测脚本:
#!/bin/bash
res=`ps -ef|grep "cpolar.*masterSHELL"|wc -l`

basePath="/home/ehseeper/Desktop/cpolar"
detectionLogPath=${basePath}/Detection.log
nohupLogPath=${basePath}/nohup.log
date=`date`

echo $date >> ${detectionLogPath}
echo "Detect cpolar process: ${res}" >> ${detectionLogPath}
if test $res -ge 2
then
	echo "Cpolar service is running" >> ${detectionLogPath}
else
	echo "Cpolar service is not running!" >> ${detectionLogPath}
	echo "" >> ${nohupLogPath}
	echo "${date}" >> ${nohupLogPath}
	`nohup cpolar tcp 22 >> ${nohupLogPath} 2>&1 &`
fi
echo "" >> ${detectionLogPath}
- 1
- 2
- 3
- 4
- 5
- 6
- 7
- 8
- 9
- 10
- 11
- 12
- 13
- 14
- 15
- 16
- 17
- 18
- 19
- 20
- 21
切root用户使用crontab 命令编写定时任务
contab -e
- 1


