- 1图像采集卡 Xtium™2-XGV PX8支持高速 GigE Vision 工业相机
- 2window.navigator.userAgent用来区分设备和浏览器
- 3云空间技术在视频监控中的隐私保护策略
- 4嵌入式软件工程师待遇如何?嵌入式开发越老越吃香吗?
- 5浅分享一下zzulioj刷题总结
- 6如何通过LAC(TAC)和CID进行手机定位_lac和cellid如何定位
- 7NetworkManager服务 的影响_networkmanager关闭有什么影响
- 8单片机设计_8路抢答器(AT89C51)
- 9springBoot健康检查与k8s探针_springboot 僵尸检查
- 10保姆级Gmapping算法介绍到复现
Jsplumb的坑_react jsplumb 触摸屏无效
赞
踩
一、前言
时隔三年,我跳去了某大厂工作了。从以前使用vue,到现在使用React,感觉还可以接受,毕竟现在好多框架都是开箱即用的。刚好有个拓扑图的需求,于是我技术选型了使用jsplumb,发现里面有不少坑,于是写下博客已作记录。
二、需要在container上加上position:relative;

如果你在使用jsplumb时,使用到它的api——setContainer的话,那么这个时候你就要注意了,一定要为这个container设置一个样式——position: relative;如下图1-1,图1-2:

图1-1

图1-2
至于为什么这样?其实我们可以打开控制台看到,jsplumb会为它自己画的元素加上position: absolute这个样式,如下图1-3

在这些元素的container上加上position: relative;它才不容易走样!!!这个样式问题可以解决90%的jsplumb的问题!请大家记住!!!
当然有些同学会问,为什么有时候窗口最大化最小化,或者resize窗口的时候,jsplumb不会自动跟踪dom的位置变化导致老是对不齐呢?这其实就是canvas的一个机制造成的。毕竟使用了canvas,你不得不通过监听window.resize来对canvas的高宽进行调整了。
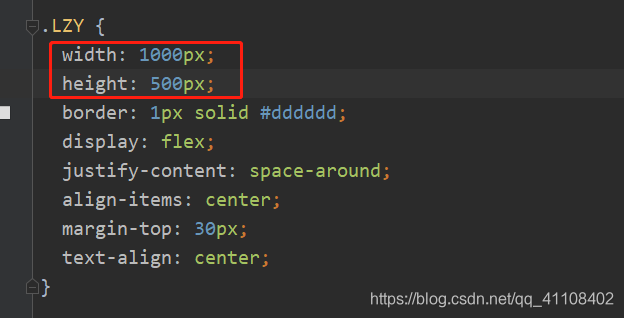
像我下图,其实我用了一个偷懒的办法,直接把它设置成container设置成px像素,这样子就无论怎么缩小放大窗口,jsplumb绘制的元素都可以自动跟踪dom的位置变化了。
但是一旦把width,height设置成百分比,或者vw,vh,那么就要用window.resize方法了


二、如果你使用的是npm安装jsplumb而不是cdn引入的话
那么你就要像我这样子才能获取到真正的Jsplumb,才能用上它setContainer,deleteConnection等api

三、要使用jsplumb.ready
jsplumb和jquery一样,也是要等待元素加载完成才能使用的,不然它会因为找不到元素id而报错
所以我们要如下图那样,在componentDidMount加上:

四、使用jsplumb.reset清除绘图缓存
如果你离开了当前的页面的时候,一定要记得使用jsplumb.reset()方法,把jsplumb的东西清除掉,不然他会一直保留在浏览器缓存,然后下次进去页面会出现很多意想不到的bug:


这个方法解决了好多坑呀,和上面说的position: relative;一样的。
五、完整代码
react代码:
- import React from 'react';
- import jsplumbData from '@/utils/jsplumb-data'; // 我的测试数据
- import Style from './index.css';
- import Jsplumb from 'jsplumb'; // 引入npm安装了的jsplumb
-
- // 这是一个坑,一定要这样才能获取到jsplumb,进而调用它的api接口
- const jsplumb = Jsplumb.jsPlumb;
- // 定义一个变量准备接受jsplumb创建的实例
- let instance = null;
-
- export default class JPChart extends React.Component {
- constructor(props) {
- super(props);
- this.state = {
- // 这是接收测试数据的节点数据
- nodes: [],
- // 这是接收测试数据的边的数据
- edges: []
- };
- }
-
- componentDidMount() {
- // 这是一些jsplumb绘图的配置
- const defaultSetting = {
- detachable: false, // 使用了这个属性,用鼠标拖动连线两端的端点就不会使得连线消失了
- endpoint: 'Blank', // 使得连线两端端点为空,我记得这里有四种值
- // 端点的样式
- endpointStyle: { fill: '#08B375', outlineStroke: '#08B375', outlineWidth: 2 },
- // 连线的方式,这里我选择了用直线连接
- connector: ['Straight'],
- // 这里确定连线是A元素的左端(Left)连到B元素的右端(Right)
- anchor: ['Left', 'Right'],
- // 允许打印日志,方便调试
- logEnabled: true,
- // 这个是连线的样式
- paintStyle: { stroke: 'lightgray', strokeWidth: 1 },
- // 这个是连线的箭头样式,不加这个,连线就不会有样式
- overlays: [ ['Arrow', { width: 12, length: 12, location: 1 }] ]
- };
- this.setState({
- nodes: jsplumbData.nodes,
- edges: jsplumbData.edges
- });
- // 这里是个坑,一定要加ready函数,不然图出不来
- jsplumb.ready(() => {
- // 这里我创建了一个实例
- // 很多人问直接使用jsplumb有什么不同,其实如果你要
- // 画多个拓扑图的话,那么你就要用getInstance创建多个实例
- // 我这里的需求只需要画一个,所以其实直接使用jsplumb
- // 不创建实例也可以,没什么区别的
- instance = jsplumb.getInstance();
- // 限定jsplumb绘制的元素只能在这个id为LZY的元素里面
- instance.setContainer("LZY");
- // 先清除一下画布,防止缓存,这里又是一个坑的解决方法
- instance.reset();
- // 遍历从而使得每个节点相连
- jsplumbData.edges.forEach(item => {
- instance.connect({
- ...defaultSetting,
- source: item.source,
- target: item.target
- });
- });
- // 遍历使得每个元素都可以进行拖拽
- jsplumbData.nodes.forEach(item => {
- instance.draggable(item.id);
- });
- });
- }
-
- // 在这里清除jsplumb缓存
- componentWillUnmount() {
- // 如果上面不是直接用jsplumb.getInstance创建实例的话
- // 就使用jsplumb.reset清除数据即可
- instance.reset();
- }
-
- render () {
- const nodes = this.state.nodes;
- return (
- <div className={ Style.root }>
- <div className={ Style.second }>
- { /* 这个LZY的div元素是jsplumb的绘画的地方 */ }
- <div className={ Style.LZY } id="LZY">
- {
- nodes.map(item => (
- <div id={ item.id } className={ Style.item } key={ item.id }>
- { item.label }
- {
- item.children.map(v => (
- <div className={ Style.child } key={ v.id }>{ v.label }</div>
- ))
- }
- </div>
- ))
- }
- </div>
- </div>
- <div className={ Style.first }>
- <div></div>
- </div>
- </div>
- );
- }
- }

css样式:

模拟数据:
- export default {
- nodes: [
- {
- id: 'l1',
- label: 1,
- children: [
- { id: 11, label: 11 },
- { id: 12, label: 12 },
- { id: 13, label: 13 }
- ]
- },
- {
- id: 'l2',
- label: 2,
- children: [
- { id: 21, label: 21 },
- { id: 22, label: 22 },
- { id: 23, label: 23 }
- ]
- },
- {
- id: 'l3',
- label: 3,
- children: [
- { id: 31, label: 31 },
- { id: 32, label: 32 },
- { id: 33, label: 33 }
- ]
- },
- {
- id: 'l4',
- label: 4,
- children: [
- { id: 41, label: 41 },
- { id: 42, label: 42 },
- { id: 43, label: 43 }
- ]
- }
- ],
- edges: [
- {
- source: 'l1',
- target: 'l2'
- },
- {
- source: 'l2',
- target: 'l3'
- },
- {
- source: 'l3',
- target: 'l4'
- }
- ]
- };

最后
jsplumb其实我还要研究更复杂的例子,并且将会对比g6,那么之后遇到什么坑,我会继续更新到这里,希望这对各位同学有所帮助吧,有兴趣的话可以点击一波关注~~~


