- 14.1 SciPy库介绍及导入_scipy.intergrate怎么导入
- 2关系抽取全面总结:五大类实体关系三元组抽范式模型总结
- 3SpringCloudAlibaba 2021.0.1 - Java/Kotlin 项目完整搭建(Nacos + OpenFeign + Getway + Sentinel)_springcloudalibaba项目搭建
- 4PyTorch QAT(量化感知训练)实践——基础篇
- 5用反馈的观点看带源极负反馈的共源级_带源极负反馈的cs放大器增益
- 6SpringBoot项目application配置文件数据库密码上传git暴露问题解决方案
- 7seq2seq (中英对照翻译)Attention_基于tensorflow框架的seq2seq中英机器翻译模型云盘下载
- 8python自动回复机器人的条件和限制_一个自动回复FAQ问题的聊天机器人
- 9文件服务器不能识别的标点符号,语音识别标点符号
- 10AI说,它可以把你变成个游戏 | 3D人体模型 · CVPR
GPT(Generative Pre-Training)论文解读及源码实现(二)_gptq论文
赞
踩
本篇为gpt2的pytorch实现,参考 nanoGPT
nanoGPT如何使用见后面第5节
1 数据准备及预处理
data/shakespeare/prepare.py 文件源码分析
1.1 数据划分
下载数据后90%作为训练集,10%作为验证集
with open(input_file_path, 'r') as f:
    data = f.read()
n = len(data)
train_data = data[:int(n*0.9)]
val_data = data[int(n*0.9):]
- 1
- 2
- 3
- 4
- 5
1.2 数据编码
使用tiktoken包进行gpt2编码,gpt2默认编码方式为 bpe
enc = tiktoken.get_encoding("gpt2")
train_ids = enc.encode_ordinary(train_data[:100])
val_ids = enc.encode_ordinary(val_data[:100])
print(f"train has {len(train_ids):,} tokens")
print(f"val has {len(val_ids):,} tokens")

>>>
	train has 31 tokens
	val has 40 tokens
- 1
- 2
- 3
- 4
- 5
- 6
- 7
- 8
- 9
如上取了train_data100个字符,编码后为31个tokens, 100个val 编码后为40个token. 可以通过enc.decode(train_ids) 还原为原始文本数据
train_ids 输出形式为:[5962, 22307, 25, 198, 8421, 356, 5120, 597, 2252, 11, 3285, 502, 2740, 13, 198, 198, 3237, 25, 198, 5248, 461, 11, 2740, 13, 198, 198, 5962, 22307, 25, 198, 1639]
2 训练数据加工
构造训练数据X,Y,其中target数据Y为X平移一位生成,每次取batch_size个数据
    data = train_data if split == 'train' else val_data # data: 301966
    ix = torch.randint(len(data) - block_size, (batch_size,))
    x = torch.stack([torch.from_numpy((data[i:i+block_size]).astype(np.int64)) for i in ix])
    y = torch.stack([torch.from_numpy((data[i+1:i+1+block_size]).astype(np.int64)) for i in ix])
- 1
- 2
- 3
- 4
3 模型训练
3.1 GPT模型结构
3.1.1 embedding层
token embedding 和位置embedding
(batch_size 取4,句子长度取8,则输入x shape =[4,8])
embedding后维度,如下图所示
- token embedding shape=[4,8,128]
- 位置embeddign shape=[8,128]
wte = nn.Embedding(config.vocab_size, config.n_embd),
wpe = nn.Embedding(config.block_size, config.n_embd),
- 1
- 2
其中位置信息根据句子长度生成
pos = torch.arange(0, x.size(1), dtype=torch.long, device=device)
- 1

3.1.2 attention 层(带因果推断的attention,即需要上三角maske)
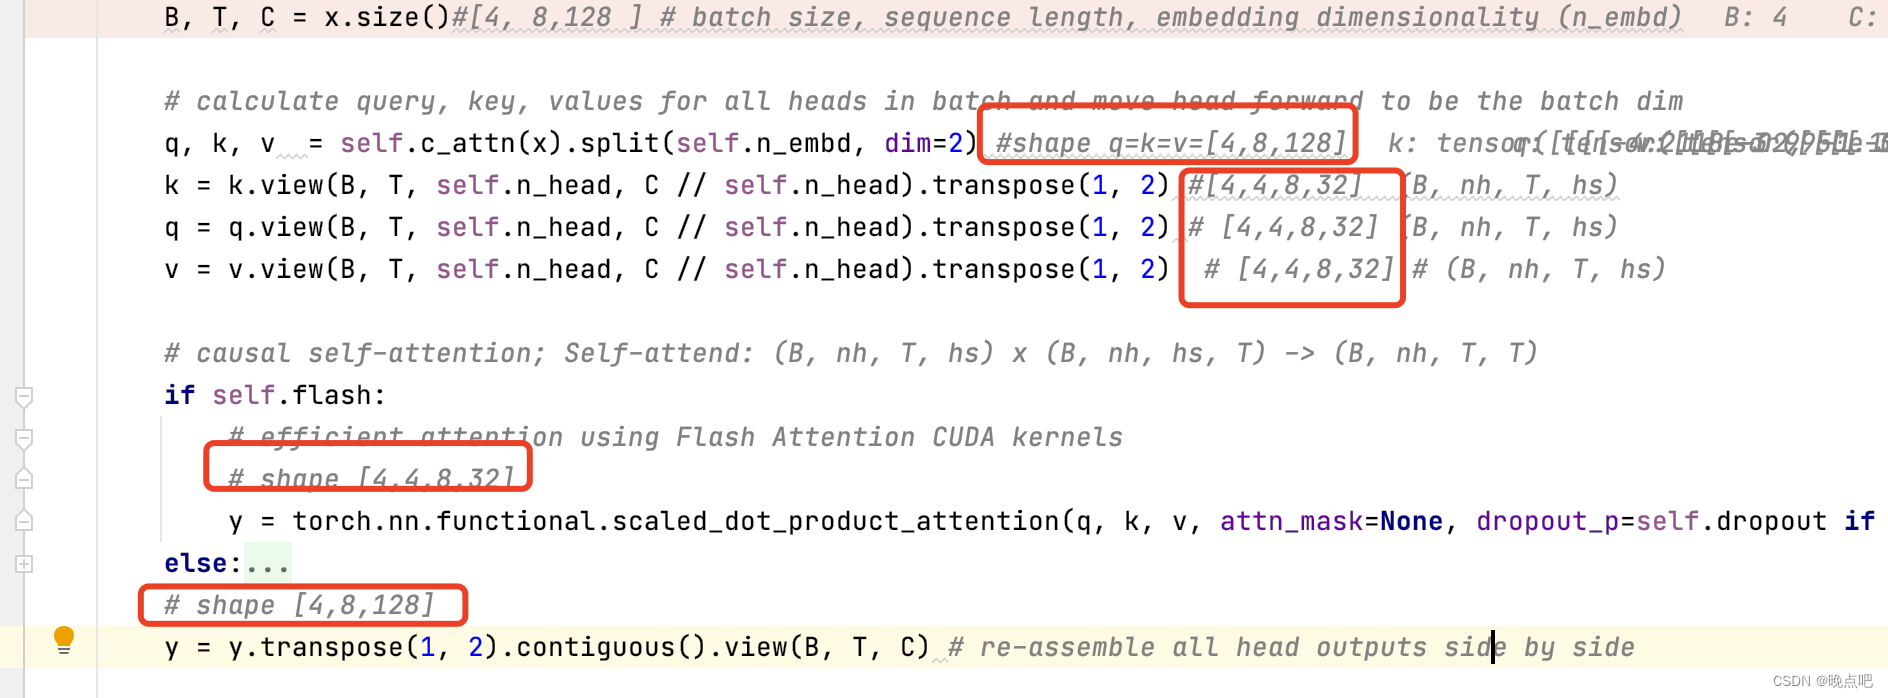
输入x shape=[4,8,128],
通过线性层后 shape: q=k=v=[4,8,128]
将embedding维度进行多头划分后,shape =[4,4,8,32]
(torch2 支持因果attention )

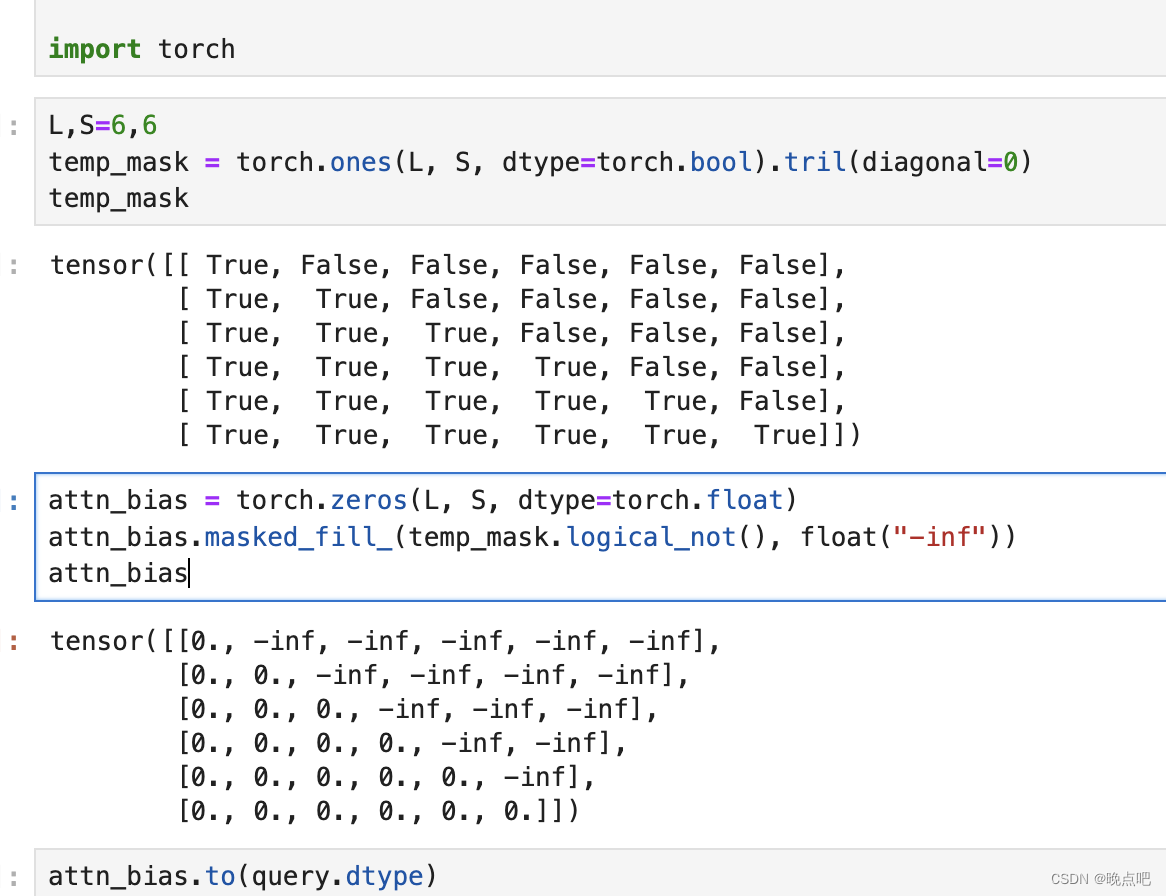
重点:attention 中mask实现,
即给上三角矩阵填充负无穷大数(负无穷在softmax时,值为0,即权重为0)
 L, S = query.size(-2), key.size(-2)
 scale_factor = 1 / math.sqrt(query.size(-1)) if scale is None else scale
 attn_bias = torch.zeros(L, S, dtype=query.dtype)
 if is_causal:
     assert attn_mask is None
     temp_mask = torch.ones(L, S, dtype=torch.bool).tril(diagonal=0)
     attn_bias.masked_fill_(temp_mask.logical_not(), float("-inf"))
     attn_bias.to(query.dtype)
- 1
- 2
- 3
- 4
- 5
- 6
- 7
- 8

3.1.3 block层
-
gpt2 会有n_layer个block层,每个block层由layer normal层,attention层,mlp层构成(具体可以参考transformer)
-
block层,由attention层和全连接层组成,
输入x shape为 [4,8,128]
输出attention shape为 [4,8,128]
输出MLP shape为 [4,8,128]
class Block(nn.Module):

    def __init__(self, config):
        super().__init__()
        self.ln_1 = LayerNorm(config.n_embd, bias=config.bias)
        self.attn = CausalSelfAttention(config)
        self.ln_2 = LayerNorm(config.n_embd, bias=config.bias)
        self.mlp = MLP(config)

    def forward(self, x):
        x = x + self.attn(self.ln_1(x)) # shape [4,8,128]
        x = x + self.mlp(self.ln_2(x)) # shape [4,8,128]
        return x
- 1
- 2
- 3
- 4
- 5
- 6
- 7
- 8
- 9
- 10
- 11
- 12
- 13
3.2 损失函数
输入x shape [4,8,128]
输出 logits shape [4,8, 50304],即词典中每个单词的得分
loss为交叉熵损失,为一个标量,
 logits = self.lm_head(x) #; logits shape: [4,8, 50304]
 loss = F.cross_entropy(logits.view(-1, logits.size(-1)), targets.view(-1), ignore_index=-1) # targets 即为之前训练数据的 Y数据
- 1
- 2
4 模型推理
4.1 模型加载
加载训练时保存的模型

4.2 定义数据处理的编解码器
数据编解码器与训练时一致
    enc = tiktoken.get_encoding("gpt2")
    encode = lambda s: enc.encode(s, allowed_special={"<|endoftext|>"})
    decode = lambda l: enc.decode(l)
- 1
- 2
- 3
4.3 数据生成(重点)
- 第一次输入只有一个字符
idx_cond=idx: shape =[1,1]
logits shape =[1,50304]
从topK个中安概率随机取一个
和上面的idx拼接,作为第二次的输入 - 第二次输入
idx_cond=idx: shape =[1,2]
logits shape =[1,50304]
然后再从topk中安概率随机取一个进行拼接
…
-直到达到最大输出活着终止字符
    @torch.no_grad()
    def generate(self, idx, max_new_tokens, temperature=1.0, top_k=None):
        """
        Take a conditioning sequence of indices idx (LongTensor of shape (b,t)) and complete
        the sequence max_new_tokens times, feeding the predictions back into the model each time.
        Most likely you'll want to make sure to be in model.eval() mode of operation for this.
        """
        for _ in range(max_new_tokens):
            # if the sequence context is growing too long we must crop it at block_size
            idx_cond = idx if idx.size(1) <= self.config.block_size else idx[:, -self.config.block_size:]
            # forward the model to get the logits for the index in the sequence
            logits, _ = self(idx_cond)
            # pluck the logits at the final step and scale by desired temperature
            logits = logits[:, -1, :] / temperature
            # optionally crop the logits to only the top k options
            if top_k is not None:
                v, _ = torch.topk(logits, min(top_k, logits.size(-1)))
                logits[logits < v[:, [-1]]] = -float('Inf')
            # apply softmax to convert logits to (normalized) probabilities
            probs = F.softmax(logits, dim=-1)
            # sample from the distribution
            idx_next = torch.multinomial(probs, num_samples=1)
            # append sampled index to the running sequence and continue
            idx = torch.cat((idx, idx_next), dim=1)

        return idx
- 1
- 2
- 3
- 4
- 5
- 6
- 7
- 8
- 9
- 10
- 11
- 12
- 13
- 14
- 15
- 16
- 17
- 18
- 19
- 20
- 21
- 22
- 23
- 24
- 25
- 26
5 GPT2 使用
5.1 下载git源码
- git clone https://github.com/karpathy/nanoGPT.git
- 安装依赖包(建议安装torch2以上版本,其他包不限制版本)
pip install torch numpy transformers datasets tiktoken wandb tqdm
- 1
(mac pytorch 安装: pip3 install --pre torch torchvision torchaudio --extra-index-url https://download.pytorch.org/whl/nightly/cpu)
5.1 数据下载
测试下载数据及,并编码成数字格式
python data/shakespeare/prepare.py
- 1
5.2 模型训练
参数解释:
- device :使用的GPU 类型,可以是cuda ,cpu , mps
- compile 是否使用编译优化,torch2版本支持(mac mps 不支持)
- eval_iters 迭代次数
- block_size:训练句子长度(演示最大句子长度只取了8)
- batch_size : batch size
- n_layer: 使用多少个transformer block
- n_head: attention 头数
- n_embd: embedding 维度
- dropout:dropout 比例
config/train_shakespeare_char.py --device=mps --compile=False --eval_iters=20 --log_interval=1 --block_size=8 --batch_size=4 --n_layer=4 --n_head=4 --n_embd=128 --max_iters=2000 --lr_decay_iters=2000 --dropout=0.0
- 1
(备注: 我使用的是shakespeare数据集,因此将配置文件train_shakespeare_char.py 进行了修改 wandb_project = ‘shakespeare’ ;dataset = ‘shakespeare’)
5.3 模型推理
python sample.py --out_dir=out-shakespeare
- 1


