- 1MySQL 8:GROUP BY 问题解决 —— 怎么关闭ONLY_FULL_GROUP_BY (详细教程)_mysql8.0关闭groupby的配置
- 2Linux--线程的互斥
- 3基于STM32的天气时钟_基于stm32的网络天气时钟
- 4【机器学习】分类算法 - KNN算法(K-近邻算法)KNeighborsClassifier_kneighborsclassifier()
- 56月GitHub上最牛逼的10个Java开源项目,号称“Star收割机“_java开源项目排行榜
- 6Python基础篇(十六)-- Python标准库模块之heapq与bisect_python heapq库
- 7高性能mysql读书笔记三性能查询优化_mysql三个条件查询 高性能
- 8Netgear R6400v2 堆溢出漏洞分析与利用
- 9linux11——nginx, tomcat和squid_squid nginx
- 10hive经典习题50题_hive 选择题
恒凯USB数据采集卡在国产麒麟操作系统下的应用(一)环境设置、采集卡驱动安装及C语言采集应用_恒凯科技数据采集卡
赞
踩
一、基础环境设置
A: 更新系统 ,打开mate终端,输入:
sudo apt-get update
sudo apt-get install build-essential
B: 安装g++编译器,系统默认一般已经有gcc编译器,只需要单独安装一下g++编译器就可以了,终端输入:
sudo apt install g++
安装完成,使用g++ -v命令查询到版本信息即安装成功。
C: 安装USB相关系统插件,终端输入:
sudo apt install libusb-1.0-0-dev
D: 设置环境变量,使用VIM打开/etc/ld.so.conf,并在其中插入一行
include /usr/local/lib
然后,运行 sudo ldconfig /etc/ld.so.conf命令使其生效。
该行的作用是设置/usr/local/lib目录为应用程序运行时需要加载so库文件时的查找路径,一会我们要将数据采集卡的驱动库文件放置在这个目录里面。
二、编译数据采集卡的驱动库
这里我们以恒凯数据采集卡HK_USB DAQ V1.2这款采集卡产品为例,

附采集卡功能简介:16路单端/8路差分模拟量采集、12位、单通道最大采样100kps
8路单向数字量输入、8路单向数字量输出
1路pwm测量及计数器与2路pwm输出功能
产品购买链接:恒凯多功能数据采集卡USBDAQV12-Labview树莓派教程 工控学习板
首先复制驱动库文件driver_usb_daq V1.2到任意一个目录下,可以看到目录下包含了所有的源文件:
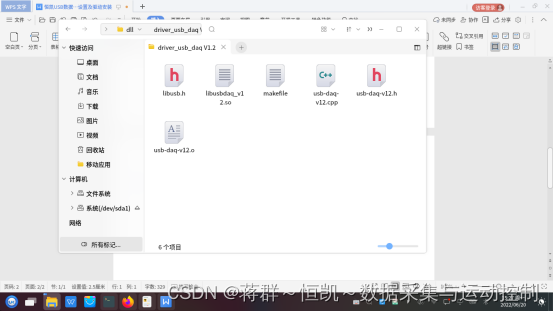
然后在终端输入命令:
make clean
make
编译出驱动库文件libusbdaq_v12.so,将该驱动库文件复制到系统目录,在前目录使用命令:
sudo cp ./libusbdaq_v12.so /usr/local/lib
至此,我们就编译好了数据采集卡的驱动,并安装到了系统当中,以备我们后面应用程序调用板卡的驱动函数读取数据。
三、编写C语言测试应用程序读取采集卡数据
A: 编写一段C测试代码如下:
#include <stdio.h>
#include <string.h>
#include<stdlib.h>
#include <math.h>

typedef  char BYTE;
- 1
- 2
- 3
- 4
- 5
- 6
//**以下是驱动库文件的.h同文件的内容,我们可以直接包含h文件,这里为了方便,直接把h文件的内容复制到程序的前面,相关函数的说明可以在数据采集卡的PDF使用手册中找到函数的具体解释///
int OpenUsb(void);
int CloseUsb(void);

 int  ADSingleV12(int dev,int ad_mod, int chan, int gain, float* adResult);
 int  ADContinuV12(int dev,int ad_mod, int chan, int gain, int Num_Sample, int Rate_Sample, float  *databuf);
 int  MADContinuV12(int dev,int ad_mod, int chan_first, int chan_last, int gain, int Num_Sample, int Rate_Sample, float  *mad_data);
 int  ADContinuConfigV12(int dev,int ad_mod, int chan, int gain, int Rate_Sample);
 int  MADContinuConfigV12(int dev,int ad_mod, int chan_first, int chan_last, int gain, int Rate_Sample);
 int  GetAdBuffSizeV12(void);  //-1 --- erro
 int  ReadAdBuffV12(int dev,float* databuf, int num);
 int  ADContinuStopV12(int dev);
 int  DASingleOutV12(int dev,int chan,int value);
 int  DADataSendV12(int dev,int chan,int Num,int *databuf);
 int  DAScanOutV12(int dev,int chan,int Freq,int scan_Num);
 int  PWMOutSetV12(int dev,int chan,int Freq,float DutyCycle);
 int  PWMInSetV12(int dev,int mod);
 int  PWMInReadV12(int dev,float* Freq, int* DutyCycle);
 int  CountSetV12(int dev,int mod);
 int  CountReadV12(int dev,int* count);
 int  DoSetV12(int dev,unsigned char chan,unsigned char state);
 int  DiReadV12(int dev,unsigned char *value);
 unsigned int  GetCardIdV12(int dev);

int  opened=0;
int i;
int main()
{
     if(-1==OpenUsb())   //首先调用打开设备函数打开设备
	{
	  printf("####usb  device open fail ####\n");
	 return -1;
	}
	else
	{
       printf("####usb  device open ok  ####\n");
	}

- 1
- 2
- 3
- 4
- 5
- 6
- 7
- 8
- 9
- 10
- 11
- 12
- 13
- 14
- 15
- 16
- 17
- 18
- 19
- 20
- 21
- 22
- 23
- 24
- 25
- 26
- 27
- 28
- 29
- 30
- 31
- 32
- 33
- 34
- 35
- 36
//这里我们设置采集卡的数字输出口0、2、4、6输出高电平5V,使用电压表测量
//OUT0、2、4、6对GND的输出电压
for(i=0;i<8;i=i+2)
	{

	 DoSetV12(0,i,1);
	 printf("### write Dout-%d set 1  ####\n",i);
	}
- 1
- 2
- 3
- 4
- 5
- 6
//这里我们设置采集卡的数字输出口1、3、5、6输出低电平0V
for(i=1;i<8;i=i+2)	 {

	  DoSetV12(0,i,0);
	  printf("### write Dout-%d set 0  ####\n",i);
	 }
	unsigned char DI=0;
	DiReadV12(0,&DI);//
	 printf("####Din = %x\n",DI);

	DASingleOutV12(0,1,(int)(5.8*4095/10));
- 1
- 2
- 3
- 4
- 5
- 6
- 7
- 8
- 9
- 10
//直接设置DA1通道的输出电压为固定5.8V
 printf("####DusbEMO  device DA1 output 5.8V  ####\n");

	DASingleOutV12(0,2,(int)(2.8*4095/10));
- 1
- 2
- 3
//直接设置DA2通道的输出电压为固定2.8V
printf("####DusbEMO device DA1 output 2.8V ####\n");
- 1
//设置PWM1输出10Hz频率,占空比30.5%的周期方波,可以使用示波器观看
PWMOutSetV12(0,0,10,30.5);
     printf("####DusbEMO  device PWM0 output FREq=10hz,duty=30.5%  ####\n");
- 1
- 2
//设置PWM2输出10H0z频率,占空比40.5%的周期方波,可以使用示波器观看
PWMOutSetV12(0,1,100,40.5);//
     printf("####DusbEMO  device PWM0 output FREq=100hz,duty=40.5%  ####\n");

	float adResult1;
- 1
- 2
- 3
- 4
//循环采集模拟输入通道AD1–16,以单端模式,选择±10V量程,采集并打印到终端输出
 for(i=0;i<16;i++)//
	{
	//ADSingleV12(int dev,int ad_mod, int chan, int gain, float* adResult);
      if(ADSingleV12(0,1,i,1,&adResult1)==0)
	{

         printf("AD_single read ad %d =%f\n",i,adResult1);

	}
	else
	{
	 printf("read ad %d fail!\n",i);
	}
	 }
    float data[1024];

//ADContinuV12(int dev,int ad_mod, int chan, int gain, int Num_Sample, int Rate_Sample, float  *databuf);
- 1
- 2
- 3
- 4
- 5
- 6
- 7
- 8
- 9
- 10
- 11
- 12
- 13
- 14
- 15
- 16
- 17
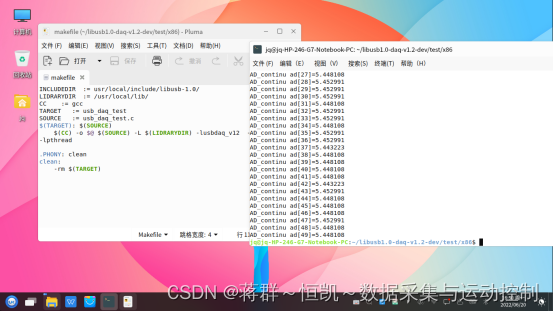
//调用单通道连续采集函数,采集AD1通道,以10K采样率连续采集1024个数据并打印,实际测试使用可以使用信号发生器输出一个100Hz的正弦波给通道1,这样采集的数据每100个数据为一个周期.
if(ADContinuV12(0,1,0,1,1024,10000,data)==0)
	{
	for(i=0;i<50;i++)
	{

	  printf("AD_continu ad[%d]=%f\n",i,data[i]);
	}

	}
	else
	{
	 printf("AD_continu read ad fail!\n");
	}
    CloseUsb();

 return 0;
}
- 1
- 2
- 3
- 4
- 5
- 6
- 7
- 8
- 9
- 10
- 11
- 12
- 13
- 14
- 15
- 16
- 17
- 18
B: 编写Makefile文件,如下:
INCLUDEDIR  := usr/local/include/libusb-1.0/
LIDRARYDIR  := /usr/local/lib/
CC    := gcc
TARGET   := usb_daq_test
SOURCE   := usb_daq_test.c
$(TARGET): $(SOURCE)
	$(CC) -o $@ $(SOURCE) -L $(LIDRARYDIR) -lusbdaq_v12  -lusb-1.0 -lm -lpthread

.PHONY: clean
clean:
	-rm $(TARGET)
- 1
- 2
- 3
- 4
- 5
- 6
- 7
- 8
- 9
- 10
- 11
特别需要注意的地方,就是在编译选项当中需要加入 -lusbdaq_v12选项用于链接采集卡的动态库,加入 -lusb-1.0用于链接系统USB插件库,加入-lm -lpthread支持线程等操作, /usr/local/lib/是USB驱动库的存放路径。
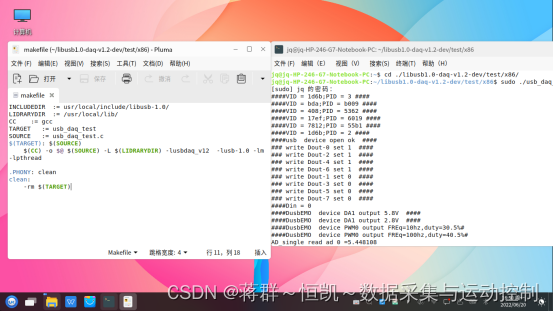
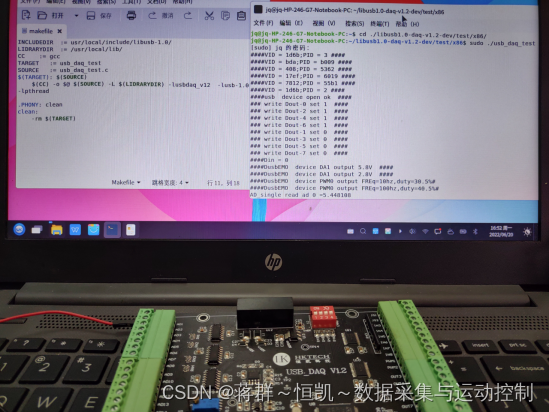
C: 在终端编译测试程序,在终端输入make 命令即可编译出可执行程序usb_daq_test
D: 运行测试程序
将USB数据采集卡通过数据线连接到电脑USB口,在终端运行测试程序,输入命令:
sudo ./usb_daq_test
运行结果如下:
jq@jqPC:~/daq-v1.2-dev/test/$ sudo ./usb_daq_test
####VID = 1d6b;PID = 3 ####
####VID = bda;PID = b009 ####
####VID = 408;PID = 5362 ####
####VID = 17ef;PID = 6019 ####
####VID = 7812;PID = 55b1 ####
####VID = 1d6b;PID = 2 ####
####usb  device open ok  ####
### write Dout-0 set 1  ####
### write Dout-2 set 1  ####
### write Dout-4 set 1  ####
### write Dout-6 set 1  ####
### write Dout-1 set 0  ####
### write Dout-3 set 0  ####
### write Dout-5 set 0  ####
### write Dout-7 set 0  ####
####Din = 0
####DusbEMO  device DA1 output 5.8V  ####
####DusbEMO  device DA1 output 2.8V  ####
####DusbEMO  device PWM0 output FREq=10hz,duty=30.5%#
####DusbEMO  device PWM0 output FREq=100hz,duty=40.5%#
AD_single read ad 0 =5.443223
AD_single read ad 1 =4.383394
AD_single read ad 2 =4.442002
AD_single read ad 3 =3.743589
AD_single read ad 4 =4.554335
AD_single read ad 5 =3.753358
AD_single read ad 6 =3.128205
AD_single read ad 7 =2.473748
AD_single read ad 8 =0.866911
AD_single read ad 9 =0.148962
AD_single read ad 10 =-0.354091
AD_single read ad 11 =-0.798534
AD_single read ad 12 =-0.925519
AD_single read ad 13 =-1.267399
AD_single read ad 14 =-1.404151
AD_single read ad 15 =-1.462759
AD_continu ad[0]=5.443223
AD_continu ad[1]=5.448108
AD_continu ad[2]=5.448108
AD_continu ad[3]=5.448108
AD_continu ad[4]=5.443223
AD_continu ad[5]=5.443223
AD_continu ad[6]=5.443223
AD_continu ad[7]=5.438339
AD_continu ad[8]=5.448108
AD_continu ad[9]=5.448108
AD_continu ad[10]=5.448108
AD_continu ad[11]=5.443223
AD_continu ad[12]=5.443223
AD_continu ad[13]=5.443223
AD_continu ad[14]=5.443223
AD_continu ad[15]=5.443223
AD_continu ad[16]=5.448108
- 1
- 2
- 3
- 4
- 5
- 6
- 7
- 8
- 9
- 10
- 11
- 12
- 13
- 14
- 15
- 16
- 17
- 18
- 19
- 20
- 21
- 22
- 23
- 24
- 25
- 26
- 27
- 28
- 29
- 30
- 31
- 32
- 33
- 34
- 35
- 36
- 37
- 38
- 39
- 40
- 41
- 42
- 43
- 44
- 45
- 46
- 47
- 48
- 49
- 50
- 51
- 52
- 53
- 54