
- 1算法—链表操作
- 22023年第十四届蓝桥杯省赛Python大学B组真题解析_蓝桥杯pythonb组松散子序列的代码分析
- 3AVL树_avl tree全称
- 4API请求报错 Required request body is missing_required request body is missing: public com.jhict
- 5springboot--跨域_springboot什么是跨域问题
- 6NEURAL MACHINE TRANSLATION BY JOINTLY LEARNING TO ALIGN AND TRANSLATE-论文翻译
- 7【FPGA】xilinx Vivado UART IP核使用_fpga uartlite ip
- 8IVX低代码平台开发——微信小程序实现抽奖功能_ivx官网
- 9uniapp首次进入App应用提示授权照片和文件权限,关闭授权提示_手机app上传图片显示权限关闭
- 10BUUCTF-[极客大挑战 2019]PHP1_[极客大挑战 2019]php 1
【人脸识别】基于Flask网页实现虚拟主播实验_face_position
赞
踩
目录
该实验基于人脸识别,简单地将人脸实时绘制为虚拟主播的动态图像,并将头部姿态数据生成到了Flask网页前端。完成该实验需要借助带有前置摄像头或外置摄像头的电脑,shape_predictor_68_face_landmarks.dat文件、Chart.min.js文件和echarts.min.js文件,大家可通过以下网盘链接获取三个文件。
链接:https://pan.baidu.com/s/1-nQkAFq9TJU999lNrydYXQ?pwd=u15u
提取码:u15u
一、虚拟主播实现
(一)读取视频流
我使用的编辑器是Pycharm。首先使用OpenCV从前置摄像头或外置摄像头读取视频流,并将其播放在窗口上。运行后系统将自动开启摄像头获取图像。
- # Step1.py
-
- import cv2
-
- cap = cv2.VideoCapture(0) # 表示内置摄像头,使用外置摄像头参数改为1
- while True:
- ret, img = cap.read()
- img = cv2.flip(img, 1) # 表示把帧左右翻转
- cv2.imshow('vtuber', img)
- cv2.waitKey(1)
(二)绘制关键点
运行后系统将自动开启摄像头获取图像,并对获取到的最大人脸进行68个点的定位。
- # Step2.py
-
- import cv2
- import numpy as np
- import dlib
-
- detector = dlib.get_frontal_face_detector()
-
- # 确保img中存在人脸,并找出最大的那一张脸
- def face_positioning(img):
- dets = detector(img, 0)
- if not dets:
- return None
- return max(dets, key=lambda det: (det.right() - det.left()) * (det.bottom() - det.top()))
-
-
- # 使用Dlib提取面部关键点
- predictor = dlib.shape_predictor(
- './data/shape_predictor_68_face_landmarks.dat') # 该文件保存在对应项目的data文件夹下
-
-
- def extract_key_points(img, position):
- landmark_shape = predictor(img, position)
- key_points = []
- for i in range(68):
- pos = landmark_shape.part(i)
- key_points.append(np.array([pos.x, pos.y], dtype=np.float32))
- return key_points
-
-
- if __name__ == '__main__':
-
- cap = cv2.VideoCapture(0)
-
- while True:
- ret, img = cap.read()
- img = cv2.flip(img, 1)
- face_position = face_positioning(img)
- key_points = extract_key_points(img, face_position)
- for i, (px, py) in enumerate(key_points): # 绘制关键点
- cv2.putText(img, str(i), (int(px), int(py)),
- cv2.FONT_HERSHEY_COMPLEX, 0.25, (255, 255, 255))
- cv2.imshow('vtuber', img)
- cv2.waitKey(1)

(三)计算面部特征并绘图
运行后系统将自动开启摄像头获取图像,并对获取到的最大人脸进行68个点的定位,同时绘制简易的虚拟主播动态图像。
- # Step3.py
-
- import cv2
- import numpy as np
- import dlib
-
- detector = dlib.get_frontal_face_detector()
-
- # 确保img中存在人脸,并找出最大的那一张脸
- def face_positioning(img):
- dets = detector(img, 0)
- if not dets:
- return None
- return max(dets, key=lambda det: (det.right() - det.left()) * (det.bottom() - det.top()))
-
-
- # 使用Dlib提取面部关键点
- predictor = dlib.shape_predictor(
- './data/shape_predictor_68_face_landmarks.dat')
-
-
- def extract_key_points(img, position):
- landmark_shape = predictor(img, position)
- key_points = []
- for i in range(68):
- pos = landmark_shape.part(i)
- key_points.append(np.array([pos.x, pos.y], dtype=np.float32))
- return key_points
-
-
- def generate_points(key_points):
- def center(array):
- return sum([key_points[i] for i in array]) / len(array)
- left_brow = [18, 19, 20, 21]
- right_brow = [22, 23, 24, 25]
- chin = [6, 7, 8, 9, 10]
- nose = [29, 30]
- return center(left_brow + right_brow), center(chin), center(nose)
-
- # 水平旋转角度和垂直旋转角度
- def generate_features(contruction_points):
- brow_center, chin_center, nose_center = contruction_points
- mid_edge = brow_center - chin_center
- bevel_edge = brow_center - nose_center
- mid_edge_length = np.linalg.norm(mid_edge)
- horizontal_rotation = np.cross(
- mid_edge, bevel_edge) / mid_edge_length ** 2
- vertical_rotation = mid_edge @ bevel_edge / mid_edge_length ** 2
- return np.array([horizontal_rotation, vertical_rotation])
-
- # 绘图
- def draw_image(h_rotation, v_rotation):
- img = np.ones([512, 512], dtype=np.float32)
- face_length = 200
- center = 256, 256
- left_eye = int(220 - h_rotation *
- face_length), int(249 + v_rotation * face_length)
- right_eye = int(292 - h_rotation *
- face_length), int(249 + v_rotation * face_length)
- month = int(256 - h_rotation * face_length /
- 2), int(310 + v_rotation * face_length / 2)
- cv2.circle(img, center, 100, 0, 1)
- cv2.circle(img, left_eye, 15, 0, 1)
- cv2.circle(img, right_eye, 15, 0, 1)
- cv2.circle(img, month, 5, 0, 1)
- return img
-
-
- def extract_img_features(img):
- face_position = face_positioning(img)
- if not face_position:
- cv2.imshow('self', img)
- cv2.waitKey(1)
- return None
- key_points = extract_key_points(img, face_position)
- for i, (p_x, p_y) in enumerate(key_points):
- cv2.putText(img, str(i), (int(p_x), int(p_y)),
- cv2.FONT_HERSHEY_COMPLEX, 0.25, (255, 255, 255))
- construction_points = generate_points(key_points)
- for i, (p_x, p_y) in enumerate(construction_points):
- cv2.putText(img, str(i), (int(p_x), int(p_y)),
- cv2.FONT_HERSHEY_COMPLEX, 0.25, (255, 255, 255))
- rotation = generate_features(construction_points)
- cv2.putText(img, str(rotation),
- (int(construction_points[-1][0]),
- int(construction_points[-1][1])),
- cv2.FONT_HERSHEY_COMPLEX, 0.5, (255, 255, 255))
- cv2.imshow('self', img)
- return rotation
-
-
- if __name__ == '__main__':
-
- cap = cv2.VideoCapture(0)
-
- ORIGIN_FEATURE_GROUP = [-0.00899233, 0.39529446]
- FEATURE_GROUP = [0, 0]
-
- while True:
- ret, img = cap.read()
- img = cv2.flip(img, 1)
- NEW_FEATURE_GROUP = extract_img_features(img)
- if NEW_FEATURE_GROUP is not None:
- FEATURE_GROUP = NEW_FEATURE_GROUP - ORIGIN_FEATURE_GROUP
- HORI_ROTATION, VERT_ROTATION = FEATURE_GROUP
- cv2.imshow('vtuber', draw_image(HORI_ROTATION, VERT_ROTATION))
- cv2.waitKey(1)
-
- if cv2.waitKey(1) & 0xFF == ord('q'):
- print("close")
- break
(四)完整代码
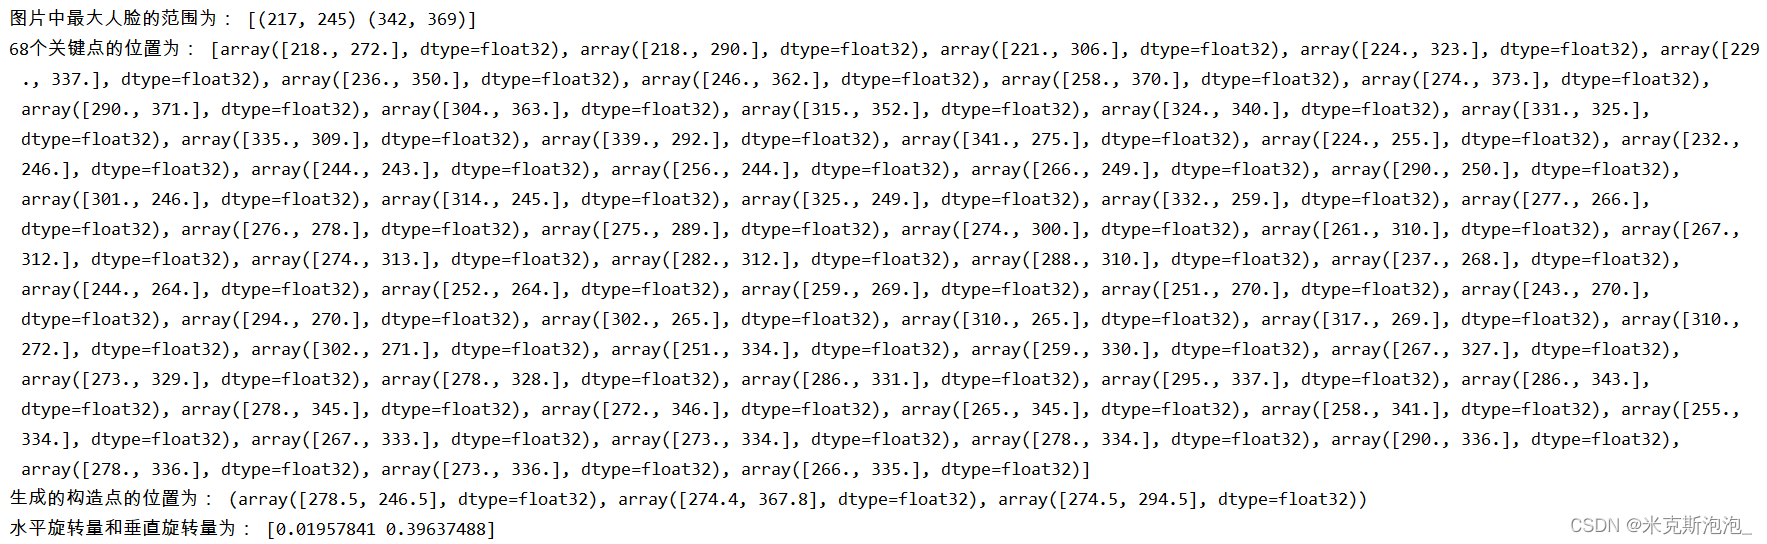
将以上三步整合,并在运行环境中输出部分数据以便我们对数据有更好的认识。完整代码如下:
- # face.py
-
- """
- detect face
- """
- import cv2
- import numpy as np
- # to detect face key point
- import dlib
-
- DETECTOR = dlib.get_frontal_face_detector()
- # 人脸模型数据
- PREDICTOR = dlib.shape_predictor(
- './data/shape_predictor_68_face_landmarks.dat')
-
-
- def face_positioning(img):
- """
- 定位人脸
- 计算最大面积
- """
- dets = DETECTOR(img, 0)
- if not dets:
- return None
- return max(dets, key=lambda det: (det.right() - det.left()) * (det.bottom() - det.top()))
-
-
- def extract_key_points(img, position):
- """
- 提取关键点
- """
- landmark_shape = PREDICTOR(img, position)
- key_points = []
- for i in range(68):
- pos = landmark_shape.part(i)
- key_points.append(np.array([pos.x, pos.y], dtype=np.float32))
- return key_points
-
-
- def generate_points(key_points):
- """
- 生成构造点
- """
- def center(array):
- return sum([key_points[i] for i in array]) / len(array)
- left_brow = [18, 19, 20, 21]
- right_brow = [22, 23, 24, 25]
- # 下巴
- chin = [6, 7, 8, 9, 10]
- nose = [29, 30]
- return center(left_brow + right_brow), center(chin), center(nose)
-
-
- def generate_features(contruction_points):
- """
- 生成特征
- """
- brow_center, chin_center, nose_center = contruction_points
- mid_edge = brow_center - chin_center
- # 斜边
- bevel_edge = brow_center - nose_center
- mid_edge_length = np.linalg.norm(mid_edge)
- # 高与底的比值
- horizontal_rotation = np.cross(
- mid_edge, bevel_edge) / mid_edge_length ** 2
- # @ 点乘
- vertical_rotation = mid_edge @ bevel_edge / mid_edge_length**2
- return np.array([horizontal_rotation, vertical_rotation])
-
-
- def draw_image(h_rotation, v_rotation):
- """
- 画脸
- Args:
- h_rotation: 水平旋转量
- v_rotation: 垂直旋转量
- """
- img = np.ones([512, 512], dtype=np.float32)
- face_length = 200
- center = 256, 256
- left_eye = int(220 - h_rotation *
- face_length), int(249 + v_rotation * face_length)
- right_eye = int(292 - h_rotation *
- face_length), int(249 + v_rotation * face_length)
- month = int(256 - h_rotation * face_length /
- 2), int(310 + v_rotation * face_length / 2)
- cv2.circle(img, center, 100, 0, 1)
- cv2.circle(img, left_eye, 15, 0, 1)
- cv2.circle(img, right_eye, 15, 0, 1)
- cv2.circle(img, month, 5, 0, 1)
- return img
-
-
- def extract_img_features(img):
- """
- 提取图片特征
- """
- face_position = face_positioning(img)
- print("图片中最大人脸的范围为:", face_position)
- if not face_position:
- cv2.imshow('self', img)
- cv2.waitKey(1)
- return None
- key_points = extract_key_points(img, face_position)
- print("68个关键点的位置为:", key_points)
- for i, (p_x, p_y) in enumerate(key_points):
- cv2.putText(img, str(i), (int(p_x), int(p_y)),
- cv2.FONT_HERSHEY_COMPLEX, 0.25, (255, 255, 255))
- construction_points = generate_points(key_points)
- print("生成的构造点的位置为:", construction_points)
- for i, (p_x, p_y) in enumerate(construction_points):
- cv2.putText(img, str(i), (int(p_x), int(p_y)),
- cv2.FONT_HERSHEY_COMPLEX, 0.25, (255, 255, 255))
- rotation = generate_features(construction_points)
- print("水平旋转量和垂直旋转量为:", rotation)
- cv2.putText(img, str(rotation),
- (int(construction_points[-1][0]),
- int(construction_points[-1][1])),
- cv2.FONT_HERSHEY_COMPLEX, 0.5, (255, 255, 255))
- cv2.imshow('self', img)
- return rotation
-
-
- if __name__ == '__main__':
- CAP = cv2.VideoCapture(0)
- # 原点特征组 my front side
- ORIGIN_FEATURE_GROUP = [-0.00899233, 0.39529446]
- FEATURE_GROUP = [0, 0]
-
- while True:
- RETVAL, IMAGE = CAP.read()
- # 翻转视频
- IMAGE = cv2.flip(IMAGE, 1)
- NEW_FEATURE_GROUP = extract_img_features(IMAGE)
- if NEW_FEATURE_GROUP is not None:
- FEATURE_GROUP = NEW_FEATURE_GROUP - ORIGIN_FEATURE_GROUP
- HORI_ROTATION, VERT_ROTATION = FEATURE_GROUP
- cv2.imshow('Vtuber', draw_image(HORI_ROTATION, VERT_ROTATION))
-
- if cv2.waitKey(1) & 0xFF == ord('q'):
- print("close")
- break
效果如图所示:

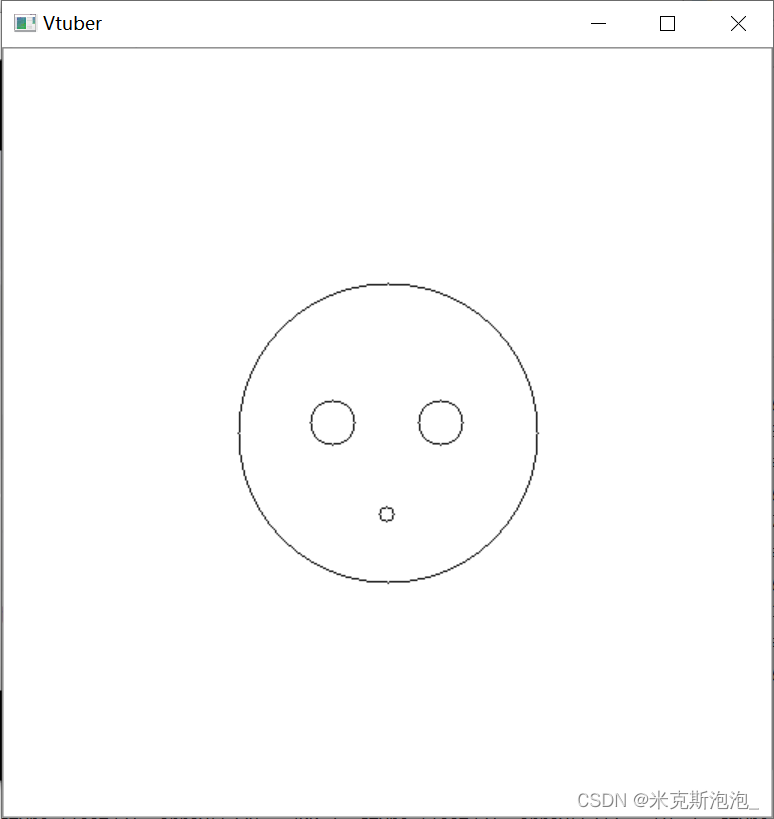
这样我们就实现了最简单的虚拟主播实验了,接下来让我们结合之前学过的Flask制作前端网页。
二、前端网页制作
首先我们新建一个项目,在该项目中新建main.py文件,static文件夹和templates文件夹。在static文件夹中导入网盘链接中的三个文件,将shape_predictor_68_face_landmarks.dat直接放在文件夹下,Chart.min.js和echarts.min.js放在js文件夹下(也可以都放置在static文件夹下)。在templates文件夹中新建home.html(主页)、image.html(动态折线图页)、show_data.html(头部姿态展示页)和virtual_echarts.html(静态折线图页)。如下所示:

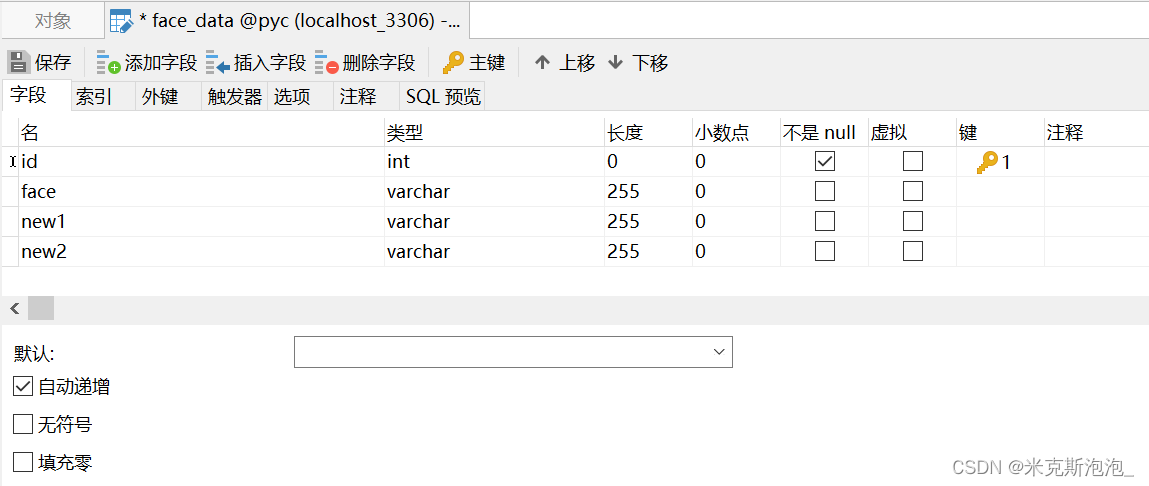
(一)建立数据库
首先,我们先建立一个数据库,便于后续将获取到的人脸数据存入。打开Navicat Premium,在某一数据库下新建一个名为"face_data"的表,并在其中添加列名id、face、new1和new2,其类型和长度等属性如图所示,注意一定要将id设置为主键,并勾选“自动递增”,否则后续实验会报错。
(二)导入虚拟主播代码并将数据存入数据库
我们将上面已经实现的虚拟主播代码与Flask网页框架结合在一起,并将虚拟主播的代码稍作修改,从而将图片中最大人脸范围、水平旋转量和垂直旋转量的数据存入数据库中。main.py代码如下所示:
- # main.py
-
- from flask import Flask, render_template, jsonify
- from flask_sqlalchemy import SQLAlchemy
- import pymysql
-
-
- # 连接数据库,便于后续存取数据
- app = Flask(__name__)
- app.config['SECRET_KEY'] = 'hard to guess string'
- app.config['SQLALCHEMY_DATABASE_URI'] = 'mysql+pymysql://root:123456@localhost:3306/pyc'
- app.config["SQLALCHEMY_TRACK_MODIFICATIONS"] = False
- app.config['SQLALCHEMY_COMMIT_ON_TEARDOWN'] = True
- # 添加一行 显示utf-8
- app.config['JSON_AS_ASCII'] = False
- db = SQLAlchemy(app)
-
-
- # 在Flask中定义数据库的列
- class face_data(db.Model):
- id = db.Column(db.Integer, primary_key=True)
- face = db.Column(db.String(255)) # 图片中最大人脸的范围
- new1 = db.Column(db.String(255)) # 水平旋转量
- new2 = db.Column(db.String(255)) # 垂直旋转量
-
-
- # 主页
- @app.route("/")
- def hello():
- return render_template("home.html")
-
-
- # 稍作修改后的虚拟主播代码
- @app.route("/save_data", methods=["GET", "POST"])
- def save_data():
- """
- detect face
- """
- import cv2
- import numpy as np
- # to detect face key point
- import dlib
-
- DETECTOR = dlib.get_frontal_face_detector()
- # 人脸模型数据
- PREDICTOR = dlib.shape_predictor(
- './static/shape_predictor_68_face_landmarks.dat')
-
- def face_positioning(img):
- """
- 定位人脸
- 计算最大面积
- """
- dets = DETECTOR(img, 0)
- if not dets:
- return None
- return max(dets, key=lambda det: (det.right() - det.left()) * (det.bottom() - det.top()))
-
- def extract_key_points(img, position):
- """
- 提取关键点
- """
- landmark_shape = PREDICTOR(img, position)
- key_points = []
- for i in range(68):
- pos = landmark_shape.part(i)
- key_points.append(np.array([pos.x, pos.y], dtype=np.float32))
- return key_points
-
- def generate_points(key_points):
- """
- 生成构造点
- """
-
- def center(array):
- return sum([key_points[i] for i in array]) / len(array)
-
- left_brow = [18, 19, 20, 21]
- right_brow = [22, 23, 24, 25]
- # 下巴
- chin = [6, 7, 8, 9, 10]
- nose = [29, 30]
- return center(left_brow + right_brow), center(chin), center(nose)
-
- def generate_features(contruction_points):
- """
- 生成特征
- """
- brow_center, chin_center, nose_center = contruction_points
- mid_edge = brow_center - chin_center
- # 斜边
- bevel_edge = brow_center - nose_center
- mid_edge_length = np.linalg.norm(mid_edge)
- # 高与底的比值
- horizontal_rotation = np.cross(
- mid_edge, bevel_edge) / mid_edge_length ** 2
- # @ 点乘
- vertical_rotation = mid_edge @ bevel_edge / mid_edge_length ** 2
- return np.array([horizontal_rotation, vertical_rotation])
-
- def draw_image(h_rotation, v_rotation):
- """
- 画脸
- Args:
- h_rotation: 水平旋转量
- v_rotation: 垂直旋转量
- """
- img = np.ones([512, 512], dtype=np.float32)
- face_length = 200
- center = 256, 256
- left_eye = int(220 - h_rotation *
- face_length), int(249 + v_rotation * face_length)
- right_eye = int(292 - h_rotation *
- face_length), int(249 + v_rotation * face_length)
- month = int(256 - h_rotation * face_length /
- 2), int(310 + v_rotation * face_length / 2)
- cv2.circle(img, center, 100, 0, 1)
- cv2.circle(img, left_eye, 15, 0, 1)
- cv2.circle(img, right_eye, 15, 0, 1)
- cv2.circle(img, month, 5, 0, 1)
- return img
-
- def extract_img_features(img):
- """
- 提取图片特征
- """
- face_position = face_positioning(img)
- print("图片中最大人脸的范围为:", face_position)
- if not face_position:
- cv2.imshow('self', img)
- cv2.waitKey(1)
- return None
- key_points = extract_key_points(img, face_position)
- print("68个关键点的位置为:", key_points)
- for i, (p_x, p_y) in enumerate(key_points):
- cv2.putText(img, str(i), (int(p_x), int(p_y)),
- cv2.FONT_HERSHEY_COMPLEX, 0.25, (255, 255, 255))
- construction_points = generate_points(key_points)
- print("生成的构造点的位置为:", construction_points)
- for i, (p_x, p_y) in enumerate(construction_points):
- cv2.putText(img, str(i), (int(p_x), int(p_y)),
- cv2.FONT_HERSHEY_COMPLEX, 0.25, (255, 255, 255))
- rotation = generate_features(construction_points)
- print("水平旋转量和垂直旋转量为:", rotation)
- cv2.putText(img, str(rotation),
- (int(construction_points[-1][0]),
- int(construction_points[-1][1])),
- cv2.FONT_HERSHEY_COMPLEX, 0.5, (255, 255, 255))
- cv2.imshow('self', img)
- return face_position, rotation
-
- if __name__ == '__main__':
- CAP = cv2.VideoCapture(0 + cv2.CAP_DSHOW)
- # 原点特征组 my front side
- ORIGIN_FEATURE_GROUP = [-0.00899233, 0.39529446]
- FEATURE_GROUP = [0, 0]
-
- while True:
- RETVAL, IMAGE = CAP.read()
- # 翻转视频
- IMAGE = cv2.flip(IMAGE, 1)
- face_position, NEW_FEATURE_GROUP = extract_img_features(IMAGE)
- if NEW_FEATURE_GROUP is not None:
- FEATURE_GROUP = NEW_FEATURE_GROUP - ORIGIN_FEATURE_GROUP
- HORI_ROTATION, VERT_ROTATION = FEATURE_GROUP
-
- res = face_data() # 实例化一条记录
- res.face = face_position
- res.new1 = NEW_FEATURE_GROUP[0]
- res.new2 = NEW_FEATURE_GROUP[1]
- db.session.add(res) # 逻辑添加
- db.session.commit() # 添加记录
-
- if cv2.waitKey(1) & 0xFF == ord('q'):
- print("close")
- break
-
- return "数据存储成功!"
-
-
- # 将数据库数据传到前端展示
- @app.route('/show_data')
- def show_data():
- db = pymysql.connect(host='localhost', user='root', password='123456', database='pyc', charset='utf8')
- cursor = db.cursor()
- cursor.execute("Select * from face_data")
- rs = cursor.fetchall()
- rs = list(rs)
- print(rs[0:10])
-
- return render_template("show_data.html", rs=rs)
-
-
- if __name__ == '__main__':
- app.run(debug=True)
接着,我们修改主页的模板home.html如下所示:
- # templates/home.html
-
-
- <!DOCTYPE html>
- <html lang="en">
- <head>
- <meta charset="UTF-8">
- <title>虚拟主播展示首页</title>
- </head>
- <body>
- <h1 align = "center" style = "font-family: 楷体"> 虚拟主播展示 </h1>
-
- <p><a href = "{{ url_for('save_data') }}" rel = "external nofollow"
- style = "top: 200px; text-decoration: none; font-size: 24px; font-family: 楷体"> 获取虚拟主播人脸数据 </a></p>
-
- <p><a href = "{{ url_for('show_data') }}" rel = "external nofollow"
- style = "top: 30px; text-decoration: none; font-size: 24px; font-family: 楷体"> 展示人脸数据 </a></p>
- </body>
- </html>
修改展示数据库数据的模板show_data.html如下所示:
- <!DOCTYPE html>
- <html lang="en">
- <head>
- <meta charset="UTF-8">
- <title>虚拟主播数据展示页</title>
- </head>
-
- <body>
- <h1>这是图片中最大人脸的范围、水平旋转量和垂直旋转量</h1>
- {% for r in rs %}
- {{r}}<br>
- {% endfor %}
- </body>
- </html>
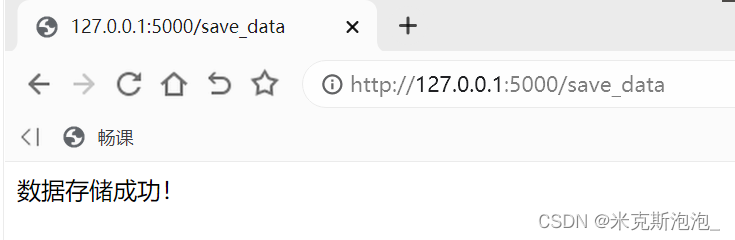
之后运行程序,首先点击“获取虚拟主播人脸数据”,出现人脸视频和虚拟主播视频后按q键停止,http://127.0.0.1:5000/save_data会显示“数据存储成功!”,证明我们的人脸数据已经存储到了数据库中,到Navicat Premium中查看,的确有数据存入。


之后点击主页中的“展示人脸数据”,会发现http://127.0.0.1:5000/show_data将数据库中的数据都展示出来了。

(三)绘制echarts折线图
在main.py文件中添加如下代码:
- # main.py
-
-
- class Mysql(object):
- def __init__(self):
- try:
- self.conn = pymysql.connect(host='localhost', user='root', password='123456', database='pyc', charset='utf8')
- self.cursor = self.conn.cursor() # 用来获得python执行Mysql命令的方法(游标操作)
- print("连接数据库成功")
- except:
- print("连接失败")
-
- def getItems(self):
- sql = "select id,new1,new2 from face_data" #获取food数据表的内容
- self.cursor.execute(sql)
- items = self.cursor.fetchall() #接收全部的返回结果行
- return items
-
-
- @app.route('/line')
- def line():
- db = Mysql()
- items = db.getItems()
- return render_template('virtual_echart.html', items=items)
并将virtual_echart.html修改如下:
- # templates/virtual_echart.html
-
-
- <!DOCTYPE html>
- <html lang="en">
- <head>
- <meta charset="UTF-8">
- <title>虚拟主播静态折线图展示</title>
- <script src="/static/js/echarts.min.js"></script>
- <style>
- #main{
- width: 1200px;
- height: 400px;
- position:relative;
- left:0px;
- top:80px;
- }
- </style>
- </head>
-
- <body>
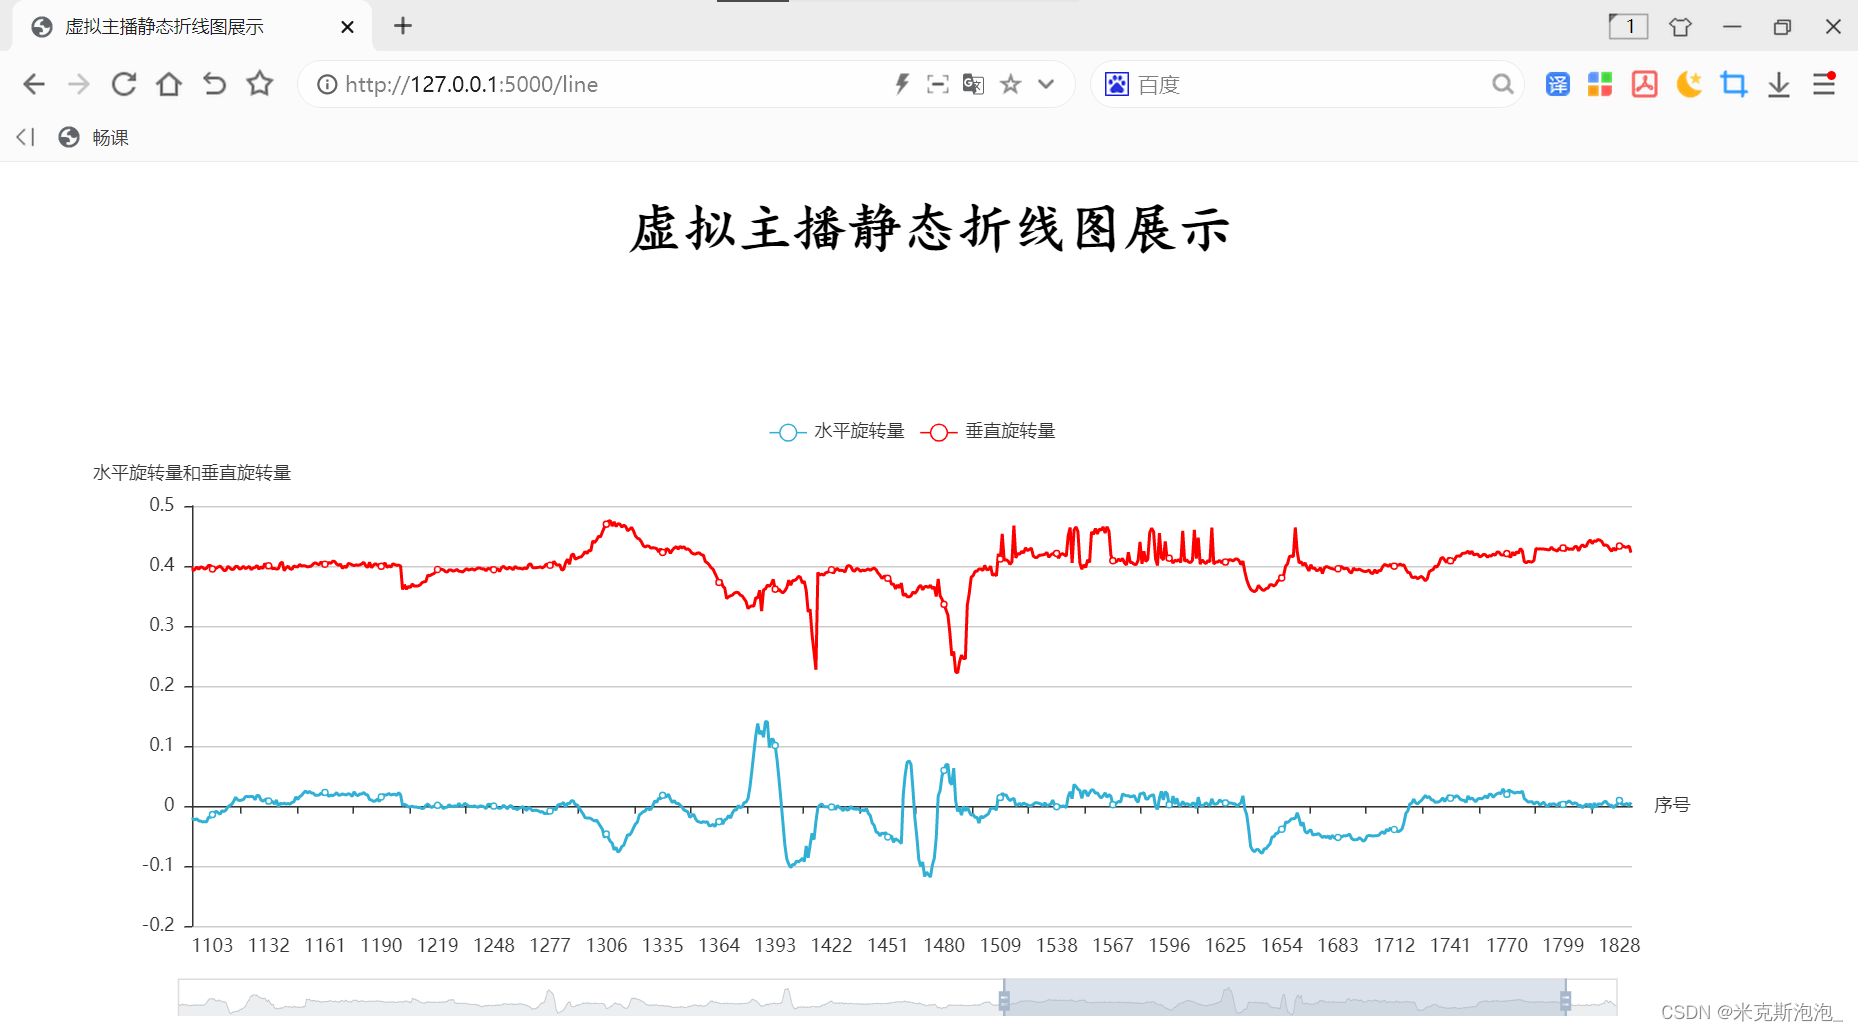
- <h1 align="center" style="font-family:楷体;font-size: 36px">虚拟主播静态折线图展示</h1>
- <p style="position:absolute;right:80px;top:100px">裴雨晨&&赵艺瑶</p>
- <div id="main" ></div>
- <script type="text/javascript">
- // 基于准备好的dom,初始化 echarts 实例并绘制图表。
- var myChart=echarts.init(document.getElementById('main'));
- // 指定图表的配置项和数据
- var option = {
- title: {
- text: ''
- },
- legend:{
- data:['水平旋转量','垂直旋转量']
- },
- dataZoom: [{
- type: 'slider',
- show: true, //flase直接隐藏图形
- xAxisIndex: [0],
- left: '9%', //滚动条靠左侧的百分比
- bottom: -5,
- start: 1,//滚动条的起始位置
- end: 40//滚动条的截止位置(按比例分割你的柱状图x轴长度)
- }],
- xAxis: {
- name:"序号",
- type: 'category',
- data:[
- {% for item in items %}
- "{{ item[0]}}",
- {% endfor %}
- ]},
- yAxis: {
- name:"水平旋转量和垂直旋转量",
- type: 'value',
- axisLabel : {
- formatter: '{value} '}
- },
- series: [
- {
- name:'水平旋转量',
- type: 'line', //line折线图。bar柱形图
- data:[{% for item in items %}
- "{{ item[1]}}",
- {% endfor %}],
- itemStyle:{normal: {color:"#31b0d5"}}
- },
- {
- name:'垂直旋转量',
- type: 'line', //line折线图。bar柱形图
- data:[{% for item in items %}
- "{{ item[2]}}",
- {% endfor %}],
- itemStyle:{normal: {color:"#ff0000"}}
- },
-
-
- ]
- };
- myChart.setOption(option);// 基于准备好的dom,初始化 echarts 实例并绘制图表。
- </script>
- </body>
- </html>
在home.html的body中添加如下代码:
- # templates/home.html
-
-
- <p><a href = "{{ url_for('line') }}" rel = "external nofollow"
- style = "top: 400px; text-decoration: none; font-size: 24px;
- font-family: 楷体"> 展示静态折线图 </a></p>
再次运行,点击主页中的“展示静态折线图”,便可在http://127.0.0.1:5000/line看到用echarts画的折线图。该图反映了人脸在水平方向和垂直方向的旋转量。
(四)绘制ajax动态折线图(未实现)
在main.py文件中添加如下代码:
- # main.py
-
-
- @app.route('/show_test') # 路由
- def show_test():
- return render_template('image.html')
-
-
- @app.route('/show_test/setData/') # 路由
- def setData():
- db = pymysql.connect(host='localhost', user='root', password='123456', database='pyc', charset='utf8')
- cursor = db.cursor()
- cursor.execute("Select count(*) from face_data")
- number = cursor.fetchall()
- # print(number[0][0])
- cursor.execute("Select new1 from face_data")
- new1 = cursor.fetchall()
- new1 = list(new1)
-
- for i in range(0, number[0][0]):
- data = {'id': i, 'h': new1[i]}
- print(data)
-
- return jsonify(data) # 将数据以字典的形式传回
并将templates文件夹中的image.html文件修改如下:
- # templates/image.html
-
-
- <!DOCTYPE html>
- <html lang="en">
- <head>
- <meta charset="UTF-8">
- <title>虚拟主播动态折线图展示</title>
- </head>
-
- <body>
- <h1>这是人脸水平旋转量的动态折线图展示</h1>
- <canvas id="panel" height="350px" width="700px"> </canvas> <!--折线图位置-->
-
- <script src="https://code.jquery.com/jquery-3.3.1.min.js"></script> <!--导入jQuery-->
- <script src="/static/js/Chart.min.js"></script> <!--导入jQuery-->
- <script>
- $(function () {
- var can = $('#panel').get(0).getContext('2d'); /*绘制类型*/
- //定义图标的数据
- var canData = {
- labels:["a","b","c","d","e","f"], /*初始x轴数据*/
- datasets : [
- {
- //折线的填充颜色
- fillColor:"rgba(255,255,255,0.1)",
- //线条颜色:
- strokeColor:"rgba(255,255,0,1)",
- //y轴初始数据:
- data:[0.01,0.03,-0.02,0.01,0.05,-0.04]
- }
- ]
- };
- //绘制图片
- var line = new Chart(can).Line(canData);
- var int = setInterval(function () { //设置定时器
- $.ajax(
- {
- url:"/show_test/setData/", //从setData函数中获取数据
- type:"get",
- data:"",
- success:function (data) {
- line.addData(
- [data["h"]], //y轴,因为同一个x轴可以有多个折线
- data["id"] //x轴
- );
- <!-- //保持x轴只有8个数据,要不随着时间推移x轴会越来越长-->
- <!-- var len = line.datasets[0].points.length;-->
- <!-- if(len>8){-->
- <!-- line.removeData()-->
- <!-- }-->
- }
- }
- )
- },1000)
- })
- </script>
- </body>
- </html>
再次运行,点击主页中的“展示动态折线图”,便可在http://127.0.0.1:5000/show_test中看到用ajax画的动态折线图。这部分代码我参考了以下文章,该文章是每隔一秒随机生成一个数字传到前端进行展示,而我企图实时获取已经存入数据库中的数据进行前端展示,结果显示后端只把数据库中的最后一条数据传到前端了。Flask框架中利用Ajax制作动态折线图_我是一只程序⚪的博客-CSDN博客_flask折线图制作动态折线图,在视图中需要两个函数,其一为页面函数,用于页面显示。另一个为折线图数据视图函数,用来生成数据传递给Ajax。创建前端页面,名为image的html页面,然后准备视图函数:函数一:关联HTML页面#函数一:关联页面@app.route('/') #路由def image(): return render_template('image.html')...https://blog.csdn.net/weixin_39561473/article/details/86608661 其实原因就在于我的代码在传递数据到前端之前对数据进行了一次for循环遍历,最后结果肯定停留在最后一条数据上。有人会说把return语句放在for循环里试试呢?这个我试过了也是不行的,因为前端从后端获取数据的时候会调用整个setData函数,这就意味着每次调用的时候循环次数都会清零,所以我这部分代码在逻辑上有很大的问题,但由于时间关系,我没能对其进行进一步的研究,所以只能暂时搁置,至于能不能真的实现我还不太清楚。或许有大佬可以在评论区解答我的疑惑~


