- 1Unity开发(四) AssetBundle最小依赖树资源打包导出_最小依赖树算法
- 2Android_studio入门之Linearlayout+基本初级语法_androidstudio常用的语句
- 3安卓进阶必备,《Flutter Dart 语言编程入门到精通》
- 4推荐三款常用接口测试工具!
- 5朱晔的互联网架构实践心得S1E7:三十种架构设计模式(上)
- 6Git push 代码时出现 FETCH_HEAD = [up to date] release -> origin/release hint: You have divergent branches_branch v1.4.5 -> fetch_head = [up to date] v1.4.5
- 7如何关闭eslint_eslint如何关闭
- 8NLP《GPT》_nlp gpt
- 9Curl学习之使用
- 10ICRA2024
Elasticsearch 单节点部署教程,以及踩坑记录_elasticsearch单节点配置
赞
踩
1、简介
Elasticsearch 作为分布式搜索引擎,在生产环境中使用集群部署,对于学习者而言我们只需要掌握如何使用即可,后续更高级的集群部署配置将在以后博客中更新。
Elasticsearch 更新迭代速度非常快,并且不同版本有着很大区别,Elasticsearch7.x 版本以后都会自带jdk,因此在Elasticsearch7.x以后不需要考虑jdk版本兼容问题;Elasticsearch8.x默认开启security(无论是生产环境还是开发环境都会带上),由此对于Elasticsearch的使用安全性增加很多要求,本文将从两个方面(开启security、关闭security)介绍Elasticsearch的安装和使用。本文使用 Elasticsearch-8.3.3 版本。
2、Elasticsearch 和 jdk 版本/操作系统之间的对应关系
从7.x开始,以后的版本ES均自带jdk,所以可即使不安装jdk也可正常运行ES。对于 ES 8.0 而言,JDK版本只有一个选择,即 JDK 17;对于 ES 8.1 及以上版本而言,支持 JDK 17、JDK 18。
ES和JDK兼容性见网址:支持一览表 | Elastic(国内jdk镜像:WEJDK学习站)
操作系统的兼容性见网址:支持一览表 | Elastic
自身以及一些管理工具兼容性:支持一览表 | Elastic
3、Elasticsearch 的下载与安装
3.1、Elasticsearch 下载
Elasticsearch 下载地址:Past Releases of Elastic Stack Software | Elastic
3.2、Elasticsearch 安装
注:Elasticsearch 不支持 root 用户启动,需要新建用户,并且赋予新的用户权限,才可以启动Elasticsearch(这些操作在root用户下进行)。
- # 1、解压到指定目录下(opt)(本文使用 elasticsearch-8.3.3 版本)
- tar -zxvf elasticsearch-8.3.3-linux-x86_64.tar.gz -C /opt
- # 2、新建用户
- useradd elasticsearch
- passwd elasticsearch # 给新建的用户设置密码
- # 3、给elasticsearch目录设置新用户
- chown elasticsearch:elasticsearch -R elasticsearch-8.3.3/
3.3、Elasticsearch 目录结构解释
| 目录名称 | 说明 |
| bin | 可执行脚本文件目录 |
| config | 配置文件目录 |
| lib | 依赖包目录 |
| data | 默认数据保存目录,最好修改 |
| logs | 默认日志保存目录,最好修改 |
| plugins | 已经安装的插件保存目录 |
| jdk | 自带jdk目录 |
| modules | 所有Elasticsearch模块 |
3.3、配置文件初解(elasticsearch.yml)
- # ---------------------------------- Cluster -----------------------------------
- # Use a descriptive name for your cluster:
- # cluster.name: my-application
- # ------------------------------------ Node ------------------------------------
- # Use a descriptive name for the node:
- # node.name: node-1
- # Add custom attributes to the node:
- #node.attr.rack: r1
- # ----------------------------------- Paths ------------------------------------
- # Path to directory where to store the data (separate multiple locations by comma):
- #path.data: /path/to/data
- # Path to log files:
- #path.logs: /path/to/logs
- # ----------------------------------- Memory -----------------------------------
- # Lock the memory on startup:
- # bootstrap.memory_lock: true
- # Make sure that the heap size is set to about half the memory available
- # on the system and that the owner of the process is allowed to use this
- # limit.
- # Elasticsearch performs poorly when the system is swapping the memory.
- # ---------------------------------- Network -----------------------------------
- # By default Elasticsearch is only accessible on localhost. Set a different
- # address here to expose this node on the network:
- network.host: 192.168.0.90
- # By default Elasticsearch listens for HTTP traffic on the first free port it
- # finds starting at 9200. Set a specific HTTP port here:
- http.port: 9200
- # For more information, consult the network module documentation.
- # --------------------------------- Discovery ----------------------------------
- # Pass an initial list of hosts to perform discovery when this node is started:
- # The default list of hosts is ["127.0.0.1", "[::1]"]
- #discovery.seed_hosts: ["host1", "host2"]
- # Bootstrap the cluster using an initial set of master-eligible nodes:
- #cluster.initial_master_nodes: ["node-1", "node-2"]
- # For more information, consult the discovery and cluster formation module documentation.
- # --------------------------------- Readiness ----------------------------------
- # Enable an unauthenticated TCP readiness endpoint on localhost
- #readiness.port: 9399
- # ---------------------------------- Various -----------------------------------
- # Allow wildcard deletion of indices:
- #action.destructive_requires_name: false
- #----------------------- BEGIN SECURITY AUTO CONFIGURATION -----------------------
-
- #----------------------- END SECURITY AUTO CONFIGURATION -------------------------
主要有几个模块:
| 模块名 | 说明 |
| Cluster | 配置集群名称 |
| Node | 配置当前节点信息(节点名称默认主机名) |
| Paths | 指定数据和日志保存路径 |
| Memory | 内存使用相关配置 |
| Network | 网络相关配置(主机ip,端口等) |
| Discovery | 集群相关参数配置 |
| BEGIN SECURITY AUTO CONFIGURATION | ES8.0默认使用security,启动时添加的配置 |
’4、Elasticsearch 启动
4.1、直接启动(默认开启security)
4.1.1、不修改配置文件启动
首次启动 Elasticsearch 时,会自动进行以下安全配置:
1)、为传输层和 HTTP 层生成 TLS 证书和密钥;
2)、TLS 配置设置被写入 elasticsearch.yml(BEGIN SECURITY AUTO CONFIGURATION 模块);
3)、为 elastic 用户生成密码。
4)、为 Kibana 生成一个注册令牌。
- # 使用 elasticsearch 用户,进入bin目录执行
- ./elasticsearch -d
启动成功如下图:

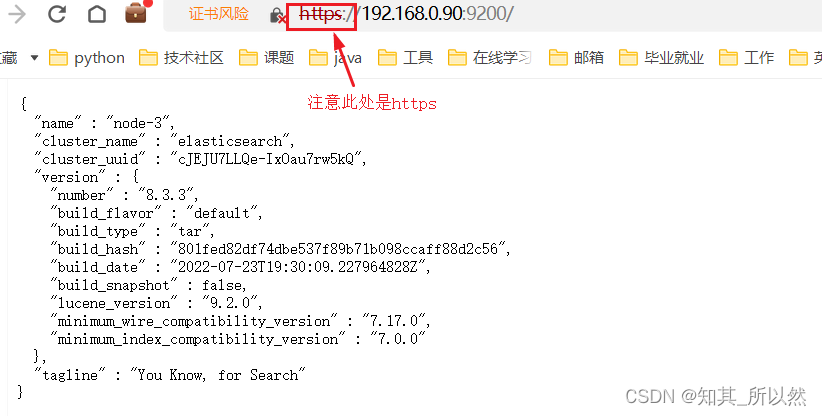
验证服务状态,使用生成的密码登录(用户名:elastic,密码启动成功生成的):
 4.1.2、修改密码
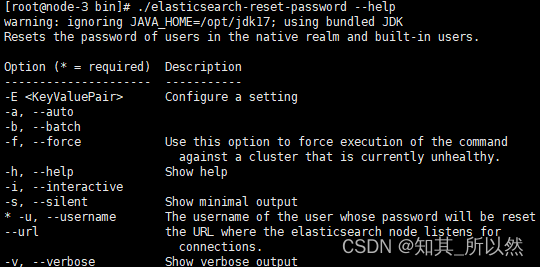
忘记密码怎么办,使用重新生成或者自定义密码。
- # 1、重新生成密码
- ./elasticsearch-reset-password -u elastic # 可以使用./elasticsearch-reset-password --help查看使用
- # 2、自定义密码
- ./elasticsearch-reset-password --username elastic -i

4.1.3、Elasticsearch 启动后配置文件(elasticsearch.yml)变化
新增如下内容(这些内容是针对security自动添加的):
- #----------------------- BEGIN SECURITY AUTO CONFIGURATION -----------------------#
- # Enable security features
- xpack.security.enabled: true
- xpack.security.enrollment.enabled: true
- # Enable encryption for HTTP API client connections, such as Kibana, Logstash, and Agents
- xpack.security.http.ssl:
- enabled: true
- keystore.path: certs/http.p12
- # Enable encryption and mutual authentication between cluster nodes
- xpack.security.transport.ssl:
- enabled: true
- verification_mode: certificate
- keystore.path: certs/transport.p12
- truststore.path: certs/transport.p12
- # Create a new cluster with the current node only
- # Additional nodes can still join the cluster later
- cluster.initial_master_nodes: ["node-3"]
- # Allow HTTP API connections from anywhere
- # Connections are encrypted and require user authentication
- http.host: 0.0.0.0
- # Allow other nodes to join the cluster from anywhere
- # Connections are encrypted and mutually authenticated
- #transport.host: 0.0.0.0
- #----------------------- END SECURITY AUTO CONFIGURATION -------------------------
4.2、关闭security 启动
4.2.1、修改配置文件
修改elasticsearch.yml配置文件如下:
- #----------------------- BEGIN SECURITY AUTO CONFIGURATION -----------------------
- # Enable security features
- xpack.security.enabled: false # 将此处设置为false,即为关闭security
- xpack.security.enrollment.enabled: true
- # Enable encryption for HTTP API client connections, such as Kibana, Logstash, and Agents
- xpack.security.http.ssl:
- enabled: true
- keystore.path: certs/http.p12
- # Enable encryption and mutual authentication between cluster nodes
- xpack.security.transport.ssl:
- enabled: true
- verification_mode: certificate
- keystore.path: certs/transport.p12
- truststore.path: certs/transport.p12
- # Create a new cluster with the current node only
- # Additional nodes can still join the cluster later
- cluster.initial_master_nodes: ["node-3"]
- # Allow HTTP API connections from anywhere
- # Connections are encrypted and require user authentication
- http.host: 0.0.0.0
- # Allow other nodes to join the cluster from anywhere
- # Connections are encrypted and mutually authenticated
- #transport.host: 0.0.0.0
- #----------------------- END SECURITY AUTO CONFIGURATION -------------------------
4.2.2、启动
- # 使用 elasticsearch 用户,进入bin目录执行
- ./elasticsearch -d
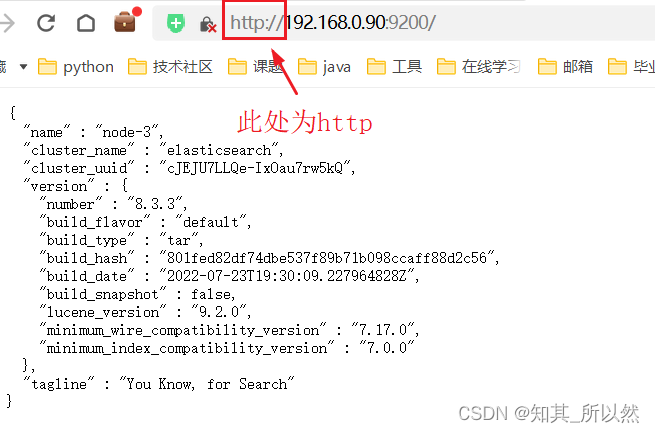
直接访问不需要输入用户名,密码。

5、安装过程中出现的问题
5.1、未新创建用户启动Elasticsearch
使用root账户直接启动会报错,新建账户,并且给Elasticsearch目录赋新用户权限,再启动即可。
5.2、操作系统设置问题
启动Elasticsearch出现错误:
max file descriptors [4096] for elasticsearch process is too low, increase to at least [65535]
bootstrap check failure [2] of [2]: max virtual memory areas vm.max_map_count [65530] is too low, increase to at least [262144]
解决方式(使用root用户更改):
- # 1、修改操作系统文件描述符参数
- vim /etc/security/limits.conf
- # 添加下面内容
- * soft nofile 65536
- * hard nofile 65536
- * soft nproc 4096
- * hard nproc 4096
- # 注:*后面有空格
- # 2、修改vm.max_map_count
- vim /etc/sysctl.conf
- # 添加下面内容
- vm.max_map_count=262144
- # 检查是否保存
- sysctl -p
- # 3、重启服务器
- reboot
6、总结
本文详细介绍Elasticsearch在打开和关闭Security情况下的安装使用,以及对安装过程遇到的一些问题进行记录,帮助大家在centos7系统中够顺利安装和使用Elasticsearch。后续将介绍集群安装和使用。
本人是一个从小白自学计算机技术,对运维、后端、各种中间件技术、大数据等有一定的学习心得,想获取自学总结资料(pdf版本)或者希望共同学习,关注微信公众号:it自学社团。后台回复相应技术名称/技术点即可获得。(本人学习宗旨:学会了就要免费分享)


