- 1uniapp 怎么设置凸起的底部tabbar_uniapp底部导航栏中间凸起
- 2第二周周报_入职培训第二周周报
- 3vue3 element-plus el-table:列表中相同名称的数据实现行合并_element-ui el-table span-method合并name相同的行
- 4【PyTorch][chapter 16][李宏毅深度学习][Neighbor Embedding][t-SNE]
- 5H264 码率控制原理
- 6Nightingale发布v5.9.2,新功能解决多个生产痛点,真香_夜莺监控( nightingale ) 新建监控大盘
- 7SQL Server 跨服务器同步或定时同步数据库
- 8es (brain split)脑裂问题导致重建索引速度缓慢_fatal error in thread
- 9汉诺塔问题—java详解(附源码)
- 10为什么 Linux 系统默认页大小是 4KB ?_linux为什么一页是4k
R语言ggplot2数据可视化_r 数据可视化 —— ggplot 坐标系
赞
踩
本系列为R语言进阶版学习,包含《R数据科学》的代码笔记及课后习题,已收录至“R数据科学”专栏,空余时间会持续更新。
第一部分 探索
第1章 使用ggplot2进行数据可视化
准备工作:安装并加载tidyverse包
install.packages("tidyverse")
library("tidyverse") #ggplot2是tidyverse的核心R包,使用ggplot2前可以先加载tidyverse包
- 1
- 2
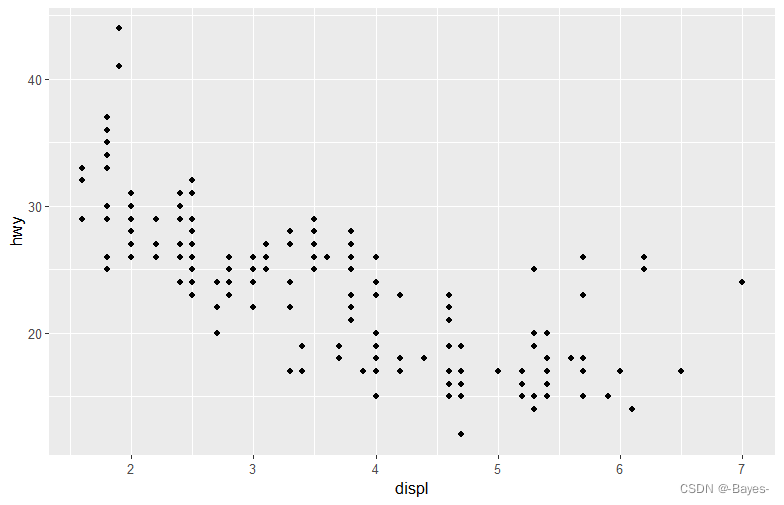
使用ggplot做个简单的散点图:
ggplot(data = mpg) +
  geom_point(mapping = aes(x = displ, y = hwy))
- 1
- 2
- 练习:
- 运行ggplot(data = mpg)
ggplot(data = mpg)
- 1
- 数据集mpg有几行几列
view(mpg) #查看完整数据框
head(mpg) #查看前6行数据
tail(mpg) #查看后6行数据
nrow(mpg) #查看mpg行数
ncol(mpg) #查看mpg列数
dim(mpg) #查看mpg行列数
glimpse(mpg) #查看数据框信息,其中包含行列数
- 1
- 2
- 3
- 4
- 5
- 6
- 7
- 变量drv的意义是什么?使用?mpg命令阅读帮助文件以找出答案
help(mpg)
#drv:the type of drive train, where f = front-wheel drive, r = rear wheel drive, 4 = 4wd
- 1
- 2
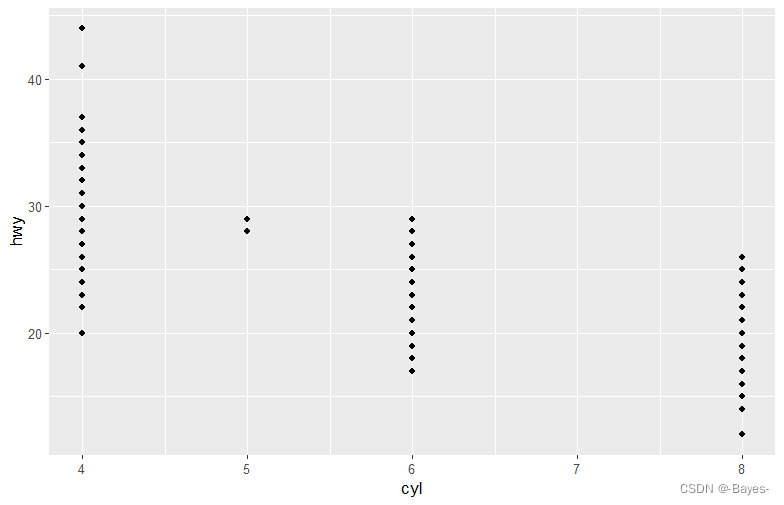
- 使用hwy和cyl绘制一张散点图
ggplot(data = mpg)+
  geom_point(mapping = aes(x = cyl,y = hwy))
ggplot(mpg,aes(x = cyl,y = hwy))+
  geom_point()
- 1
- 2
- 3
- 4
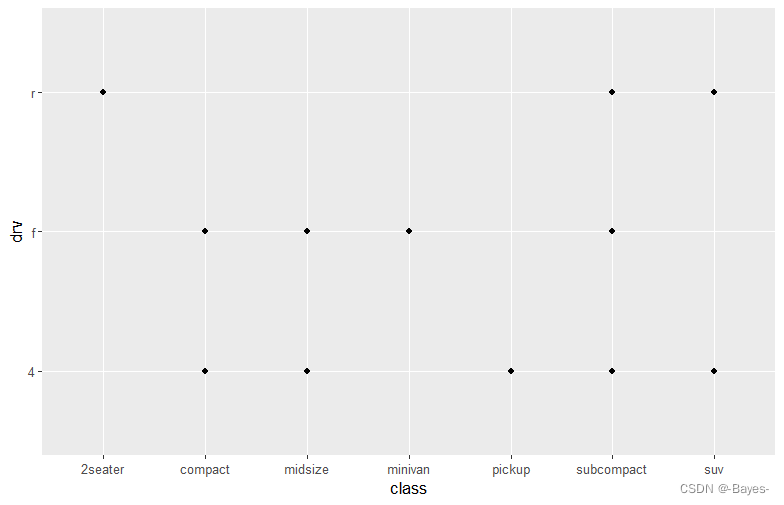
- 如果使用class和drv绘制散点图,会发生什么情况?为什么这张图没什么用处?
ggplot(data = mpg)+
  geom_point(mapping = aes(x = class,y = drv)) #class和drv为分类变量,并存在重复,不适合用散点图展示
ggplot(mpg,aes(x = class,y = drv))+
  geom_point()

#散点图不显示观测值数量,因此当所有x,y为唯一值时,最适合绘制简单散点图
- 1
- 2
- 3
- 4
- 5
- 6
count(mpg, drv, class) #快速查看变量类型和数量
# 结果:
# A tibble: 12 × 3
   drv   class          n
   <chr> <chr>      <int>
 1 4     compact       12
 2 4     midsize        3
 3 4     pickup        33
 4 4     subcompact     4
 5 4     suv           51
 6 f     compact       35
 7 f     midsize       38
 8 f     minivan       11
 9 f     subcompact    22
10 r     2seater        5
11 r     subcompact     9
12 r     suv           11
- 1
- 2
- 3
- 4
- 5
- 6
- 7
- 8
- 9
- 10
- 11
- 12
- 13
- 14
- 15
- 16
- 17
- 扩展:
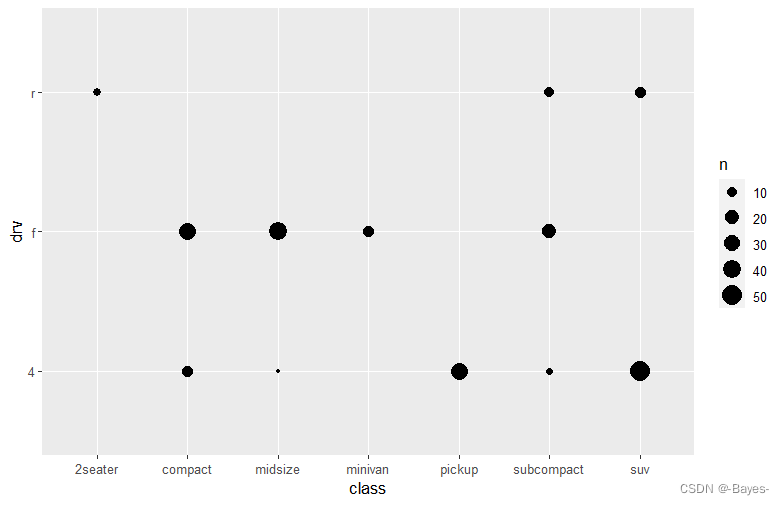
① 使用count可绘制带有观测值大小的散点图
ggplot(mpg,aes(x = class,y = drv))+
  geom_count()
- 1
- 2
② 使用色标显示观测值
mpg %>%
  count(class, drv) %>%
  ggplot(aes(x = class, y = drv))+
  geom_tile(mapping = aes(fill = n))
- 1
- 2
- 3
- 4
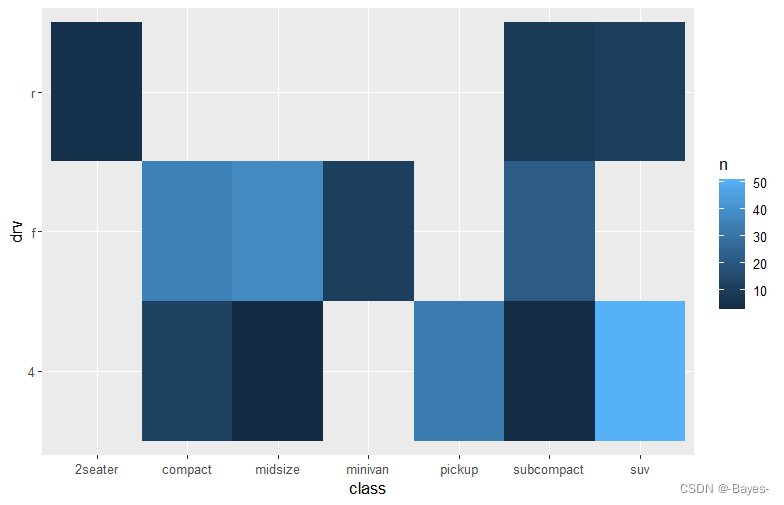
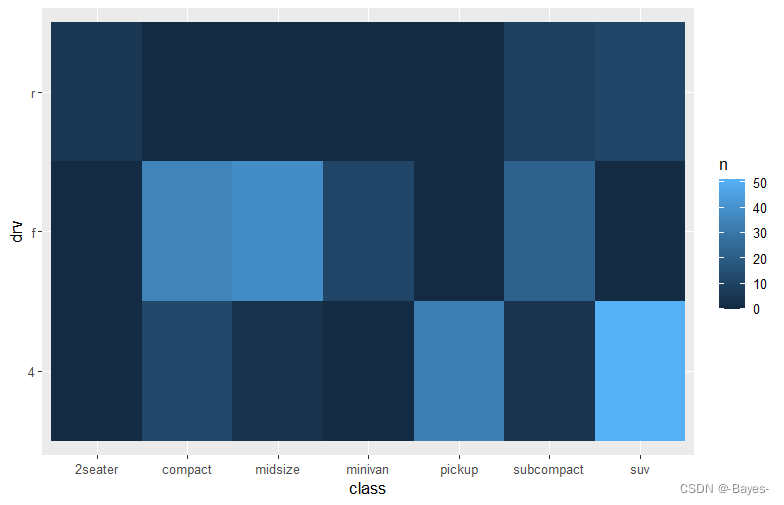
③ 补全空白区域
mpg %>%
  count(class, drv) %>%
  complete(class, drv, fill = list(n = 0)) %>% #使用n=0的色标填补空白区域
  ggplot(aes(x = class,y = drv))+
  geom_tile(mapping = aes(fill = n))
- 1
- 2
- 3
- 4
- 5
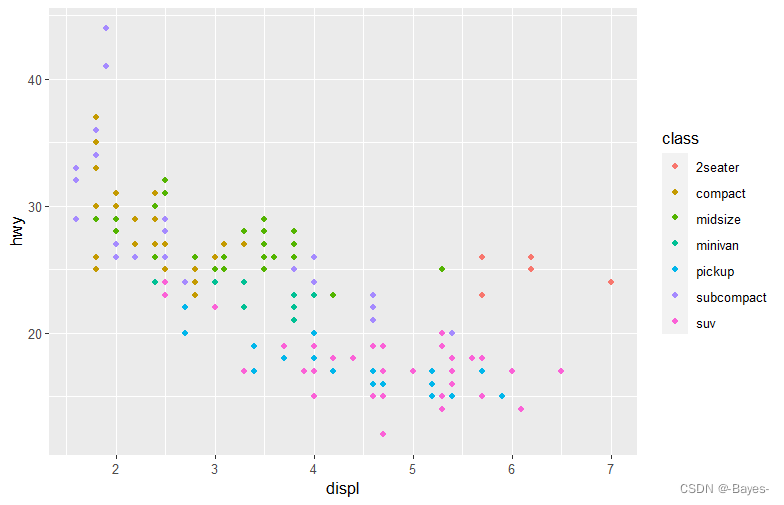
1.3 图形属性映射
ggplot(data = mpg)+
  geom_point(mapping = aes(x = displ, y = hwy, color = class)) #以class颜色分类
- 1
- 2
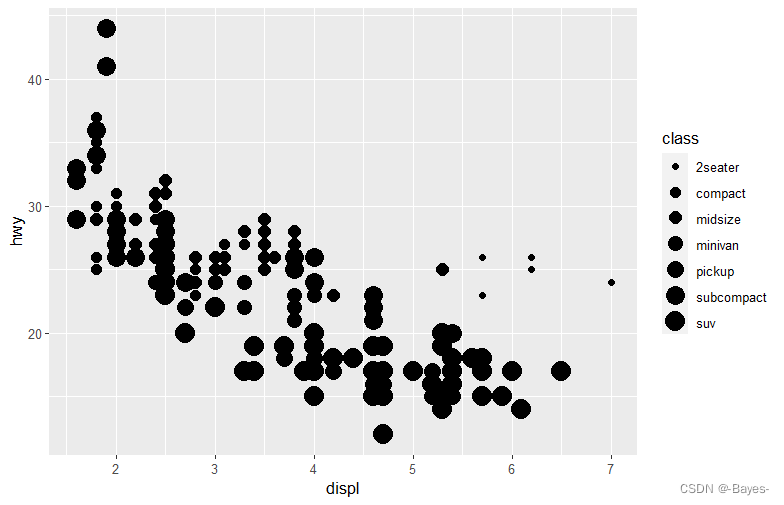
ggplot(data = mpg)+
  geom_point(mapping = aes(x = displ, y = hwy, size = class)) #以class尺寸分类
- 1
- 2
ggplot(data = mpg)+
  geom_point(mapping = aes(x = displ, y = hwy, alpha = class)) #以class透明度分类
- 1
- 2
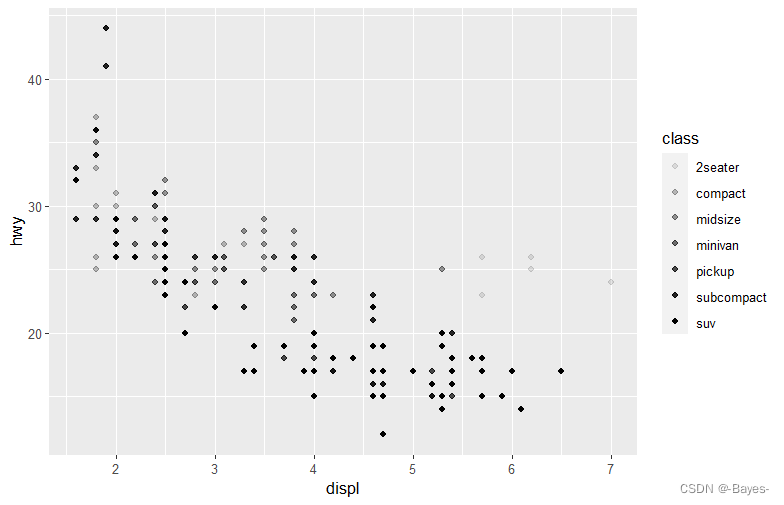
ggplot(data = mpg)+
  geom_point(mapping = aes(x = displ, y = hwy, shape = class)) #以class形状分类
- 1
- 2
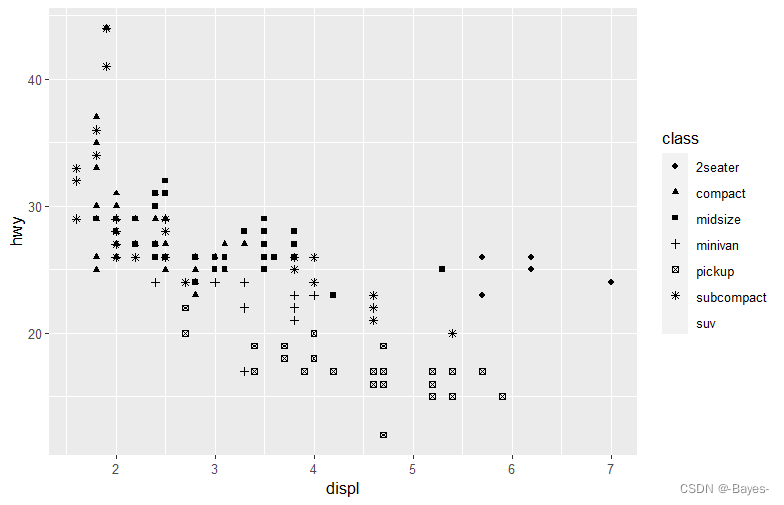
注意:ggplot2只能同时使用6种形状,当超过6种时候,多出的变量将不会显示在图中
aes() #可以将图层中每个图形属性映射集合在一起,然后传递给该图层的映射参数。
- 1
ggplot(data = mpg)+
  geom_point(mapping = aes(x = displ,y = hwy), color = "blue") #手动设计图形属性,让图中所有点为蓝色
- 1
- 2
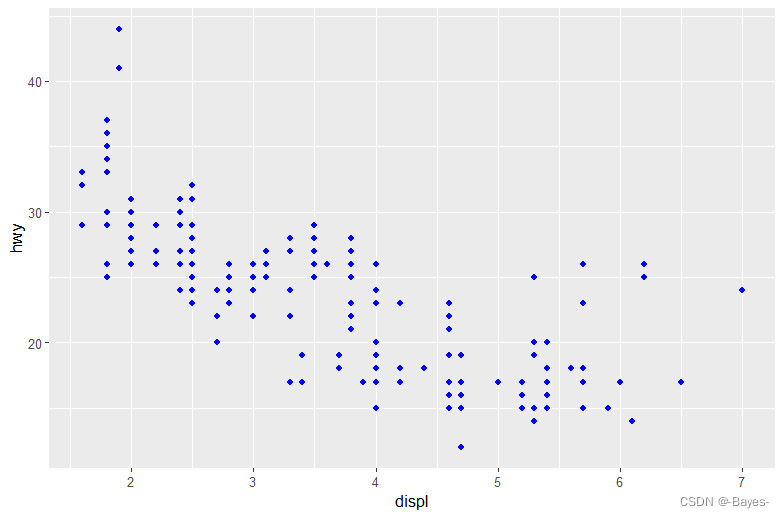
形状用数值表示,如下图所示:有些形状相同,比如0、15和22都是正方形。区别在于color和fill这两个图形属性。空心形状(0-14)的边界颜色由color决定;实心形状(15-20)的填充颜色由color决定;填充形状(21~24)的边界颜色由color决定,填充颜色由fill决定

- 练习:
- 以下这段代码有什么错误?为什么点不是蓝色的?
ggplot(data = mpg) +
  geom_point(mapping = aes(x = displ, y = hwy, color = "blue"))
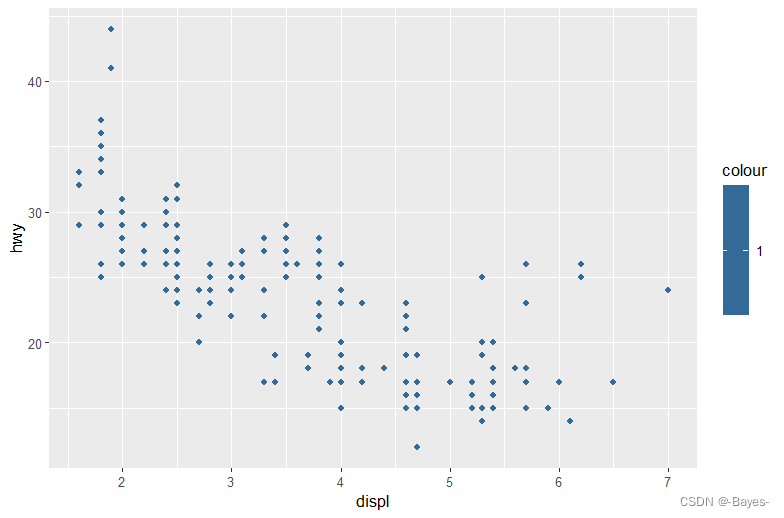
#此处color是包含在aes映射参数中,没有把blue当作颜色,而是把blue当作分类变量了,只取了一个blue值
- 1
- 2
- 3
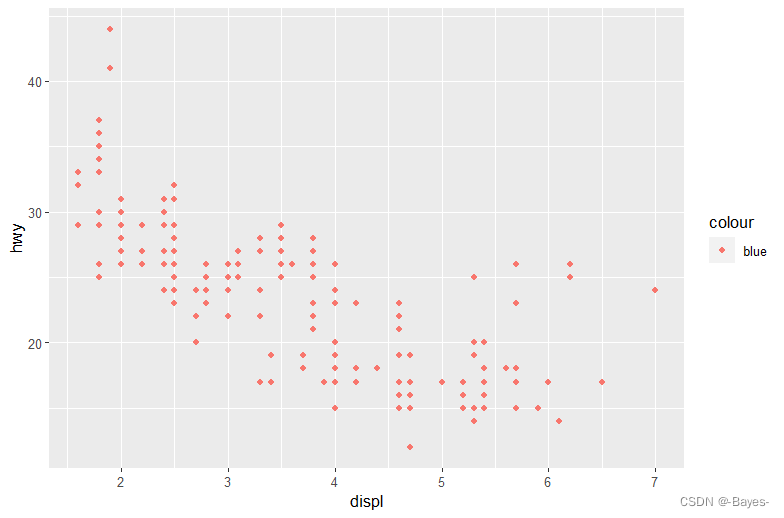
ggplot(data = mpg) +
  geom_point(mapping = aes(x = displ, y = hwy, color = 1))
- 1
- 2
ggplot(data = mpg) +
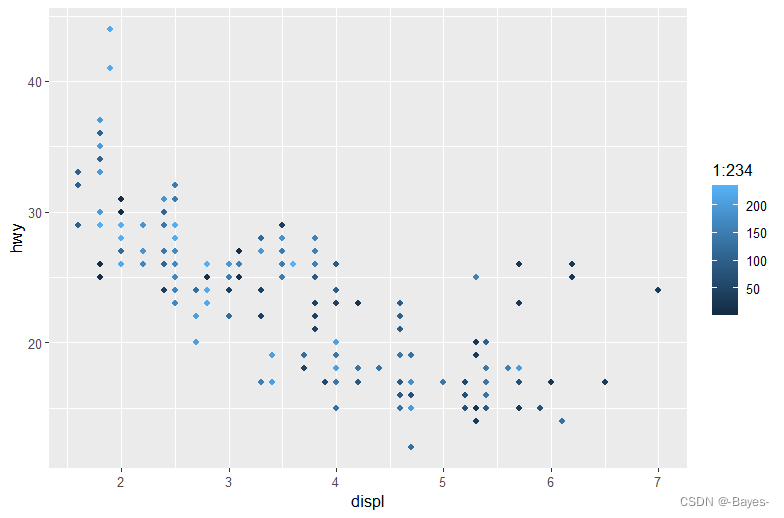
  geom_point(mapping = aes(x = displ, y = hwy, color = 1:234))
#将color取值为1,1:234效果同上
- 1
- 2
- 3
- mpg中哪些变量是分类变量?哪些变量是连续变量?(提示:输入?mpg来阅读这个数据集的文档)当调用mpg时,如何才能看到这些信息?
mpg #<chr>为分类变量,<int>、<dbl>为连续型变量
glimpse(mpg) #使用glimpse()函数可以简洁的显示数据框每列的属性
- 1
- 2
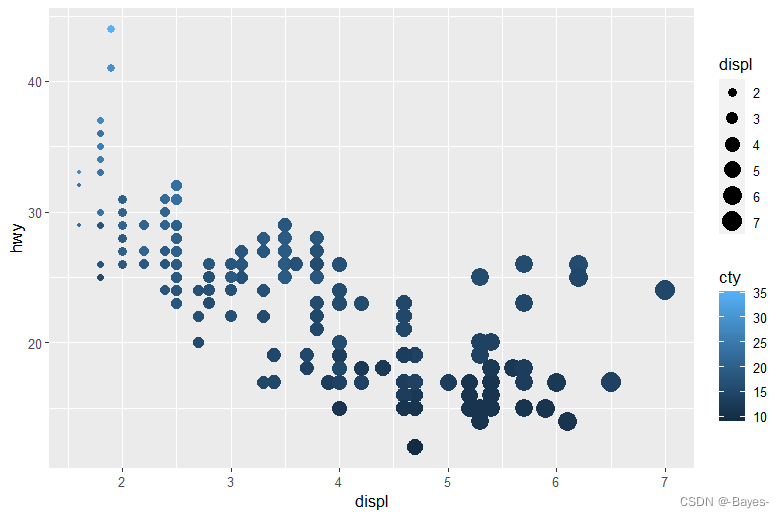
- 将一个连续变量映射为color、size 和shape。对分类变量和连续变量来说,这些图形属性的表现有什么不同?
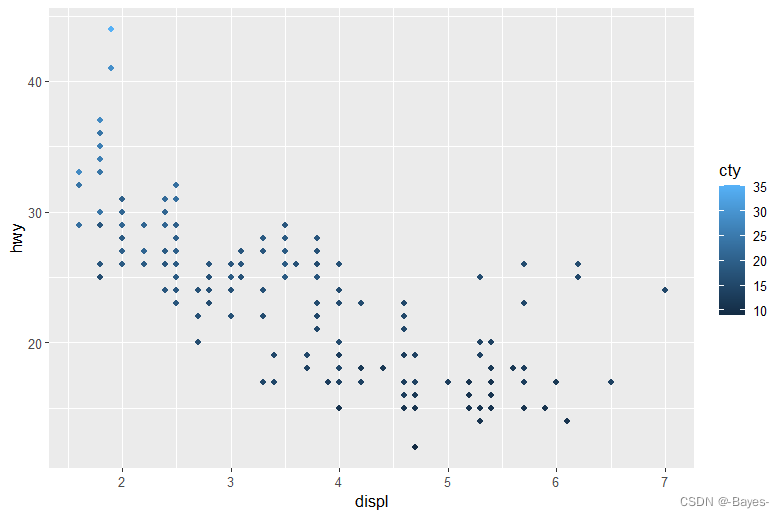
ggplot(mpg, aes(x = displ, y = hwy, color = cty))+
  geom_point() #映射为color
- 1
- 2
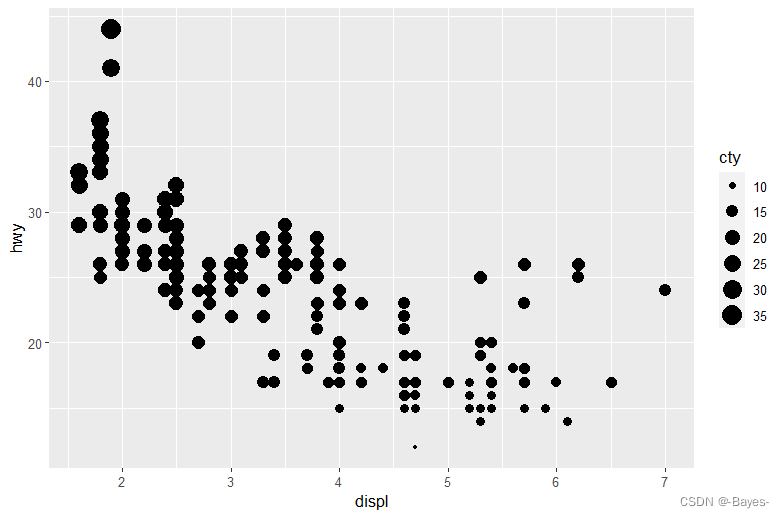
ggplot(mpg, aes(x = displ, y = hwy, size = cty))+
  geom_point() #映射为size
- 1
- 2
ggplot(mpg, aes(x = displ, y = hwy, shape = cty)) +
  geom_point() #此时会报错,因为cty为连续型变量,将它映射到形状上时是无法区分不同形状对应的大小顺序的
- 1
- 2
- 如果将同一个变量映射为多个图形属性,会发生什么情况?
ggplot(mpg, aes(x = displ, y = hwy, color = cty, size = displ))+
  geom_point()
- 1
- 2
将单个变量映射到多个变量是冗余信息,所以在大多数情况下尽量避免将单个变量映射到多个变量
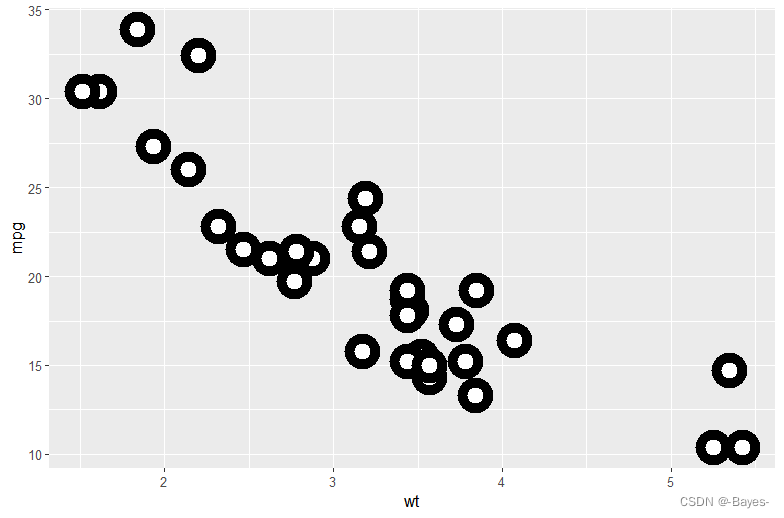
- stroke这个图形属性的作用是什么?它适用于哪些形状?(提示:使用?geom_point 命令。)
#作用是调整边框粗细
ggplot(mtcars, aes(wt, mpg))+
  geom_point(shape = 21, color = "black", fill = "white", size = 5, stroke = 5)
- 1
- 2
- 3
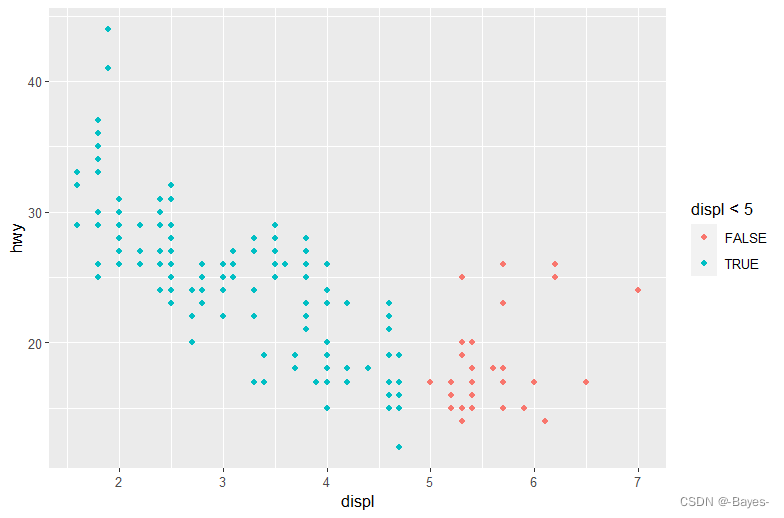
- 如果将图形属性映射为非变量名对象,比如aes(color = displ < 5),会发生什么情况?
ggplot(mpg, aes(x = displ, y = hwy, color = displ<5))+
  geom_point()
- 1
- 2
1.4 常见问题
注意:“+”必须放在一行代码的末尾,不可以放在开头
1.5 分面
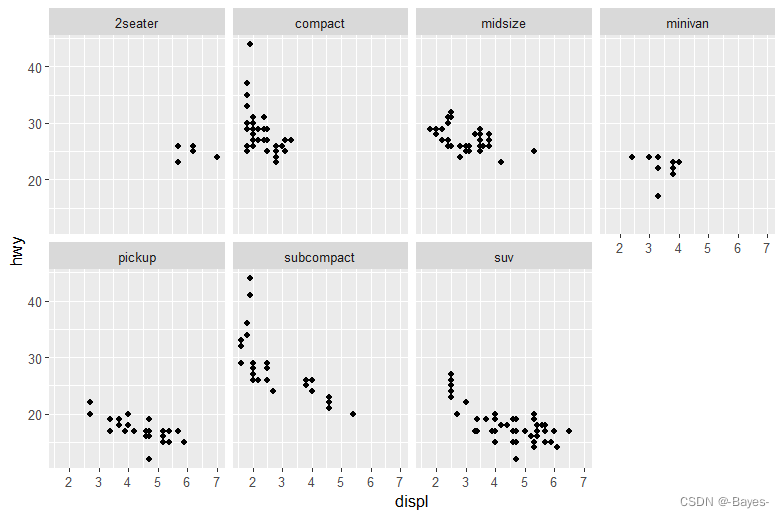
绘制分面图形:
ggplot(data = mpg)+
  geom_point(mapping = aes(x = displ, y = hwy))+
  facet_wrap(~ class, nrow = 2)
- 1
- 2
- 3
ggplot(data = mpg)+
  geom_point(mapping = aes(x = displ, y = hwy))+
  facet_grid(drv ~ cyl) #通过两个变量对图进行分面
- 1
- 2
- 3
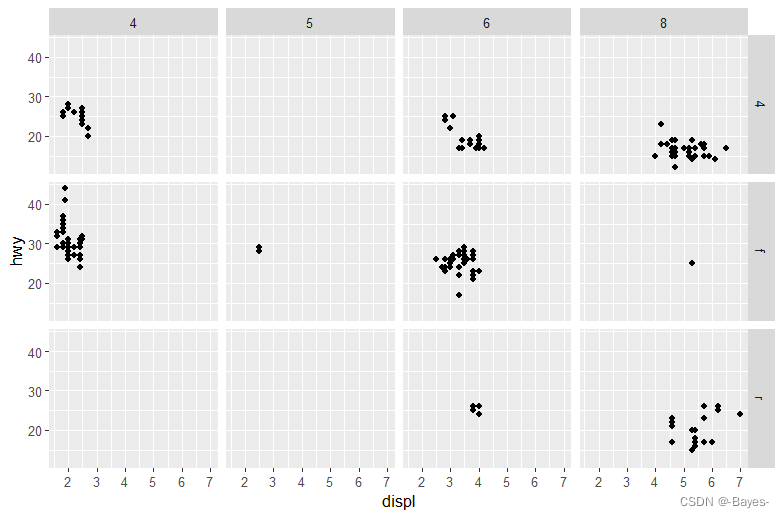
ggplot(data = mpg)+
  geom_point(mapping = aes(x = displ, y = hwy))+
  facet_grid(. ~ cyl)
- 1
- 2
- 3

- 练习:
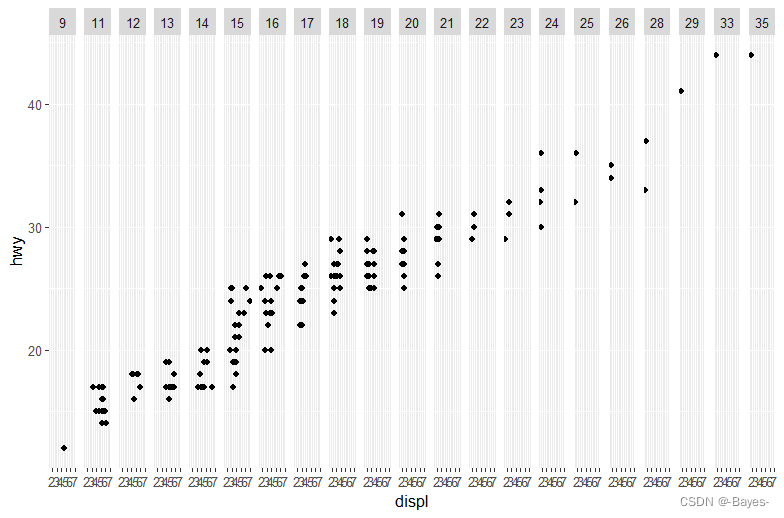
- 如果使用连续变量进行分面,会发生什么情况?
ggplot(mpg, aes(x = displ, y = hwy))+
  geom_point()+
  facet_grid(. ~ cty) #会在每一个观测值处展现一个分面
- 1
- 2
- 3
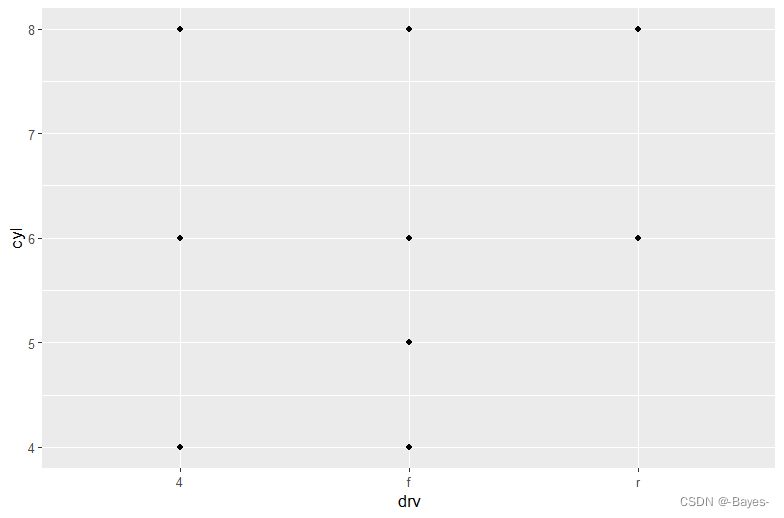
- 在使用facet_grid(drv ~ cyl) 生成的图中,空白单元的意义是什么?它们和以下代码生成的图有什么关系?
ggplot(data = mpg) +
  geom_point(mapping = aes(x = drv, y = cyl)) #空白处表示drv和cyl没有观测值的部分
- 1
- 2
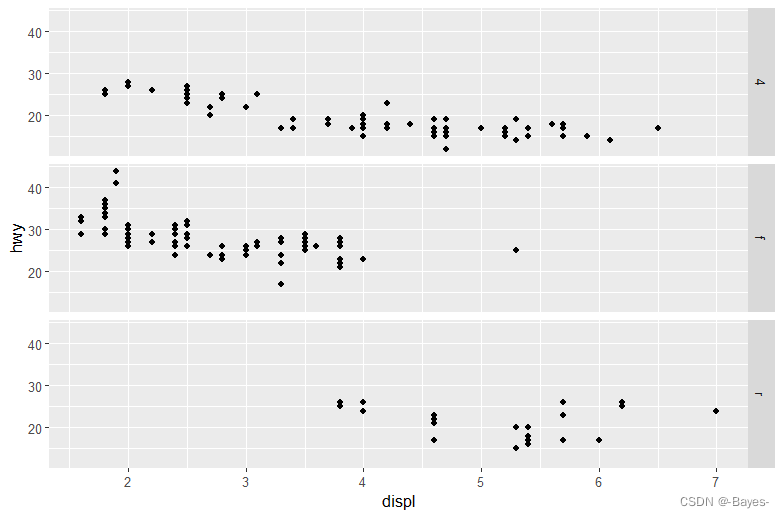
- 以下代码会绘制出什么图? . 的作用是什么?
ggplot(data = mpg) +
  geom_point(mapping = aes(x = displ, y = hwy)) +
  facet_grid(drv ~ .) #“.”表示分面时忽略该维度,在y轴上按照drv值分面
- 1
- 2
- 3
ggplot(data = mpg) +
  geom_point(mapping = aes(x = displ, y = hwy)) +
  facet_grid(. ~ cyl) #在x轴上按照cyl值分面
- 1
- 2
- 3
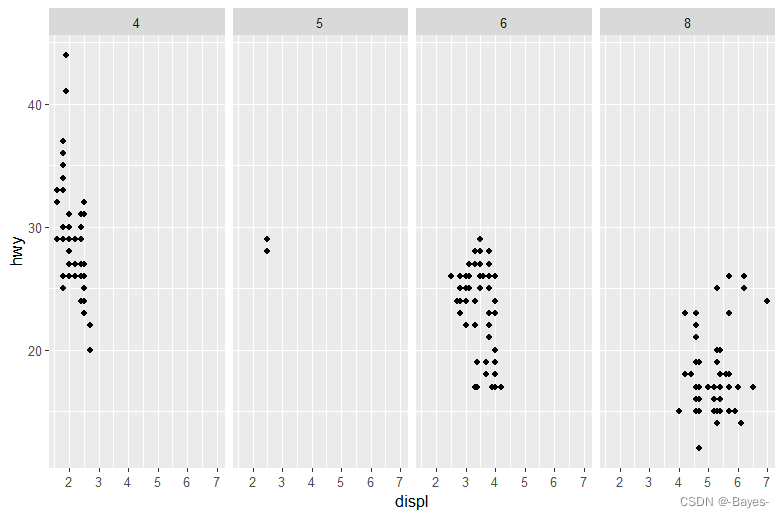
- 查看本节的第一个分面图:
ggplot(data = mpg) +
  geom_point(mapping = aes(x = displ, y = hwy)) +
  facet_wrap(~ class, nrow = 2)
#与使用图形属性相比,使用分面的优势和劣势分别是什么?如果有一个更大的数据集,你将如何权衡这两种方法的优劣?
#使用分面可以更清晰的展示各类别的主要信息,展示更多的类别,适合更大的数据集;缺点是比较各观测值时不够直观
- 1
- 2
- 3
- 4
- 5
- 阅读?facet_wrap的帮助页面。nrow 和ncol 的功能分别是什么?还有哪些选项可以控制分面的布局?为什么函数facet_grid()没有变量nrow 和ncol ?
help(facet_wrap) #nrow, ncol	Number of rows and columns.
#Nrow和ncol参数对于facet_grid()是不必要的,因为函数中指定的变量种类决定了行数和列数
- 1
- 2
- 在使用函数facet_grid() 时,一般应该将具有更多唯一值的变量放在列上。为什么这么做呢?
#会有更多的列空间
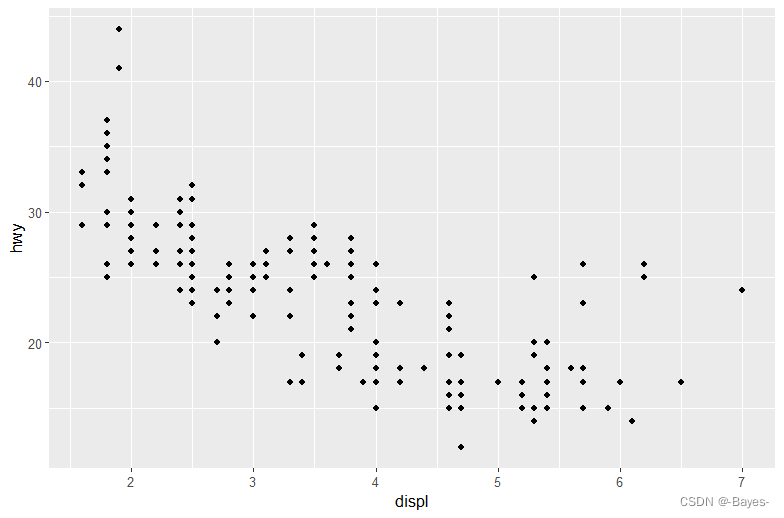
1.6 几何对象
ggplot(data = mpg) +
  geom_point(mapping = aes(x = displ, y = hwy)) #使用散点几何对象,可以设置点的形状
- 1
- 2
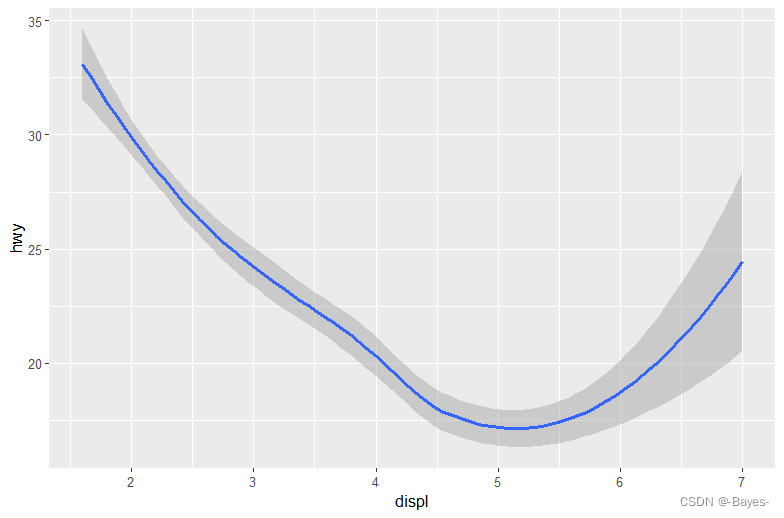
ggplot(mpg, aes(x = displ, y = hwy))+
  geom_smooth() #使用平滑曲线几何对象,可以设置线的线型
- 1
- 2
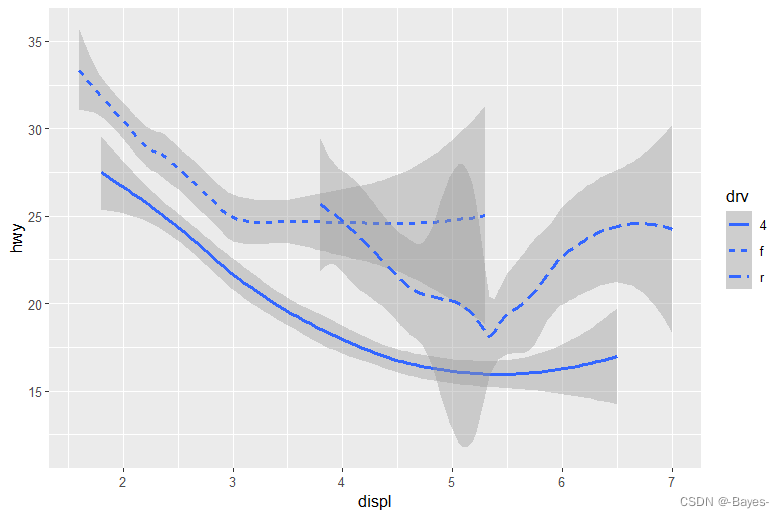
ggplot(data = mpg)+
  geom_smooth(mapping = aes(x = displ, y = hwy, linetype = drv)) #根据drv设置线型
- 1
- 2
ggplot2 提供了30多种几何对象,扩展包甚提供更多(https://www.ggplot2-exts.org 查看更多样例),想全面地了解这些对象,最好的方式是ggplot2 速查表(http://rstudio.com/cheatsheets)
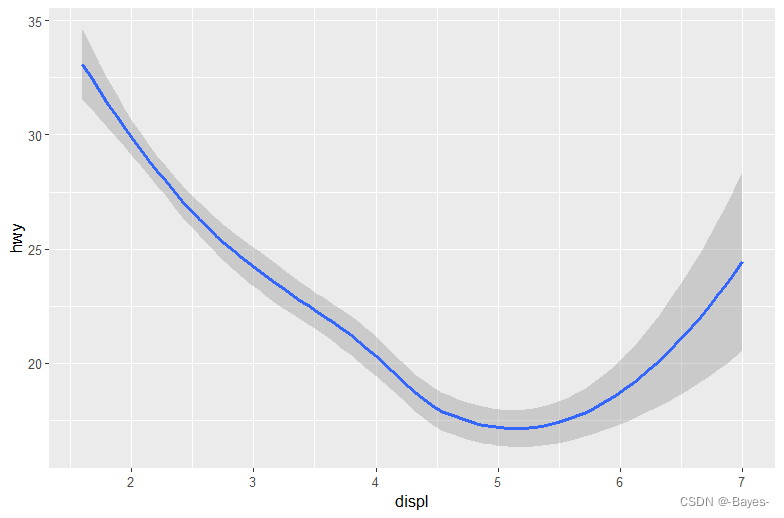
ggplot(data = mpg)+
  geom_smooth(mapping = aes(x = displ, y = hwy))
- 1
- 2
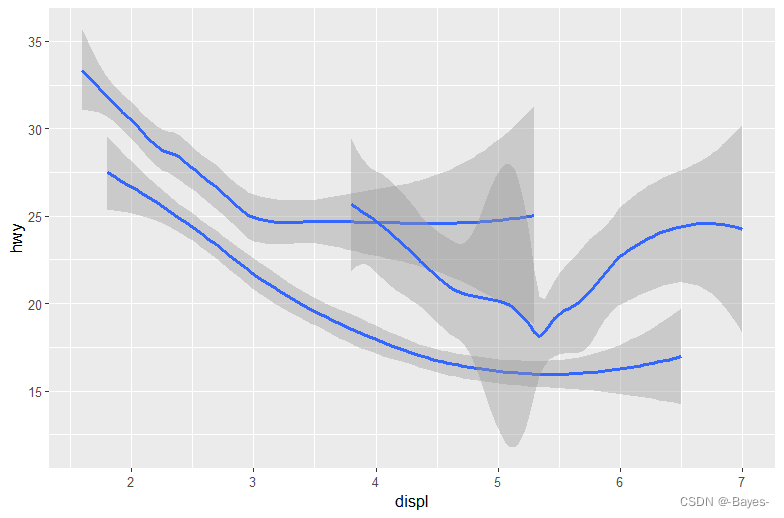
ggplot(data = mpg)+
  geom_smooth(mapping = aes(x = displ, y = hwy, group = drv)) #以用drv分组
- 1
- 2
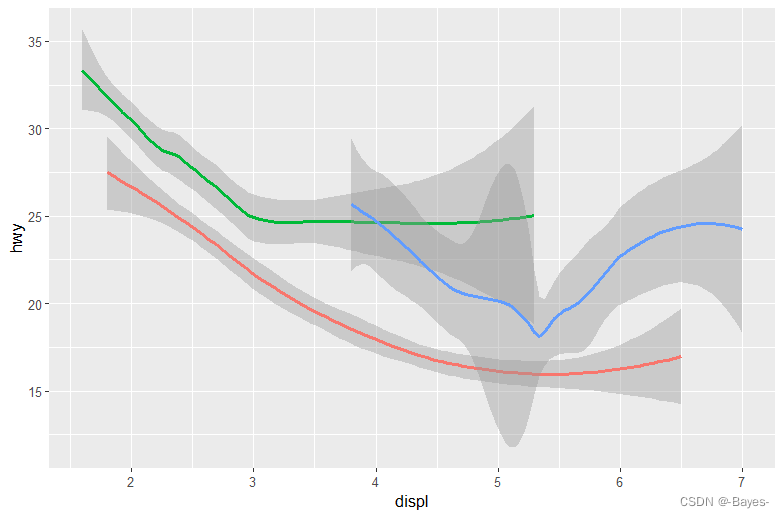
ggplot(data = mpg)+
  geom_smooth(mapping = aes(x = displ, y = hwy, color = drv), show.legend = FALSE) #以drv为颜色分组,不要图例
- 1
- 2
#在同一张图中显示多个几何对象
ggplot(data = mpg)+
  geom_point(mapping = aes(x = displ, y = hwy))+
  geom_smooth(mapping = aes(x = displ, y = hwy))
- 1
- 2
- 3
- 4
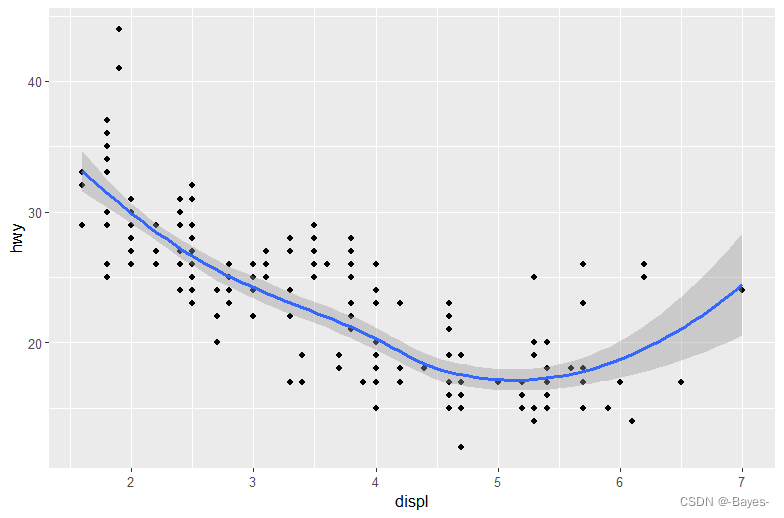
#也可以这样简单的表达结果同上,避免代码重复:
ggplot(data = mpg, mapping = aes(x = displ, y = hwy))+
  geom_point()+
  geom_smooth()
- 1
- 2
- 3
- 4
#可以任意增加各几何对象的展示,如此处散点图增加class用颜色分类
ggplot(data = mpg, mapping = aes(x = displ, y = hwy))+
  geom_point(mapping = aes(color = class))+
  geom_smooth()
- 1
- 2
- 3
- 4

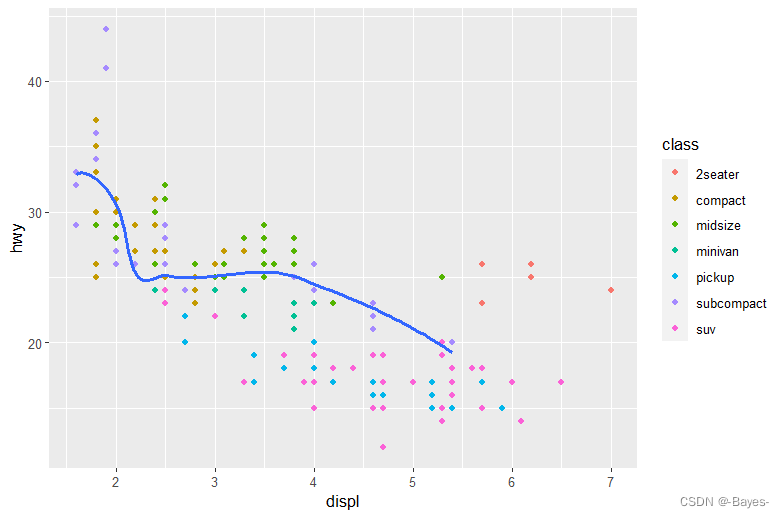
#也可以为不同的图层指定不同的数据
ggplot(data = mpg, mapping = aes(x = displ, y = hwy))+
  geom_point(mapping = aes(color = class))+
  geom_smooth(data = filter(mpg, class == "subcompact"), se = FALSE) #只画出subcompact类车曲线
- 1
- 2
- 3
- 4
- 练习:
- 在绘制折线图、箱线图、直方图和分区图时,应该分别使用哪种几何对象?
geom_line()#折线图
geom_boxplot()#箱线图
geom_histogram()#直方图
geom_area()#分区图
- 1
- 2
- 3
- 4
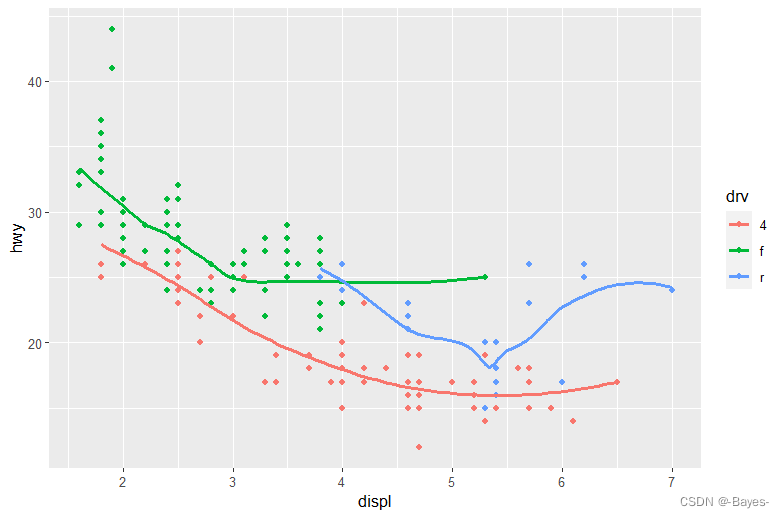
- 在脑海中运行以下代码,并预测会有何种输出。接着在R中运行代码,并检查你的预测是否正确。
ggplot(data = mpg,mapping = aes(x = displ, y = hwy, color = drv)) +
  geom_point() +
  geom_smooth(se = FALSE)
#是一个x轴displ、y轴hwy,并按drv颜色分类的散点图,叠加一层以drv颜色分类,且不含标准误阴影区间的线图
- 1
- 2
- 3
- 4
-
show.legend = FALSE的作用是什么?删除它会发生什么情况?你觉得我为什么要在本章前面的示例中使用这句代码?
#show.legend = FALSE 用于删除图例,可以保持整体统一美观 -
geom_smooth() 函数中的se参数的作用是什么?
se参数代表去除标准误差区间阴影,使得展示更加简洁 -
以下代码生成的两张图有什么区别吗?为什么?
ggplot(data = mpg, mapping = aes(x = displ, y = hwy)) +
  geom_point() +
  geom_smooth()
ggplot() +
  geom_point(data = mpg,mapping = aes(x = displ, y = hwy)) +
  geom_smooth(data = mpg,mapping = aes(x = displ, y = hwy))
#没有区别,因为下面代码表达的内容和上方表的意思重复了
- 1
- 2
- 3
- 4
- 5
- 6
- 7
- 自己编写R代码来生成以下各图。
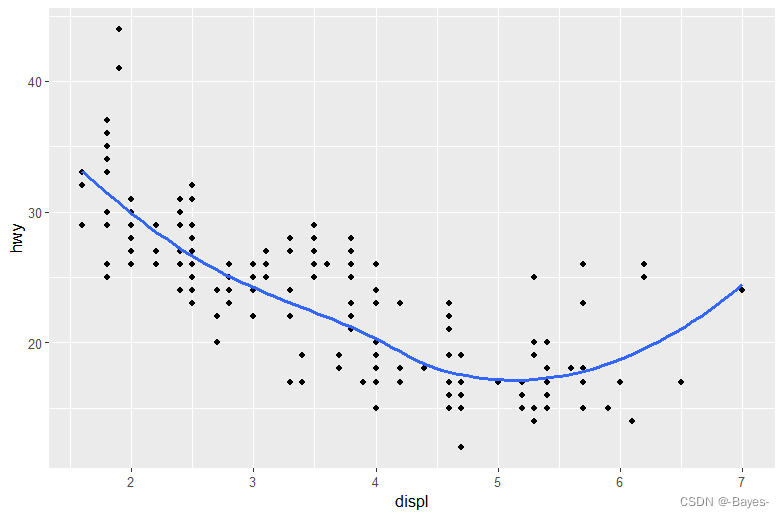
#图1 使用2种几何对象展示
ggplot(data = mpg, mapping = aes(x = displ, y = hwy))+
  geom_point()+
  geom_smooth(se = FALSE)
- 1
- 2
- 3
- 4
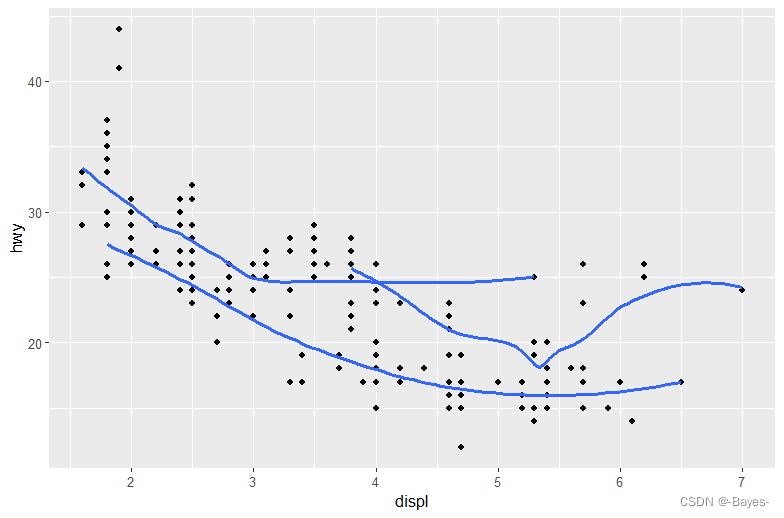
#图2 使用2种几何对象,其中一种线型几何对象用drv分类,并去除阴影
ggplot(data = mpg, mapping = aes(x = displ, y = hwy))+
  geom_point()+
  geom_smooth(mapping = aes(class = drv), se = FALSE)
- 1
- 2
- 3
- 4
#图3 使用2种几何对象,且都用drv颜色分类,并去除阴影
ggplot(data = mpg, mapping = aes(x = displ, y = hwy, color = drv))+
  geom_point()+
  geom_smooth(se = FALSE)
- 1
- 2
- 3
- 4
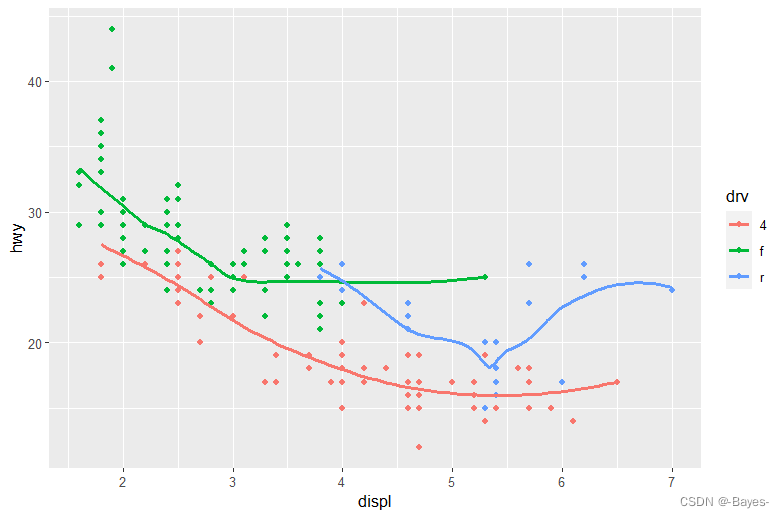
#图4 使用2种几何对象,散点图用drv颜色分类,线图不用drv颜色分类
ggplot(data = mpg, mapping = aes(x = displ, y = hwy))+
  geom_point(mapping = aes(color = drv))+
  geom_smooth(se = FALSE)
- 1
- 2
- 3
- 4
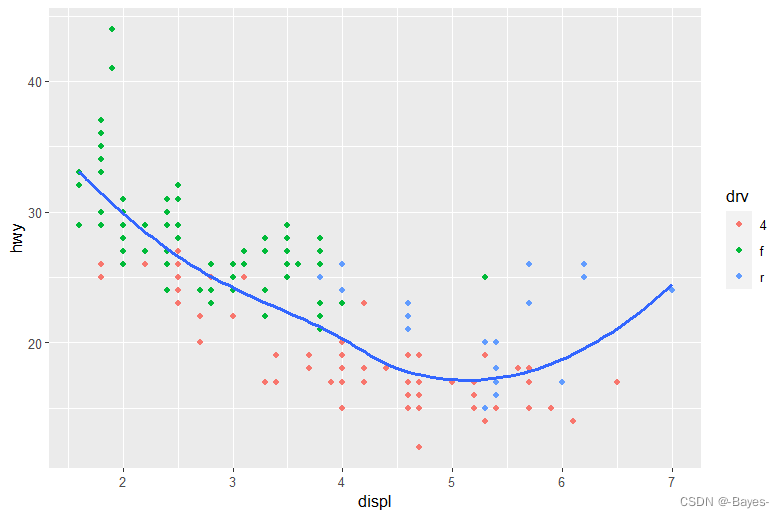
#图5 使用2种几何对象,散点图用drv颜色分类,线图用drv线型分类
ggplot(data = mpg, mapping = aes(x = displ, y = hwy))+
  geom_point(mapping = aes(color = drv))+
  geom_smooth(mapping = aes(linetype = drv),se = FALSE)
- 1
- 2
- 3
- 4
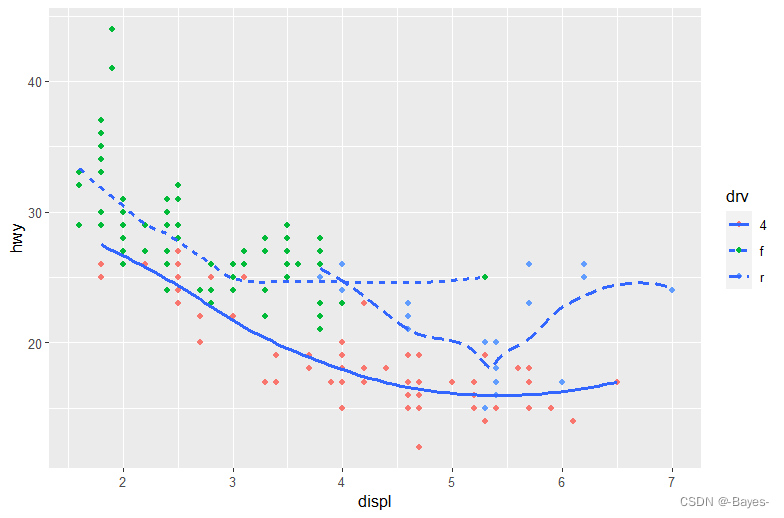
#图6 看不清,貌似外框为白色点图
ggplot(data = mpg, mapping = aes(x = displ, y = hwy))+
  geom_point(size = 4, color = "white")+
  geom_point(aes(color = drv))
- 1
- 2
- 3
- 4
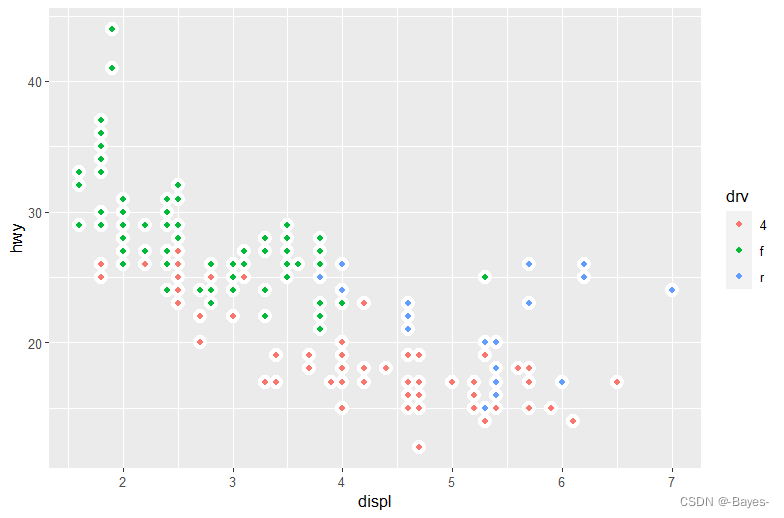
1.7 统计变换
绘图时用来计算新数据的算法称为stat(statistical transformation,即统计变换)
可以使用stat_count()来替换geom_bar()
ggplot(data = diamonds)+
  geom_bar(mapping = aes(x = cut)) #注意这里输出的y轴并非是diamonds数据集中的变量,而是通过cut变量计算(统计变换)生成的
- 1
- 2

View(diamonds)
glimpse(diamonds) #快速浏览下数据集diamonds的框架
#Rows: 53,940
#Columns: 10
#$ carat   <dbl> 0.23, 0.21, 0.23, 0.29, 0.31, 0.24, 0.24, 0.26, 0.22, 0.23, 0.30, 0.23,…
#$ cut     <ord> Ideal, Premium, Good, Premium, Good, Very Good, Very Good, Very Good, F…
#$ color   <ord> E, E, E, I, J, J, I, H, E, H, J, J, F, J, E, E, I, J, J, J, I, E, H, J,…
#$ clarity <ord> SI2, SI1, VS1, VS2, SI2, VVS2, VVS1, SI1, VS2, VS1, SI1, VS1, SI1, SI2,…
#$ depth   <dbl> 61.5, 59.8, 56.9, 62.4, 63.3, 62.8, 62.3, 61.9, 65.1, 59.4, 64.0, 62.8,…
#$ table   <dbl> 55, 61, 65, 58, 58, 57, 57, 55, 61, 61, 55, 56, 61, 54, 62, 58, 54, 54,…
#$ price   <int> 326, 326, 327, 334, 335, 336, 336, 337, 337, 338, 339, 340, 342, 344, 3…
#$ x       <dbl> 3.95, 3.89, 4.05, 4.20, 4.34, 3.94, 3.95, 4.07, 3.87, 4.00, 4.25, 3.93,…
#$ y       <dbl> 3.98, 3.84, 4.07, 4.23, 4.35, 3.96, 3.98, 4.11, 3.78, 4.05, 4.28, 3.90,…
#$ z       <dbl> 2.43, 2.31, 2.31, 2.63, 2.75, 2.48, 2.47, 2.53, 2.49, 2.39, 2.73, 2.46,…
- 1
- 2
- 3
- 4
- 5
- 6
- 7
- 8
- 9
- 10
- 11
- 12
- 13
- 14
demo <- tribble(~a, ~b, "bar_1", 20, "bar_2", 30, "bar_3", 40)
ggplot(demo)+
  geom_bar(aes(x = a, y = b), stat = "identity")
- 1
- 2
- 3

ggplot(data = diamonds)+
  geom_bar(mapping = aes(x = cut, y = ..prop.., group = 1))
- 1
- 2
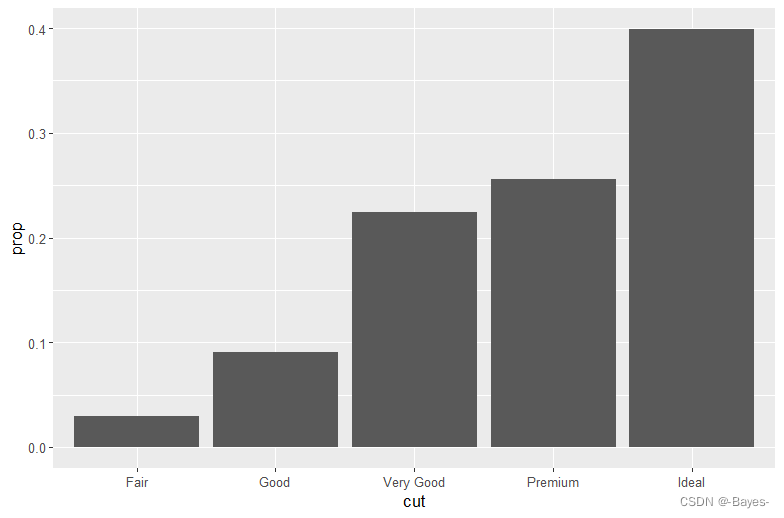
ggplot(data = diamonds)+
  stat_summary(mapping = aes(x = cut,y = depth), fun.ymin = min, fun.ymax = max, fun.y = median)
- 1
- 2
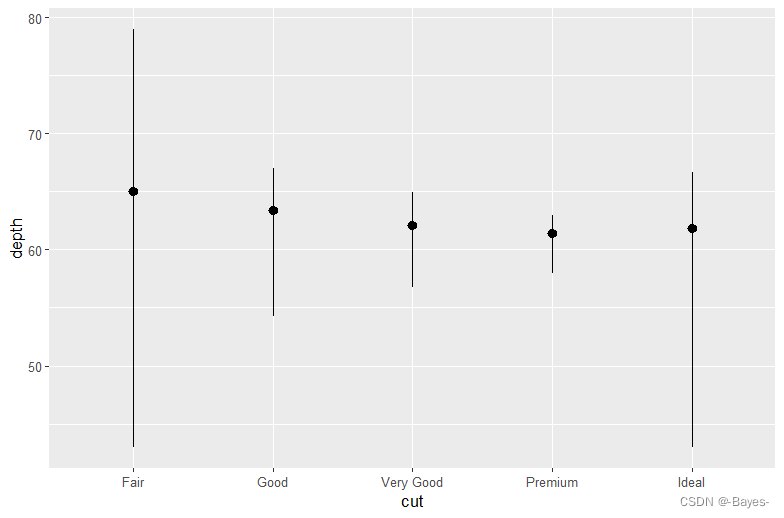
help(stat_bin) #查看全部统计变换
- 1
- 练习:
- stat_summary() 函数的默认几何对象是什么?不使用统计变换函数的话,如何使用几何对象函数重新生成以上的图?
#默认几何对象是geom_pointrange()
ggplot(data = diamonds)+
  geom_pointrange(mapping = aes(x = cut, y = depth),
                  stat = "summary", #到这步为止是使用均值和标准差计算中间点和起止线,所以后面要定义一下
                  fun.min = min,
                  fun.max = max,
                  fun = median)  #定义一下起止线
- 1
- 2
- 3
- 4
- 5
- 6
- 7
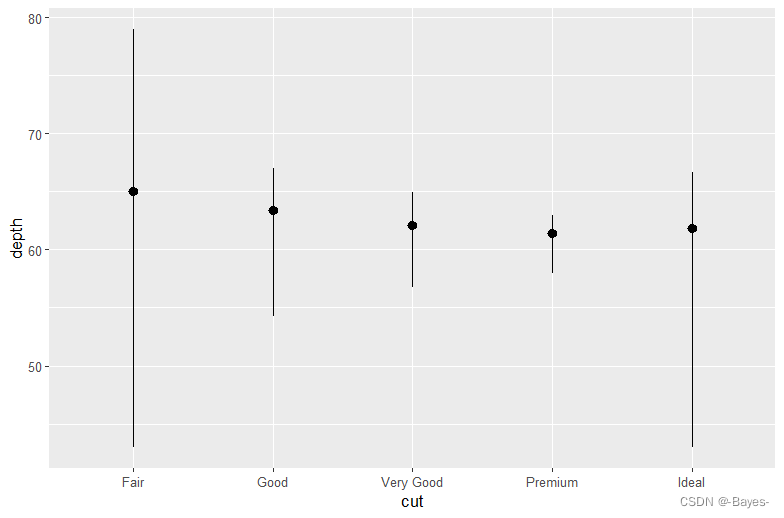
- geom_col() 函数的功能是什么?它和geom_bar() 函数有何不同?
ggplot(diamonds)+
  geom_col(mapping = aes(x = cut, y = price)) #geom_col的默认属性是stat_identity,geom_bar默认属性是stat_count
- 1
- 2
- 多数几何对象和统计变换都是成对出现的,总是配合使用。仔细阅读文档,列出所有成对的几何对象和统计变换。它们有什么共同之处?
"
#①成对出现的几何和变换
geom_bar()	stat_count()
geom_bin2d()	stat_bin_2d()
geom_boxplot()	stat_boxplot()
geom_contour_filled()	stat_contour_filled()
geom_contour()	stat_contour()
geom_count()	stat_sum()
geom_density_2d()	stat_density_2d()
geom_density()	stat_density()
geom_dotplot()	stat_bindot()
geom_function()	stat_function()
geom_sf()	stat_sf()
geom_sf()	stat_sf()
geom_smooth()	stat_smooth()
geom_violin()	stat_ydensity()
geom_hex()	stat_bin_hex()
geom_qq_line()	stat_qq_line()
geom_qq()	stat_qq()
geom_quantile()	stat_quantile()
- 1
- 2
- 3
- 4
- 5
- 6
- 7
- 8
- 9
- 10
- 11
- 12
- 13
- 14
- 15
- 16
- 17
- 18
- 19
- 20
#②几何的默认变换
geom_abline()	stat_identity()
geom_area()	stat_identity()
geom_bar()	stat_count()	x
geom_bin2d()	stat_bin_2d()	x
geom_blank()	None
geom_boxplot()	stat_boxplot()	x
geom_col()	stat_identity()
geom_count()	stat_sum()	x
geom_countour_filled()	stat_countour_filled()	x
geom_countour()	stat_countour()	x
geom_crossbar()	stat_identity()
geom_curve()	stat_identity()
geom_density_2d_filled()	stat_density_2d_filled()	x
geom_density_2d()	stat_density_2d()	x
geom_density()	stat_density()	x
geom_dotplot()	stat_bindot()	x
geom_errorbar()	stat_identity()
geom_errorbarh()	stat_identity()
geom_freqpoly()	stat_bin()	x
geom_function()	stat_function()	x
geom_hex()	stat_bin_hex()	x
geom_histogram()	stat_bin()	x
geom_hline()	stat_identity()
geom_jitter()	stat_identity()
geom_label()	stat_identity()
geom_line()	stat_identity()
geom_linerange()	stat_identity()
geom_map()	stat_identity()
geom_path()	stat_identity()
geom_point()	stat_identity()
geom_pointrange()	stat_identity()
geom_polygon()	stat_identity()
geom_qq_line()	stat_qq_line()	x
geom_qq()	stat_qq()	x
geom_quantile()	stat_quantile()	x
geom_raster()	stat_identity()
geom_rect()	stat_identity()
geom_ribbon()	stat_identity()
geom_rug()	stat_identity()
geom_segment()	stat_identity()
geom_sf_label()	stat_sf_coordinates()	x
geom_sf_text()	stat_sf_coordinates()	x
geom_sf()	stat_sf()	x
geom_smooth()	stat_smooth()	x
geom_spoke()	stat_identity()
geom_step()	stat_identity()
geom_text()	stat_identity()
geom_tile()	stat_identity()
geom_violin()	stat_ydensity()	x
geom_vline()	stat_identity()
- 1
- 2
- 3
- 4
- 5
- 6
- 7
- 8
- 9
- 10
- 11
- 12
- 13
- 14
- 15
- 16
- 17
- 18
- 19
- 20
- 21
- 22
- 23
- 24
- 25
- 26
- 27
- 28
- 29
- 30
- 31
- 32
- 33
- 34
- 35
- 36
- 37
- 38
- 39
- 40
- 41
- 42
- 43
- 44
- 45
- 46
- 47
- 48
- 49
- 50
- 51
#③变换的默认几何
stat_bin_2d()	geom_tile()
stat_bin_hex()	geom_hex()	x
stat_bin()	geom_bar()	x
stat_boxplot()	geom_boxplot()	x
stat_count()	geom_bar()	x
stat_countour_filled()	geom_contour_filled()	x
stat_countour()	geom_contour()	x
stat_density_2d_filled()	geom_density_2d()	x
stat_density_2d()	geom_density_2d()	x
stat_density()	geom_area()
stat_ecdf()	geom_step()
stat_ellipse()	geom_path()
stat_function()	geom_function()	x
stat_function()	geom_path()
stat_identity()	geom_point()
stat_qq_line()	geom_path()
stat_qq()	geom_point()
stat_quantile()	geom_quantile()	x
stat_sf_coordinates()	geom_point()
stat_sf()	geom_rect()
stat_smooth()	geom_smooth()	x
stat_sum()	geom_point()
stat_summary_2d()	geom_tile()
stat_summary_bin()	geom_pointrange()
stat_summary_hex()	geom_hex()
stat_summary()	geom_pointrange()
stat_unique()	geom_point()
stat_ydensity()	geom_violin()	x
"
- 1
- 2
- 3
- 4
- 5
- 6
- 7
- 8
- 9
- 10
- 11
- 12
- 13
- 14
- 15
- 16
- 17
- 18
- 19
- 20
- 21
- 22
- 23
- 24
- 25
- 26
- 27
- 28
- 29
- 30
-
stat_smooth() 函数会计算出什么变量?哪些参数可以控制它的行为?
y:预测值 ; ymin:置信区间下限 ; ymax:置信区间上限 ; se:标准误差 -
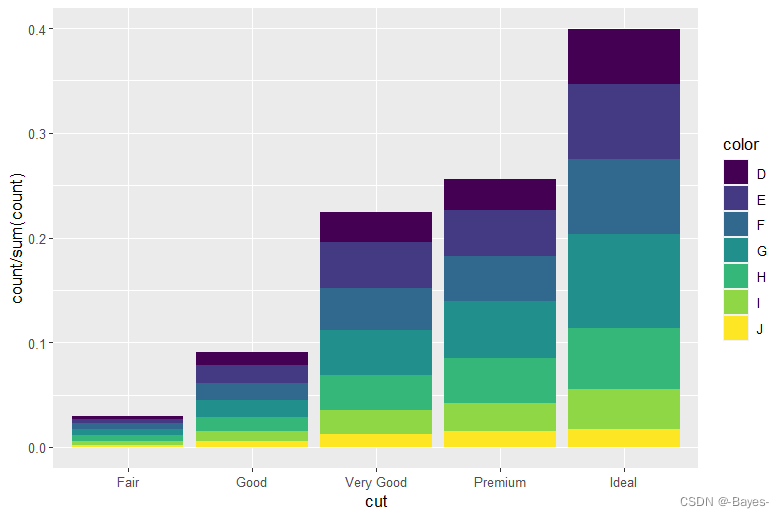
在比例条形图中,我们需要设定group = 1,这是为什么呢?换句话说,以下两张图会有什么问题?
ggplot(data = diamonds) +
  geom_bar(mapping = aes(x = cut, y = ..prop..))
ggplot(data = diamonds) +
  geom_bar(mapping = aes(x = cut, fill = color, y = ..prop..))
#如果不设定group = 1,图中所有的图形将具有相同的高度
- 1
- 2
- 3
- 4
- 5
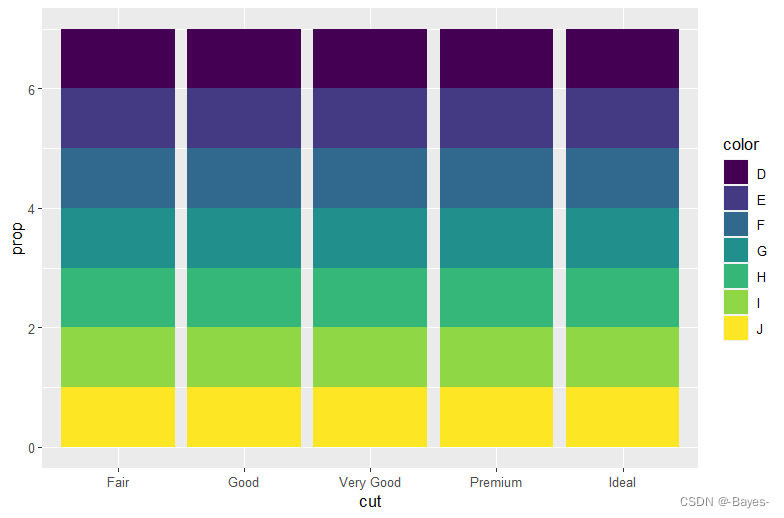
#设定group = 1
ggplot(data = diamonds) +
  geom_bar(mapping = aes(x = cut, y = ..prop.., group = 1))
ggplot(data = diamonds) +
  geom_bar(aes(x = cut, y = ..count.. / sum(..count..), fill = color))
- 1
- 2
- 3
- 4
- 5
1.8 位置调整
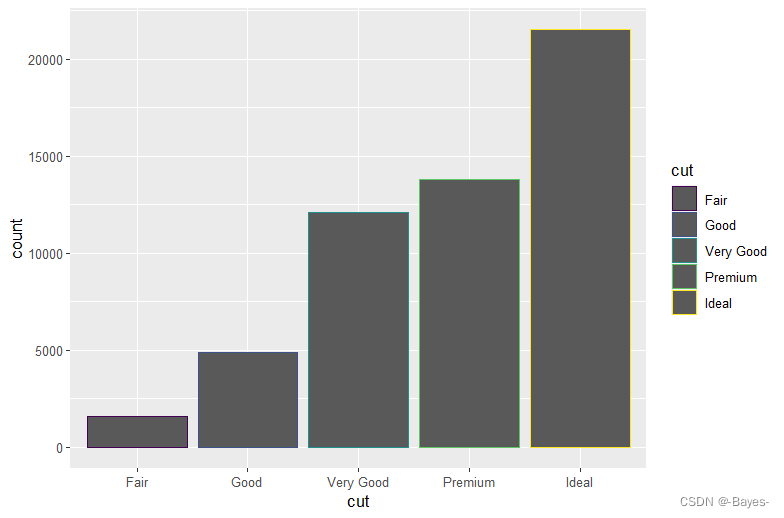
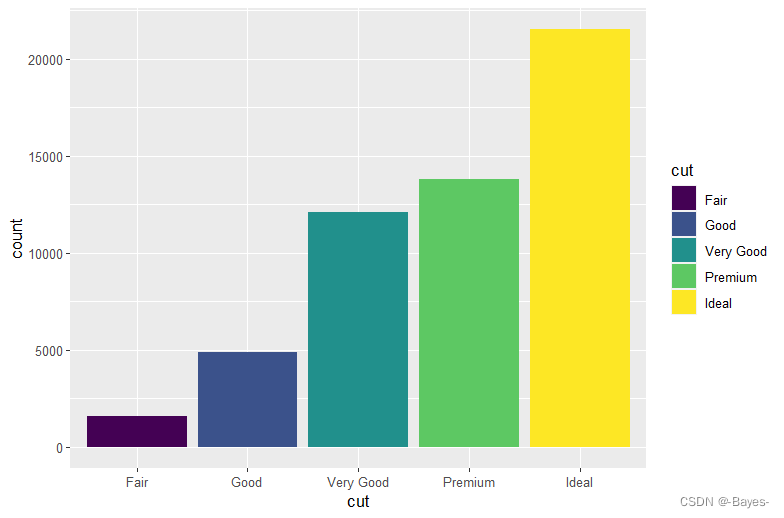
使用color或fill来为条形图上色
ggplot(data = diamonds)+
  geom_bar(mapping = aes(x = cut, color = cut))
- 1
- 2
ggplot(data = diamonds)+
  geom_bar(mapping = aes(x = cut, fill = cut)) #cut标色
- 1
- 2
ggplot(data = diamonds)+
  geom_bar(mapping = aes(x = cut, fill = clarity)) #以clarify标色堆叠
- 1
- 2
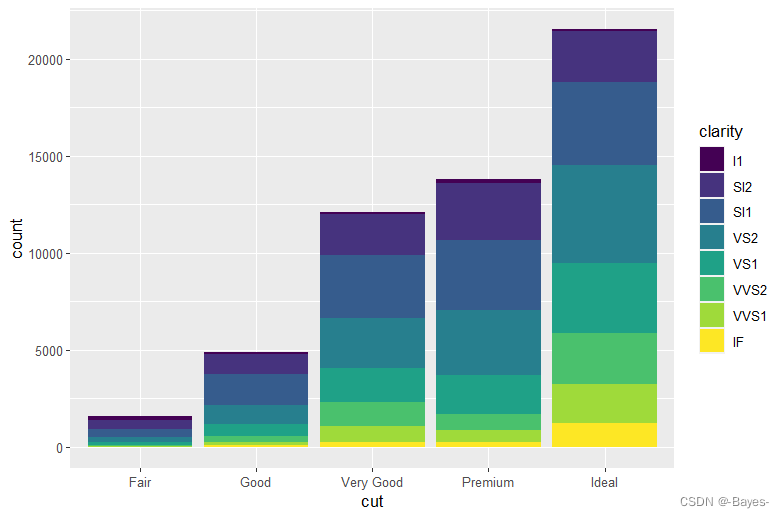
这种堆叠是由position参数设定的位置调整功能自动完成的,如果不想生成堆叠式条形
图,还可以使用以下3 种之一:“identity”、“fill” 和"dodge"
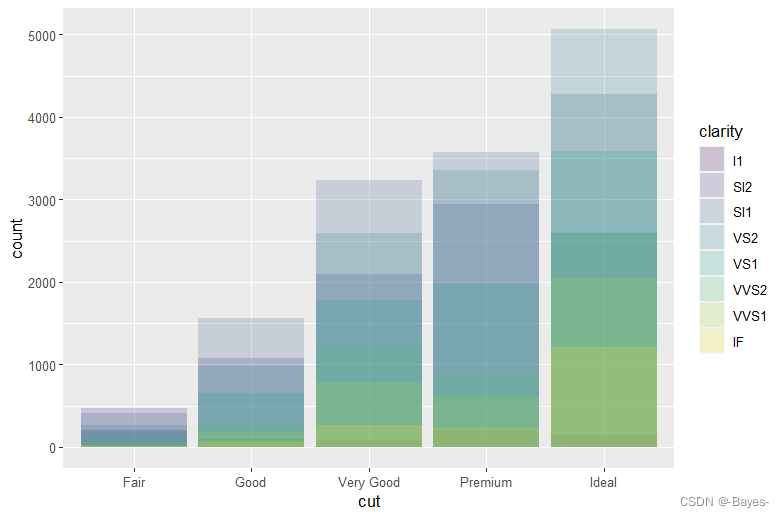
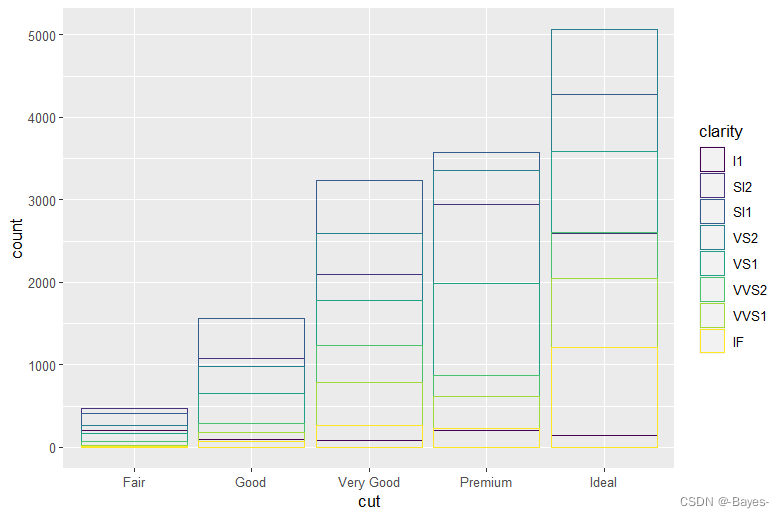
- position = "identity"将每个对象直接显示在图中,不太适合条形图;所以设置alpha参数为一个较小的数,从而使得条形略微透明
ggplot(data = diamonds, mapping = aes(x = cut, fill = clarity))+
  geom_bar(alpha = 1/5, position = "identity")
- 1
- 2
#或者设定fill = NA,让条形完全透明
ggplot(data = diamonds, mapping = aes(x = cut, color = clarity))+
  geom_bar(fill = NA, position = "identity")
- 1
- 2
- 3
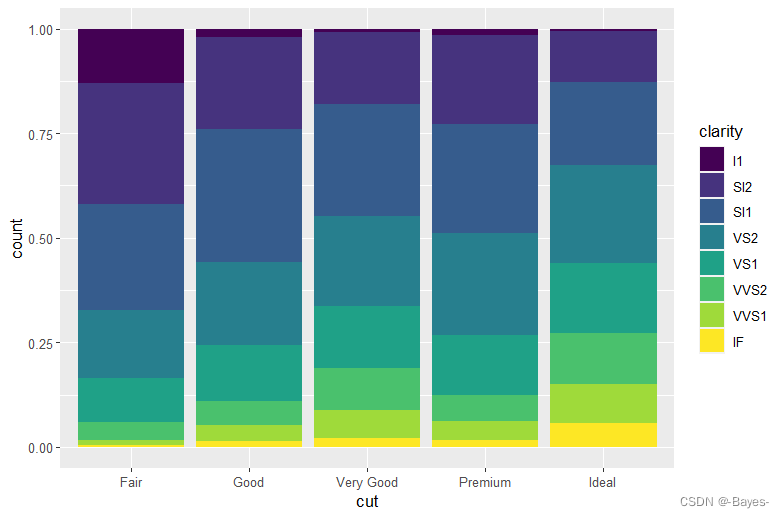
- position = “fill” 的效果与堆叠相似,但每组堆叠条形具有同样的高度,因此这种条形图可以非常轻松地比较各组间的比例
ggplot(data = diamonds)+
  geom_bar(mapping = aes(x = cut, fill = clarity), position = "fill")
- 1
- 2
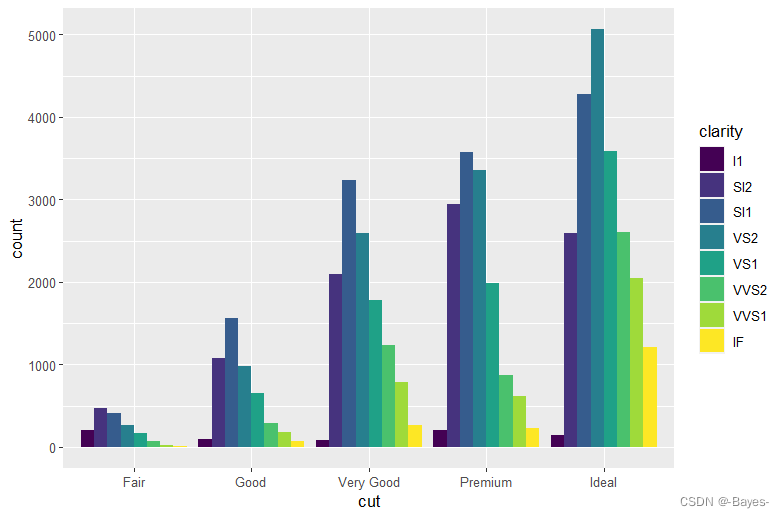
- position = “dodge” 将每组中的条形依次并列放置,这样可以非常轻松地比较每个条形表示的具体数值
ggplot(data = diamonds)+
  geom_bar(mapping = aes(x = cut, fill = clarity), position = "dodge")
- 1
- 2
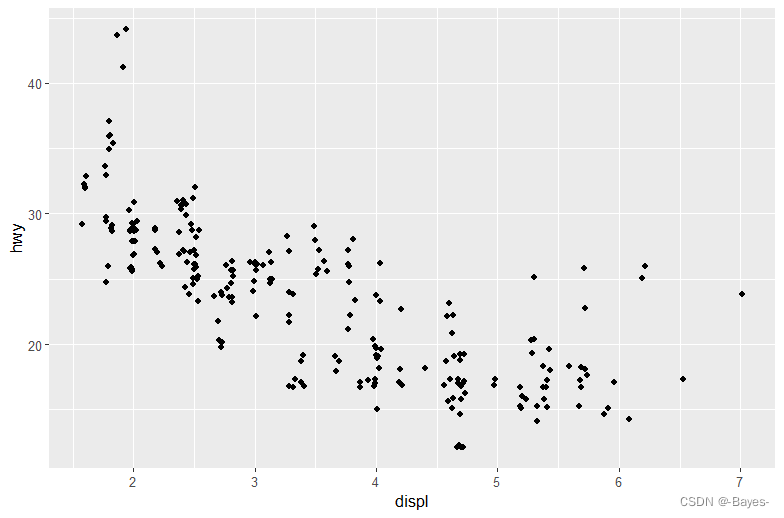
- position = “jitter” 为每个数据点添加一个很小的随机扰动,这样可以将重叠的点分散开,因为不可能有两个点会收到同样的随机扰动
ggplot(data = mpg)+
  geom_point(mapping = aes(x = displ, y = hwy), position = "jitter")
- 1
- 2
- 练习:
- 以下图形有什么问题?应该如何改善?
ggplot(data = mpg, mapping = aes(x = cty, y = hwy))+
  geom_point() #散点图的点有重叠
- 1
- 2
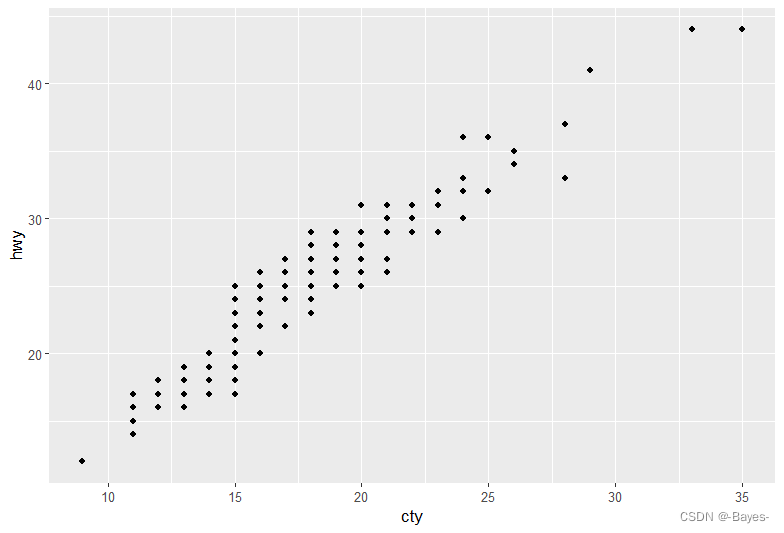
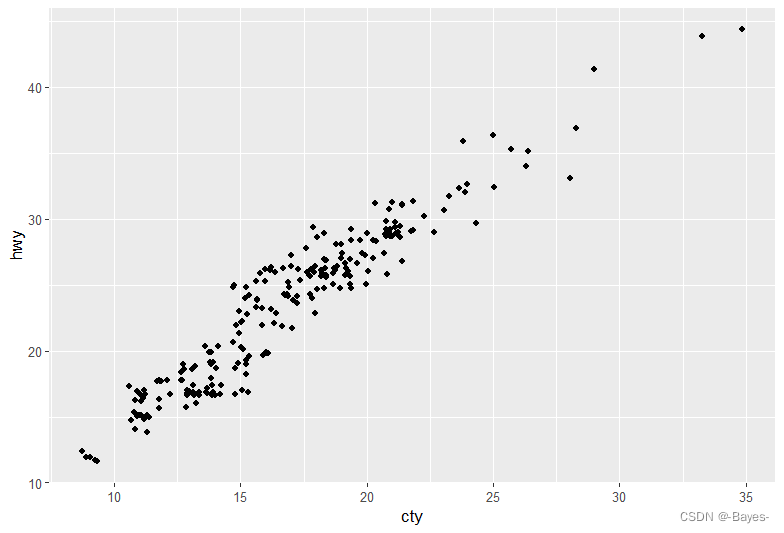
ggplot(data = mpg, mapping = aes(x = cty, y = hwy))+
  geom_point(position = "jitter") #添加随机扰动,将重叠的点分开
- 1
- 2
- geom_jitter() 使用哪些参数来控制抖动的程度?
help("geom_jitter")
#geom_jitter(mapping = NULL, data = NULL, stat = "identity", position = "jitter", ..., width = NULL, height = NULL, na.rm = FALSE, show.legend = NA, inherit.aes = TRUE)
- 1
- 2
#width控制水平位移,height控制垂直位移。默认情况下两个方向都引入噪声
ggplot(data = mpg, mapping = aes(x = cty, y = hwy))+
  geom_jitter()
- 1
- 2
- 3

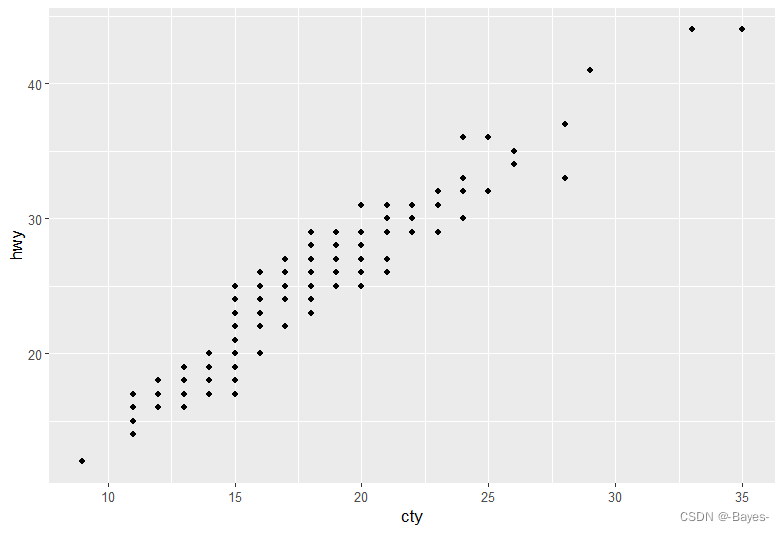
#width,height都设为0的情况
ggplot(data = mpg, mapping = aes(x = cty, y = hwy))+
  geom_jitter(width = 0, height = 0)
- 1
- 2
- 3
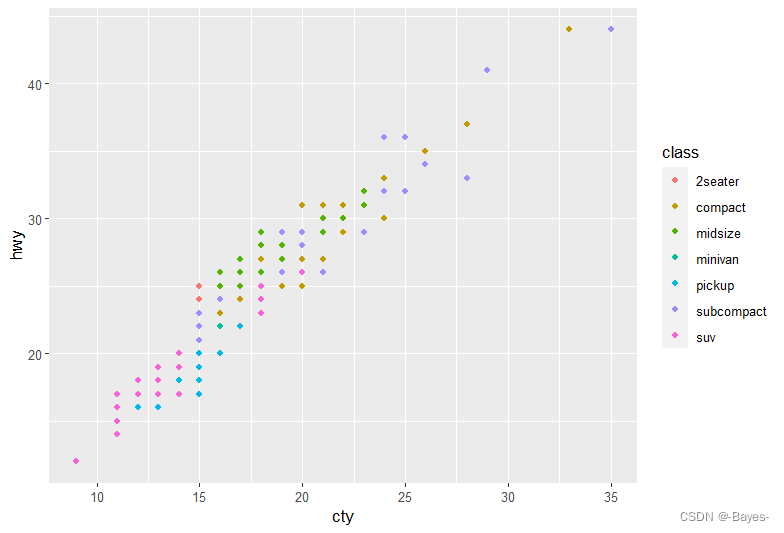
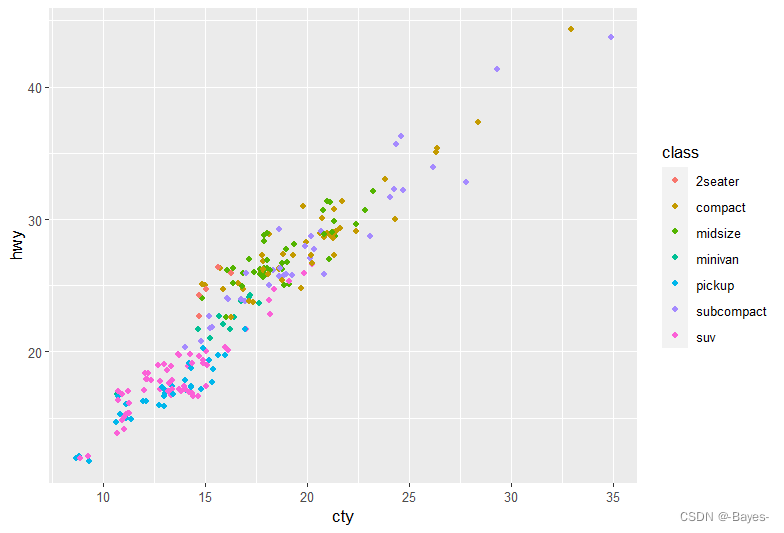
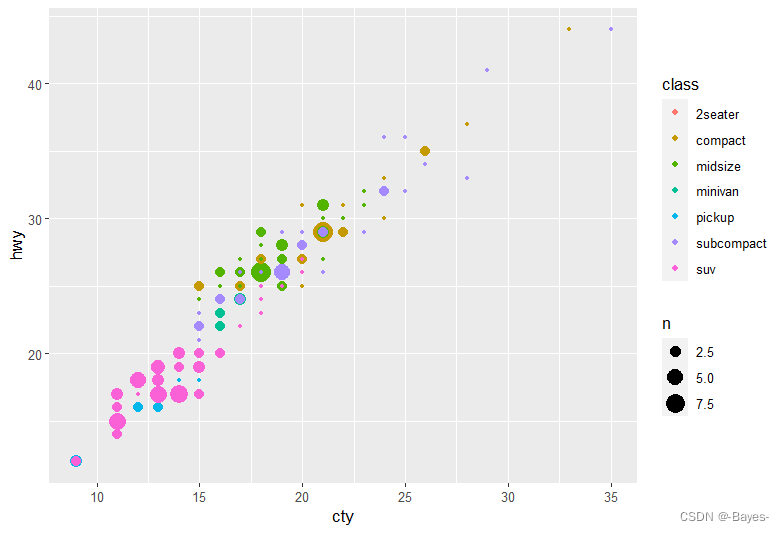
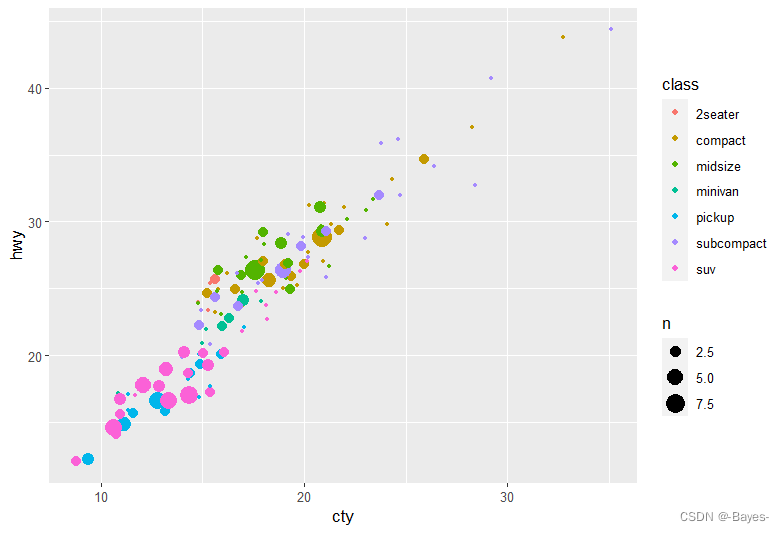
- 对比geom_jitter() 与geom_count()。
ggplot(data = mpg, mapping = aes(x = cty, y = hwy, color = class))+
  geom_point()
- 1
- 2
ggplot(data = mpg, mapping = aes(x = cty, y = hwy, color = class))+
  geom_jitter()
- 1
- 2
ggplot(data = mpg, mapping = aes(x = cty, y = hwy, color = class))+
  geom_count()
- 1
- 2
ggplot(data = mpg, mapping = aes(x = cty, y = hwy, color = class))+
  geom_count(position = "jitter")
- 1
- 2
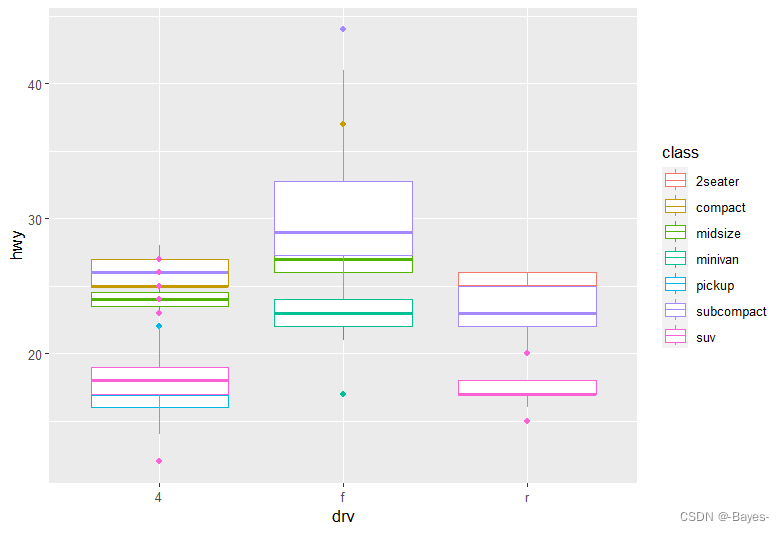
- geom_boxplot() 函数的默认位置调整方式是什么?创建mpg 数据集的可视化表示来演示一下。
ggplot(data = mpg, mapping = aes(x = drv, y = hwy, color = class))+
  geom_boxplot()
- 1
- 2
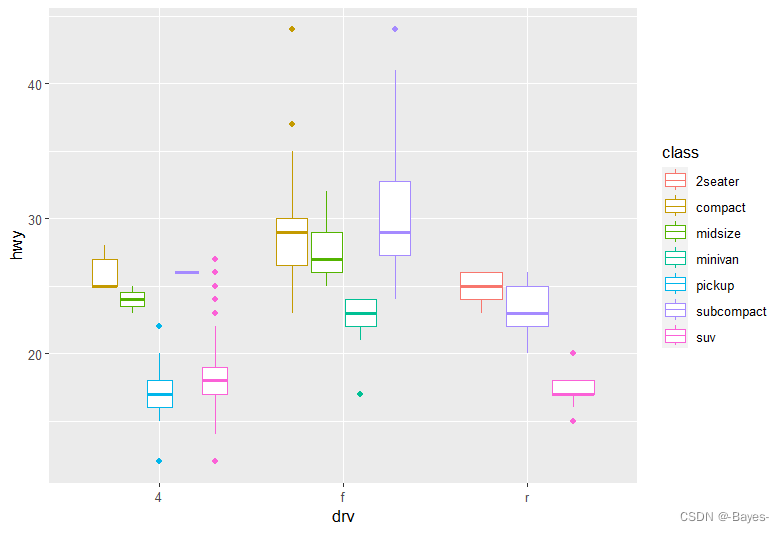
ggplot(data = mpg, mapping = aes(x = drv, y = hwy, color = class))+
  geom_boxplot(position = "identity")
- 1
- 2
1.9 坐标系
- ggplot中默认的坐标系是笛卡尔坐标系,也可以切换极坐标系
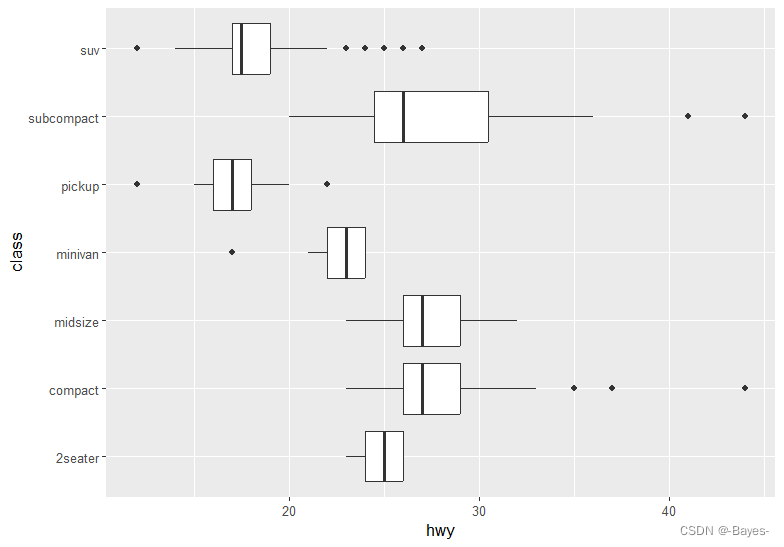
- coord_flip()函数可以交换x轴和y轴
ggplot(data = mpg, mapping = aes(x= class, y = hwy))+
  geom_boxplot()
- 1
- 2
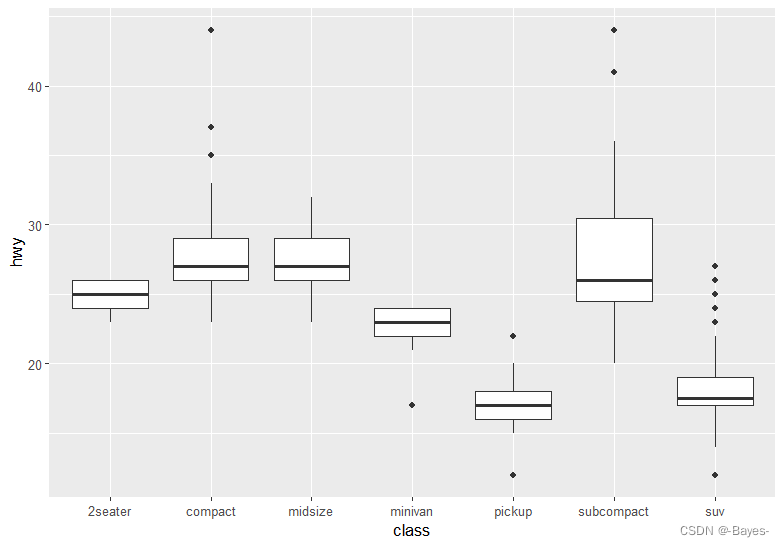
ggplot(data = mpg, mapping = aes(x= class, y = hwy))+
  geom_boxplot()+
  coord_flip() #此时交换了x轴和y轴
- 1
- 2
- 3
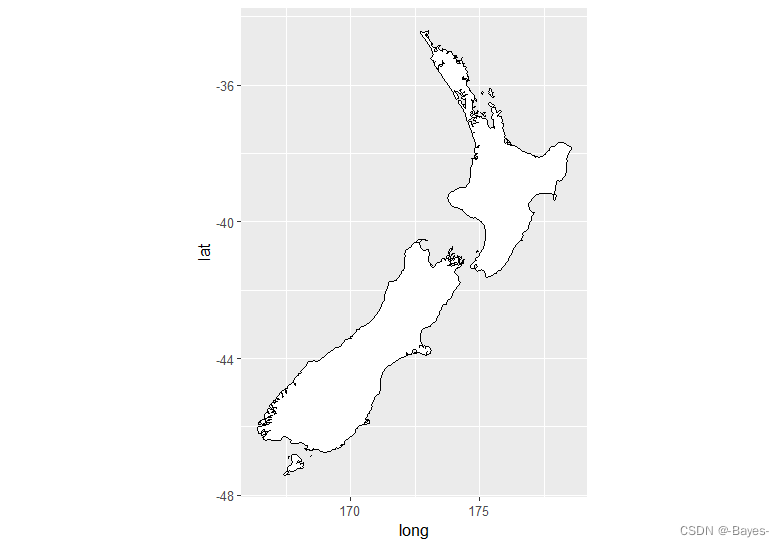
- coord_quickmap()函数可以为地图设置合适的纵横比
nz <- map_data("nz")
ggplot(nz, aes(long, lat, group = group))+
  geom_polygon(fill = "white", color = "black")
- 1
- 2
- 3

ggplot(nz, aes(long, lat, group = group))+
  geom_polygon(fill = "white", color = "black")+
  coord_quickmap()
- 1
- 2
- 3
- 扩展
如果想要绘制世界地图,只需将 nz 改为 world
world <- map_data("world")
ggplot(world, aes(long, lat, group = group))+
  geom_polygon(fill = "white", color = "black")+
  coord_quickmap()
- 1
- 2
- 3
- 4
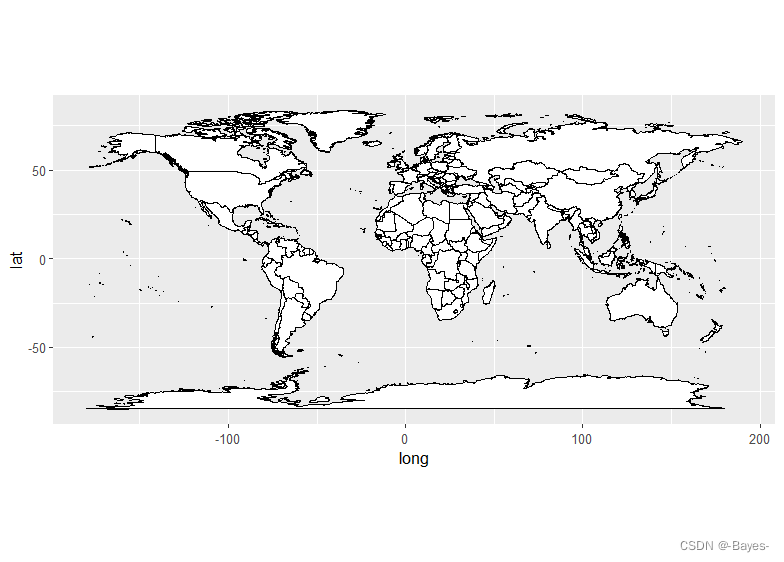
== 同理,还可以换成 county、france、italy、state、usa、world2 ==
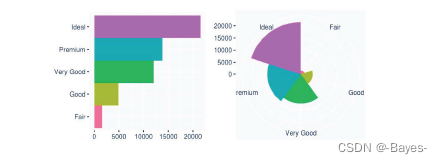
- coord_polar()函数可以切换极坐标
bar <- ggplot(data = diamonds)+
  geom_bar(mapping = aes(x = cut,y = cut), show.legend = FALSE, width = 1, stat = "identity")+
  theme(aspect.ratio = 1)+
  labs(x = NULL, y = NULL)

bar + coord_flip()
bar + coord_polar()
- 1
- 2
- 3
- 4
- 5
- 6
- 7
- 练习:
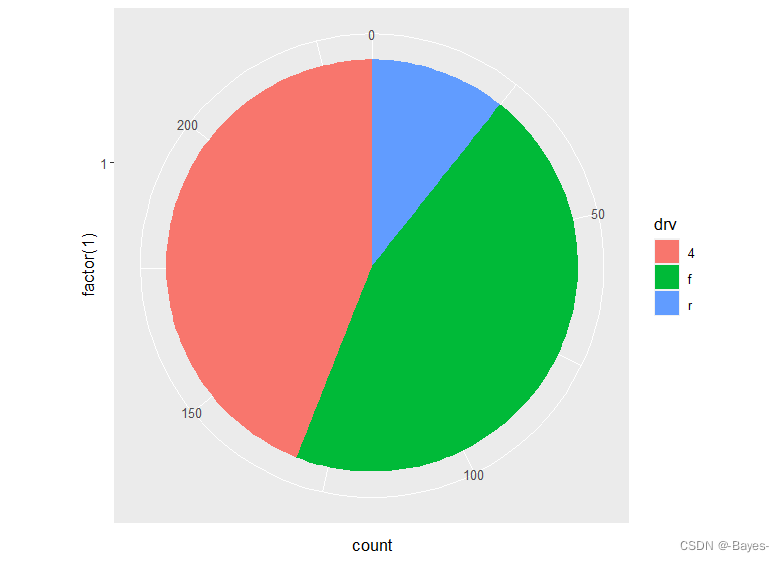
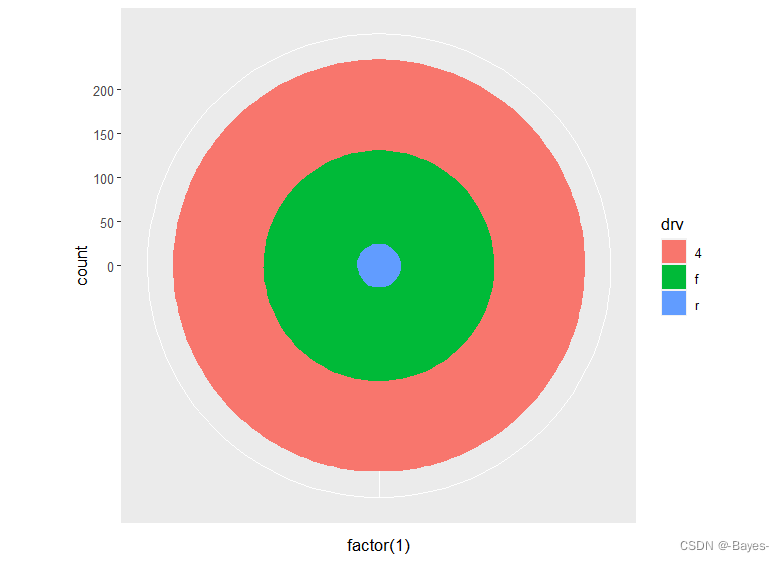
- 使用coord_polar() 函数将堆叠式条形图转换为饼图。
ggplot(mpg, aes(x = factor(1), fill = drv)) +
  geom_bar(width = 1) +
  coord_polar(theta = "y")
- 1
- 2
- 3
ggplot(mpg, aes(x = factor(1), fill = drv)) +
  geom_bar(width = 1) +
  coord_polar() #生成靶心图
- 1
- 2
- 3
- labs() 函数的功能是什么?阅读一下文档。
help(labs)
- 1
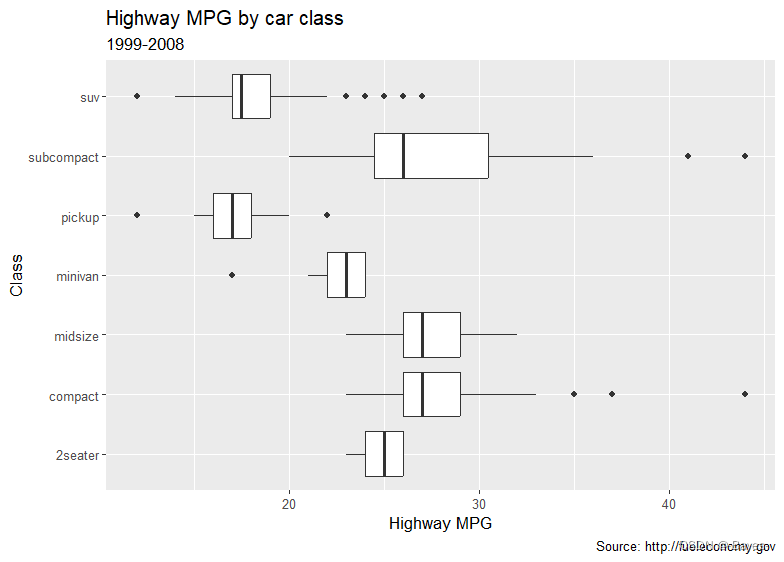
ggplot(data = mpg, mapping = aes(x = class, y = hwy)) +
  geom_boxplot() +
  coord_flip() +
  labs(y = "Highway MPG",
       x = "Class",
       title = "Highway MPG by car class",
       subtitle = "1999-2008",
       caption = "Source: http://fueleconomy.gov")
- 1
- 2
- 3
- 4
- 5
- 6
- 7
- 8
ggplot(data = mpg, mapping = aes(x = class, y = hwy)) +
  geom_boxplot() +
  coord_flip() +
  labs(y = "Highway MPG",
       x = "Year",
       title = "Highway MPG by car class")
- 1
- 2
- 3
- 4
- 5
- 6

- coord_quickmap() 函数和coord_map() 函数的区别是什么?
- coord_map () 使用mapproj软件包定义的任何投影,将地球的一部分(近似球形)投影到二维平面上。地图投影一般不会保留直线,因此这需要大量的计算。
- coord_quickmap () 是一种快速近似,可以保留直线。它最适用于靠近赤道的较小区域。这意味着对coord_quickmap () 的绘制不满意时,可以尝试一下coord_map ()
- 下图表明城市和公路燃油效率之间有什么关系?为什么coord_fixed() 函数很重要?
geom_abline() 函数的作用是什么?
#一加仑油行驶的距离越远,则燃油效率越高
ggplot(data = mpg, mapping = aes(x = cty, y = hwy)) +
  geom_point() +
  geom_abline() + #geom_abline()添加回归曲线
  coord_fixed() #coord_fixed()坐标系纵横比可以设置固定,固定纵横比后,无论什么图形,其比例都是一样的
- 1
- 2
- 3
- 4
- 5


