- 1Python - OpenCV简介_opencv-python
- 2Vue3中如何获取DOM节点信息_vue3获取dom节点
- 3elementPlus自定义主题色_element plus 主题色
- 4无法吃午餐的学生数量(leetcode)_c语言学校的自助午餐提供圆形和方形的三明治,分别用数字 0 和 1 表示
- 5Next.js 中的路由初学者指南,附有示例_nextjs userouter
- 6element-ui中avator插件关于头像显示的问题
- 7Unity半透明材质,写入深度的半透明材质,不透明材质之间的遮挡关系_unity standard 半透明自身遮挡关系
- 8健康管理师【13】_风险评估的具体内容包括3个方面,不包括下列哪项
- 9计算机网络体系架构认知--网络协议栈
- 10使用gitee创建远程maven仓库_gitee创建maven项目
驱动程序——字符设备驱动框架
赞
踩
学习驱动程序也可以看博文:树莓派——linux内核与驱动
编写驱动程序一般在Source Insight 里面,因为驱动程序需要依赖内核提供的函数
参考Misc.c(drivers\char)文件,该文件是经典的字符设备驱动程序
字符设备驱动程序框架
字符设备驱动程序的框架:
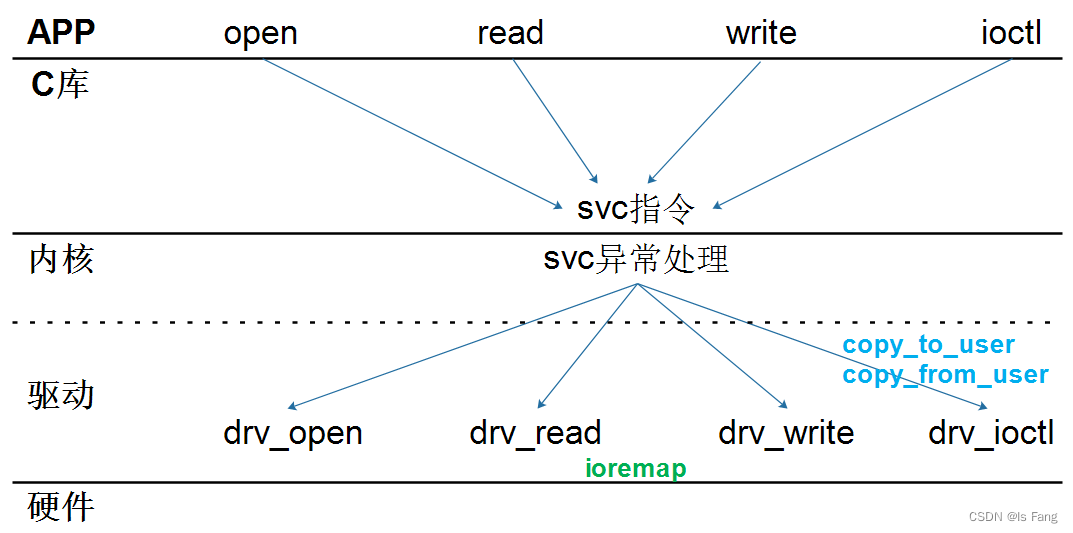
编写驱动程序的步骤
由上述函数的调用流程可知,编写驱动有如下步骤
① 确定主设备号,也可以让内核分配
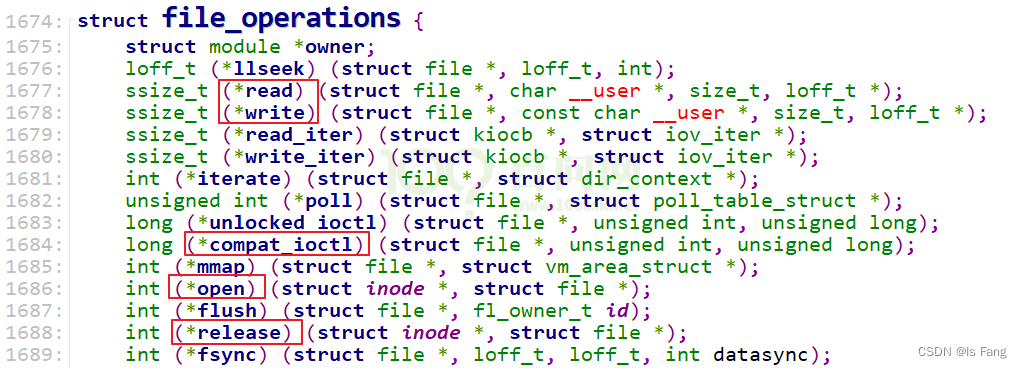
② 定义自己的 file_operations 结构体
③ 实现对应的 drv_open/drv_read/drv_write 等函数,填入 file_operations 结构体
④ 把 file_operations 结构体告诉内核:register_chrdev(第一个参数为主设备号,若为0则表示又内核自动分配)
⑤ 谁来注册驱动程序啊?得有一个入口函数:安装驱动程序时,就会去调用这个入口函数
⑥ 有入口函数就应该有出口函数:卸载驱动程序时,出口函数调用unregister_chrdev
⑦ 其他完善:提供设备信息,自动创建设备节点:class_create,device_create
- 驱动怎么操作硬件?
- 通过 ioremap 映射寄存器的物理地址得到虚拟地址,读写虚拟地址。
- 驱动怎么和 APP 传输数据?
- 通过 copy_to_user、copy_from_user 这 2 个函数。
代码
实现功能:
- APP 调用 write 函数时,传入的数据保存在驱动中
- APP 调用 read 函数时,把驱动中保存的数据返回给 APP
指令:
./hello_drv_test -w char_drv // 把字符串发给驱动程序
./hello_drv_test -r // 把驱动中保存的字符串读回来
- 1
- 2
hello_drv.c
#include <linux/module.h>
#include <linux/fs.h>
#include <linux/errno.h>
#include <linux/miscdevice.h>
#include <linux/kernel.h>
#include <linux/major.h>
#include <linux/mutex.h>
#include <linux/proc_fs.h>
#include <linux/seq_file.h>
#include <linux/stat.h>
#include <linux/init.h>
#include <linux/device.h>
#include <linux/tty.h>
#include <linux/kmod.h>
#include <linux/gfp.h>

/* 1. 确定主设备号                                                                 */
static int major = 0;
static char kernel_buf[1024];//保存用户空间发送过来的字符串
static struct class *hello_class;


#define MIN(a, b) (a < b ? a : b)

/* 3. 实现对应的open/read/write等函数,填入file_operations结构体                   */
static ssize_t hello_drv_read (struct file *file, char __user *buf, size_t size, loff_t *offset)
{
	int err;
	printk("%s %s line %d\n", __FILE__, __FUNCTION__, __LINE__);
	err = copy_to_user(buf, kernel_buf, MIN(1024, size));
	return MIN(1024, size);
}

static ssize_t hello_drv_write (struct file *file, const char __user *buf, size_t size, loff_t *offset)
{
	int err;
	printk("%s %s line %d\n", __FILE__, __FUNCTION__, __LINE__);
	err = copy_from_user(kernel_buf, buf, MIN(1024, size));
	return MIN(1024, size);
}

static int hello_drv_open (struct inode *node, struct file *file)
{
	printk("%s %s line %d\n", __FILE__, __FUNCTION__, __LINE__);
	return 0;
}

static int hello_drv_close (struct inode *node, struct file *file)
{
	printk("%s %s line %d\n", __FILE__, __FUNCTION__, __LINE__);
	return 0;
}

/* 2. 定义自己的file_operations结构体                                              */
static struct file_operations hello_drv = {
	.owner	 = THIS_MODULE,
	.open    = hello_drv_open,
	.read    = hello_drv_read,
	.write   = hello_drv_write,
	.release = hello_drv_close,
};

/* 4. 把file_operations结构体告诉内核:注册驱动程序                                */
/* 5. 谁来注册驱动程序啊?得有一个入口函数:安装驱动程序时,就会去调用这个入口函数 */
static int __init hello_init(void)
{
	int err;

	printk("%s %s line %d\n", __FILE__, __FUNCTION__, __LINE__);
	major = register_chrdev(0, "hello", &hello_drv);  /* /dev/hello */
	//主设备号为0表示由内核进行分配


	hello_class = class_create(THIS_MODULE, "hello_class");
	err = PTR_ERR(hello_class);
	if (IS_ERR(hello_class)) {
		printk("%s %s line %d\n", __FILE__, __FUNCTION__, __LINE__);
		unregister_chrdev(major, "hello");
		return -1;
	}

	device_create(hello_class, NULL, MKDEV(major, 0), NULL, "hello"); /* /dev/hello */

	return 0;
}

/* 6. 有入口函数就应该有出口函数:卸载驱动程序时,就会去调用这个出口函数           */
static void __exit hello_exit(void)
{
	printk("%s %s line %d\n", __FILE__, __FUNCTION__, __LINE__);
	device_destroy(hello_class, MKDEV(major, 0));
	class_destroy(hello_class);
	unregister_chrdev(major, "hello");
}


/* 7. 其他完善:提供设备信息,自动创建设备节点                                     */

module_init(hello_init);//宏函数,将函数修饰为入口函数
module_exit(hello_exit);//宏函数,将函数修饰为出口函数

MODULE_LICENSE("GPL");//协议
- 1
- 2
- 3
- 4
- 5
- 6
- 7
- 8
- 9
- 10
- 11
- 12
- 13
- 14
- 15
- 16
- 17
- 18
- 19
- 20
- 21
- 22
- 23
- 24
- 25
- 26
- 27
- 28
- 29
- 30
- 31
- 32
- 33
- 34
- 35
- 36
- 37
- 38
- 39
- 40
- 41
- 42
- 43
- 44
- 45
- 46
- 47
- 48
- 49
- 50
- 51
- 52
- 53
- 54
- 55
- 56
- 57
- 58
- 59
- 60
- 61
- 62
- 63
- 64
- 65
- 66
- 67
- 68
- 69
- 70
- 71
- 72
- 73
- 74
- 75
- 76
- 77
- 78
- 79
- 80
- 81
- 82
- 83
- 84
- 85
- 86
- 87
- 88
- 89
- 90
- 91
- 92
- 93
- 94
- 95
- 96
- 97
- 98
- 99
- 100
- 101
- 102
hello_drv_test.c
#include <sys/types.h>
#include <sys/stat.h>
#include <fcntl.h>
#include <unistd.h>
#include <stdio.h>
#include <string.h>

/*
 * ./hello_drv_test -w abc
 * ./hello_drv_test -r
 */
int main(int argc, char **argv)
{
	int fd;
	char buf[1024];
	int len;

	/* 1. 判断参数 */
	if (argc < 2)
	{
		printf("Usage: %s -w <string>\n", argv[0]);
		printf("       %s -r\n", argv[0]);
		return -1;
	}

	/* 2. 打开文件 */
	fd = open("/dev/hello", O_RDWR);
	if (fd == -1)
	{
		printf("can not open file /dev/hello\n");
		return -1;
	}

	/* 3. 写文件或读文件 */
	if ((0 == strcmp(argv[1], "-w")) && (argc == 3))
	{
		len = strlen(argv[2]) + 1;
		len = len < 1024 ? len : 1024;
		write(fd, argv[2], len);
	}
	else
	{
		len = read(fd, buf, 1024);
		buf[1023] = '\0';
		printf("APP read : %s\n", buf);
	}

	close(fd);

	return 0;
}
- 1
- 2
- 3
- 4
- 5
- 6
- 7
- 8
- 9
- 10
- 11
- 12
- 13
- 14
- 15
- 16
- 17
- 18
- 19
- 20
- 21
- 22
- 23
- 24
- 25
- 26
- 27
- 28
- 29
- 30
- 31
- 32
- 33
- 34
- 35
- 36
- 37
- 38
- 39
- 40
- 41
- 42
- 43
- 44
- 45
- 46
- 47
- 48
- 49
- 50
- 51
- 52
- 53
驱动模块代码编译(编写Makefile,编译时间短)
驱动程序中包含了很多头文件,这些头文件来自内核,不同的 ARM 板它的某些头文件可能不同。所以编译驱动程序时,需要指定板子所用的内核的源码路径。
要编译哪个文件:设置 obj-m 变量即可
怎么把.c 文件编译为驱动程序.ko:这要借助内核的顶层 Makefile,。
# 1. 使用不同的开发板内核时, 一定要修改KERN_DIR
# 2. KERN_DIR中的内核要事先配置、编译, 为了能编译内核, 要先设置下列环境变量:
# 2.1 ARCH,          比如: export ARCH=arm64
# 2.2 CROSS_COMPILE, 比如: export CROSS_COMPILE=aarch64-linux-gnu-
# 2.3 PATH,          比如: export PATH=$PATH:/home/book/100ask_stm32mp157_pro-sdk/ToolChain/arm-buildroot-linux-gnueabihf_sdk-buildroot/bin
# 注意: 不同的开发板不同的编译器上述3个环境变量不一定相同,
#       请参考各开发板的高级用户使用手册

KERN_DIR = /home/book/100ask_stm32mp157_pro-sdk/Linux-5.4

all:
	make -C $(KERN_DIR) M=`pwd` modules
	$(CROSS_COMPILE)gcc -o hello_drv_test hello_drv_test.c

clean:
	make -C $(KERN_DIR) M=`pwd` modules clean
	rm -rf modules.order
	rm -f hello_drv_test

obj-m	+= hello_drv.o
- 1
- 2
- 3
- 4
- 5
- 6
- 7
- 8
- 9
- 10
- 11
- 12
- 13
- 14
- 15
- 16
- 17
- 18
- 19
- 20
- 21
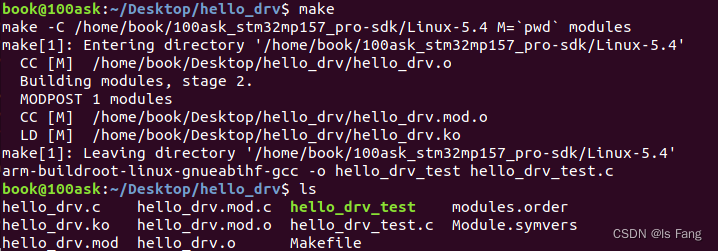
此时,目录下有编译好的内核模块hello_drv.ko和可执行程序hello_drv_test
移植到开发板上
驱动模块代码编译(修改Makefile,编译时间长)
驱动模块代码编译(模块的编译需要配置过的内核源码。放在指定的目录下,编译、连接后生成的内核模块后缀为.ko,编译过程首先会到内核源码目录下,读取顶层的Makefile文件,然后再返回模块源码所在目录。)
操作步骤:
-
由于操作的是字符设备驱动,所以将该驱动代码hello_drv.c拷贝到ubuntu的 /home/book/100ask_stm32mp157_pro-sdk/Linux-5.4/drivers/char 目录下的文件夹中(也可选择设备目录下其它文件)
-
修改该文件夹下Makefile文件(驱动代码放到哪个目录,就修改该目录下的Makefile),将字符驱动代码编译为模块,文件内容如下图所示:(-y表示编译进内核,-m表示生成驱动模块,CONFIG_表示是根据config生成的),因为最终是要将模块加载到开发板上而不是虚拟机中,所以要生成模块然后移植到开发板挂载,所以只需要将obj-m += hello_drv.o添加到Makefile中即可。
-
回到/home/book/100ask_stm32mp157_pro-sdk/Linux-5.4/编译驱动文件,因为Makefile文件之间有关联,在最外层进行编译,如果配置好环境变量,执行make编译生成驱动模块
-
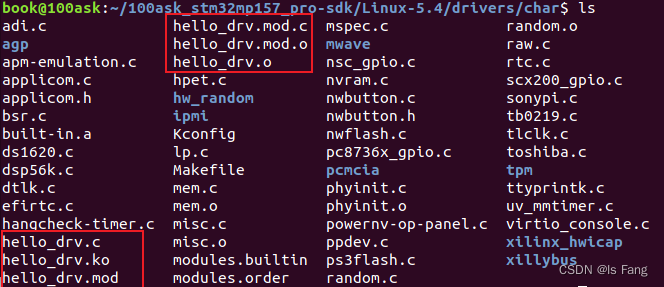
编译完成后在/Linux-5.4/drivers/char目录下会生成以下几个文件:.o的文件是object文件,.ko是kernel object
-
将生成的.ko文件发送给开发板
cp hello_drv.ko /home/book/nfs_rootfs- 1
-
将上层调用代码(hello_drv_test.c)进行交叉编译后发送给开发板,开发板目录下存在发送过来的hello_drv.ko文件和hello_drv_test.c这两个文件, 都已经完成编译
-
在开发板执行加载内核驱动
insmod hello_drv.ko。此时dev下就有该驱动设备名称
加载内核驱动(相当于通过insmod调用了module_init这个宏,然后将整个结构体加载到驱动链表中)
加载完成后就可以在dev下面看到名字为hello_drv的设备驱动(这个和驱动代码里面static char *module_name=“hello_drv”;//模块名这行代码有关),设备号也和代码里面相关。
-
lsmod查看系统的驱动模块是否完成 -
在装完驱动后可以使用指令:
rmmod +驱动名(不需要写.ko)将驱动卸载。
测试
打开内核的打印信息,有些板子默认打开了
echo "7 4 1 7" > /proc/sys/kernel/printk
- 1
运行测试
./hello_drv_test -w char_drv // 把字符串发给驱动程序
./hello_drv_test -r // 把驱动中保存的字符串读回来
- 1
- 2
运行结果:

如果没有打开内核信息,可以通过dmesg指令查看该驱动在内核打印的信息, dmesg |grep hello_drv(报错信息不影响)
 加粗样式
加粗样式
应用调用open函数打开文件
应用层打开文件函数:
int open(const char *pathname, int flags, mode_t mode);
- 1
APP 打开文件时,可以得到一个整数,这个整数被称为文件句柄。对于 APP的每一个文件句柄,在内核里面都有一个“struct file”与之对应,所以传入的 flags、mode 等参数会被记录在内核中对应的 struct file 结构体里(f_flags、f_mode)。
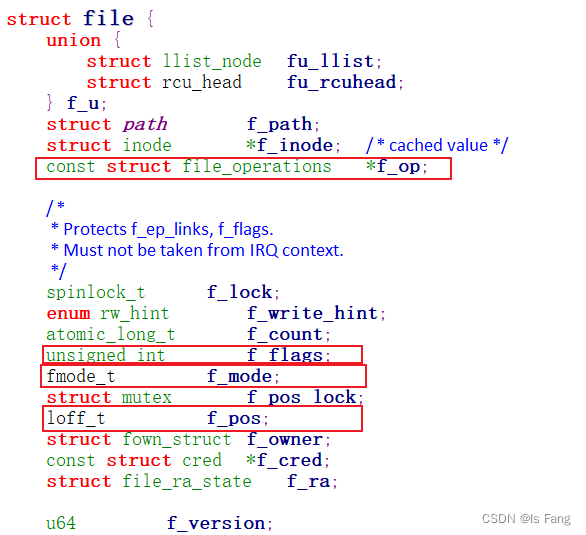
去读写文件时,文件的当前偏移地址也会保存在 struct file 结构体的f_pos 成员里。
所以应用于内核之间的函数调用关系如下:

应用调用open函数打开设备文件
打开字符设备节点时,内核中也有对应的 struct file
应用调用open/read/write就会调用该结构体中对应的函数(编写在驱动程序中),调用关系如下:
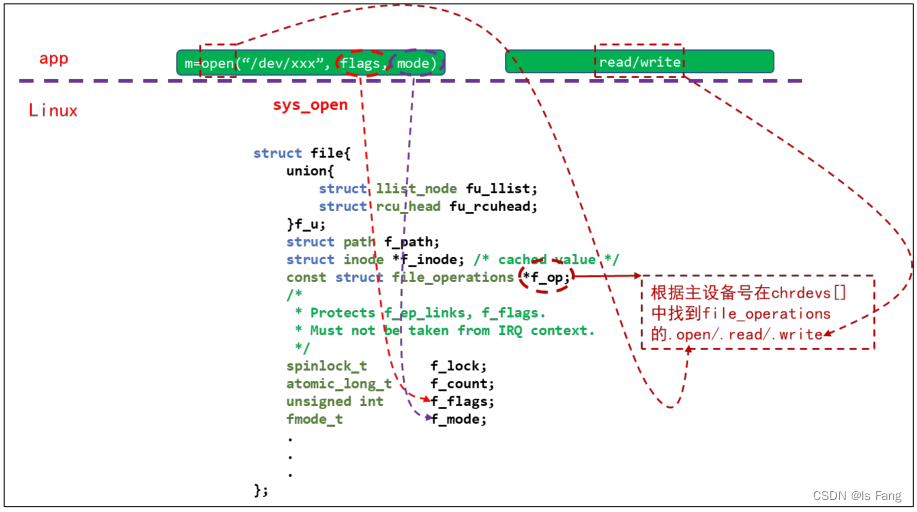
该结构体中的结构体:struct file_operations *f_op,是由驱动程序提供的,编写驱动程序是要定义该结构体,该结构体的定义如下:
copy_from_user/copy_to_user 函数
驱动程序和应用程序之间传递数据,要使用copy_from_user/copy_to_user 函数
这两个函数分别是将用户空间的数据拷贝到内核空间以及将内核空间中的数据拷贝到用户空间
函数copy_from_user原型:
copy_from_user(void *to, const void __user *from, unsigned long n)
- 1
返回值:
- 失败返回没有被拷贝成功的字节数,
- 成功返回0
参数详解:
- to 将数据拷贝到内核的地址,即内核空间的数据目标地址指针
- from 需要拷贝数据的地址,即用户空间的数据源地址指针
- n 拷贝数据的长度(字节)也就是将@from地址中的数据拷贝到@to地址中去,拷贝长度是n
class_destroy/device_create 浅析
驱动程序的核心是 file_operations 结构体:分配、设置、注册它。“class_destroy/device_create”函数知识起一些辅助作用:在/sys 目录下创建一些目录、文件,这样 Linux 系统中的 APP(比如 udev、mdev)就可以根据这些目录或文件来创建设备节点。
以下代码将会在“/sys/class”目录下创建一个子目录“hello_class”:
hello_class = class_create(THIS_MODULE, "hello_class");
- 1
以下代码将会在“/sys/class/hello_class”目录下创建一个文件“hello”:
device_create(hello_class, NULL, MKDEV(major, 0), NULL, "hello");
- 1
更详细的信息请看图 :


